Last spring, I found myself scrolling through photos of vintage cottagecore sweaters at two in the morning, completely unable to sleep. My daughter had mentioned wanting something "romantic but cozy" for her birthday, and I just could not get the idea out of my head. I kept picturing this dreamy blush pink pullover with flowers cascading across the yoke, something that looked like it belonged in a Jane Austen adaptation but was actually wearable to brunch. When I finally sketched it out on the back of an envelope, I knew I had to make it happen. This Blush Floral Bobble Sweater is the result of that sleepless night, and honestly, it turned out even better than what I had imagined.
Get the Ad-Free PDF Pattern
You can find the free pattern below, or you can purchase the ad-free printable PDF from my shop.
Get the Printable PDF →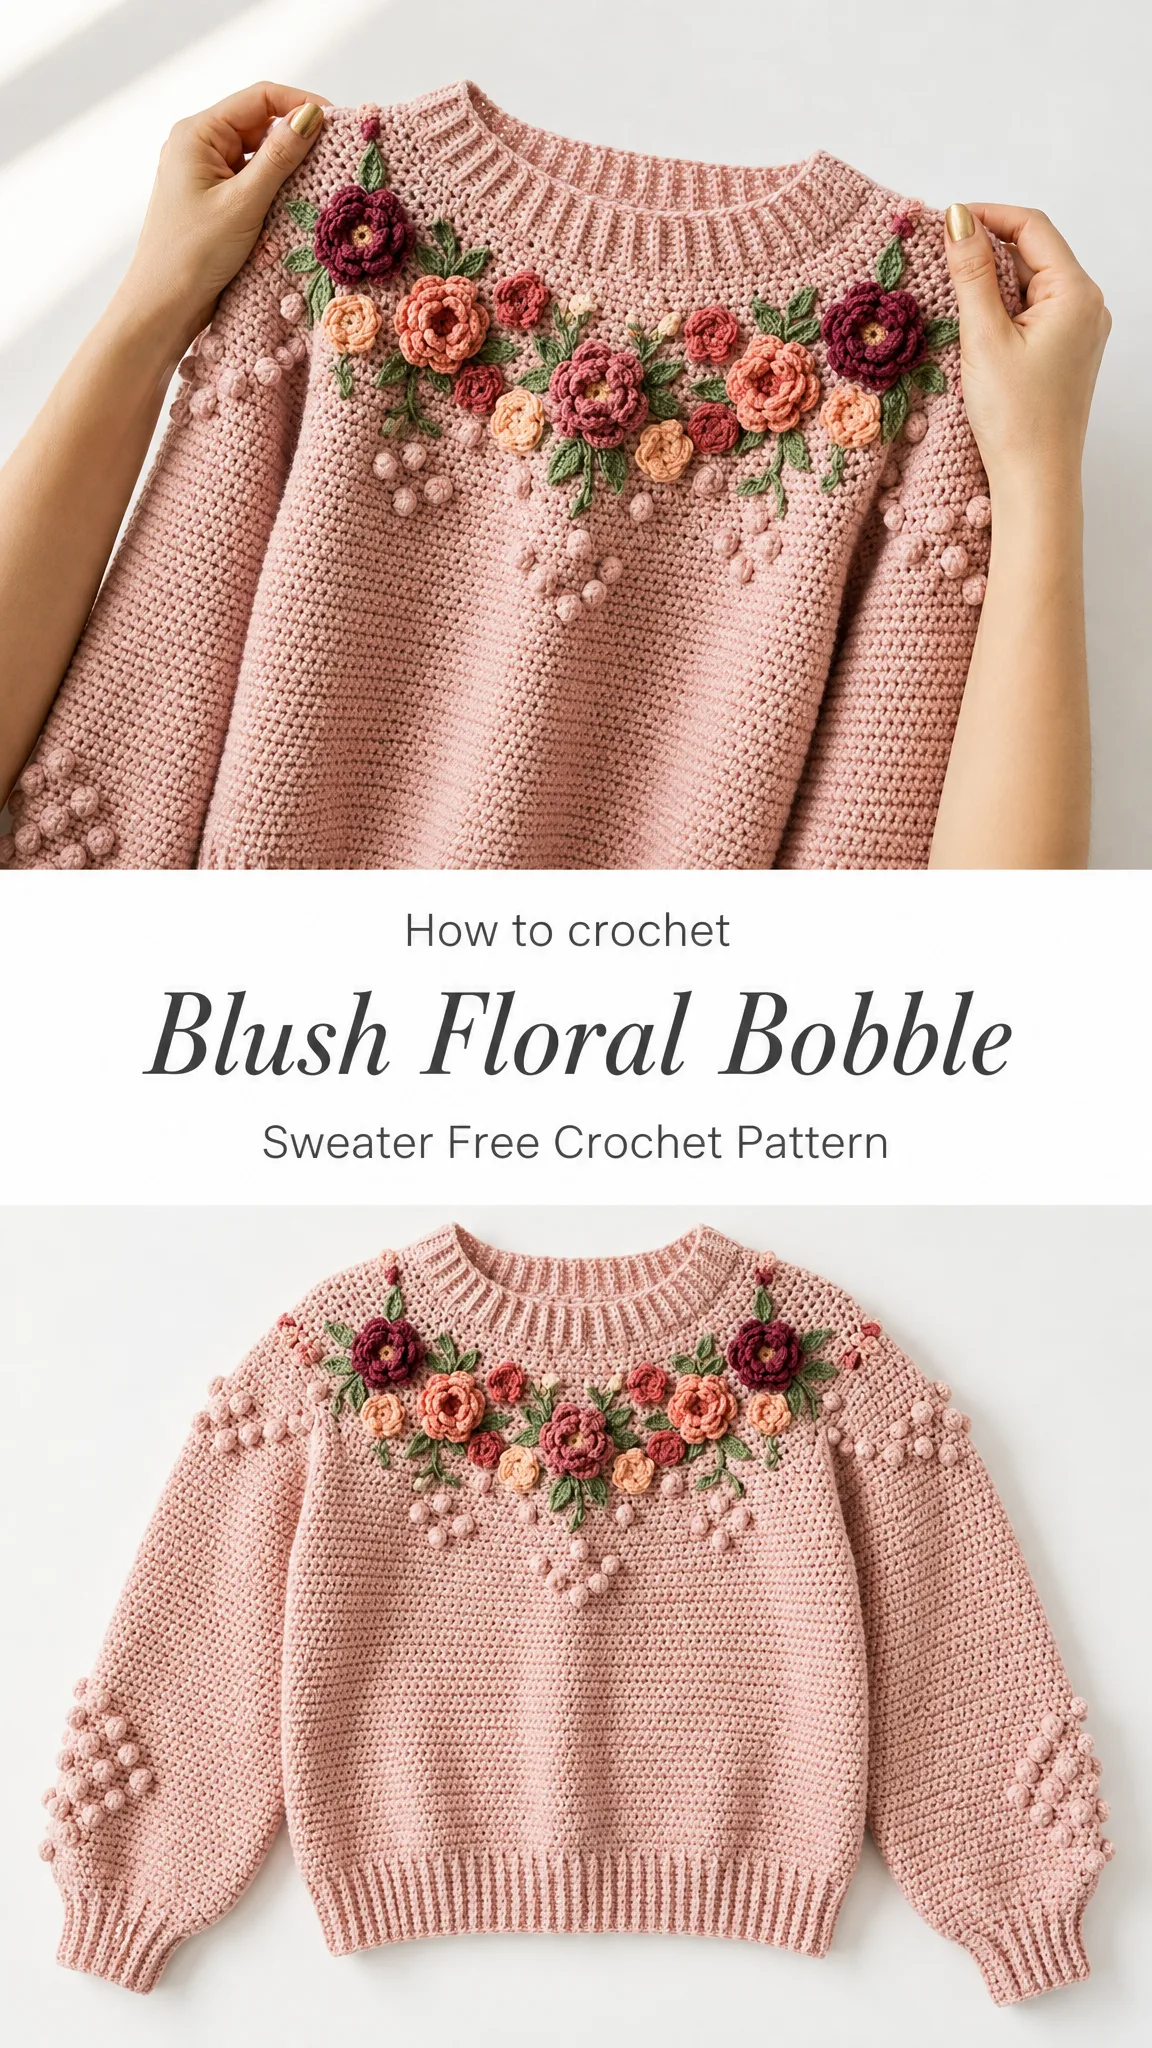
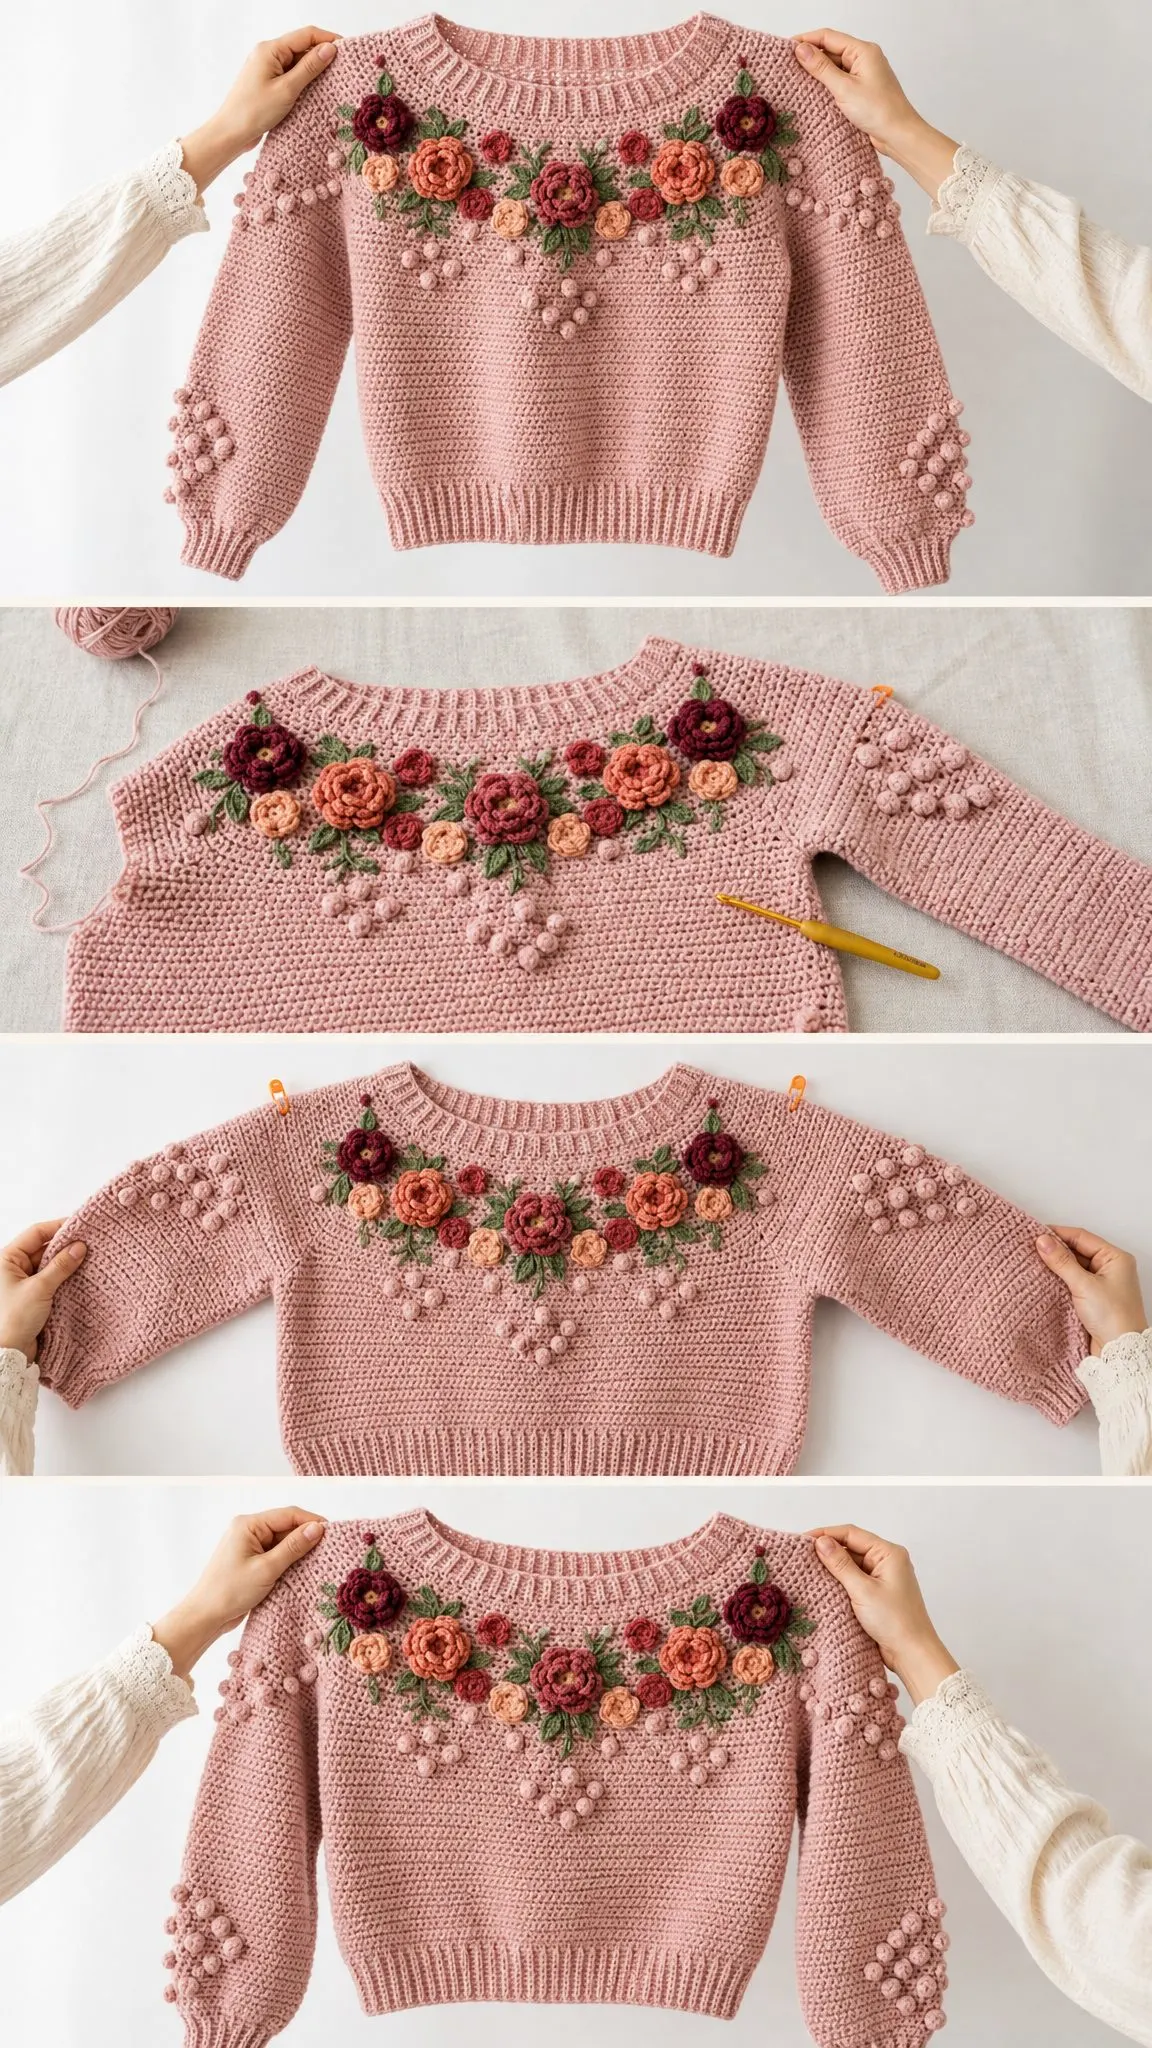
This crochet pattern creates a cropped, softly textured pullover featuring rose garland appliques across the upper chest and back, plus dimensional bobble stitches scattered down the sleeves and body. The construction is straightforward once you understand the flow. You will make two flat body panels, two flat sleeves, then seam everything together before adding the floral embellishments. The slip stitch back loop ribbing gives the bottom hem, cuffs, and neckband that polished handmade finish that elevates the whole piece.
About This Pattern
Skill Level: Intermediate
Finished Size: Adult Medium with a relaxed cropped fit. The chest circumference measures 35.5 inches (90 cm), body length from shoulder is 15.5 inches (39.5 cm), upper sleeve circumference is 16 inches (40.5 cm), and sleeve length from underarm is 15.5 inches (39.5 cm).
This sweater is designed with approximately 3 to 5 inches (7.5 to 12.5 cm) of positive ease for a comfortable, relaxed fit. Choose this size if your full bust measurement is 30 to 32 inches (76 to 81 cm). The pattern includes guidance for customizing to larger or smaller sizes.
Materials You Will Need
Yarn:
Suggested Yarns:
When substituting yarn, always match gauge first. A lighter yarn will produce a smaller, drapier sweater. A heavier yarn will increase both width and length.
Hooks:
Notions:
Gauge
Main stitch: 14 single crochet stitches by 16 rows equals 4 inches (10 cm) square after blocking with the 5.0 mm hook.
Ribbing: 8 slip stitches in back loop measure approximately 2 inches (5 cm) tall with the 4.5 mm hook.
Please swatch, block, and match both stitch gauge and row gauge before starting your sweater. This step truly makes or breaks your finished measurements.
Abbreviations and Stitch Guide
This pattern uses US crochet terms throughout. If you typically work from UK patterns, remember that US single crochet (sc) equals UK double crochet (dc), US double crochet (dc) equals UK treble (tr), and US slip stitch (sl st) equals UK slip stitch (ss).
Special Stitches
Slip Stitch BLO Ribbing: Insert your hook in the back loop only of the next stitch, yarn over, and pull through both the stitch and the loop on your hook in one motion. Keep your loops relaxed so the ribbing has good stretch. This creates those beautiful horizontal ridges that mimic knit ribbing.
Bobble: This stitch creates those cute popcorn-like bumps. Work 5 unfinished double crochet stitches in the indicated stitch. Here is how: yarn over, insert hook, pull up a loop, yarn over and pull through 2 loops. Repeat this 5 times total in the same stitch. You will have 6 loops on your hook. Yarn over and pull through all 6 loops at once. On the next stitch, work a firm single crochet to pop the bobble toward the right side of your work.
Surface Chain Stitch: With yarn held behind the fabric, insert your hook from front to back, pull up a loop, then insert your hook in the next placement point and pull up a new loop through the loop already on your hook. You will use this technique for the trailing stems of your floral garland.
Invisible Seam: With right sides together, whipstitch through the outer loops only. Do not pull so tightly that the seam puckers. This keeps your seams nearly invisible from the outside.
Left-Handed Note: Work the same rows and stitch counts. Your floral garland will mirror naturally. Place the largest roses first, then fill with leaves and buds so the curve still travels gracefully from shoulder to shoulder.
Body Panels – Make 2
The panels are worked from the lower ribbing upward. Make one front panel and one back panel using identical instructions. The chain 1 turning chains do not count as stitches throughout this pattern.
Lower Ribbing
With your smaller hook (4.5 mm), chain 9.
Row 1: Slip stitch in the 2nd chain from hook and in each chain across. (8 sl sts)
Rows 2 through 62: Chain 1, turn, slip stitch in back loop only across. (8 sl sts)
Do not fasten off. Turn the ribbing so the long edge is at the top, ready to pick up stitches for the main panel.
Main Panel
Change to your larger hook (5.0 mm).
Row 1 (RS): Chain 1, work 62 single crochet evenly along the long edge of the ribbing, placing 1 single crochet at the end of each rib row. (62 sc)
Rows 2 through 32: Chain 1, turn, single crochet in each stitch across. (62 sc)
Checkpoint: Your panel should measure approximately 10 inches (25.5 cm) from the lower edge including the ribbing at this point.
Row 33: Chain 1, turn, sc 10, Bobble, [sc 6, Bobble] 6 times, sc 9. (62 sts)
Row 34: Chain 1, turn, single crochet across. (62 sc)
Row 35: Chain 1, turn, sc 6, Bobble, [sc 7, Bobble] 6 times, sc 7. (62 sts)
Row 36: Chain 1, turn, single crochet across. (62 sc)
Row 37: Chain 1, turn, sc 12, Bobble, [sc 8, Bobble] 4 times, sc 13. (62 sts)
Rows 38 through 50: Chain 1, turn, single crochet across. (62 sc)
Fasten off, leaving a long tail for shoulder seaming.
Panel Checkpoint: Width should measure approximately 17.75 inches (45 cm). Total length should measure approximately 14.5 inches (37 cm) before the neckband.
Make the second panel to match.
Sleeves – Make 2
The sleeves are worked flat from the cuff upward. Increases are placed at both edges to create that soft balloon shape you see in the photos.
Cuff Ribbing
With your smaller hook (4.5 mm), chain 10.
Row 1: Slip stitch in the 2nd chain from hook and in each chain across. (9 sl sts)
Rows 2 through 30: Chain 1, turn, slip stitch in back loop only across. (9 sl sts)
Do not fasten off. Turn to work along the long edge.
Sleeve Body
Change to your larger hook (5.0 mm).
Row 1 (RS): Chain 1, work 30 single crochet evenly along the cuff edge. (30 sc)
Rows 2 and 3: Chain 1, turn, single crochet across. (30 sc)
Row 4: Chain 1, turn, 2 single crochet in the first stitch, single crochet to the last stitch, 2 single crochet in the last stitch. (32 sc)
Rows 5 through 7: Chain 1, turn, single crochet across. (32 sc)
Increase Rows 8, 12, 16, 20, 24, 28, 32, 36, 40, 44, 48, and 52: Chain 1, turn, 2 single crochet in the first stitch, single crochet to the last stitch, 2 single crochet in the last stitch.
Your stitch counts after these increase rows will be: 34, 36, 38, 40, 42, 44, 46, 48, 50, 52, 54, and 56 single crochet respectively.
All unlisted rows through Row 52: Chain 1, turn, single crochet across at the current stitch count.
Sleeve Bobble Placement
Row 14 (with 36 sts): Chain 1, turn, sc 5, Bobble, [sc 4, Bobble] 5 times, sc 5. (36 sts)
Row 30 (with 44 sts): Chain 1, turn, sc 6, Bobble, [sc 5, Bobble] 5 times, sc 7. (44 sts)
Row 46 (with 52 sts): Chain 1, turn, sc 8, Bobble, [sc 6, Bobble] 5 times, sc 8. (52 sts)
Sleeve Checkpoint: Top edge should measure approximately 16 inches (40.5 cm). Sleeve length should measure approximately 15.5 inches (39.5 cm) from the cuff edge.
Fasten off, leaving a long seaming tail.
Floral Motifs
Make a balanced mix of roses, leaves, and buds. Leave long tails on each piece for sewing. The garland sits across the upper chest and upper back, approximately 1.25 inches (3 cm) below the neckband.
Rose Spiral – Make 14 Total
Large Rose (Make 4): Chain 31. Row 1: Single crochet in the 2nd chain from hook and in each chain across. (30 sc) Row 2: Chain 3, turn, work 4 double crochet in each stitch across. Fasten off. Roll into a rose shape and stitch through the base to secure.
Medium Rose (Make 6): Chain 25. Row 1: Single crochet in the 2nd chain from hook and in each chain across. (24 sc) Row 2: Chain 3, turn, work 4 double crochet in each stitch across. Fasten off, roll, and secure.
Small Rose (Make 4): Chain 19. Row 1: Single crochet in the 2nd chain from hook and in each chain across. (18 sc) Row 2: Chain 3, turn, work 3 double crochet in each stitch across. Fasten off, roll, and secure.
Leaves and Buds
Leaf (Make 28): Chain 7. In the 2nd chain from hook, work single crochet, half double crochet, double crochet, double crochet, half double crochet, single crochet across the chain. Chain 1, rotate your work, then work single crochet, half double crochet, double crochet, double crochet, half double crochet, single crochet along the opposite side of the foundation chain. Slip stitch to the first single crochet. Fasten off.
Bud (Make 12): Chain 4, work 6 double crochet in the 4th chain from hook. Fasten off, pull the tail to curl the piece, and stitch into a small cup shape.
Stems
Use green yarn and the surface chain stitch to create two shallow arcs: one across the front panel and one across the back panel. Add short side stems before sewing on the leaves.
Assembly
Shoulders and Neck Opening
Lay both panels with right sides together. Along the top edge, seam 16 stitches for the right shoulder, leave the center 30 stitches open for the neck, and seam 16 stitches for the left shoulder. The front and back shoulders match 16 stitches to 16 stitches.
Side Seams
Mark 8 inches (20.5 cm) down from each shoulder for the armhole. Seam from the lower edge up to the marker on each side. The armhole opening uses the upper 32 body rows, which match the 16 inch (40.5 cm) sleeve top circumference.
Sleeve Seams and Set-In
Fold each sleeve lengthwise with right sides together and seam from cuff to top edge. With right sides together, pin the sleeve seam to the side seam, then pin the sleeve top evenly around the armhole. Sew in place without stretching the fabric.
Neckband
With your smaller hook (4.5 mm) and blush yarn, join at a shoulder seam.
Round 1: Chain 1, work 72 single crochet evenly around the neck opening. Use a pick-up ratio of approximately 3 stitches for every 4 row ends and 1 stitch in each unseamed top stitch. Join with a slip stitch. (72 sc)
Rounds 2 through 5: Chain 1, single crochet in back loop only around, join. (72 sc)
Fasten off. The neckband should sit flat and gently pull the opening into a soft crew shape.
Floral Placement and Finishing
Garland Placement
Front: Place 2 large roses near the outer upper chest, 3 medium roses through the center curve, 2 small roses as fillers, 14 leaves, and 6 buds.
Back: Repeat with 2 large or medium focal roses, 5 additional roses of various sizes, 14 leaves, and 6 buds.
Pin everything first before sewing anything down. Keep the lowest flowers no more than 3.5 inches (9 cm) below the neckband so the design reads as a cohesive yoke rather than a scattered applique field. Sew each flower through the base only so the petals remain dimensional and lush.
Blocking
Steam lightly or wet block the sweater flat to the finished measurements. Do not flatten the roses. Cup your hand around them while steaming to preserve their shape. Let the garment dry completely before wearing.
Care Instructions
Hand wash or machine wash on gentle cycle according to your yarn label. Turn the sweater inside out, place it in a mesh laundry bag, and lay flat to dry. Reshape the flowers while the sweater is still damp.
Size Customization
For the closest fit, make a gauge swatch first, then adjust the panel width and row counts as needed. Keep both panels identical and keep shoulder seams equal.
Width: At this gauge, 14 single crochet equals 4 inches (10 cm). Each 7 stitches changes one panel by approximately 2 inches (5 cm) and the full chest by approximately 4 inches (10 cm). Add or remove stitches in multiples of 2 to keep shoulder distribution balanced.
Length: At this gauge, 16 rows equals 4 inches (10 cm). Add or remove 4 rows for approximately 1 inch (2.5 cm). Keep bobble rows in the upper third of the garment.
Sleeves: For a slimmer sleeve, stop increasing after 48 single crochet and seam to a slightly smaller armhole. For a fuller sleeve, continue increasing every 4th row to 60 single crochet. Match the sleeve top circumference to the armhole opening before sewing.
Motif Count: A larger size usually needs 2 to 4 extra roses and 6 to 8 extra leaves so the floral garland still crosses from shoulder to shoulder. Place the largest flowers first, then fill gaps with leaves, buds, and surface stems.
Maker Checkpoints
Use these measurements to verify your progress:
| Stage | What to Check |
|---|---|
| After ribbing | Long edge has 62 rib rows for body, 30 rib rows for cuff |
| After body Row 32 | Panel approximately 10 inches (25.5 cm) tall including ribbing |
| After body Row 50 | Panel approximately 17.75 inches wide by 14.5 inches tall |
| After sleeve Row 52 | Top edge 56 sc, approximately 16 inches (40.5 cm) |
| After neckband | 72 stitches around, flat edge with gentle stretch |
Troubleshooting Tips
Panel is too wide: Use a smaller hook or remove stitches in pairs.
Panel is too short: Add plain single crochet rows before the bobble section.
Neckband ripples: Pick up fewer stitches.
Neckband pulls in too tight: Pick up more stitches.
Flowers feel heavy: Sew only the base firmly and consider using lighter weight yarn for the petals.
Final Thoughts
This Blush Floral Bobble Sweater crochet pattern brings together so many techniques I love: the satisfying texture of bobble stitches, the artistry of floral appliques, and the polished look of slip stitch ribbing. It is the kind of project that feels like a creative journey from start to finish. Every time I see the finished sweater, I remember that sleepless night with the envelope sketch and smile.
Thank you so much for choosing this pattern for your next project. I genuinely hope you love making it as much as I loved designing it. If you finish your sweater, I would absolutely love to see photos! Tag me on Instagram or share in our Facebook group.
If you want to come back to this pattern later, go ahead and save it to your Pinterest boards so you can find it easily when you are ready to start. And please drop a comment below if you make this sweater. I love hearing which color combinations you choose and seeing how everyone puts their own spin on the floral arrangement. Happy crocheting!
Want a Quick & Easy Printable Version?
Get a clean, beautifully formatted PDF of this pattern — easy to follow step by step, ready to print or save on any device. No scrolling, no distractions, just the pattern.
Get the Printable PDF →