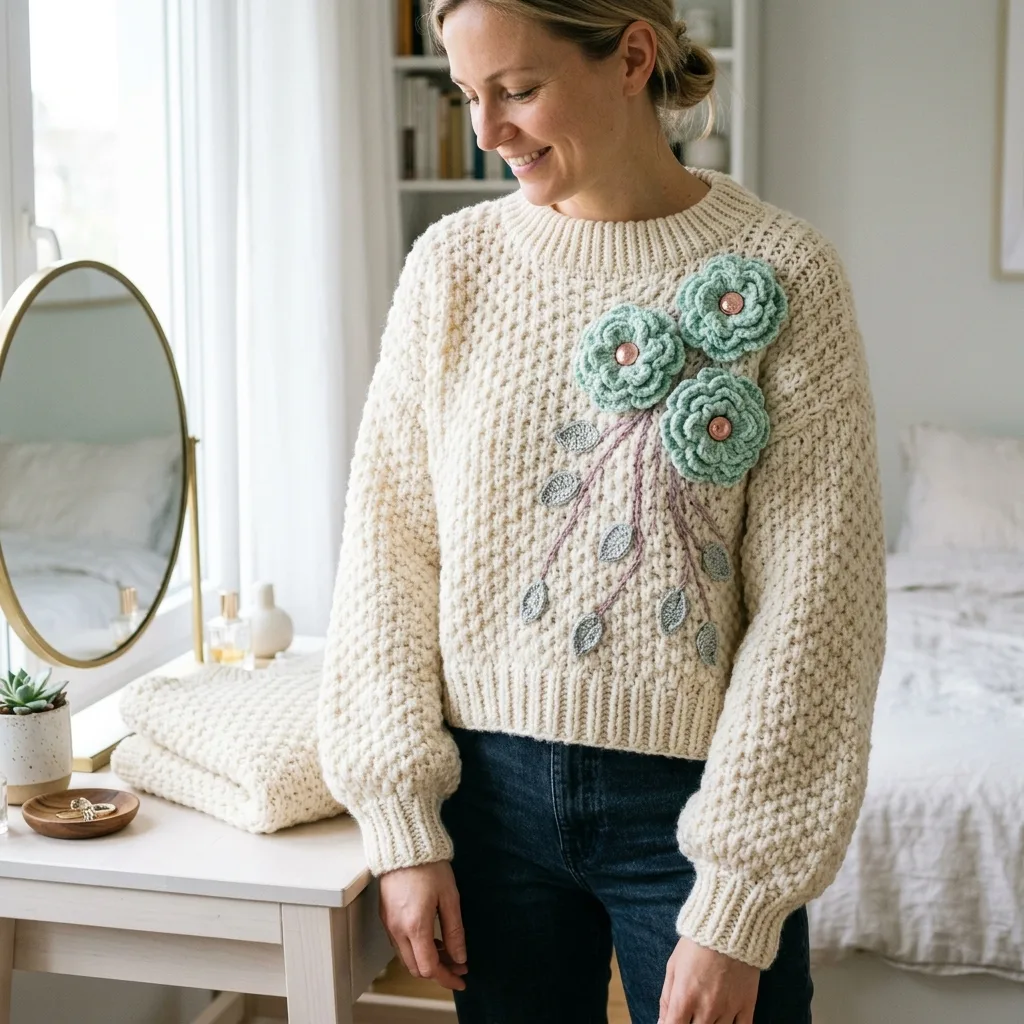
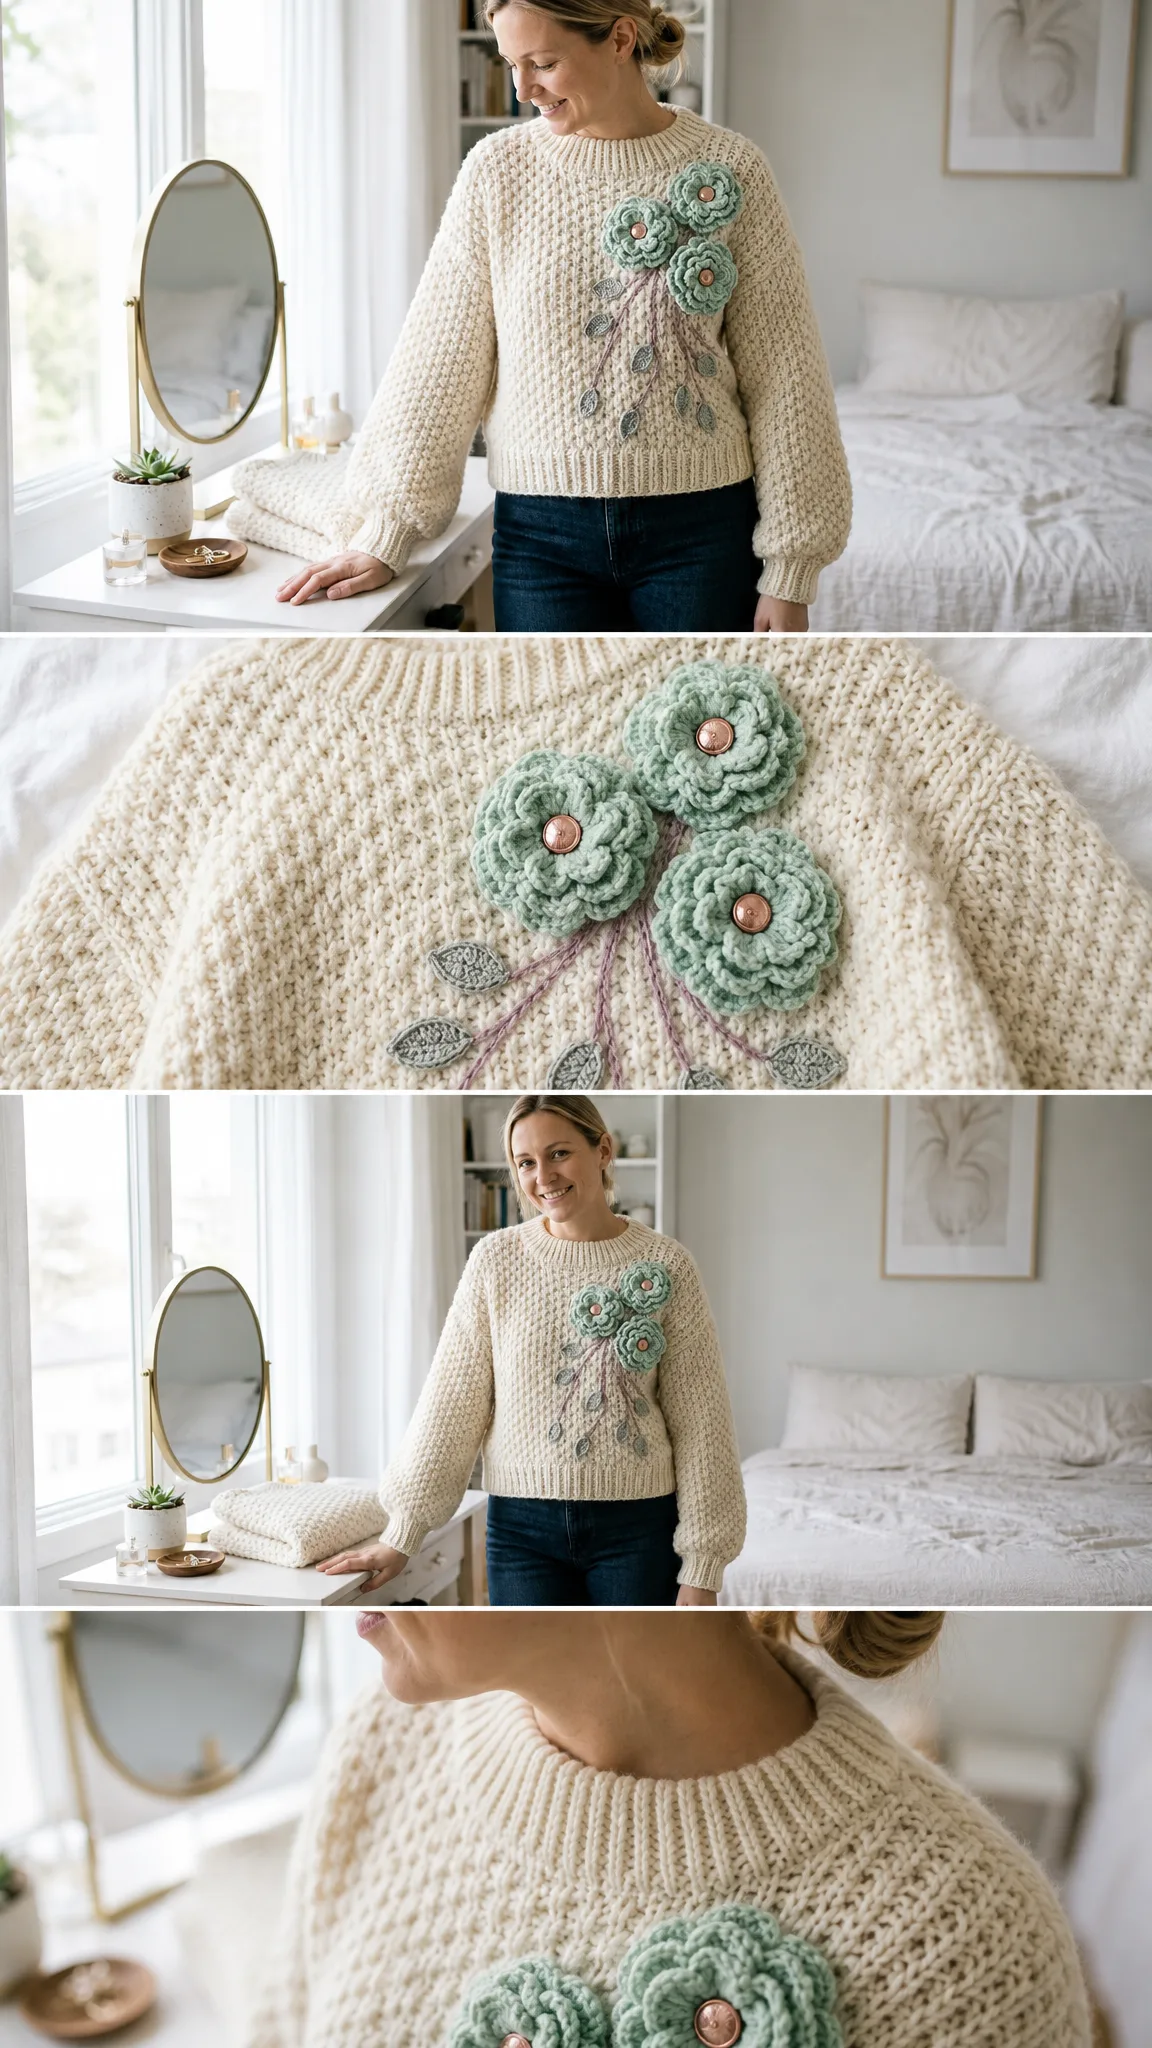
I call this one the Vanity Sweater because it sat on my bedroom vanity table for three whole weeks before I finally finished the embroidery. I kept walking past it, admiring those mint peonies, telling myself I would stitch them down "tomorrow." The design came from an old sketch in my project notebook, a cropped silhouette with oversized sleeves and a cascade of flowers trailing down the front. When I finally pulled it together, I understood why past me had been so excited about this idea. The combination of plush pebbled texture, soft mint blooms, and delicate embroidered vines creates something that feels like a wearable garden. If you have been looking for a sweater project that goes beyond basic construction and lets you add some real artistic flair, this pattern is absolutely for you.
Get the Ad-Free PDF Pattern
You can find the free pattern below, or you can purchase the ad-free printable PDF from my shop.
Get the Printable PDF →
About This Cozy Cropped Sweater Pattern
This crochet sweater pattern produces a relaxed, cropped pullover with dramatic balloon sleeves, three dimensional mint peony appliques, surface crocheted vine stems in dusty mauve, and silver green leaves scattered along the trailing stems. The body uses a satisfying alternating single crochet and double crochet texture that creates a pebbled, almost knit look fabric.
Skill level: Confident intermediate. The sweater construction itself uses simple rectangular shaping with straight body panels and straight set sleeves. The parts that require extra care are the applique placement, seaming, and tidy finishing work.
Time estimate: 18 to 24 hours for the main sweater, plus additional time for blocking and sewing on all the embellishments.
Finished measurements: Adult relaxed cropped fit with a finished chest of approximately 48 inches (122 cm), body length of 20 inches (51 cm), and upper sleeve circumference of 18.5 to 19 inches (47 to 48 cm). The intended ease is 8 to 12 inches (20 to 30.5 cm) of positive ease for that cozy oversized look.
This pattern uses US crochet terms throughout. If you are a UK maker, remember that US single crochet (sc) equals UK double crochet (dc), and US double crochet (dc) equals UK treble crochet (tr).
Materials You Will Need
Main yarn: 780 yards (713 meters) of bulky weight wool or wool blend in warm ivory
Flowers: 90 yards (82 meters) of bulky or aran weight yarn in soft mint
Leaves: 55 yards (50 meters) of DK or worsted weight yarn in silver sage
Stems: 22 yards (20 meters) of DK yarn or embroidery yarn in dusty mauve
Hooks:
Extras: Stitch markers, tapestry needle, pins, 3 round buttons measuring 0.5 to 0.625 inches (12 to 16 mm), sewing needle, and matching thread
Yarn Suggestions
Some excellent options for the main sweater body include Lion Brand Wool-Ease Thick & Quick for a lofty, cozy statement fabric, Knit Picks Wonderfluff Bulky for a lighter cloud like sweater, or Cascade 128 Superwash for a smooth, washable wool option.
When substituting yarn, choose a bulky weight that produces the listed gauge after blocking. For a softer drape, look for a round yarn with wool, alpaca, or an acrylic wool blend. I recommend avoiding stiff cotton for the main sweater as it will not have the same cozy drape.
Gauge Information
Textured fabric gauge: 12 stitches and 10 rows equals 4 inches (10 cm) in the alternating sc/dc pattern after blocking
Rib gauge: 10 sc BLO rows equals approximately 2.5 inches (6.5 cm) relaxed
Before you begin, make a swatch, wash or steam block it, then measure carefully. Match both your stitch gauge and row gauge before starting the actual sweater. This step is especially important for garments because even small gauge differences multiply across the width and length of your panels.
Abbreviations and Stitch Definitions
ch – chain: wrap yarn over hook and pull through the loop on hook
dc – double crochet: yarn over, insert hook, pull up a loop, yarn over and pull through 2 loops, yarn over and pull through remaining 2 loops
hdc – half double crochet: yarn over, insert hook, pull up a loop, yarn over and pull through all 3 loops
inc – increase: work 2 stitches in one stitch
rem – remaining
rep – repeat
rnd – round
RS – right side
sc – single crochet: insert hook, pull up a loop, yarn over and pull through both loops
sc BLO – single crochet through back loop only: insert hook under only the back loop of the stitch below, then complete a single crochet as normal
sl st – slip stitch: insert hook, pull up a loop and draw it directly through the loop on hook
sp – space
st(s) – stitch or stitches
WS – wrong side
Special Stitches and Techniques
Textured Stitch (Even Count)
Row 1: Single crochet in first stitch, double crochet in next stitch. Repeat across the row.
Row 2: Single crochet in each double crochet and double crochet in each single crochet.
This stacks tall stitches over short stitches, creating that beautiful raised pebbled texture.
Ribbing
Chain 11. Single crochet in the 2nd chain from hook and each chain across. For each following row, chain 1, turn, and single crochet through the back loop only in each stitch. Each row has 10 single crochets.
Surface Chain Stem
Hold your yarn behind the fabric. Insert the hook from front to back and pull up a loop. Insert the hook along your marked stem path and pull a loop through the loop on your hook. Continue in a smooth line along your design.
Invisible Seam
With right sides together, whipstitch through inner loops only, keeping the seam flexible.
Pattern Notes
Chain 1 turning chains do not count as stitches throughout this pattern.
Chain 2 in flower petals does not count as a stitch unless specifically stated otherwise.
Keep the textured stitch over an even stitch count at all times. If you customize the width, add or subtract stitches in multiples of 2.
Pin every applique before sewing. Leave the lower vine ends loose looking but securely stitched down at several points for a natural trailing effect.
For left handed crocheters, work the same instructions. Your fabric will travel in the opposite direction, so mirror the applique placement so the peony spray sits on your upper left chest when worn.
Body Panels: Make Front and Back
Hem Ribbing (Both Panels)
With your main yarn and 6.5 mm hook, chain 11.
Row 1: Single crochet in 2nd chain from hook and each chain across. (10 sc)
Rows 2 through 72: Chain 1, turn, sc BLO across. (10 sc)
Rotate to work along the long edge.
Row 73 setup: Chain 1, work 1 single crochet into the end of each rib row. (72 sc)
Texture Section
Rows 1 through 38 (Front and Back): Chain 1, turn, work textured stitch across. (72 sts)
Row 39 (Front only): Work textured stitch across first 23 stitches. Leave center 26 stitches unworked. Join a second strand and work last 23 stitches. (23 + 23 sts)
Row 39 (Back): Work textured stitch across. (72 sts)
Rows 40 through 44 (Front): Work each shoulder separately in texture pattern. (23 sts each)
Rows 40 through 44 (Back): Work texture across. (72 sts)
Checkpoint: Front panel from hem to shoulder should measure approximately 20 inches (51 cm). Each panel should be approximately 24 inches (61 cm) wide.
The back panel neck is not cut lower. During shoulder seaming, you will leave the center 26 stitches open. The front neck is 6 rows lower for a relaxed crew shape.
Sleeves: Make 2
Cuff Ribbing
With main yarn and 6.5 mm hook, chain 11.
Row 1: Single crochet in 2nd chain from hook and each chain across. (10 sc)
Rows 2 through 32: Chain 1, turn, sc BLO across. (10 sc)
Fold cuff short ends together and seam. Rotate to long edge and work 32 single crochets evenly around the cuff edge. (32 sc)
Sleeve Body
Rows 1 through 4: Chain 1, turn. Work textured stitch flat. (32 sts)
Row 5: Increase 4 evenly by increasing in stitches 4, 12, 20, and 28, keeping texture sequence. (36 sts)
Rows 6 through 8: Work textured stitch. (36 sts)
Row 9: Increase 4 evenly in stitches 5, 14, 23, and 32. (40 sts)
Rows 10 through 12: Work textured stitch. (40 sts)
Row 13: Increase 4 evenly in stitches 5, 15, 25, and 35. (44 sts)
Rows 14 through 16: Work textured stitch. (44 sts)
Row 17: Increase 4 evenly in stitches 6, 17, 28, and 39. (48 sts)
Rows 18 through 20: Work textured stitch. (48 sts)
Row 21: Increase 4 evenly in stitches 6, 18, 30, and 42. (52 sts)
Rows 22 through 24: Work textured stitch. (52 sts)
Row 25: Increase 4 evenly in stitches 7, 20, 33, and 46. (56 sts)
Rows 26 through 38: Work textured stitch. Fasten off, leaving a long tail. (56 sts)
Checkpoint: Sleeve body should measure approximately 15.25 inches (39 cm) from cuff pickup edge. Full sleeve approximately 18 inches (46 cm). Upper edge approximately 18.5 to 19 inches (47 to 48 cm) wide before seaming.
Seaming and Neckline
Shoulders
Place front and back panels with right sides together. Seam 23 stitches at each shoulder. Leave the center 26 stitches open at back and the shaped center opening at front.
Turn right side out and check that the front neck dip sits lower than the back neck.
Side Seams and Armholes
From hem upward, seam each side for approximately 10.5 inches (26.5 cm).
Leave approximately 9.5 inches (24 cm) open for each armhole. This opening matches the sleeve upper edge circumference when the sleeve is seamed.
Sleeve Seams and Setting In
Fold sleeve lengthwise with right sides together and seam from cuff to underarm.
Turn sweater wrong side out. Place sleeve right side out inside armhole so right sides are together. Match underarm seam to side seam and sleeve top center to shoulder seam.
Pin evenly. Sew around armhole without stretching. Repeat for second sleeve.
Neckband
With main yarn and 6.5 mm hook, join at left shoulder.
Round 1: Pick up 84 single crochets evenly around neck. Work 26 across back, 17 down front left curve, 24 across lower front opening, and 17 up front right curve. Join. (84 sc)
Rounds 2 through 6: Chain 1, work front post sc/back post sc ribbing or sc BLO in joined rounds. (84 sts)
Fasten off and weave in ends.
Pick up note: Use approximately 3 stitches for every 4 row ends along the front curves so the neckband lies flat without pulling.
Mint Peonies: Make 3
Use mint yarn and 5.5 mm hook. Make two 3.25 inch (8 cm) flowers and one slightly smaller flower by working only Rounds 1 through 4 for the lower right peony.
Round 1: Magic ring, chain 1, 10 single crochets in ring, join. (10 sc)
Round 2: Slip stitch in next stitch, [half double crochet, 3 double crochets, half double crochet] in next stitch. Repeat from asterisk 5 times total. (5 inner petals)
Round 3: Working behind petals, chain 5, slip stitch around post/base between petals. Repeat 5 times. (5 loops)
Round 4: In each loop work [single crochet, half double crochet, 5 double crochets, half double crochet, single crochet]. (5 middle petals)
Round 5: Working behind middle petals, chain 7, slip stitch between petals. Repeat 5 times. (5 loops)
Round 6: In each loop work [single crochet, half double crochet, 7 double crochets, half double crochet, single crochet]. Join and fasten off. (5 outer petals)
Button Centers
Sew one button to the center of each peony after blocking. Keep stitches hidden under the button edge.
Placement
Pin the flower cluster on the wearer’s upper left chest. Position one flower near the shoulder line, one slightly lower toward center front, and one lower right. Keep the highest flower at least 1.25 inches (3 cm) below the neckband seam.
Leaves and Embroidered Vines
Leaves: Make 8
With silver sage yarn and 5 mm hook, chain 9.
Work along first side: single crochet in 2nd chain, half double crochet in next, double crochet in next 3, half double crochet in next, single crochet in next, 3 single crochets in last chain.
Rotate to opposite side of chain: single crochet in next, half double crochet in next, double crochet in next 3, half double crochet in next, single crochet in last. Slip stitch to first single crochet and fasten off. (17 sts)
Vine Stems
Mark 6 to 8 curved stem lines with removable thread or pins, starting beneath the flower cluster and trailing diagonally toward the lower center front.
Surface chain along each path with dusty mauve yarn. Keep the lines light and organic, not perfectly straight.
Sew leaves in pairs along the vines. Angle each leaf outward and tack the tip so it does not curl.
Applique Map
Peonies (3 total): Cluster covers approximately 7 x 7 inches (18 x 18 cm) on upper left front
Leaves (8 total): Scatter along stems, with 2 to 3 leaves extending below the flower cluster
Vines (6 to 8 total): Begin under flowers and trail 8 to 10 inches (20 to 25 cm) downward
Finishing and Blocking
Weave in all sweater ends before applique work. Weave motif ends after sewing.
Steam block the sweater lightly from the wrong side, hovering the iron or steamer. Do not flatten the texture.
Block peonies separately by pinning petals open. Let them dry fully before sewing to the sweater.
After all embellishments are attached, give the front a final light steam from the wrong side only.
Care Instructions
Hand wash in cool water with wool wash, or follow the yarn label if using washable yarn. Press water out in a towel and do not wring. Lay flat to dry, reshaping sleeve cuffs, neckband, and flower petals. Store folded, not hung, to protect the shoulders and appliques.
Troubleshooting Common Issues
Panel width is off: Adjust hook size and remake your swatch. Width should be approximately 24 inches (61 cm) per panel.
Texture looks striped: Make sure Row 2 places single crochet into each double crochet and double crochet into each single crochet.
Neckband ruffles: Remove and pick up fewer stitches along curves. Use the 3 for 4 row end ratio.
Sleeve cap pulls: Open armhole seam slightly or ease sleeve top more evenly around opening.
Flowers droop: Add extra hidden stitches under the lower petals and button center.
Size Customization
Use the listed gauge to adjust while preserving the sweater shape. Keep all texture stitch counts even.
Change chest: Add or subtract 2 stitches per panel for each 1.33 inches (3.4 cm) total chest change.
Change length: Add or subtract texture rows before neckline shaping. 10 rows equals 4 inches (10 cm).
Change sleeve length: Add or subtract even numbered rows after Row 25 before fastening off.
Change armhole depth: Leave a larger or smaller side opening, then check sleeve top circumference. Sleeve top should be very close to armhole circumference.
Move embellishment: Keep the flower cluster above bust apex and inside the shoulder line so the weight does not pull the neckline.
Quick Sizing Formula
Target finished chest equals body chest measurement plus 8 to 12 inches (20 to 30.5 cm). Divide target finished chest by 2 to get each panel width. At 12 stitches per 4 inches (10 cm), multiply each panel width in inches by 3 to get panel stitch count, then round to the nearest even number.
Example: 50 inch finished chest divided by 2 equals 25 inch panel. 25 multiplied by 3 equals 75 stitches. Round to 76 stitches. Work 76 rib rows and pick up 76 single crochets along the long edge.
Keep the neck opening proportionate. For a wider panel, leave approximately 36% of the panel stitches for the center neck and split the remaining stitches evenly for shoulders.
I hope you absolutely love making this sweater as much as I loved designing it. Save this pattern to your Pinterest boards so you can find it easily when you are ready to cast on, and please leave a comment below if you make one. I would love to see your mint peonies blooming!
Want a Quick & Easy Printable Version?
Get a clean, beautifully formatted PDF of this pattern — easy to follow step by step, ready to print or save on any device. No scrolling, no distractions, just the pattern.
Get the Printable PDF →