Go grab that gorgeous yarn you’ve been saving for the perfect project. You know the one. It’s sitting in your stash waiting for something special, and this crochet backpack pattern is exactly what it’s been waiting for. This design uses tight single crochet stitches worked in continuous rounds to create a structured, sturdy bag that actually holds its shape. The construction is more straightforward than it looks, I promise. You’ll work the base flat, build up the sides in the round, then add the flap, straps, and front pocket as separate pieces. If you can single crochet and increase, you can absolutely make this bag. I’d call it an intermediate project simply because of the assembly and hardware, not because of any tricky stitches.
Why This Crochet Backpack Pattern Works
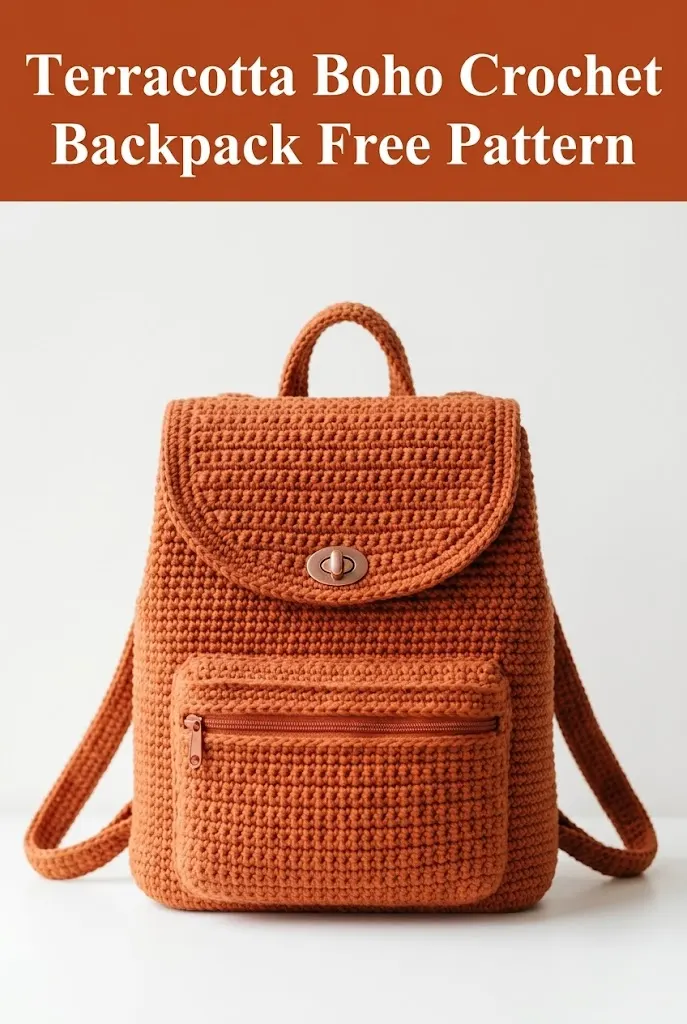
This terracotta boho crochet backpack hits that sweet spot between handmade charm and polished design. The tight stitch gauge means your belongings won’t poke through the fabric. The structured shape keeps it from looking slouchy or homemade in a bad way. And that warm terracotta color? It works with everything from jeans to sundresses.
What I love most about this crochet backpack tutorial is how practical the finished piece actually is. The front zippered pocket keeps your phone and keys accessible. The twist lock closure on the flap adds security without being fussy. The adjustable straps and top handle give you carrying options.
This step by step pattern breaks everything into manageable pieces. You’re never working on something too big or too complicated at once.
Materials You’ll Need
Before you start, gather these supplies:
Yarn:
Hook:
Notions:
Finished Dimensions:
Stitch Abbreviations and Definitions
Let me walk you through each stitch you’ll use in this crochet pattern:
Ch = Chain: Yarn over, pull through loop on hook. This creates your foundation.
Sl st = Slip stitch: Insert hook, yarn over, pull through stitch AND loop on hook in one motion. Used for joining and moving across stitches without adding height.
Sc = Single crochet: Insert hook into stitch, yarn over, pull up a loop (2 loops on hook), yarn over, pull through both loops. For example, "sc in next 10 sts" means you repeat this stitch 10 times across the next 10 stitches.
Inc = Increase: Work 2 single crochet stitches into the same stitch. This adds one stitch to your count.
Dec = Decrease (invisible decrease preferred): Insert hook through front loops only of next 2 stitches, yarn over, pull through both front loops, yarn over, pull through both loops on hook. This removes one stitch.
Gauge Information
Getting gauge right matters for bags. You want a tight, sturdy fabric.
Gauge: 18 stitches and 20 rows = 10cm (4 inches) in single crochet
Work a test swatch before starting. If your swatch is too loose and floppy, go down a hook size. A loose gauge means a saggy bag that won’t hold its shape.
How to Crochet the Backpack Base
The base is worked flat in rows, then you’ll pick up stitches around the edge to build up the sides.
Ch 19.
Row 1: Sc in 2nd ch from hook and in each ch across. (18 sts)
Rows 2 to 36: Ch 1, turn. Sc in each st across. (18 sts)
You should have a rectangle approximately 10cm wide by 18cm long. Don’t fasten off.
Building Up from the Base
Now you’ll work around the entire edge of the base to create the bottom round of the bag body.
Setup Round: Ch 1, do not turn. Work 1 sc in the end of each row along the long side (36 sc), work 18 sc across the short end, work 36 sc along the other long side, work 18 sc across the starting chain edge. Place marker to mark beginning of round. (108 sts)
Crocheting the Backpack Body
Work in continuous rounds. Do not join. Move your stitch marker up each round.
Rounds 1 to 55: Sc in each st around. (108 sts)
Your bag body should measure approximately 28cm (11 inches) tall from the base.
Final Round: Sl st in next st. Fasten off and weave in ends.
Shaping Tips
The magic of this crochet backpack pattern is the continuous spiral rounds. They create that beautiful, seamless texture you see in the photos. Just remember to move your marker each round so you know where you started.
If your work starts to pull or lean to one side, try working with a slightly looser tension. The fabric should be firm but not so tight that it distorts.
Creating the Flap
The flap is worked flat in rows, starting wide and decreasing to create the curved bottom edge.
Ch 41.
Row 1: Sc in 2nd ch from hook and in each ch across. (40 sts)
Rows 2 to 20: Ch 1, turn. Sc in each st across. (40 sts)
Now begin decreasing for the curved bottom:
Row 21: Ch 1, turn. Dec, sc in each st to last 2 sts, dec. (38 sts)
Row 22: Ch 1, turn. Sc in each st across. (38 sts)
Rows 23 to 32: Repeat Rows 21 and 22 five more times. (28 sts after Row 31)
Row 33: Ch 1, turn. Dec, sc in each st to last 2 sts, dec. (26 sts)
Row 34: Ch 1, turn. Dec, sc in each st to last 2 sts, dec. (24 sts)
Rows 35 to 38: Repeat Row 34 four more times. (16 sts after Row 38)
Edging Round: Ch 1, do not turn. Sc evenly around entire flap edge, working 3 sc in each corner to keep it flat. Sl st to first sc to join. Fasten off.
Making the Front Pocket
This pocket holds a small zipper. Work it flat, then sew the zipper in before attaching to the bag.
Ch 33.
Row 1: Sc in 2nd ch from hook and in each ch across. (32 sts)
Rows 2 to 28: Ch 1, turn. Sc in each st across. (32 sts)
Fasten off, leaving a long tail for sewing.
Adding the Zipper
Lay your pocket flat. Position the zipper about 4 rows down from the top edge. Using a sewing needle and matching thread, whipstitch the zipper tape to the wrong side of the pocket, centering it. You’ll cut a slit in the crochet fabric along the zipper teeth once it’s secured.
This is the fiddliest part of the whole project. Take your time. If sewing in zippers makes you nervous, you could skip this and just have an open pocket.
Crocheting the Shoulder Straps
Make two identical straps.
Ch 7.
Row 1: Sc in 2nd ch from hook and in each ch across. (6 sts)
Rows 2 to 200: Ch 1, turn. Sc in each st across. (6 sts)
Your straps should measure approximately 100cm (40 inches) long. Adjust length as needed for your preferred fit.
Fasten off, leaving a long tail.
Edging (optional): Work 1 round of sc evenly around entire strap for a more polished look. This step is optional but helps the straps lie flat.
Making the Top Handle
Ch 7.
Row 1: Sc in 2nd ch from hook and in each ch across. (6 sts)
Rows 2 to 30: Ch 1, turn. Sc in each st across. (6 sts)
Fasten off, leaving a long tail for sewing. This creates a handle approximately 15cm (6 inches) long.
Assembly Instructions
Now comes the satisfying part. You’ll bring all your pieces together.
Attaching the Pocket
Position the front pocket on the center front of the bag body, approximately 3cm up from the base. Pin in place. Using your tapestry needle and matching yarn, whipstitch around three sides (bottom and both sides), leaving the top open above the zipper.
Attaching the Flap
Position the straight edge of the flap along the back top edge of the bag, on the outside. The flap should fold forward over the opening. Whipstitch securely in place.
Installing the Twist Lock
Mark the center of the flap bottom curve. This is where the top part of your twist lock will go. Follow the hardware manufacturer’s instructions for installation. You’ll typically need to cut small holes and push prongs through, then bend them flat on the wrong side.
Mark the corresponding spot on the bag front for the bottom part of the lock. Install following the same method.
Attaching the Straps
Fold the bottom end of each strap over a D-ring. Stitch securely. Attach D-rings to the bottom back corners of the bag, approximately 5cm up from the base.
Thread the top ends of the straps through D-rings or swivel clips, then attach these to the top back corners of the bag, just below where the flap attaches. This allows for adjustable strap length.
Attaching the Top Handle
Fold each end of the handle over by 2cm and stitch to create loops. Position the handle centered on the back of the bag, just below the flap line. Stitch securely through both layers.
Finishing Touches
Weave in all remaining ends. Block your bag lightly if needed by stuffing it with tissue paper and allowing it to set overnight. This helps everything settle into the right shape.
Tips for a Professional Look
Work with consistent tension throughout. Uneven stitches show more on solid-color projects like this crochet backpack pattern.
When sewing pieces together, keep your stitches small and even. Nobody will see them if you do it right.
Test your hardware placement before cutting any holes. Hold pieces in place, try closing the lock, adjust as needed.
Customization Ideas
This beginner friendly crochet backpack design works beautifully in so many colors. Try navy for classic style, cream for boho vibes, or black for everyday sophistication.
You could add a fabric lining for extra durability. Cut cotton fabric to fit the inside, fold edges under, and hand stitch in place around the top opening.
Consider adding an interior pocket by sewing a small fabric rectangle inside before lining.
For longer straps, simply add more rows. For a smaller bag, reduce your starting chain on the base and adjust body round counts proportionally.
Skill Level Breakdown
If you’re wondering whether you can tackle this crochet tutorial, here’s my honest assessment.
Comfortable beginners can make this bag. You need to know single crochet, chaining, and basic increasing and decreasing. That’s it for stitches.
The intermediate skills come from assembly and hardware. Sewing pieces together neatly takes patience. Installing a zipper and twist lock requires some basic sewing knowledge.
Advanced crocheters will breeze through this project and might want to add embellishments, colorwork, or structural modifications.
Don’t let the hardware intimidate you. Take it slow. Watch a video or two if you’ve never installed a twist lock before. You’ve got this.
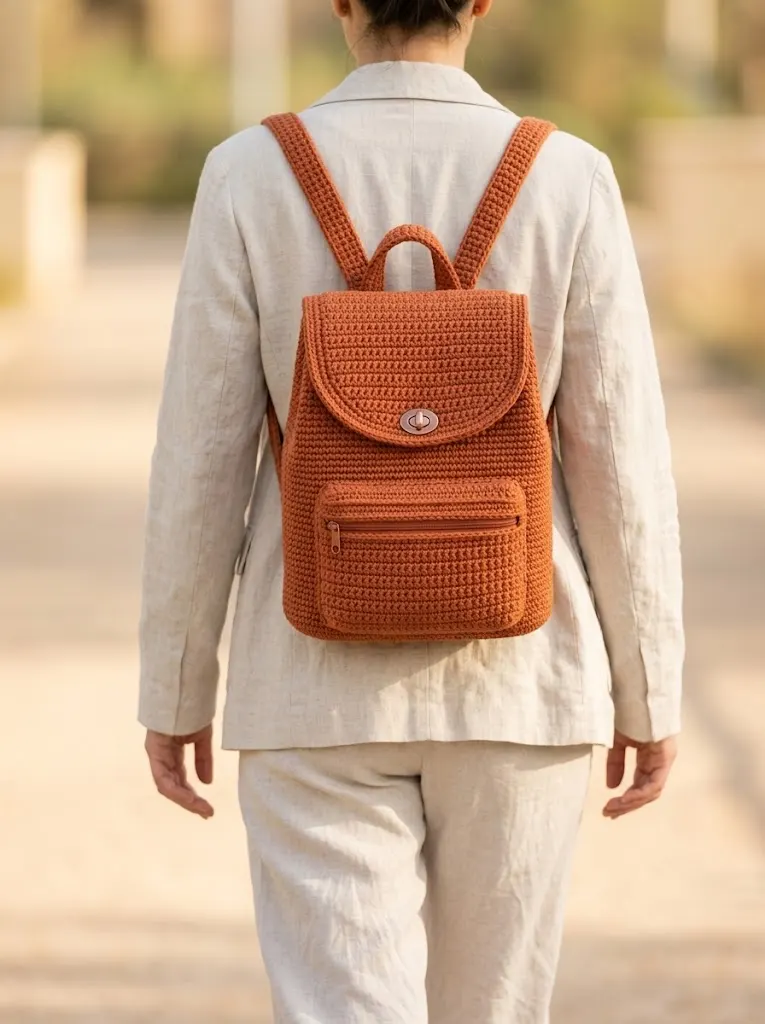
I really hope you love making this terracotta boho crochet backpack as much as I loved designing it. If you make one, please share a photo on Instagram or in our Facebook group. I genuinely love seeing your finished projects and color choices. It makes my whole day.
If this pattern is calling your name, go ahead and save it to your Pinterest boards so you can find it when you’re ready to cast on. And please drop a comment below if you make one. I’d love to hear how it turns out for you.
