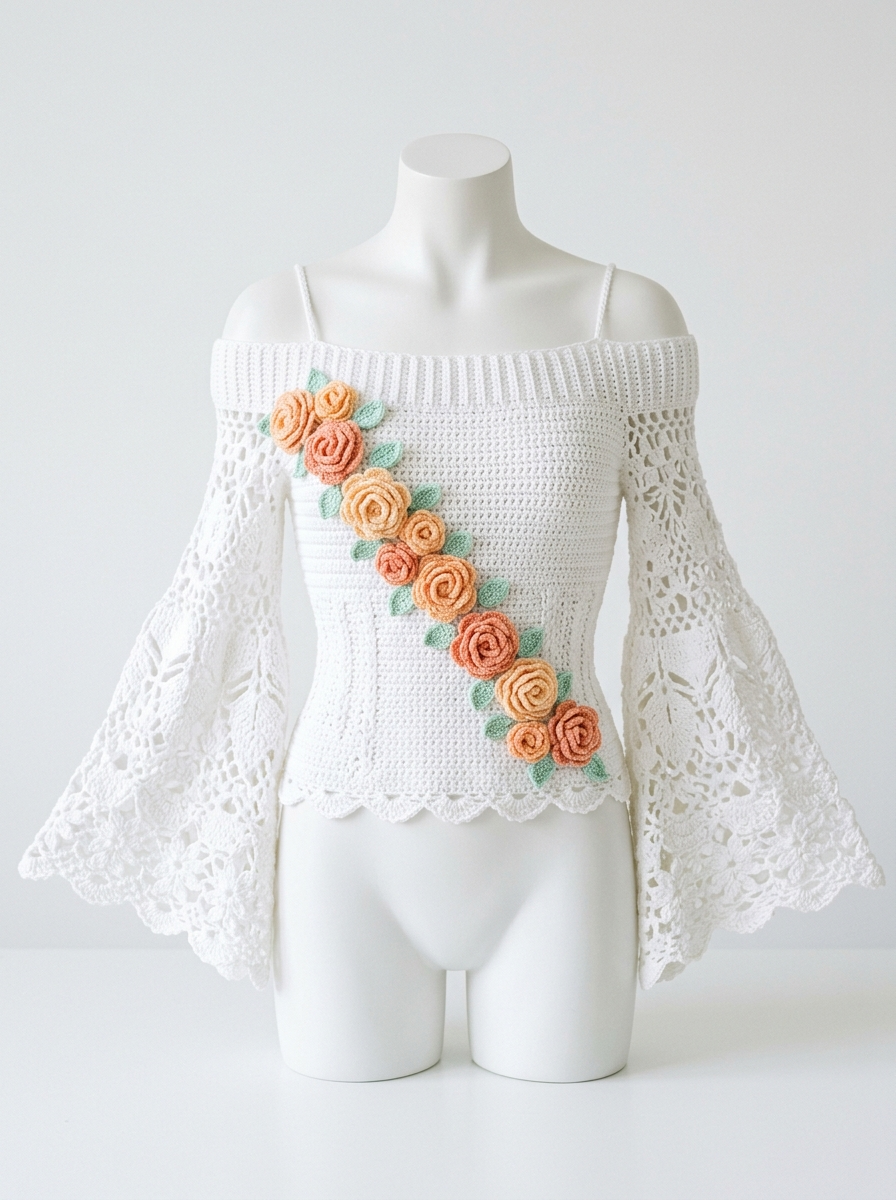
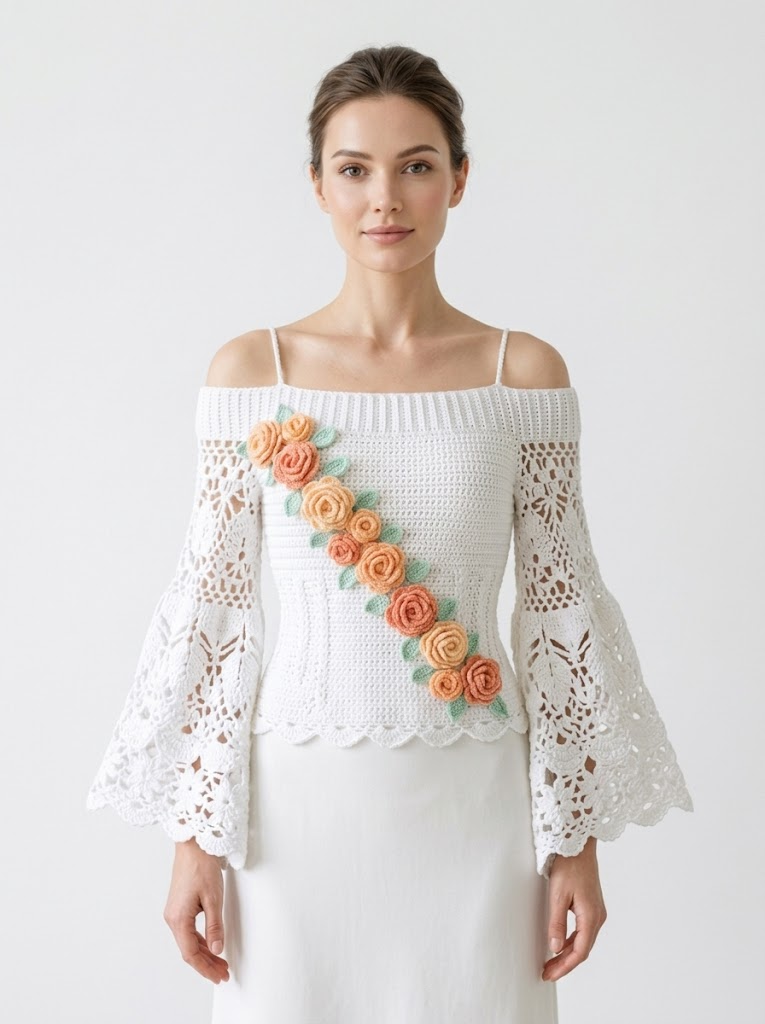
This white lace floral crochet blouse stopped me in my tracks when I finished it. The combination of delicate lace bell sleeves, a fitted bodice, and that stunning diagonal cascade of roses creates something truly special. If you have intermediate crochet skills and patience for detail work, you can absolutely make this gorgeous piece.
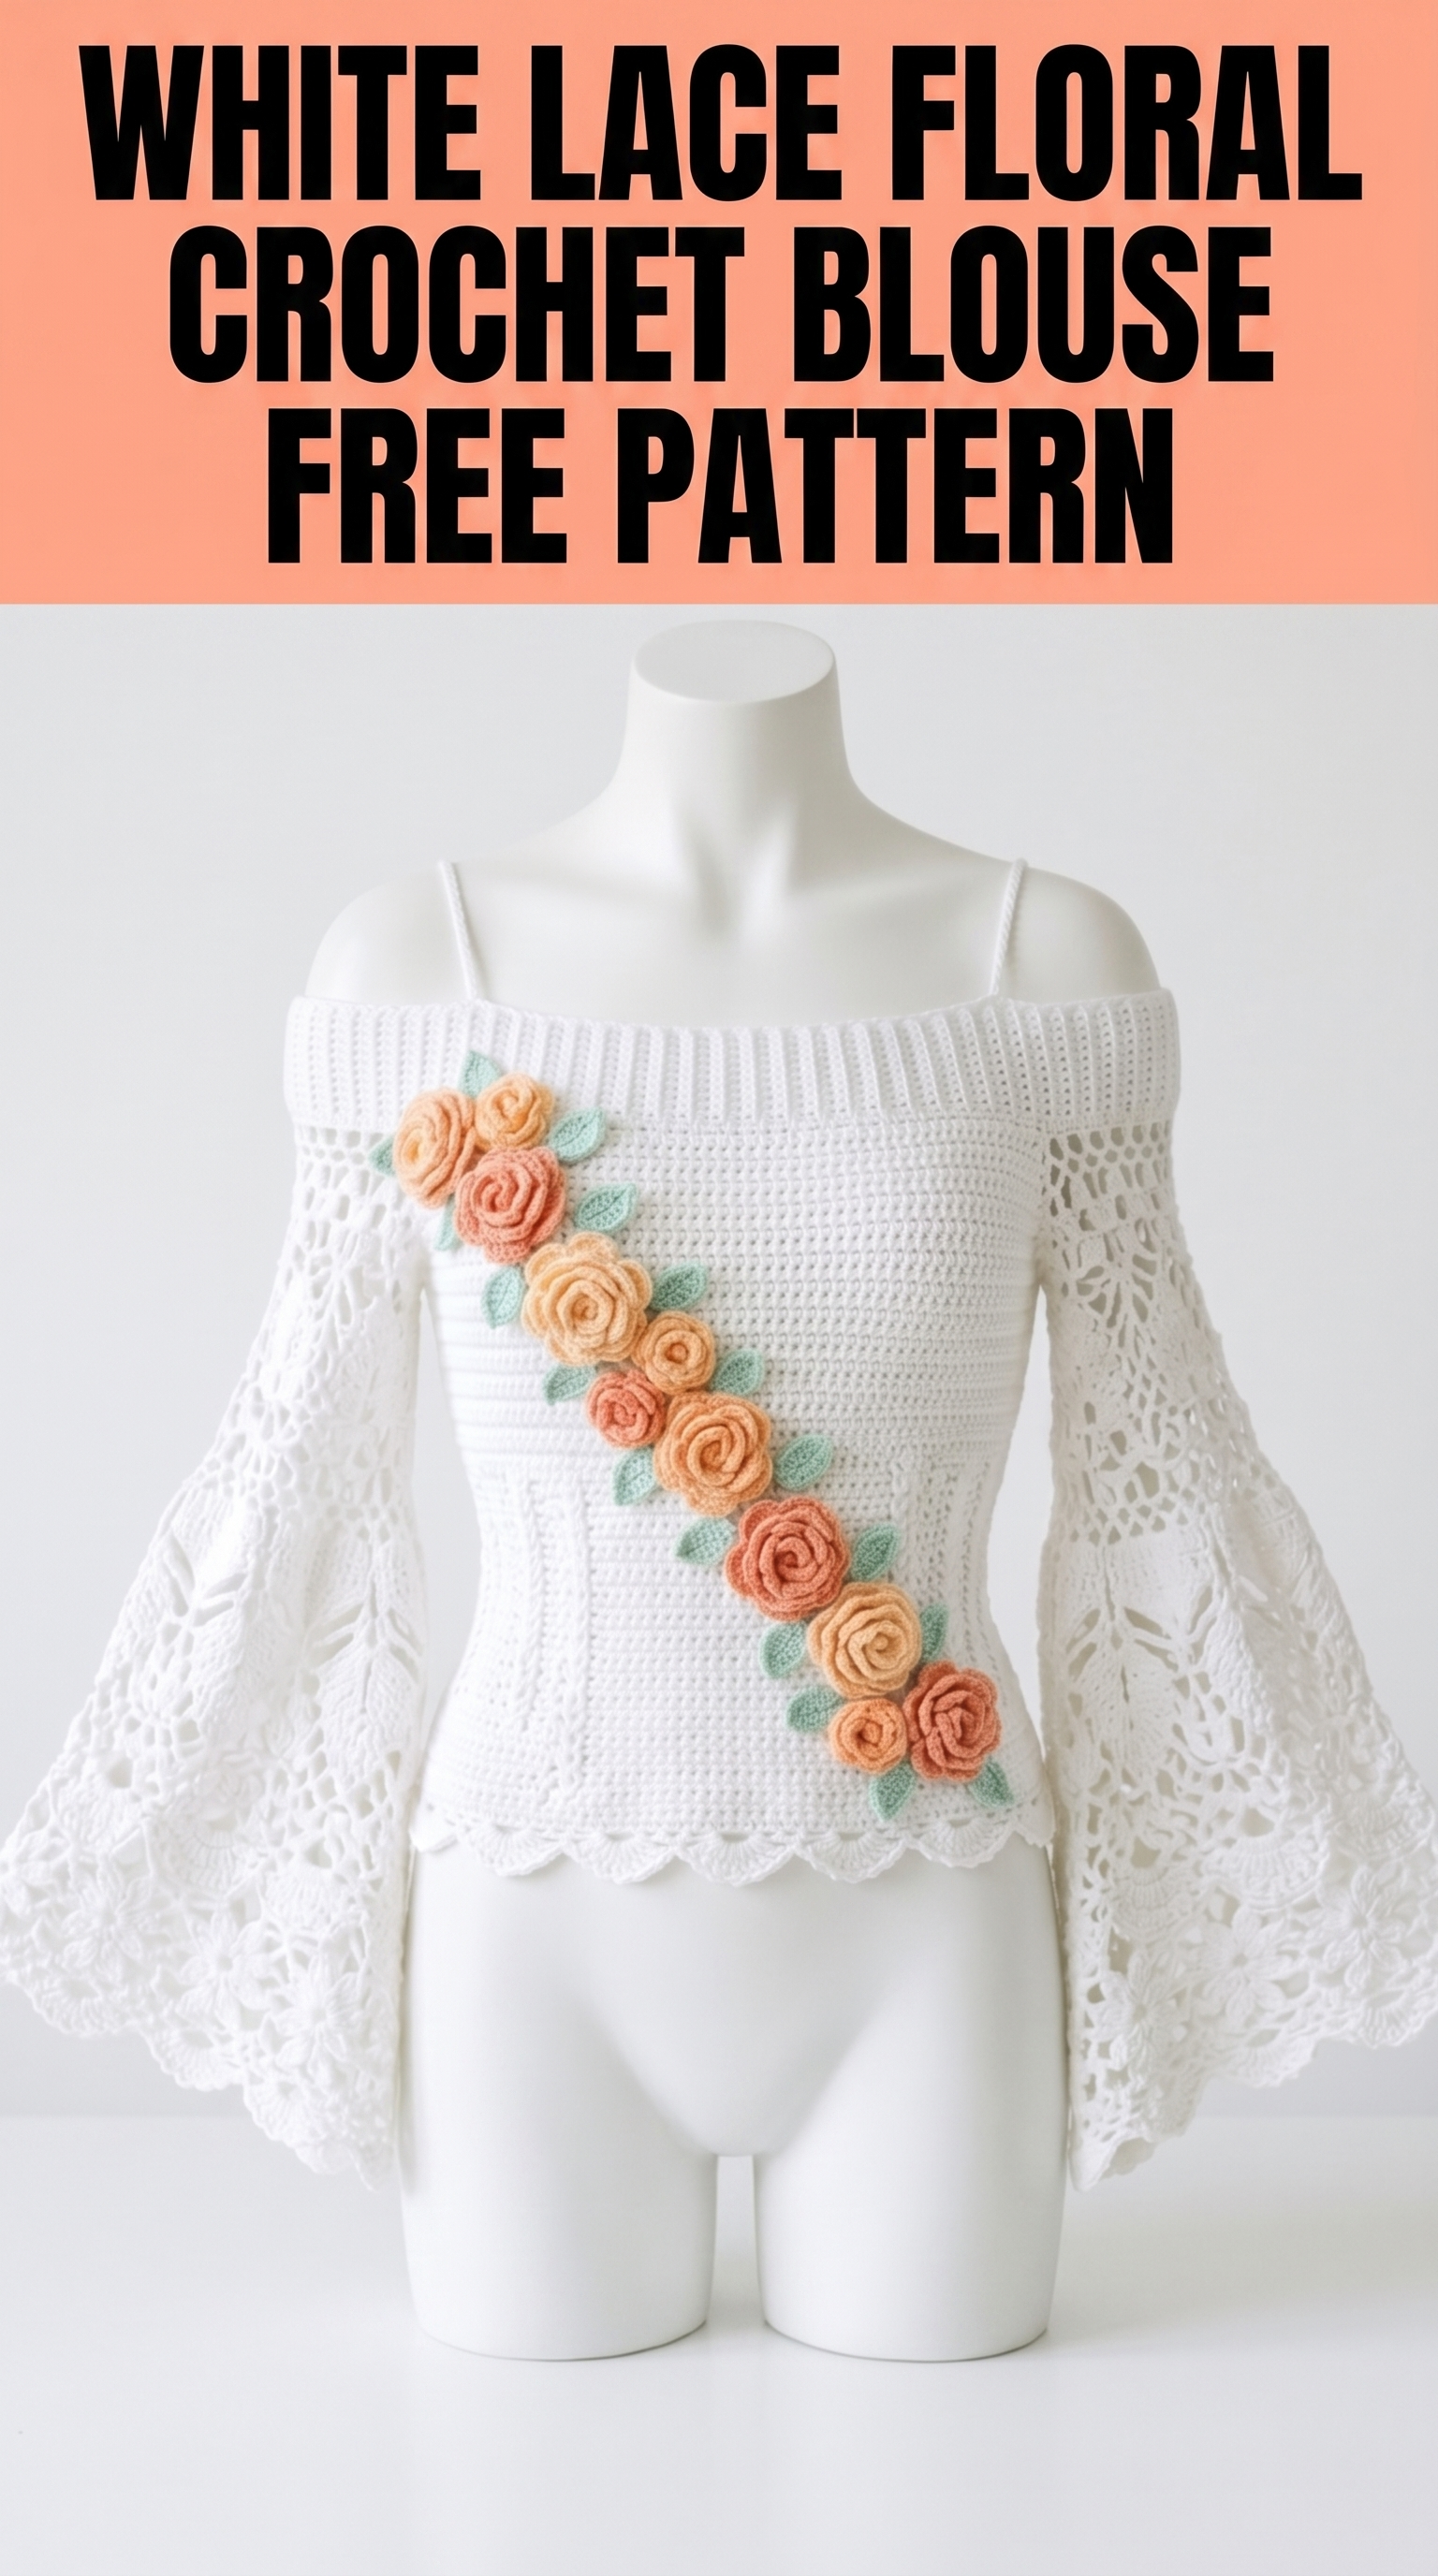
The construction looks complex, but I promise it breaks down into manageable sections. You will work the bodice, attach those dramatic sleeves, add the sweet scalloped hem, and then create individual roses and leaves to appliqué diagonally across the front. Let me walk you through every step of this crochet blouse pattern.
Why This Lace Crochet Top Works
This design has serious boho romantic energy. The off-shoulder neckline with thin spaghetti straps gives you that trendy cold-shoulder look while the straps keep everything secure. Those bell sleeves are the showstopper though. They drape beautifully and feature an intricate lace pattern that catches light in the prettiest way.
The fitted bodice uses simple stitches worked in rows, creating clean lines that contrast with all that lace drama. And those roses? They transform a lovely top into a wearable art piece. The peach and coral tones against white feel fresh and romantic without being too sweet.
Skill level: Intermediate. You need comfort with basic stitches, reading lace charts or written instructions, working in the round for sleeves, and patience for appliqué finishing.
Materials You Will Need
Yarn:
I recommend 100% mercerized cotton for this project. The sheen highlights the lace work beautifully, and cotton holds structure better than acrylic for fitted garments.
Hook: 3.0mm (US D/3) for bodice and flowers, 3.5mm (US E/4) for sleeves
Notions:
Gauge (Please Check This)
Bodice gauge with 3.0mm hook in single crochet:
22 stitches and 24 rows = 4 inches
Sleeve gauge with 3.5mm hook in lace pattern:
One lace repeat (approximately 16 stitches) = 3 inches
Take time to swatch. A fitted top that does not fit is just frustrating. Adjust your hook size up if your stitches run tight, down if loose.
Finished Measurements
This pattern is written for size Small. Adjust foundation chain and increases for other sizes.
Abbreviations and Stitch Definitions
Let me define everything before we start. Refer back here anytime.
ch = chain: Yarn over, pull through loop on hook. Creates foundation or spaces.
sl st = slip stitch: Insert hook, yarn over, pull through stitch AND loop on hook in one motion. Used for joining or invisible movement.
sc = single crochet: Insert hook in stitch, yarn over and pull up loop (2 loops on hook), yarn over and pull through both loops. Shortest basic stitch.
hdc = half double crochet: Yarn over, insert hook, yarn over and pull up loop (3 loops), yarn over and pull through all 3 loops. Medium height.
dc = double crochet: Yarn over, insert hook, yarn over and pull up loop (3 loops), yarn over and pull through 2 loops, yarn over and pull through remaining 2 loops. Taller stitch, common in lace.
tr = treble crochet: Yarn over twice, insert hook, yarn over and pull up loop (4 loops), [yarn over, pull through 2 loops] three times. Very tall stitch.
sk = skip: Miss the indicated number of stitches.
sp = space: The gap created by chains, where you work into rather than into a stitch.
dec = decrease: Work two stitches together as one to reduce stitch count.
inc = increase: Work two stitches in the same place to add stitches.
The Pattern: Step by Step Instructions
Bodice Back Panel
The bodice is worked flat in rows, bottom to top.
Foundation: Ch 95 (or adjust to your bust measurement plus 2 inches ease, keeping stitch count odd).
Row 1: Sc in 2nd ch from hook and in each ch across. Turn. (94 sts)
Row 2: Ch 1 (does not count as stitch throughout), sc in each st across. Turn. (94 sts)
Rows 3 through 40: Repeat Row 2. This creates approximately 6.5 inches of fabric.
Shape armholes:
Row 41: Ch 1, sl st in first 6 sts, ch 1, sc in same st and in each st across until 6 sts remain, leave remaining unworked. Turn. (82 sts)
Row 42: Ch 1, sc2tog (single crochet decrease: insert hook in first st, pull up loop, insert in next st, pull up loop, yarn over, pull through all 3 loops), sc across until 2 sts remain, sc2tog. Turn. (80 sts)
Rows 43 through 46: Repeat Row 42. (72 sts after Row 46)
Rows 47 through 70: Ch 1, sc in each st across. Turn. (72 sts)
This completes your back panel. Fasten off and weave in ends.
Bodice Front Panel
Work identical to back panel through Row 70.
Do not fasten off. We will create the ribbed neckband next.
Ribbed Neckband
The top edge features a lovely ribbed texture that adds stretch and visual interest.
Working across the top of the front panel:
Row 1: Ch 8, sc in 2nd ch from hook and in each of next 6 ch, sl st in next 2 sts of bodice edge. Turn. (7 sts in rib)
Row 2: Sk the sl sts, working in back loops only (blo), sc in each of 7 sts. Turn.
Row 3: Ch 1, sc blo in each of 7 sts, sl st in next 2 sts of bodice edge. Turn.
Repeat Rows 2 and 3 across entire top edge of front panel, then continue around to back panel, creating one continuous ribbed neckband.
Join with sl st to first row of ribbing. Fasten off.
Side Seams
Pin front and back panels together at side edges with wrong sides facing. Using sl st or whip stitch, join from bottom hem to armhole. Repeat for other side.
Lace Bell Sleeves (Make 2)
These dramatic sleeves are worked in the round from armhole down. Switch to your 3.5mm hook.
Setup Round: Join yarn at center of underarm, ch 1, work 80 sc evenly around armhole opening. Sl st to first sc to join. Place marker. (80 sts)
Round 1: Ch 4 (counts as dc plus ch 1), sk 1 st, *dc in next st, ch 1, sk 1 st* around, sl st to 3rd ch of beginning ch 4. (40 dc, 40 ch-1 sps)
Round 2: Sl st into ch-1 sp, ch 3 (counts as dc), dc in same sp, ch 1, *2 dc in next ch-1 sp, ch 1* around, sl st to top of ch 3. (80 dc, 40 ch-1 sps)
Rounds 3 through 6: Ch 3, dc in each dc and ch 1 in each sp around. Join.
Begin lace expansion:
Round 7: Ch 3, dc in next st, *ch 2, sk 2 sts, dc in next 4 sts* around, adjusting final repeat as needed. Join.
Round 8: Ch 3, dc in next st, *ch 1, sc in ch-2 sp, ch 1, dc in next 4 sts* around. Join.
Round 9: Ch 3, dc in next st, *ch 2, sk (ch, sc, ch), dc in 4 dc, ch 2* around. Join.
Round 10: Ch 3, dc in next st, *5 dc in ch-2 sp (shell made), dc in next 4 dc* around. Join.
Continue in established lace pattern, adding shells and chain spaces to create the flowing pineapple-style lace visible in the sleeves. Work approximately 45 rounds total, increasing shell sizes and adding chains between motifs every 4 to 6 rounds.
Final round: Work a scallop edging: *sc, sk 1, 5 dc in next st (shell), sk 1* around. Sl st to join. Fasten off.
Spaghetti Straps (Make 2)
These thin straps add security and style.
Ch 120 (or measure from back neckband, over shoulder, to front neckband for your body).
Row 1: Sl st in 2nd ch from hook and in each ch across. Fasten off.
Sew one end to inside of back neckband approximately 4 inches from center. Try on the top and mark where front attachment should fall. Sew front end in place.
Scalloped Bottom Hem
Join yarn at one side seam along bottom edge of bodice.
Round 1: Ch 1, sc evenly around entire bottom edge. Sl st to join.
Round 2: Ch 1, *sc in next st, sk 2 sts, 5 dc in next st, sk 2 sts* around. Sl st to join. Fasten off.
This creates that sweet scalloped edge visible in the design.
Spiral Roses (Make 9 to 11)
These dimensional roses are worked in a spiral from center outward, then rolled and stitched.
Make some in peach, some in coral, for visual variety.
Ch 40.
Row 1: Sc in 2nd ch from hook, *ch 3, sk 1 ch, sc in next ch* across. (20 ch-3 loops)
Row 2: Ch 1, turn, *sc in ch-3 sp, 4 dc in same sp* across all loops.
Starting at the end where you fastened off, roll the strip tightly for the center bud, then more loosely as you spiral outward. Use a tapestry needle and matching yarn to tack the bottom edge as you roll, securing the rose shape.
Make a mix of sizes by starting with ch 30 for smaller roses and ch 50 for larger ones.
Leaves (Make 18 to 22)
Using sage green yarn:
Ch 10.
Row 1: Sc in 2nd ch from hook, hdc in next st, dc in next 2 sts, tr in next 2 sts, dc in next st, hdc in next st, 3 sc in last ch (this creates the point).
Working down the other side of the foundation chain: hdc, dc, tr in 2 sts, dc in 2 sts, hdc, sc. Sl st to first sc. Fasten off.
This creates a pointed oval leaf shape with natural dimension from the stitch height changes.
Appliqué Placement
Lay your finished blouse flat. Arrange roses and leaves in a diagonal cascade from upper left (near shoulder) to lower right (near opposite hip).
Start by pinning roses first. Vary sizes and colors, clustering 2 to 3 roses together in spots. Tuck leaves behind and around roses, angling them naturally like real foliage.
Step back and look. Adjust until the composition feels balanced but organic, not too perfect.
Using matching thread or yarn and a tapestry needle, whip stitch each piece securely to the bodice, stitching through the back layer only when possible to keep the inside tidy.
Tips for Success with This Crochet Tutorial
Blocking matters: Block all pieces before assembly. Wet block the bodice panels to even out stitches. Pin sleeves into a bell shape and steam lightly.
Count your chains: The lace sleeves are unforgiving if you miss a chain space. Count after every round for the first ten rounds until the pattern is in your muscle memory.
Roses take practice: Make one or two practice roses before committing to all of them. Once you understand how the spiral rolls, they come together quickly.
Try it on: Fit the bodice before adding sleeves. Make adjustments to length or width while it is still easy.
Wrapping Up This White Lace Floral Crochet Blouse Pattern
You now have everything you need to create this stunning white lace floral crochet blouse from start to finish. The combination of a clean fitted bodice, dramatic lace bell sleeves, and romantic rose appliqués creates a piece you will reach for again and again.
This crochet pattern takes time and attention, but every hour shows in the finished result. Imagine wearing this to a garden party, a summer wedding, or just a special brunch with friends.
Thank you so much for choosing this pattern. I genuinely cannot wait to see your version come to life. When you finish yours, please share your photos on Instagram and tag me, or post them to Facebook so I can celebrate your work with you.
Happy crocheting, friend. You have got this.
