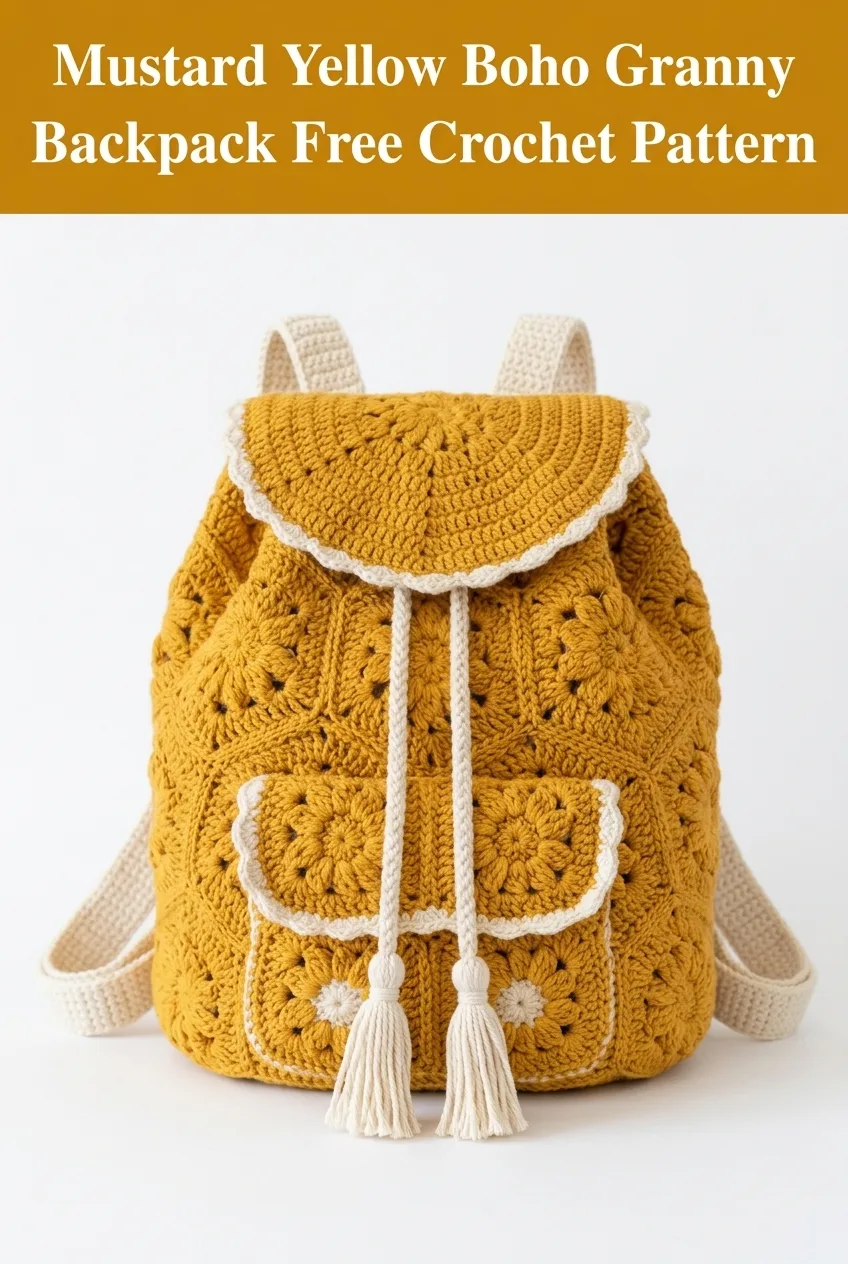
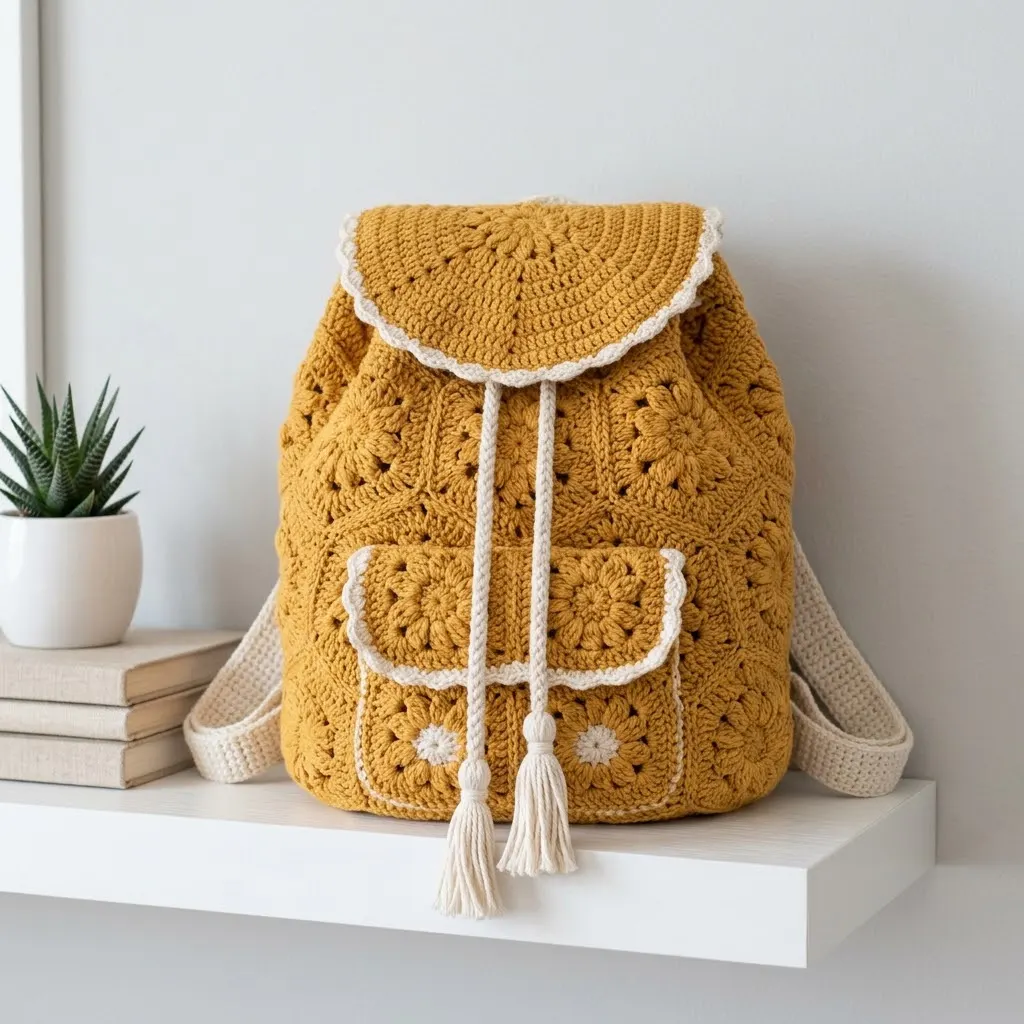
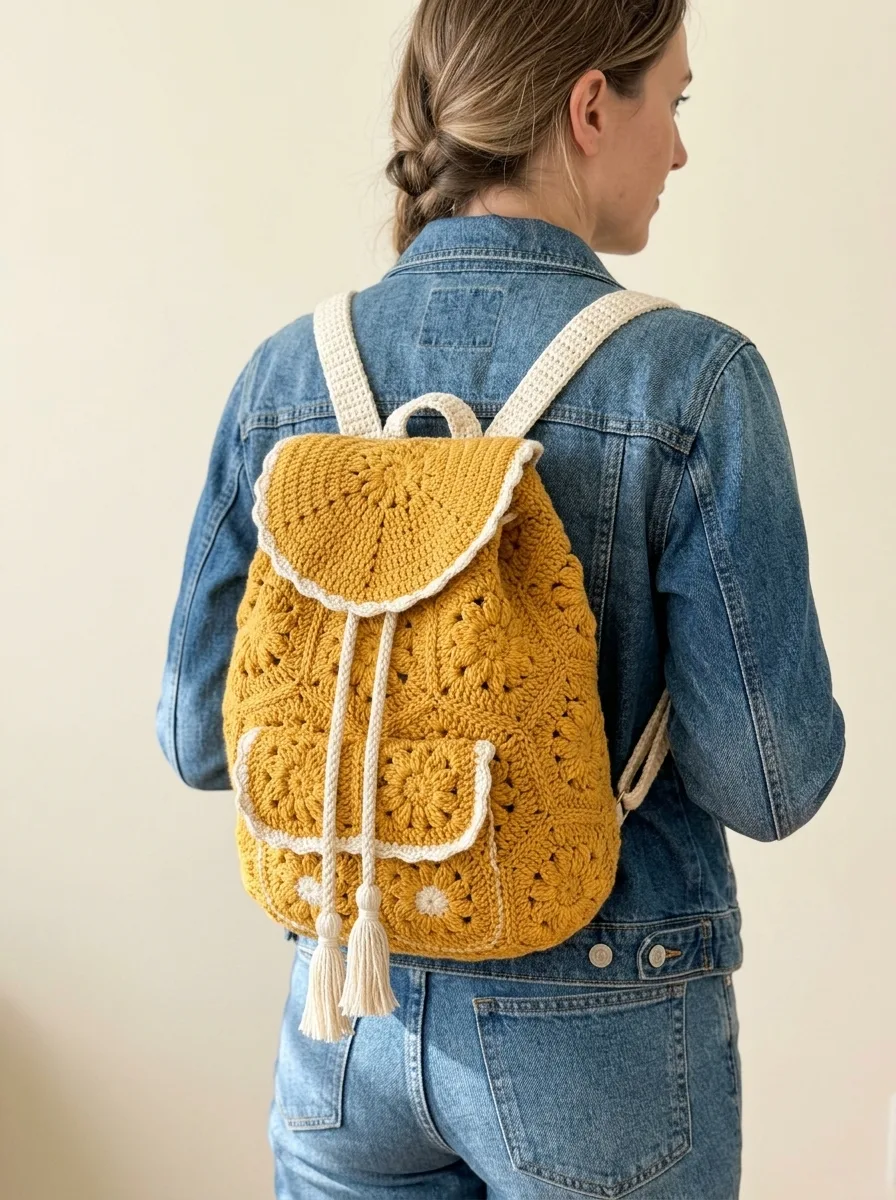
Looking for a stylish, handmade bag that actually holds everything you need for a day out? This mustard yellow boho granny backpack combines classic granny squares with modern construction to create a functional accessory you will reach for again and again. The pattern uses double crochet clusters and chain spaces you already know, making it approachable for confident beginners ready to tackle their first bag project. It works up surprisingly quickly once you get into a rhythm, and the finished backpack makes an impressive handmade gift for the boho lover in your life.
Why You Will Love This Crochet Backpack Pattern
This granny square backpack caught my eye because it strikes that perfect balance between vintage charm and everyday practicality. The construction uses traditional granny squares for the body, which means you can work on individual squares during your lunch break or while watching TV. Then you join them together and add the finishing touches for a professional looking result.
The contrast edging in cream creates beautiful definition against the mustard yellow, making every stitch pop. Those adorable tassels on the drawstring closure add movement and personality. And the front pocket? Absolutely essential for keeping your phone or keys within easy reach.
Skill level: Intermediate. If you can make a granny square and are comfortable joining pieces, you can absolutely make this backpack.
Materials Needed for Your Crochet Boho Backpack
Yarn:
I recommend a sturdy cotton yarn for this project. Cotton holds its shape better than acrylic for bags, and it will not stretch out when you load it up with your belongings. Look for something with good stitch definition so your granny clusters really stand out.
Hook:
Notions:
Gauge
4 inch square = one completed granny square using 5.0mm hook
Always check your gauge before starting. If your squares come out too big, go down a hook size. Too small? Go up a hook size. Consistent gauge means your squares will join together perfectly.
Abbreviations and Stitch Definitions
Let me walk you through every stitch abbreviation you will encounter in this crochet tutorial.
Ch = Chain. Wrap yarn over hook, pull through loop on hook. This creates the foundation and spaces between stitches.
Sl st = Slip stitch. Insert hook, yarn over, pull through both the stitch and the loop on your hook in one motion. Used for joining and moving across stitches invisibly.
Dc = Double crochet. Yarn over, insert hook into stitch, yarn over and pull up a loop (3 loops on hook), yarn over and pull through 2 loops (2 loops remain), yarn over and pull through remaining 2 loops. Creates a tall stitch.
3dc-cl = 3 double crochet cluster. Work 3 dc into the same stitch or space. This creates the signature "puff" of a granny square.
Sc = Single crochet. Insert hook, yarn over, pull up a loop (2 loops on hook), yarn over, pull through both loops. A short, tight stitch.
Ch-sp = Chain space. The gap created by chain stitches, where you will insert your hook for the next stitch group.
Sk = Skip. Miss the indicated stitch or space.
Step by Step Crochet Pattern Instructions
Part One: Making the Granny Squares (Make 24 in Main Color, 4 with Contrast Centers)
You will need 28 total granny squares for this backpack. Most use solid mustard yellow. Four squares feature a cream center with mustard outer rounds, which adds visual interest to the front panel and straps.
Solid Granny Square:
Round 1: With main color, make a magic ring. Ch 3 (counts as first dc throughout), 2 dc into ring, ch 2. *3dc-cl into ring, ch 2.* Repeat from * two more times. Sl st to top of beginning ch-3 to join. (4 clusters, 4 ch-2 corners)
Round 2: Sl st into ch-2 corner space. Ch 3, 2 dc in same space, ch 1. *In next corner ch-2 space, work (3dc-cl, ch 2, 3dc-cl), ch 1.* Repeat from * around. In first corner, work 3dc-cl, ch 2. Sl st to top of beginning ch-3. (8 clusters, 4 ch-2 corners, 4 ch-1 spaces)
Round 3: Sl st into corner ch-2 space. Ch 3, 2 dc in same space, ch 1. 3dc-cl in next ch-1 space, ch 1. *In corner ch-2 space work (3dc-cl, ch 2, 3dc-cl), ch 1. 3dc-cl in next ch-1 space, ch 1.* Repeat from * around. Complete the first corner with 3dc-cl, ch 2. Sl st to join. (12 clusters, 4 corners)
Round 4: Sl st into corner space. Ch 3, 2 dc in same space, ch 1. *3dc-cl in next ch-1 space, ch 1.* Repeat to next corner. *In corner work (3dc-cl, ch 2, 3dc-cl), ch 1. Continue 3dc-cl in each ch-1 space with ch 1 between.* Repeat around entire square. Sl st to join. Fasten off. (16 clusters, 4 corners)
Each finished square should measure approximately 4 inches.
Contrast Center Squares (Make 4):
Work Round 1 in cream. Fasten off and join mustard yellow for Rounds 2 through 4. These squares create focal points on your backpack.
Part Two: Joining the Granny Squares
Lay out your squares in the following arrangement:
Back Panel: 3 squares wide x 4 squares tall (12 squares)
Front Panel: 3 squares wide x 3 squares tall (9 squares). Position one contrast center square in the middle.
Bottom Panel: 3 squares in a row (3 squares)
Side Panels: Created during the joining process by connecting front to back along edges.
Joining Method:
Place two squares with right sides together. Using cream yarn for beautiful contrast, work single crochet through both layers along one edge. Insert hook through both corresponding loops of both squares, yarn over, pull through, complete sc. Work approximately 12 to 15 sc across each edge, matching stitch for stitch.
Continue joining squares in rows first, then join rows together. Your seams will show on the outside as a decorative element, which is perfect for that boho aesthetic.
Part Three: Assembling the Backpack Body
Once your panels are joined, connect them in this order:
1. Attach bottom panel to back panel along one edge
2. Attach front panel to opposite side of bottom panel
3. Join side edges of front and back panels together, creating a box shape
4. The top remains open for the drawstring closure
The assembled body should form a rectangular bucket approximately 12 inches tall, 9 inches wide, and 4 inches deep.
Part Four: Creating the Flap
The semicircular flap uses the same stitch pattern worked flat, then shaped into a half circle.
Row 1: With main color, ch 40. 3dc-cl in 4th ch from hook, ch 1, sk 2 ch. *3dc-cl in next ch, ch 1, sk 2.* Repeat across. Turn. (13 clusters)
Rows 2 through 6: Ch 3, 3dc-cl in first ch-1 space. *Ch 1, 3dc-cl in next ch-1 space.* Continue across, decreasing one cluster at each end every other row by slip stitching over the first and last clusters. This creates the curved shape.
Edging: Join cream yarn. Sc evenly around entire flap edge, working 3 sc in the corners to help them lie flat. Work approximately 60 to 70 sc total around the curve.
Part Five: Making the Front Pocket
Square Base:
Make one 4 inch granny square using main color with a contrast center. This matches the accent squares on your body.
Pocket Edging:
Join cream yarn. Sc around three sides only, leaving the top open. Work approximately 12 sc per side. (36 sc total)
Position the pocket on the lower front of your backpack, centered. Use whip stitch to attach along bottom and side edges, leaving the top open for access.
Part Six: Crocheting the Straps
Strap (Make 2):
With cream yarn, ch 150 for adjustable length straps.
Row 1: Sc in 2nd ch from hook and each ch across. (149 sc)
Rows 2 through 5: Ch 1, turn. Sc in each st across. (149 sc)
Fasten off. Weave in ends.
Each finished strap should be approximately 36 inches long and 1 inch wide. Adjust the starting chain for longer or shorter straps based on your preference.
Attach straps to the back panel of your backpack. Position the top attachments approximately 2 inches from the top edge, spaced evenly. Attach bottom of straps to the bottom corners of the back panel. Use sturdy whip stitch or slip stitch joining, reinforcing several times for durability.
Part Seven: Drawstring Closure
Drawstring Cord (Make 2):
With cream yarn, ch 80.
Row 1: Sl st in 2nd ch from hook and each ch across. (79 sl sts)
Fasten off, leaving a long tail.
Making the Tassels:
Cut 20 strands of cream yarn, each approximately 8 inches long. Fold in half. Thread the loop through the end of your drawstring cord. Pull cut ends through the loop and tighten. Trim tassel ends evenly to approximately 2.5 inches.
Create two drawstring cords with tassels.
Adding the Drawstring:
Using a yarn needle, weave one drawstring through the ch-2 corner spaces of the top row of granny squares, starting at the front center and going around to return to center. Weave the second cord in the opposite direction. When you pull both cords, the top cinches closed.
Part Eight: Attaching the Flap
Position your completed flap centered on the back panel, approximately 1 inch below the top edge. The curved portion should hang over the front of the backpack.
Using main color yarn, whip stitch the straight edge of the flap securely to the back panel. Reinforce this seam well since it will bear some stress when opening and closing the backpack.
Optional: Add a magnetic snap or button closure to secure the flap to the front of the backpack.
Part Nine: Finishing Details
Cream Trim Around Body:
Join cream yarn at any corner of the top opening. Sc evenly around the entire top edge, working through the edge stitches of each granny square. Work approximately 3 sc per square edge. Sl st to first sc to join. Fasten off.
Weaving in Ends:
You will have many ends from joining all those squares. Take your time weaving each end through several stitches on the wrong side. For a bag that will get regular use, weaving ends thoroughly prevents unraveling.
Optional Lining:
Cut fabric lining to match the interior dimensions of your backpack. Hand stitch or use fabric glue to secure. A lining prevents small items from poking through the granny square openings and adds durability.
Tips for Success with This Granny Square Backpack Pattern
Blocking matters. Before joining, wet block or steam block your granny squares so they are all exactly the same size. This makes joining so much easier.
Use stitch markers generously. Mark your corners and the center of each edge before joining. This helps you match up stitches perfectly.
Reinforce high stress points. Add extra stitching where straps attach and around the drawstring holes. These areas take the most wear.
Choose your yarn wisely. Cotton and cotton blends work best for bags because they do not stretch. If you prefer acrylic, look for one marketed as "sturdy" or "structural."
Customization Ideas
Want to make this crochet backpack uniquely yours? Try these variations:
Final Measurements
Thank you so much for choosing this pattern for your next crochet project. I genuinely cannot wait to see what color combinations you choose for your boho granny backpack. Tag me on Instagram or share your finished project on Facebook so I can cheer you on!
If you loved this step by step crochet tutorial, go ahead and pin it to your favorite Pinterest board so you can find it whenever you are ready to cast on. And please drop a comment below when you finish yours. I read every single one, and seeing your creations absolutely makes my day.
