Go dig through your stash right now. That gorgeous seafoam cotton you have been saving for something special? This is the project. This Seahorse Garden Crochet Bag combines a sturdy single crochet base with whimsical appliqué work that looks far more complicated than it actually is. You will build the bag body using straightforward stitches, then bring it to life with colorful seahorses, swaying seaweed, and tiny shell accents. I will be honest with you. The appliqués require some patience and attention to shaping, but nothing here is beyond an adventurous beginner or confident intermediate crocheter. If you can single crochet and follow a basic increase pattern, you can absolutely make this bag.
Why You Will Love This Crochet Bag Pattern
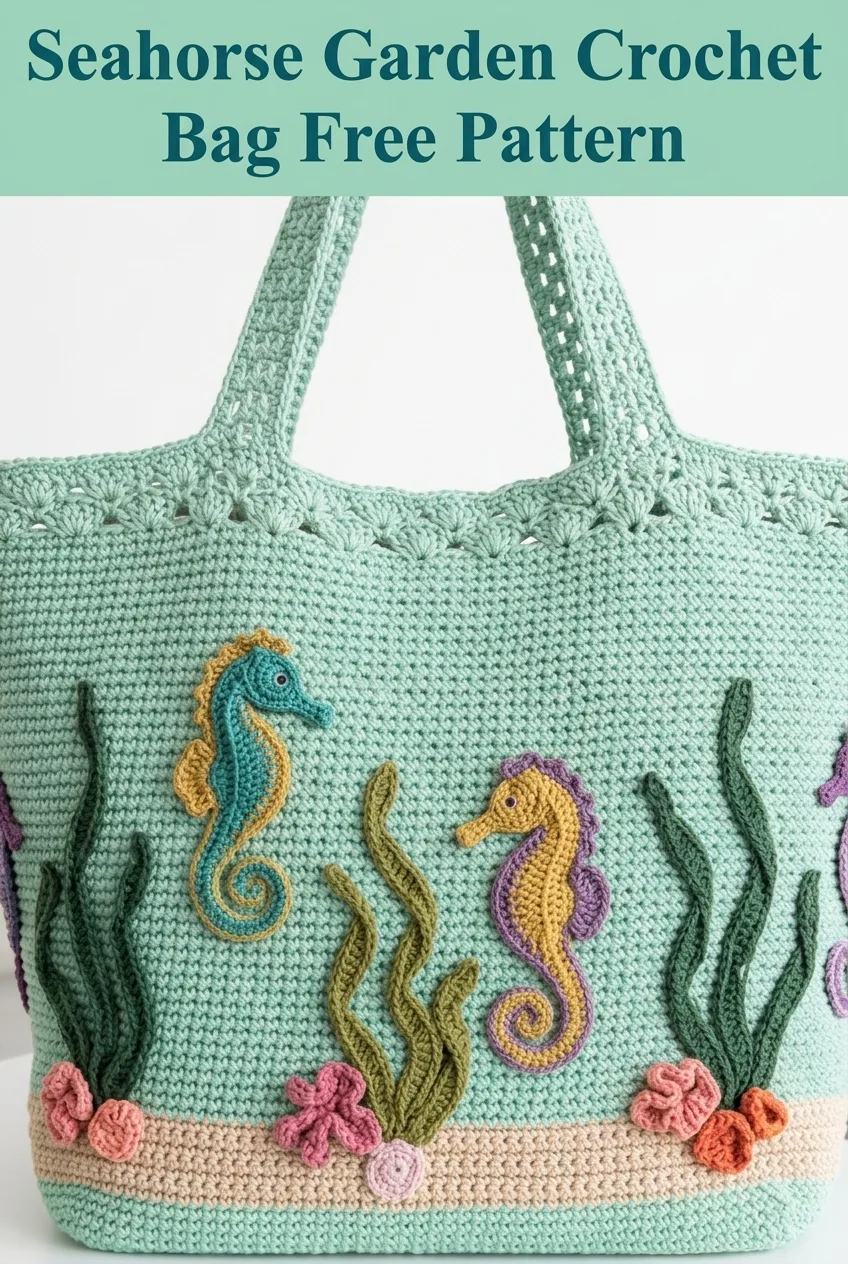
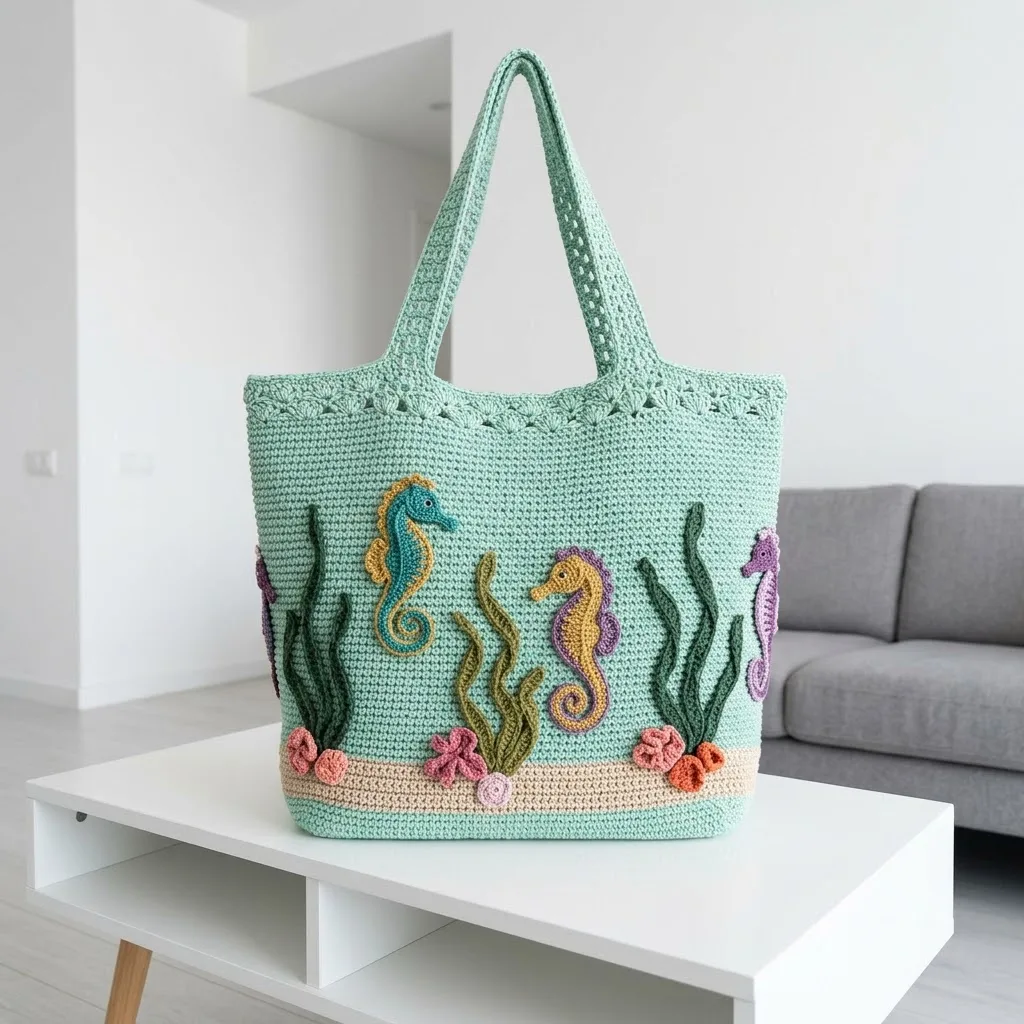
This ocean-themed crochet tote is a true statement piece. The mint green body evokes calm coastal waters, while the sandy beige band at the bottom grounds the whole design like a beach floor. The seahorse appliqués in teal, golden yellow, and soft lavender add personality without overwhelming the bag. Dark green seaweed tendrils and pink coral clusters complete the underwater garden effect.
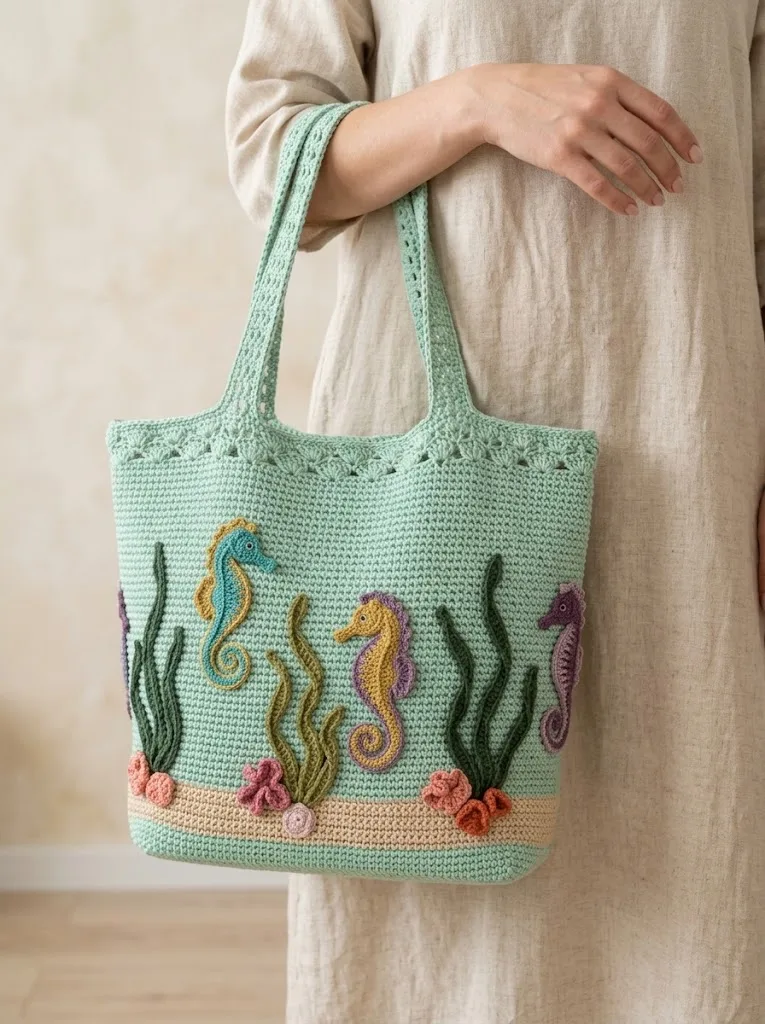
What makes this bag practical? The dense single crochet (sc) fabric creates a sturdy structure that holds its shape. The handles are reinforced and long enough to carry comfortably over your shoulder. The decorative shell border along the top edge adds visual interest while also creating a finished look.
Whether you use it as a beach bag, market tote, or everyday carryall, this crochet bag tutorial will give you something truly unique.
Skill Level
Intermediate
You should be comfortable with basic stitches, working in the round, and attaching appliqués. The bag body is beginner friendly, but the seahorse and seaweed appliqués involve some shaping that requires focus.
Finished Dimensions
Materials Needed
Yarn
Use worsted weight cotton yarn (weight category 4). Cotton provides structure, is easy to wash, and holds appliqués well. Here is what you need:
Tools
Gauge
With 5.0 mm hook and worsted weight cotton:
14 sc x 16 rows = 4 inches (10 cm)
Take time to check your gauge. A tighter gauge creates a sturdier bag that will not stretch out of shape.
Abbreviations and Stitch Definitions
Let me walk you through every stitch you will use. Even if you know these, it helps to be on the same page.
Step by Step Crochet Pattern
Part 1: Bag Base
The base is worked flat in rows, then you will pick up stitches around the entire rectangle to build the body.
Using 5.0 mm hook and sand/beige yarn:
Row 1: Ch 57. Sc in 2nd ch from hook and in each ch across. (56 sc)
Rows 2–20: Ch 1, turn. Sc in each st across. (56 sc)
You should have a flat rectangle approximately 16 inches wide and 5 inches long. This forms the bottom of your bag.
Do not fasten off. You will now work around the entire perimeter.
Part 2: Bag Body
You will pick up stitches around all four sides of the base, then work in continuous rounds.
Setup Round: Ch 1, do not turn. Work 56 sc across the short end of the base (this is the same edge you just finished). Place a stitch marker. Work 20 sc evenly along the long side edge (approximately 1 sc per row). Work 56 sc across the foundation chain edge. Work 20 sc evenly along the remaining long side edge. Join with sl st to first sc if desired, or continue working in a spiral. Place marker at the beginning of rounds. (152 sc total)
Rounds 1–8: Sc in each st around. (152 sc per round)
At the end of Round 8, you will switch colors.
Color Change: Switch to seafoam/mint yarn.
Rounds 9–55: Sc in each st around. (152 sc per round)
You should now have a bag body approximately 13.5 inches tall. The sandy bottom represents the ocean floor, and the mint green rises like water above it.
Part 3: Decorative Shell Border
This pretty border creates the scalloped edge you see at the top of the bag.
Round 56: With seafoam yarn, *sc in next 2 sts, sk 1 st, 5 dc in next st (shell made), sk 1 st.* Repeat from * to * around. Adjust the final repeat slightly if needed to end evenly. Sl st to first sc to join.
Round 57: Ch 3 (counts as first dc). Work 1 dc in each dc of the shell below, and 1 sc between each shell. This creates the layered look. Sl st to join.
Fasten off and weave in ends.
Part 4: Handles (Make 2)
The handles are worked flat and then attached to the bag.
Using 5.0 mm hook and seafoam yarn:
Row 1: Ch 71. Sc in 2nd ch from hook and in each ch across. (70 sc)
Rows 2–6: Ch 1, turn. Sc in each st across. (70 sc)
Fasten off, leaving a long tail for sewing.
Attaching Handles:
Position the first handle approximately 4 inches from each side edge on one side of the bag. Pin in place. Use a yarn needle and matching yarn to whip stitch securely along the bottom edge of each handle end. Reinforce with extra stitches for durability.
Repeat for the second handle on the opposite side, making sure both handles align evenly.
Part 5: Seahorse Appliqués (Make 4)
These charming seahorses are the stars of your bag. You will need patience here, but the results are worth it.
Make one in teal, one in golden yellow, one in lavender, and one additional in your color of choice.
Using 3.5 mm hook:
Body:
Row 1: Ch 2. Work 6 sc in 2nd ch from hook. (6 sc)
Row 2: Ch 1, turn. Inc in each st across. (12 sc)
Rows 3–5: Ch 1, turn. Sc in each st across. (12 sc)
Row 6: Ch 1, turn. Sc2tog, sc in next 8 sts, sc2tog. (10 sc)
Rows 7–9: Ch 1, turn. Sc in each st across. (10 sc)
Row 10: Ch 1, turn. Sc2tog, sc in next 6 sts, sc2tog. (8 sc)
Rows 11–13: Ch 1, turn. Sc in each st across. (8 sc)
Continue decreasing every 3 rows until you have 4 sts remaining.
Neck and Head:
Row 14: Ch 1, turn. Sc in each st. (4 sc)
Rows 15–18: Ch 1, turn. Sc in each st. (4 sc)
Head:
Row 19: Ch 1, turn. Inc in first st, sc in next 2 sts, inc in last st. (6 sc)
Rows 20–22: Ch 1, turn. Sc in each st. (6 sc)
Row 23: Ch 1, turn. Sc2tog, sc in next 2 sts, sc2tog. (4 sc)
Snout:
Row 24: Ch 1, turn. Sc2tog twice. (2 sc)
Rows 25–27: Ch 1, turn. Sc in each st. (2 sc)
Fasten off, leaving a tail for sewing.
Curled Tail:
Join yarn at the base of the body. Ch 15. Sc in 2nd ch from hook, hdc in next 3 ch, sc in remaining sts. Fasten off. The chain will naturally curl. Shape with your fingers.
Dorsal Fin:
Join yarn along the back edge. *Sl st, ch 3, sl st in same st. Sk 1 st.* Repeat 4 times along the back. Fasten off.
Use a contrasting color (olive or dark green) to embroider simple curved lines across the body for detail.
Part 6: Seaweed Appliqués (Make 6 to 8)
These are surprisingly simple. You are basically creating wavy chains.
Using 3.5 mm hook and olive green or dark forest green yarn:
Method 1 (Tall Seaweed):
Ch 30. Work 2 sc in 2nd ch from hook, *1 sc in next ch, 2 sc in next ch.* Repeat from * to end. The extra stitches cause the piece to twist and wave naturally.
Fasten off.
Method 2 (Short Seaweed):
Ch 18. Repeat the same stitch pattern as above.
Make a variety of lengths and shades for visual interest.
Part 7: Coral and Shell Appliqués (Make 5 to 7)
Small Shell:
Using 3.5 mm hook and coral pink or peach yarn:
Round 1: Magic ring. Work 6 sc into ring. Pull tight. (6 sc)
Round 2: *Sl st, ch 2, 3 dc in same st, ch 2, sl st in same st.* Repeat in next 2 sts. (3 shell petals)
Fasten off. Flatten slightly.
Coral Cluster:
Ch 8. Work 3 sc in 2nd ch from hook. Sl st in next ch. *Ch 5, work 3 sc in 2nd ch from hook, sl st back down.* Repeat for branching effect.
Part 8: Assembling the Bag
This is the fun part. Lay your bag flat and arrange the appliqués before sewing anything down.
1. Position the seahorses so they appear to be swimming among the seaweed. Space them evenly around the bag. Remember the bag has two sides, so place appliqués on both.
2. Arrange seaweed pieces at varying heights, tucking some behind seahorses and letting others stand alone.
3. Cluster the shells and coral along the beige/sand section at the bottom, as if resting on the ocean floor.
4. Pin everything in place. Step back and check the balance.
5. Using a yarn needle and matching yarn, whip stitch each appliqué securely to the bag. Take your time.
6. Weave in all remaining ends.
Tips for Success
Yarn choice matters. Cotton holds its shape beautifully for bags. Acrylic will stretch over time. If you prefer acrylic, consider lining the bag with fabric.
Block your appliqués. Before sewing them on, lightly steam or wet block each seahorse and seaweed piece. This helps them lay flat and look polished.
Reinforce the handles. Bags carry weight. Sew the handles on twice if needed, and consider using fabric interfacing inside the handle attachment points.
Make it your own. Prefer starfish instead of seahorses? Add some. Want more shells? Go for it. This pattern is a canvas for your creativity.
Who Is This Pattern For?
This crochet tote bag pattern is perfect for ocean lovers, beach enthusiasts, and anyone who wants to carry a piece of summer with them all year. It makes a thoughtful gift for gardeners, teachers, or anyone who appreciates handmade beauty. Because the appliqués are modular, you could even simplify the design for a faster project or go all out with extra sea creatures.
Final Thoughts on the Seahorse Garden Crochet Bag
You now have everything you need to create this stunning ocean-themed crochet bag from start to finish. The combination of simple construction and detailed appliqué work makes this a truly rewarding project. Take your time with the seahorses, enjoy the meditative rhythm of the bag body, and watch the underwater garden come to life in your hands.
Thank you so much for being here and trusting me with your crafting time. I genuinely hope you love making this as much as I loved designing it. If you create your own Seahorse Garden Bag, please tag me on Instagram or share in my Facebook group. I would absolutely love to see your color combinations and creative touches.
I hope you will pin this pattern to your favorite Pinterest board so you can find it whenever you are ready to start. And if you make this bag, please leave a comment below. Your feedback and photos make this community so special, and I always smile when I see your finished projects.
