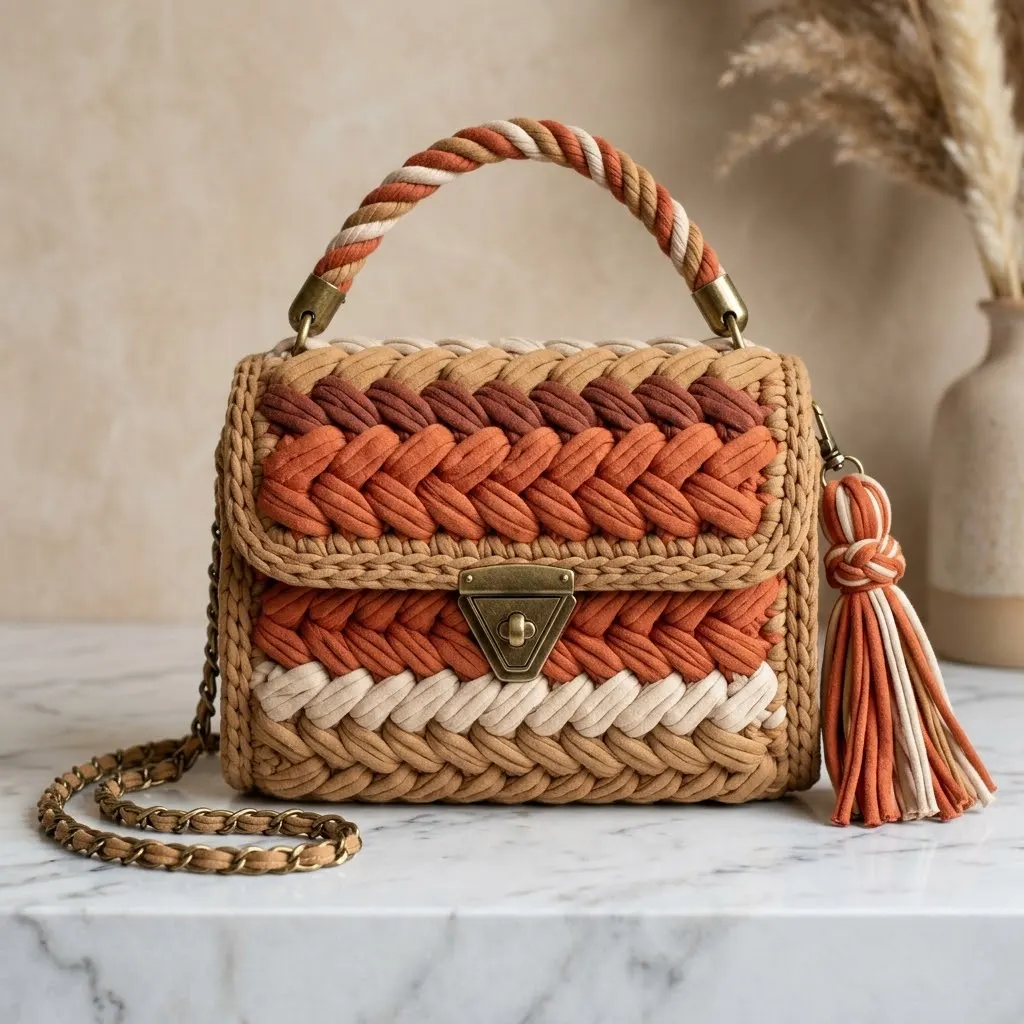
I have been dreaming about designing a structured crochet handbag that actually looks like something you would buy in a boutique. I wanted warm earthy tones, a sophisticated braided texture, and hardware that elevates the whole piece. When I finally sat down to work out the construction, I focused on making the stitch pattern bold enough to showcase chunky t-shirt yarn while keeping the shape clean and boxy. I am SO pleased with how this turned out. The braided herringbone rows create such a luxe woven effect, and that twisted rope handle adds the perfect boho finishing touch.
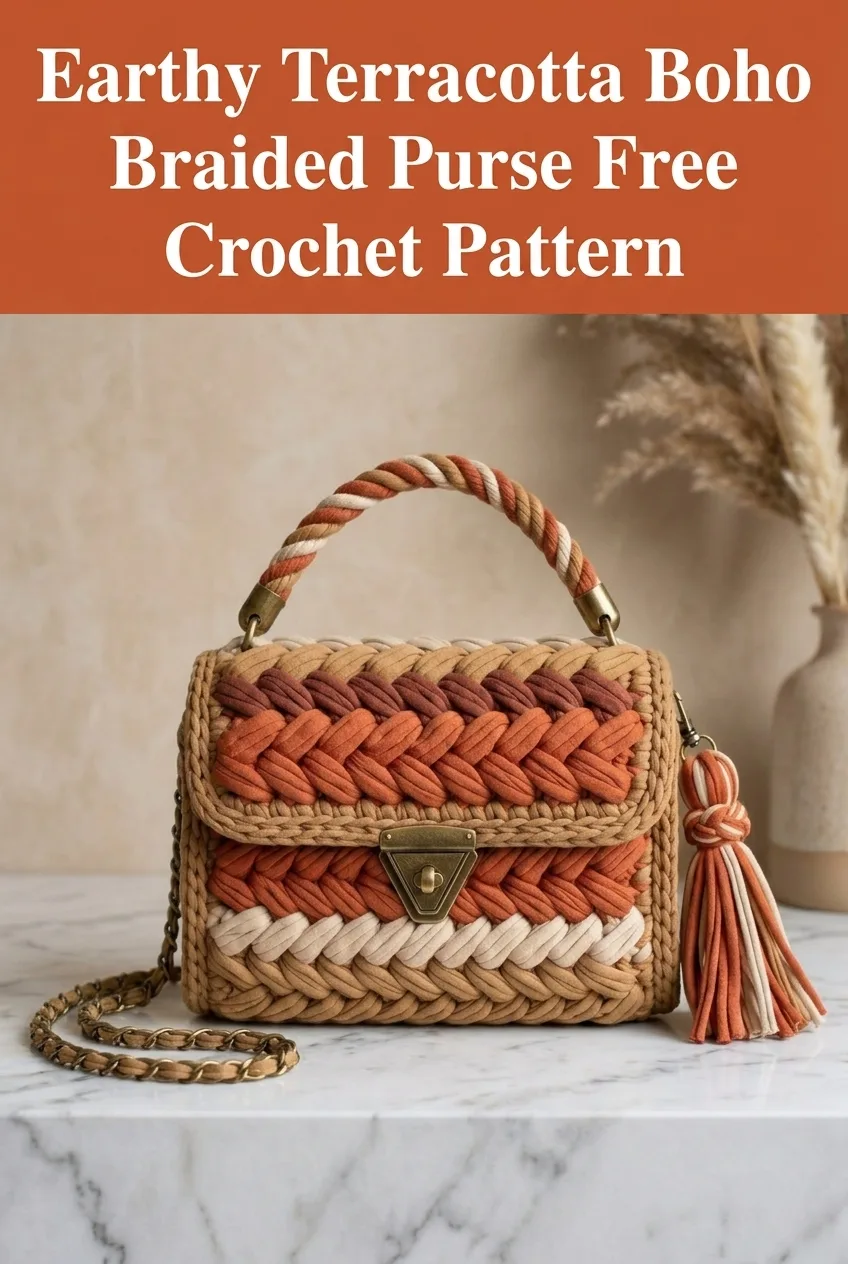
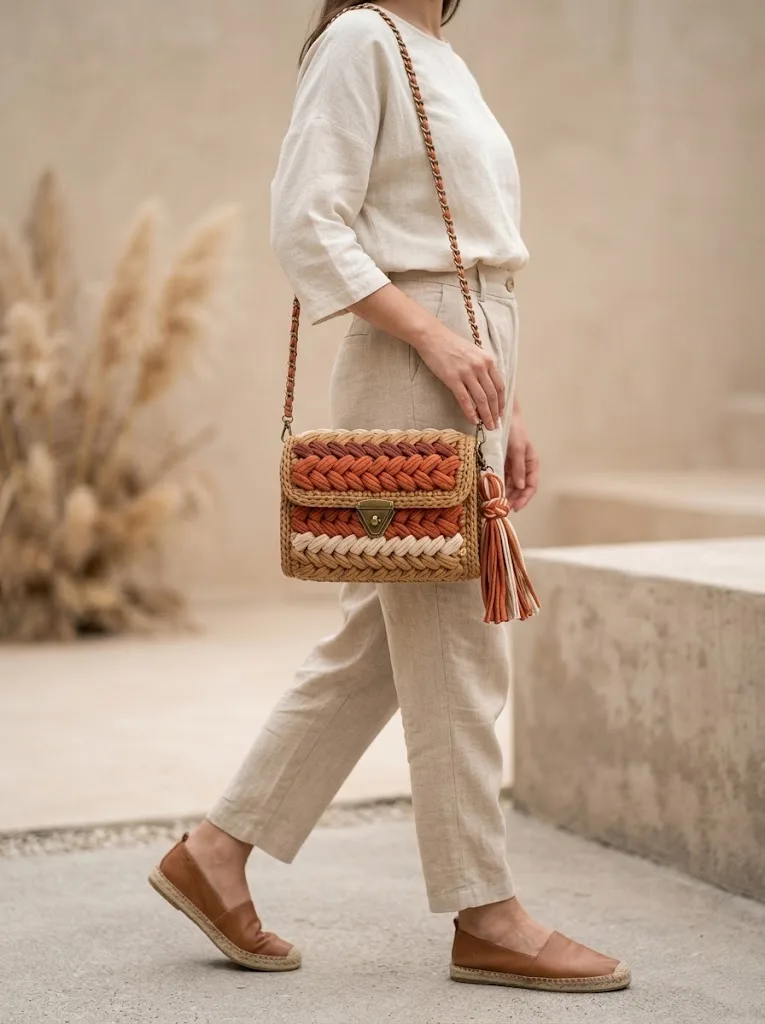
This Earthy Terracotta Boho Braided Purse crochet pattern combines textured stitchwork with professional hardware to create a bag that looks incredibly high-end. Whether you carry it as a crossbody with the chain strap or grab it by that gorgeous twisted handle, this purse makes a statement.
Why You Will Love This Crochet Purse Pattern
This is not your average crocheted bag. The construction creates a sturdy, structured piece that holds its shape beautifully. The braided stitch pattern mimics woven leather or raffia, giving you that expensive boutique look without the price tag.
What makes this pattern special:
If you have been wanting to try t-shirt yarn or tackle a structured bag project, this is your sign. The chunky yarn works up quickly, and the visual payoff is absolutely worth the effort.
Skill Level
Intermediate
This crochet tutorial requires comfort with basic stitches and introduces the herringbone half double crochet technique. If you can work in the round and follow a color change pattern, you can absolutely make this purse. I will walk you through the trickier bits step by step.
Finished Dimensions
Materials Needed
Yarn
You will be working with t-shirt yarn, also called trapillo or ribbon yarn. This is a super bulky weight fabric yarn that creates substantial, structured fabric perfect for bags.
Colors and approximate amounts:
Recommended yarn: Hoooked Zpagetti, Lily Sugar’n Cream Scrubbies, or any comparable t-shirt yarn. You can also cut your own from old t-shirts if you want to upcycle.
Hook
Notions
Gauge
6 stitches and 5 rows = 4 inches in herringbone half double crochet with 12mm hook and t-shirt yarn.
Gauge matters for this project because the bag needs to be sturdy and hold its shape. If your stitches are too loose, the purse will be floppy. Too tight, and it will be stiff and difficult to work. Take time to swatch and adjust your hook size if needed.
Abbreviations and Stitch Definitions
Let me break down every stitch you will need for this pattern. Even if you are familiar with these, the herringbone variation might be new to you.
ch = Chain. Wrap yarn over hook and pull through loop on hook. This creates the foundation and turning chains.
sl st = Slip stitch. Insert hook, yarn over, pull through stitch AND loop on hook in one motion. Used for joining and invisible seams.
sc = Single crochet. Insert hook into stitch, yarn over and pull up a loop (2 loops on hook), yarn over and pull through both loops. Creates a short, dense stitch.
hdc = Half double crochet. Yarn over, insert hook into stitch, yarn over and pull up a loop (3 loops on hook), yarn over and pull through all 3 loops. Creates a slightly taller stitch than single crochet.
HHDC = Herringbone half double crochet. This is the star of our pattern. Yarn over, insert hook into stitch, yarn over and pull through stitch AND first loop on hook (2 loops remain), yarn over and pull through both loops. This creates a distinctive slanted, braided texture.
inc = Increase. Work 2 stitches into the same stitch to add width.
FLO = Front loop only. Work into just the front loop of the stitch, leaving the back loop unworked.
BLO = Back loop only. Work into just the back loop of the stitch, leaving the front loop unworked.
Special Technique: Herringbone Half Double Crochet
Do not let this stitch intimidate you. It is simply a half double crochet with one small change in how you pull through the loops.
Step by step:
1. Yarn over your hook
2. Insert hook into the next stitch
3. Yarn over and pull through the stitch AND the first loop on your hook at the same time (this is the key difference)
4. You now have 2 loops on your hook
5. Yarn over and pull through both remaining loops
The magic happens in step 3. Instead of pulling up a loop and stopping, you pull it right through that first loop in one motion. This tilts each stitch slightly, creating that beautiful braided or woven appearance.
Practice tip: Work a small swatch of 15 chains and 10 rows before starting the purse. Once you get the rhythm, it becomes second nature.
Pattern Instructions
Base Panel (Make 1)
The base creates the bottom and structure of your purse.
Using Color A (Tan) and 12mm hook:
Row 1: Ch 13. Sc in 2nd ch from hook and in each ch across. (12 sc)
Row 2: Ch 1, turn. Sc in each st across. (12 sc)
Rows 3-8: Repeat Row 2. (12 sc)
Fasten off, leaving a long tail for seaming later.
Your base should measure approximately 8 inches by 3 inches.
Front and Back Panels (Make 2)
These panels feature the gorgeous braided stripe pattern.
Using Color A (Tan) and 12mm hook:
Row 1: Ch 13. HHDC in 3rd ch from hook and in each ch across. (11 HHDC)
Row 2: Ch 2 (does not count as stitch throughout), turn. HHDC in each st across. (11 HHDC)
Rows 3-4: Continue with Color A. HHDC in each st across. (11 HHDC)
Color Change for Stripe Pattern:
Row 5: Change to Color D (Cream). HHDC in each st across. (11 HHDC)
Row 6: Continue with Color D. HHDC in each st across. (11 HHDC)
Row 7: Change to Color B (Terracotta). HHDC in each st across. (11 HHDC)
Row 8: Change to Color C (Burnt Orange). HHDC in each st across. (11 HHDC)
Row 9: Continue with Color C. HHDC in each st across. (11 HHDC)
Fasten off front panel, weave in ends.
For the back panel, work Rows 1-9 the same way.
Flap Panel (Make 1)
The flap covers the front and holds your clasp hardware.
Using Color A (Tan) and 12mm hook:
Row 1: Ch 13. HHDC in 3rd ch from hook and in each ch across. (11 HHDC)
Row 2: Ch 2, turn. HHDC in each st across. (11 HHDC)
Row 3: Change to Color C (Burnt Orange). HHDC in each st across. (11 HHDC)
Row 4: Continue with Color C. HHDC in each st across. (11 HHDC)
Row 5: Change to Color B (Terracotta). HHDC in each st across. (11 HHDC)
Row 6: Change to Color E (Burgundy). HHDC in each st across. (11 HHDC)
Row 7: Continue with Color E. HHDC in each st across. (11 HHDC)
Row 8: Change to Color A (Tan). HHDC in each st across. (11 HHDC)
Fasten off, leaving a long tail for attaching to back panel.
Side Panels (Make 2)
The side panels give your purse its boxy, structured shape.
Using Color A (Tan) and 12mm hook:
Row 1: Ch 6. Sc in 2nd ch from hook and in each ch across. (5 sc)
Rows 2-9: Ch 1, turn. Sc in each st across. (5 sc)
Fasten off, leaving long tails for seaming.
Each side panel should measure approximately 3 inches by 6 inches.
Edging Border
Once all panels are assembled, you will add a finished edge around the top opening.
Using Color A (Tan):
Join yarn at any corner of the opening. Work 1 round of sc evenly around the entire top edge, working 3 sc in each corner to keep it flat. Sl st to first sc to join.
Fasten off and weave in ends.
Assembly Instructions
Take your time with assembly. Proper seaming makes the difference between a handmade look and a professional finish.
Step 1: Attach Base to Front Panel
With wrong sides facing out, use a tapestry needle and matching yarn to whip stitch the base panel to the bottom edge of the front panel. Work through both loops of each stitch for a strong seam.
Step 2: Attach Base to Back Panel
Repeat the same process, attaching the opposite edge of the base to the back panel.
Step 3: Add Side Panels
Whip stitch each side panel to the front, back, and base panels. Work carefully around the corners to keep everything aligned.
Step 4: Attach Flap
Position the flap at the top back edge. Whip stitch the top row of the flap to the top row of the back panel. The flap should fold forward over the front of the purse.
Step 5: Turn Right Side Out
Carefully turn the entire bag right side out. Use a crochet hook to gently push out the corners.
Twisted Rope Handle
This handle uses a simple twisted technique with multiple yarn colors.
Materials: Cut 6 strands, each 36 inches long. Use 2 strands each of Colors B, C, and D.
Instructions:
1. Knot all 6 strands together at one end
2. Secure the knot (clip it to something stable)
3. Twist the bundle tightly in one direction until it wants to kink
4. Fold the twisted bundle in half
5. Allow it to twist around itself naturally
6. Knot the loose ends together
The finished rope should measure approximately 12 inches. Attach each end to a D-ring using tight wrapping with matching yarn.
Hardware Installation
Turn-Lock Clasp
Position the decorative plate of your turn-lock clasp centered on the front panel, about 1 inch down from the top edge. Mark the prong positions. Use small sharp scissors to carefully create openings for the prongs. Push prongs through from the front, secure backing plate on the inside.
Position the twist mechanism on the underside of the flap to align with the front plate. Install using the same method.
D-Rings and Handle
Attach D-rings to each side of the purse opening using small yarn loops worked through the side seams. Thread the twisted rope handle through both D-rings.
Chain Strap
Attach lobster clasps to each end of your chain strap. Clip to the D-rings for crossbody wear.
Tassel Accent
Cut 20 strands of yarn, each 8 inches long. Use a mix of Colors B, C, and D. Bundle together and fold in half. Wrap a separate strand tightly around the bundle about 1 inch from the fold to create the tassel head. Attach to one D-ring or the zipper pull.
Designer Tips and Customization Ideas
Want more structure? Line the interior with cotton fabric or add plastic canvas inserts to the base and sides.
Different color palette? This design works beautifully in coastal blues, neutral grays, or bold jewel tones.
Beginner modification: Skip the herringbone stitch and use regular half double crochet throughout. You will still get gorgeous results with less learning curve.
Gift idea: This purse makes an incredible handmade gift. The hardware elevates it beyond typical crochet projects, making it perfect for birthdays, holidays, or treating yourself.
Troubleshooting Common Issues
Purse is too floppy: Your gauge may be too loose. Try going down one hook size, or add interfacing or plastic canvas to the interior.
Herringbone stitches look uneven: Practice makes perfect. The slant becomes more consistent as you develop muscle memory. Your first row might look different from your last, and that is completely normal.
Hardware prongs are too wide: Use a leather punch or small sharp scissors. Work slowly to avoid making holes too large.
Colors are pooling oddly: T-shirt yarn can have variations within the same skein. Embrace it as part of the handmade charm, or cut and rejoin to reset the color placement.
Final Thoughts on the Earthy Terracotta Boho Braided Purse Crochet Pattern
You did it. You now have everything you need to create a stunning designer-style purse with your own two hands. This boho braided purse crochet pattern combines approachable techniques with professional details that make the finished piece truly special.
I hope you love making this as much as I loved designing it. The moment you add that hardware and see the whole thing come together is so satisfying.
Thank you for trusting me with your crafting time. It genuinely means the world. If you make this purse, I would absolutely love to see it. Tag me on Instagram or share a photo on Facebook so I can celebrate your beautiful work.
Save this pattern to your Pinterest boards so you can find it whenever you are ready to start. And if you make this purse, please leave a comment below. I love hearing which colors you chose and how the project turned out for you.
