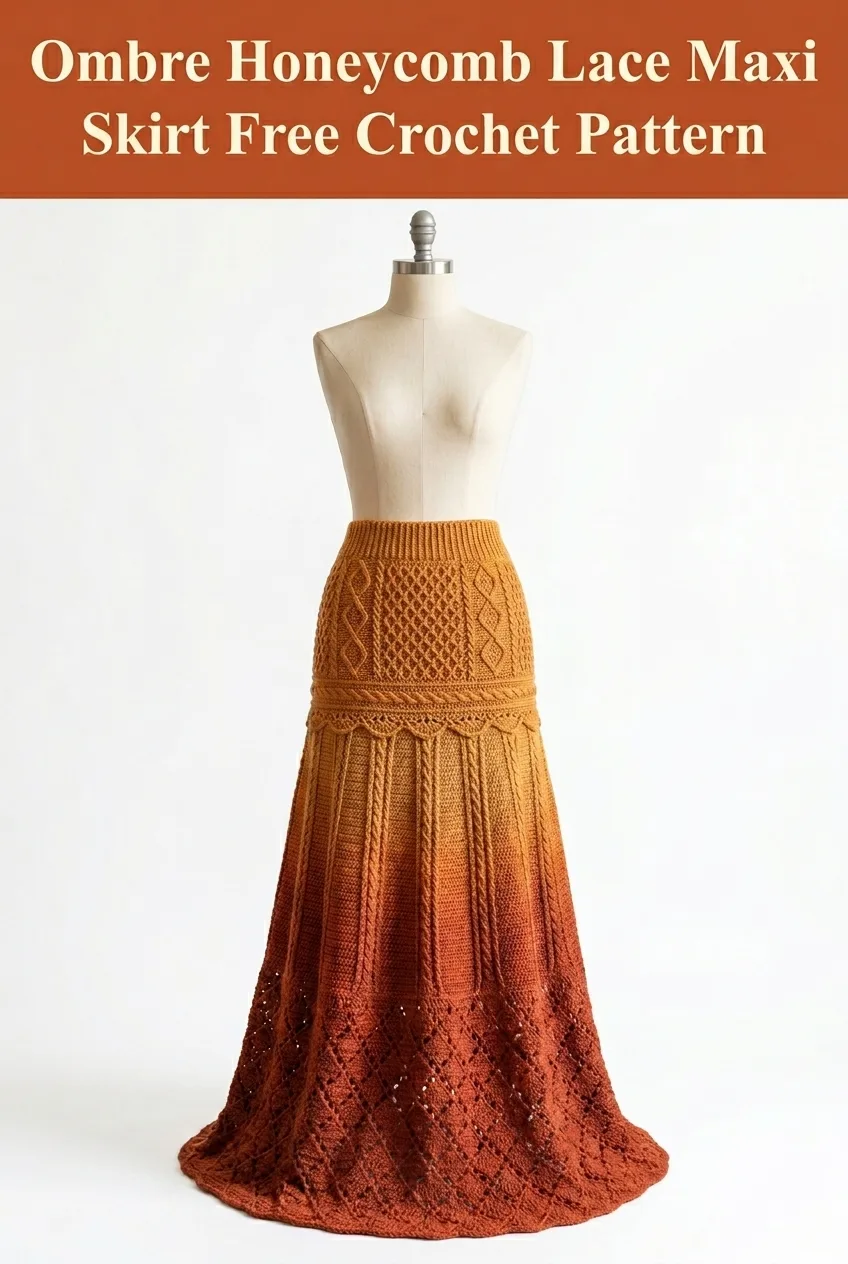
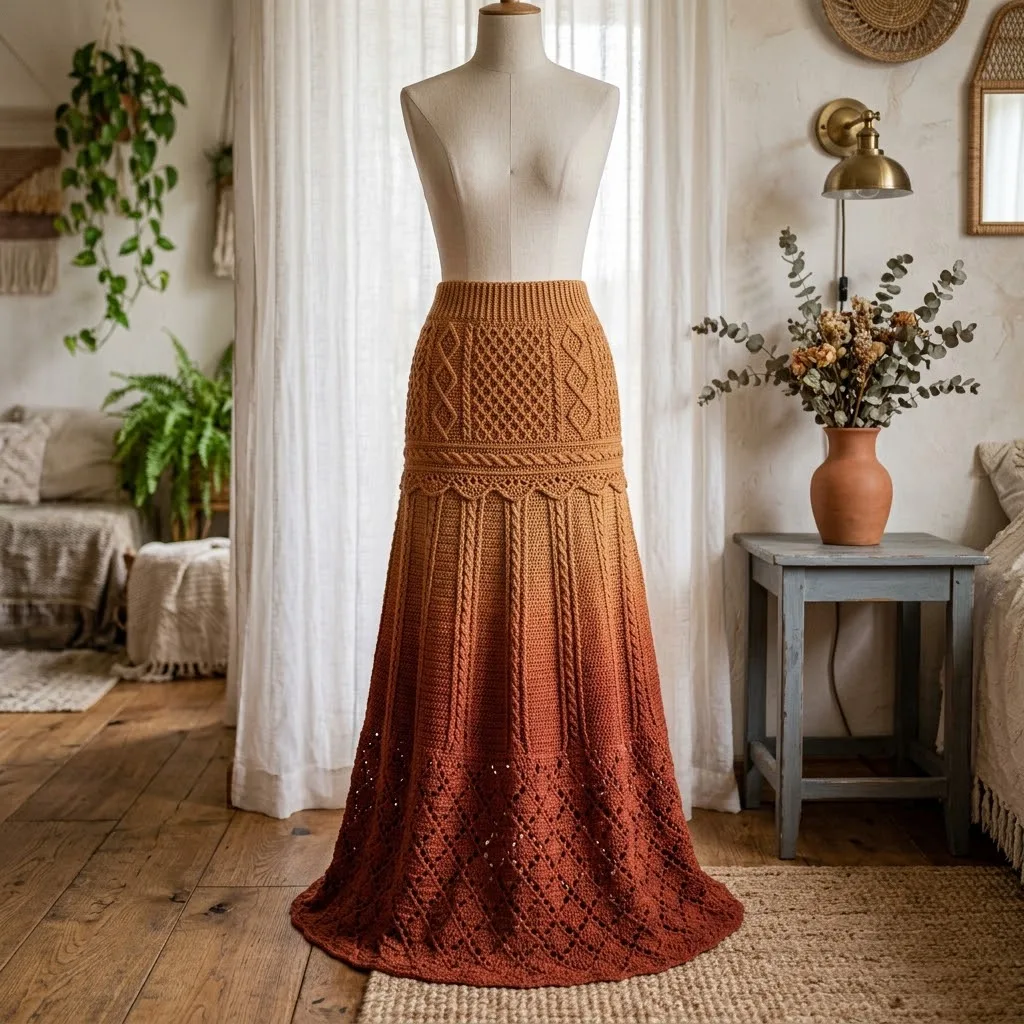
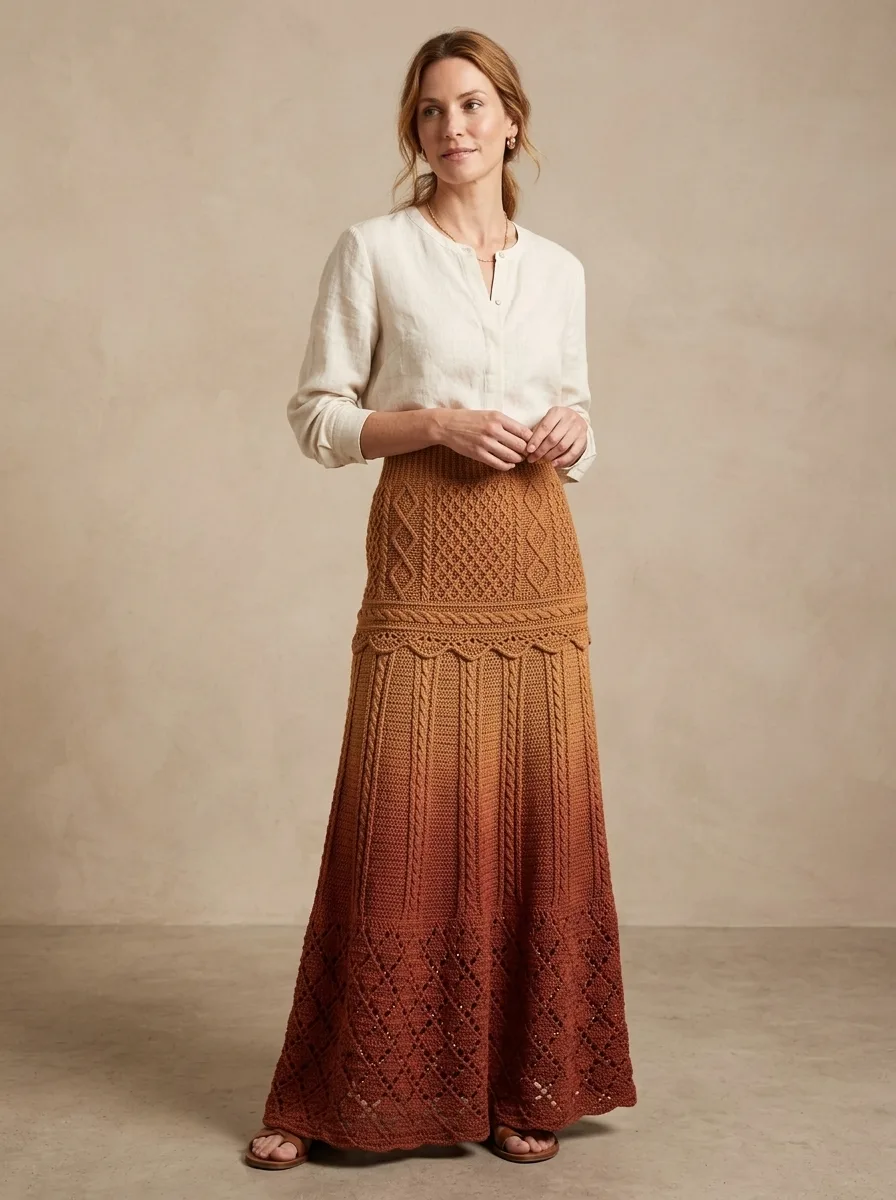
This is a stunning floor-length crochet skirt featuring cable panels, diamond lattice texture, and an ombre color transition from golden mustard to deep rust. The construction combines a fitted ribbed waistband with a flared lower section. You will use intermediate techniques including front post stitches, cable crossings, and lace mesh work. The skirt is worked in sections and joined.
I have been wanting to design a statement piece like this for ages, and honestly, this pattern exceeded every expectation I had in my head. The way the ombre yarn naturally shifts through those warm autumn tones while the texture catches the light? Absolutely worth every hour I put into it.
Why You Will Love This Crochet Skirt Pattern
This ombre honeycomb lace maxi skirt is a showstopper. The combination of traditional cable techniques with open lace panels creates visual depth that photographs beautifully and feels incredible to wear. The fitted hip section provides structure while the flared lower half moves gracefully with every step.
What makes this crochet pattern special:
This is a project for crocheters who want to challenge themselves and create something truly wearable and artistic. Plan for approximately 40 to 50 hours of work depending on your pace.
Materials Needed for Your Crochet Maxi Skirt
Yarn:
I recommend a smooth wool blend or acrylic with good stitch definition. The cable work really pops with a yarn that holds its shape well. Look for a yarn with slight sheen if you want the texture to catch light beautifully.
Hook:
Notions:
Gauge for This Crochet Tutorial
Main body gauge with 5.0 mm hook:
16 stitches and 12 rows = 4 inches in half double crochet
Cable panel gauge:
One complete diamond motif = approximately 3.5 inches wide
Check your gauge before beginning. This skirt is fitted at the waist and hips, so accurate gauge matters for proper fit. If your gauge is off, adjust your hook size accordingly.
Sizing Information
This pattern is written for size Small with adjustments for Medium, Large, and XL in parentheses throughout.
| Size | Waist | Hip | Length |
|---|---|---|---|
| S | 26 to 28 inches | 36 to 38 inches | 42 inches |
| M | 30 to 32 inches | 40 to 42 inches | 42 inches |
| L | 34 to 36 inches | 44 to 46 inches | 43 inches |
| XL | 38 to 40 inches | 48 to 50 inches | 43 inches |
Abbreviations and Stitch Definitions
Let me walk you through every stitch you will need. I am defining each one completely so you feel confident before you begin.
ch = chain: Wrap yarn over hook, pull through loop on hook. This creates your foundation and turning chains.
sl st = slip stitch: Insert hook, yarn over, pull through both the stitch and the loop on your hook in one motion. Used for joining and invisible movement.
sc = single crochet: Insert hook, yarn over, pull up a loop (2 loops on hook), yarn over, pull through both loops. A short, tight stitch.
hdc = half double crochet: Yarn over, insert hook, yarn over, pull up a loop (3 loops on hook), yarn over, pull through all 3 loops. Medium height stitch.
dc = double crochet: Yarn over, insert hook, yarn over, pull up a loop (3 loops on hook), yarn over, pull through 2 loops, yarn over, pull through remaining 2 loops. Taller stitch that works up quickly.
FPdc = front post double crochet: Yarn over, insert hook from front to back to front around the post of the stitch below (not into the top), complete as normal dc. Creates raised texture on the front of your work.
BPdc = back post double crochet: Yarn over, insert hook from back to front to back around the post of the stitch below, complete as normal dc. Creates recessed texture.
FPtr = front post treble crochet: Yarn over twice, insert hook around post from front, complete as normal treble. Used for cable crossings.
Cable Cross (CC): Skip next 2 stitches, FPtr around the next 2 stitches, then FPtr around the 2 skipped stitches working in front of the stitches just made. This creates the twisted rope effect.
ch-sp = chain space: The gap created by chains in the previous row. You will work into these spaces, not into individual chains.
Special Techniques in This Crochet Pattern
Understanding the Diamond Lattice Panel
The beautiful raised diamond shapes you see on the hip section are created using front post and back post double crochet stitches arranged in a specific pattern. As you work each row, you will shift the position of your front post stitches by one stitch, creating diagonal lines that meet to form diamonds.
Do not worry if this sounds complicated. I break it down row by row in the pattern, and once you complete one full diamond repeat, you will understand the rhythm.
Working the Cable Panels
The vertical twisted ropes running down the skirt are made using cable crosses. You will skip stitches, work your post stitches out of order, and then go back to work the skipped stitches. This creates the overlapping twisted effect.
A helpful tip here: use stitch markers to mark the center of each cable panel. This keeps you oriented and prevents accidentally drifting off pattern.
Creating the Ombre Effect
The color transition happens gradually as you work down the skirt. You will not need special ombre yarn. Instead, you will change colors at specific rows to create a blended effect. I include optional color blending rows where you can carry both colors and alternate stitches for an even smoother transition.
Step by Step Crochet Pattern Instructions
Section 1: Ribbed Waistband
The waistband is worked sideways in rows, then joined to form a ring.
Using smaller hook and Color A, ch 13 (15, 17, 19).
Row 1: Sc in 2nd ch from hook and each ch across. (12, 14, 16, 18 sc)
Row 2: Ch 1, turn. Working in back loops only (BLO), sc in each st across. (12, 14, 16, 18 sc)
Rows 3 through 104 (116, 128, 140): Repeat Row 2.
This creates the stretchy ribbed texture. Try the waistband around your natural waist. It should fit snugly but comfortably. Adjust row count if needed.
Joining: Fold waistband so first and last rows meet. Sl st through both layers to join into a ring. Do not fasten off.
Section 2: Hip Yoke with Diamond Lattice
You will now pick up stitches along the bottom edge of the waistband and work in rounds.
Setup Round: Ch 1, work 104 (116, 128, 140) sc evenly around the lower edge of the waistband, join with sl st to first sc. Place marker for beginning of round.
Round 1 (Foundation for panels): Ch 2 (counts as hdc here and throughout), hdc in each st around, join. (104, 116, 128, 140 sts)
Round 2 (Establish diamond pattern): Ch 2, *hdc in next 10 sts, FPdc around next st, hdc in next 2 sts, FPdc around next st, hdc in next 10 sts, place marker for cable panel, FPdc around next 4 sts (cable section)*, repeat from * around, adjusting stitch counts to fit your size, join.
Rounds 3 through 6: Continue working the diamond lattice by shifting FPdc positions one stitch closer together each round on the inside edges, and one stitch apart on the outside edges. This creates the diamond shape.
Round 7 (Cable Cross Round): Work pattern as established. When you reach each cable panel, work Cable Cross (CC) as described in special techniques.
Rounds 8 through 24: Continue diamond lattice pattern, working cable crosses every 6th round. The diamonds will complete approximately 3 times vertically.
Your stitch count remains: (104, 116, 128, 140 sts)
Section 3: Scalloped Transition Band
This decorative band separates the fitted hip section from the flared lower skirt.
Round 1: Ch 3, dc in each st around, join. (104, 116, 128, 140 dc)
Round 2: Ch 3, dc in same st, 2 dc in each st around, join. (208, 232, 256, 280 dc)
Round 3 (Scallop Round): Ch 1, *sc in next st, hdc in next st, dc in next st, hdc in next st, sc in next st, sl st in next st*, repeat from * around, join.
Round 4: Ch 3, working behind scallops into Round 2 stitches, dc in each st around, join. (208, 232, 256, 280 dc)
This creates the lovely draped scallop edge you see at the hip line.
Section 4: Flared Lower Skirt with Vertical Cables
Now begins the dramatic flared section. You will continue the cable panels while adding the honeycomb lace pattern between them.
Begin Color B transition at this point or continue with Color A for 4 more rounds before transitioning.
Round 1 (Establish lower pattern): Ch 3, *dc in next 22 (25, 28, 31) sts, FPdc around next 4 sts (cable), dc in next 22 (25, 28, 31) sts*, repeat from * around, join.
Rounds 2 through 6: Continue as established, working cable crosses on Round 6.
Round 7 (Begin honeycomb lace between cables): Ch 3, *dc in next 2 sts, ch 1, skip 1 st, dc in next 2 sts, ch 1, skip 1 st*, repeat honeycomb pattern between cable sections, maintaining cable panels as established, join.
Rounds 8 through 30: Continue honeycomb lace pattern with cable panels. Work cable crosses every 6th round.
Color Transition to C: At Round 20, begin transitioning to Color C. For smooth blending, alternate stitches between colors B and C for 2 rounds before switching fully to C.
Rounds 31 through 50: Continue pattern in Color C, working honeycomb lace with wider mesh openings (ch 2, skip 2) for the bottom third of the skirt.
Final Stitch Count: Approximately (260, 290, 320, 350 sts) due to lace expansion.
Section 5: Bottom Border
Round 1: Ch 1, sc in each st and ch-sp around, join.
Round 2: Ch 1, *sc in next 4 sts, 3 sc in next st (creates scallop point)*, repeat from * around, join.
Round 3: Sl st in each st around. Fasten off.
Finishing Your Ombre Crochet Skirt
Weave in all ends carefully, especially at color change points. Take your time here. This skirt has many ends, and secure finishing prevents unraveling.
Block your skirt by soaking in lukewarm water with a splash of wool wash for 20 minutes. Gently squeeze out excess water (do not wring), and lay flat on blocking mats. Stretch the lace sections gently to open up the honeycomb pattern. Let dry completely.
Insert elastic into the waistband by threading 1 inch elastic through the ribbing, overlapping ends by 1 inch, and sewing securely.
Tips for Success with This Crochet Tutorial
Count your stitches at the end of every round for the first 10 rounds. Yes, every round. This catches mistakes early when they are easy to fix.
Use lifelines before cable cross rounds. Thread a piece of scrap yarn through all your stitches. If something goes wrong, you can rip back to the lifeline without losing earlier work.
Try it on after completing the hip yoke section. This is your last chance to adjust the fit easily before the flared section begins.
Take breaks during cable sections. These require concentration, and tired hands make mistakes.
Styling Your Handmade Maxi Skirt
This ombre honeycomb lace maxi skirt pairs beautifully with a fitted cream sweater or simple tank top. The warm rust and mustard tones work wonderfully for autumn events, outdoor weddings, or harvest festivals. Add a leather belt at the natural waist to define your silhouette, or wear it as is for a flowing bohemian look.
How Long Does This Crochet Pattern Take?
Plan for 40 to 50 hours total. The waistband and hip yoke work up in about 10 hours. The flared lower section takes the longest due to the increasing stitch count and lace pattern. Many crocheters work on this as a long term project over several weeks.
Thank you so much for choosing this pattern. I genuinely hope you love making this skirt as much as I loved designing it. When you finish yours, please share a photo with me on Instagram or in my Facebook group. I absolutely love seeing your finished projects, and your makes always inspire other crocheters to try something new.
If this pattern caught your eye, save it to your Pinterest boards so you can find it when you are ready to start. And please, drop a comment below if you make one. I would love to hear about your yarn choices, color combinations, and how it turns out. Happy crocheting!
