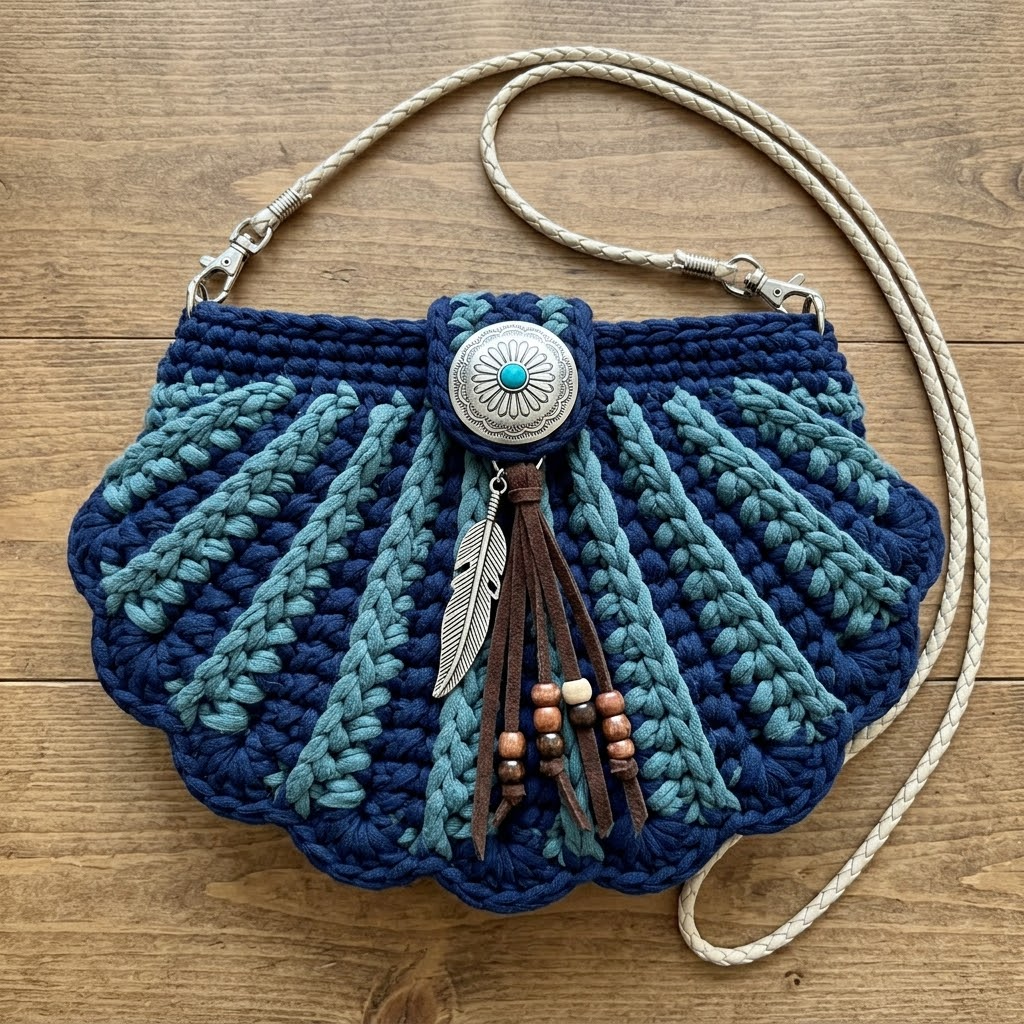
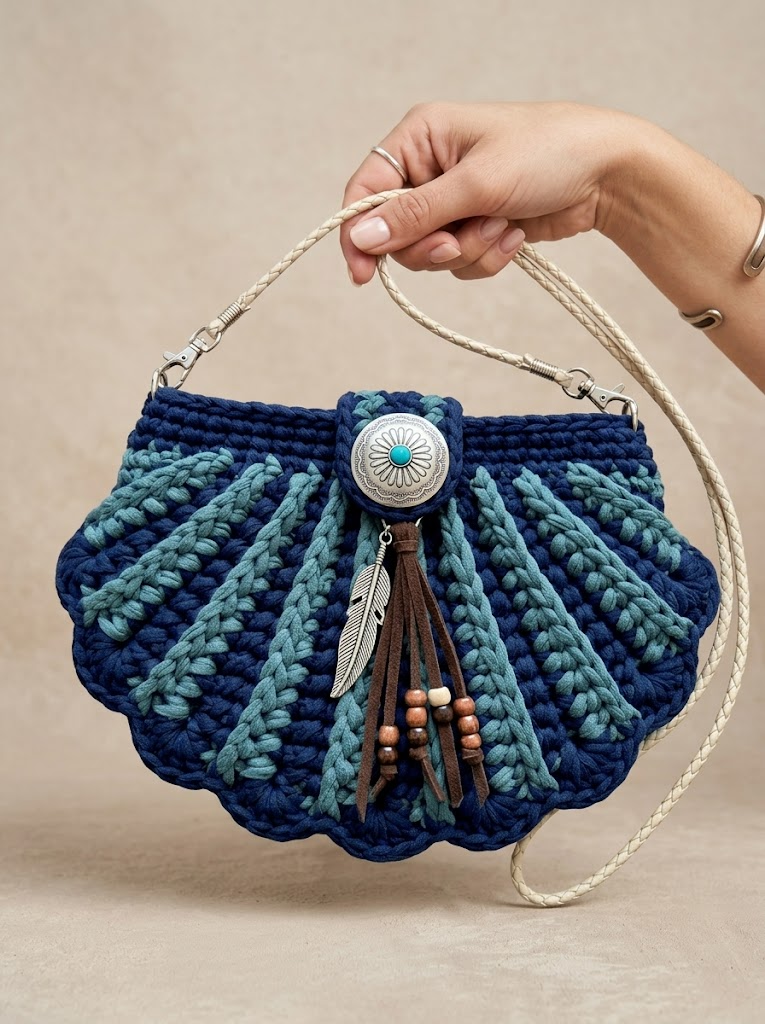
This stunning boho seashell clutch bag might just be my new favorite project. The scalloped shell shape, the gorgeous two-tone colorwork, and that southwestern-style concho closure all come together to create something truly special. If you have been searching for a crochet pattern that looks impressive but works up faster than you would expect, you are in the right place.

I designed this bag using chunky t-shirt yarn, which means it crochets quickly and holds its shape beautifully. The shell silhouette comes from strategic increases that fan out from the base, creating those lovely radiating ridges you see in the finished piece. Do not let the intricate look intimidate you. If you can work basic stitches in the round and follow a simple two-color pattern, you can absolutely make this bag.
Let me walk you through everything you need to recreate this boho seashell clutch from scratch.
Why This Crochet Pattern Works So Well
Before we dive into the step by step instructions, I want to share what makes this design special. The shell shape is not just decorative. It is actually a clever construction method that creates a naturally curved bag with a wide opening at the top and a tapered bottom. This means your items stay secure without needing a zipper.
The raised ridge texture comes from working into the back loops only on certain rounds. This creates those dimensional lines that radiate outward like the ridges on a real seashell. The technique sounds fancy, but I promise it is straightforward once you get going.
The two-color striping pattern alternates between navy and dusty teal, giving the bag that coastal bohemian vibe. You could easily customize the colors to match your wardrobe or use a single color for a more minimalist look.
Materials You Will Need
Gathering your supplies before starting any crochet tutorial makes the whole process smoother. Here is what I used for this boho clutch bag.
Yarn:
T-shirt yarn is also called trapillo or zpagetti. It is a super bulky weight fabric yarn made from recycled jersey material. The chunky weight creates that substantial, structured look you see in the photos. If you cannot find t-shirt yarn, you could substitute any super bulky yarn, though the texture will look slightly different.
Hook:
Notions:
Stitch Abbreviations and Definitions
Let me define every stitch before we begin. I want you to feel confident with the terminology.
Chain (ch): The foundation stitch. Yarn over, pull through the loop on your hook. This creates the base that other stitches build on.
Slip stitch (sl st): Insert hook into stitch, yarn over, pull through both the stitch and the loop on your hook in one motion. Used for joining rounds.
Single crochet (sc): Insert hook into stitch, yarn over and pull up a loop (two loops on hook), yarn over and pull through both loops. This creates a short, tight stitch.
Half double crochet (hdc): Yarn over, insert hook into stitch, yarn over and pull up a loop (three loops on hook), yarn over and pull through all three loops. Slightly taller than single crochet.
Double crochet (dc): Yarn over, insert hook into stitch, yarn over and pull up a loop (three loops on hook), yarn over and pull through two loops (two loops remain), yarn over and pull through remaining two loops. Creates a taller stitch with nice drape.
Back loop only (BLO): Work into only the back loop of the stitch instead of both loops. This creates a raised ridge on the front of your work.
Increase (inc): Work two stitches into the same stitch. This adds one stitch to your count.
Gauge Information
With t-shirt yarn and a 10mm hook, you should get approximately 7 stitches and 5 rows per 4 inches in single crochet. T-shirt yarn gauge can vary quite a bit between brands, so I recommend making a small swatch first.
That said, exact gauge is less critical for a bag than for a garment. If your bag turns out slightly larger or smaller, it will still be completely functional and beautiful.
Skill Level
I would call this an easy to intermediate crochet pattern. You should be comfortable with:
If you are newer to crochet, take your time with the increases. Using stitch markers at each increase section will help you stay on track.
Finished Dimensions
The completed boho seashell clutch measures approximately:
The crossbody strap adds adjustable length for wearing.
Step by Step Crochet Pattern for the Shell Body
This bag is worked in joined rounds from the bottom center outward. The shell shape develops naturally as you work the increase sections.
Foundation
Using navy yarn, make a magic ring.
Round 1: Ch 1, work 6 sc into the magic ring. Pull the ring closed. Sl st to first sc to join. (6 sts)
Round 2: Ch 1, work 2 sc in each st around. Sl st to join. (12 sts)
Round 3: Ch 1, *1 sc, 2 sc in next st* repeat around. Sl st to join. (18 sts)
Place a stitch marker at the beginning of your round. This helps you keep track as the pattern becomes more complex.
Building the Shell Ridges
Now we begin creating the radiating ridge pattern. The ridges form between the increase sections.
Round 4: Change to teal yarn. Ch 1, working in BLO only, *2 sc, 2 sc in next st* repeat around. Sl st to join. (24 sts)
Round 5: Change to navy. Ch 1, working in BLO only, *3 sc, 2 sc in next st* repeat around. Sl st to join. (30 sts)
Round 6: Change to teal. Ch 1, working in BLO only, *4 sc, 2 sc in next st* repeat around. Sl st to join. (36 sts)
Round 7: Change to navy. Ch 1, working in BLO only, *5 sc, 2 sc in next st* repeat around. Sl st to join. (42 sts)
Round 8: Change to teal. Ch 1, working in BLO only, *6 sc, 2 sc in next st* repeat around. Sl st to join. (48 sts)
Round 9: Change to navy. Ch 1, working in BLO only, *7 sc, 2 sc in next st* repeat around. Sl st to join. (54 sts)
Round 10: Change to teal. Ch 1, working in BLO only, *8 sc, 2 sc in next st* repeat around. Sl st to join. (60 sts)
You should now see distinct ridges radiating outward from the center, with the teal color creating raised lines against the navy background.
Continuing the Shell Shape
Round 11: Change to navy. Ch 1, working in BLO only, *9 sc, 2 sc in next st* repeat around. Sl st to join. (66 sts)
Round 12: Change to teal. Ch 1, working in BLO only, *10 sc, 2 sc in next st* repeat around. Sl st to join. (72 sts)
At this point, your piece should be forming a nice flat circle with beautiful texture. We are about halfway through the body.
Round 13: Change to navy. Ch 1, working in BLO only, *11 sc, 2 sc in next st* repeat around. Sl st to join. (78 sts)
Round 14: Change to teal. Ch 1, working in BLO only, *12 sc, 2 sc in next st* repeat around. Sl st to join. (84 sts)
Final Shell Rounds
Round 15: Change to navy. Ch 1, working in BLO only, *13 sc, 2 sc in next st* repeat around. Sl st to join. (90 sts)
Round 16: Change to teal. Ch 1, working in BLO only, *14 sc, 2 sc in next st* repeat around. Sl st to join. (96 sts)
Fasten off teal yarn. You now have one complete shell panel.
Creating the Second Panel
Make a second identical shell panel following the same instructions above. You will join these two panels together to form the bag.
Joining the Panels and Creating the Top Edge
Hold both panels together with wrong sides facing inward. The raised ridges should face outward on both sides.
Using navy yarn and working through both layers:
Joining Round: Starting at one side edge, sl st through both panels evenly around the curved edge, stopping about 3 inches from where you started. This creates the bottom and sides of your bag while leaving the top open.
Top Edge Round 1: Continue in navy, ch 1, work sc evenly around the top opening, working through single layers now. Work approximately 40 sc across the front panel top, then 40 sc across the back panel top. Sl st to join. (80 sts approximately)
Top Edge Rounds 2 through 4: Ch 1, sc in each st around. Sl st to join. (80 sts)
This creates the sturdy navy band you see at the top of the bag. Fasten off and weave in all ends.
Attaching the Hardware and Embellishments
Adding the Strap Attachment Points
At each top side corner where the front and back panels meet, attach a D-ring or swivel clip anchor. You can do this by crocheting a small tab:
Ch 8, sl st to form a loop, sc around the loop 12 times. Attach to the bag corner with a few stitches. Repeat on the other side.
Clip your braided crossbody strap to these attachment points.
Adding the Concho Closure
Center your decorative concho button on the front panel, about 1 inch below the top edge. Stitch it securely in place using matching thread or yarn.
Attach the leather tassel and feather charm to the concho using a small jump ring or by threading directly through the button holes.
Customization Ideas for Your Boho Clutch
This crochet pattern works beautifully with modifications. Here are some ideas:
Troubleshooting Tips
My circle is cupping or ruffling: This usually means your tension is too tight (cupping) or too loose (ruffling). Try going up or down a hook size.
The ridges are not showing up: Make sure you are working into the back loop only. If you accidentally work through both loops, the ridge effect disappears.
My color changes look messy: When switching colors, complete the last yarn over of your final stitch with the new color. This creates cleaner transitions.
The panels are different sizes: T-shirt yarn can vary in thickness even within the same skein. Try to use consistent tension throughout.
Final Thoughts on This Boho Seashell Clutch Bag Crochet Pattern
I absolutely love how this project turned out. The seashell shape is eye-catching without being over the top, and the southwestern embellishments give it that perfect boho vibe. This makes a wonderful gift for the beach lover or bohemian soul in your life.
Working with t-shirt yarn is so satisfying because you see progress quickly. You could realistically finish this entire boho seashell clutch bag in a weekend, maybe even a single afternoon if you are feeling ambitious.
Thank you so much for choosing this crochet tutorial for your next project. I genuinely hope you enjoy making this bag as much as I enjoyed designing it. When you finish yours, I would love to see it. Tag me on Instagram or share your photos in our Facebook group. Seeing your creations honestly makes my whole day.
Happy crocheting, friend. You have got this.
