
Last Valentine’s Day, I walked into my sister’s bathroom and nearly gasped. She had this adorable pink and cream crocheted set covering everything from the toilet tank to the floor. When I asked where she got it, she laughed and said her grandmother made it decades ago. That set had survived three house moves and still looked charming.
I became slightly obsessed with recreating that cozy, vintage bathroom vibe. After months of swatching, frogging, and perfecting heart motifs, I finally have a complete pattern to share. This pink heart bathroom set brings back all those nostalgic feelings while looking fresh and modern.
The best part? Once you understand the tapestry crochet technique for the hearts, the whole set comes together like a dream. Five coordinating pieces. One cohesive look. Your bathroom will never be the same.
What You Will Make
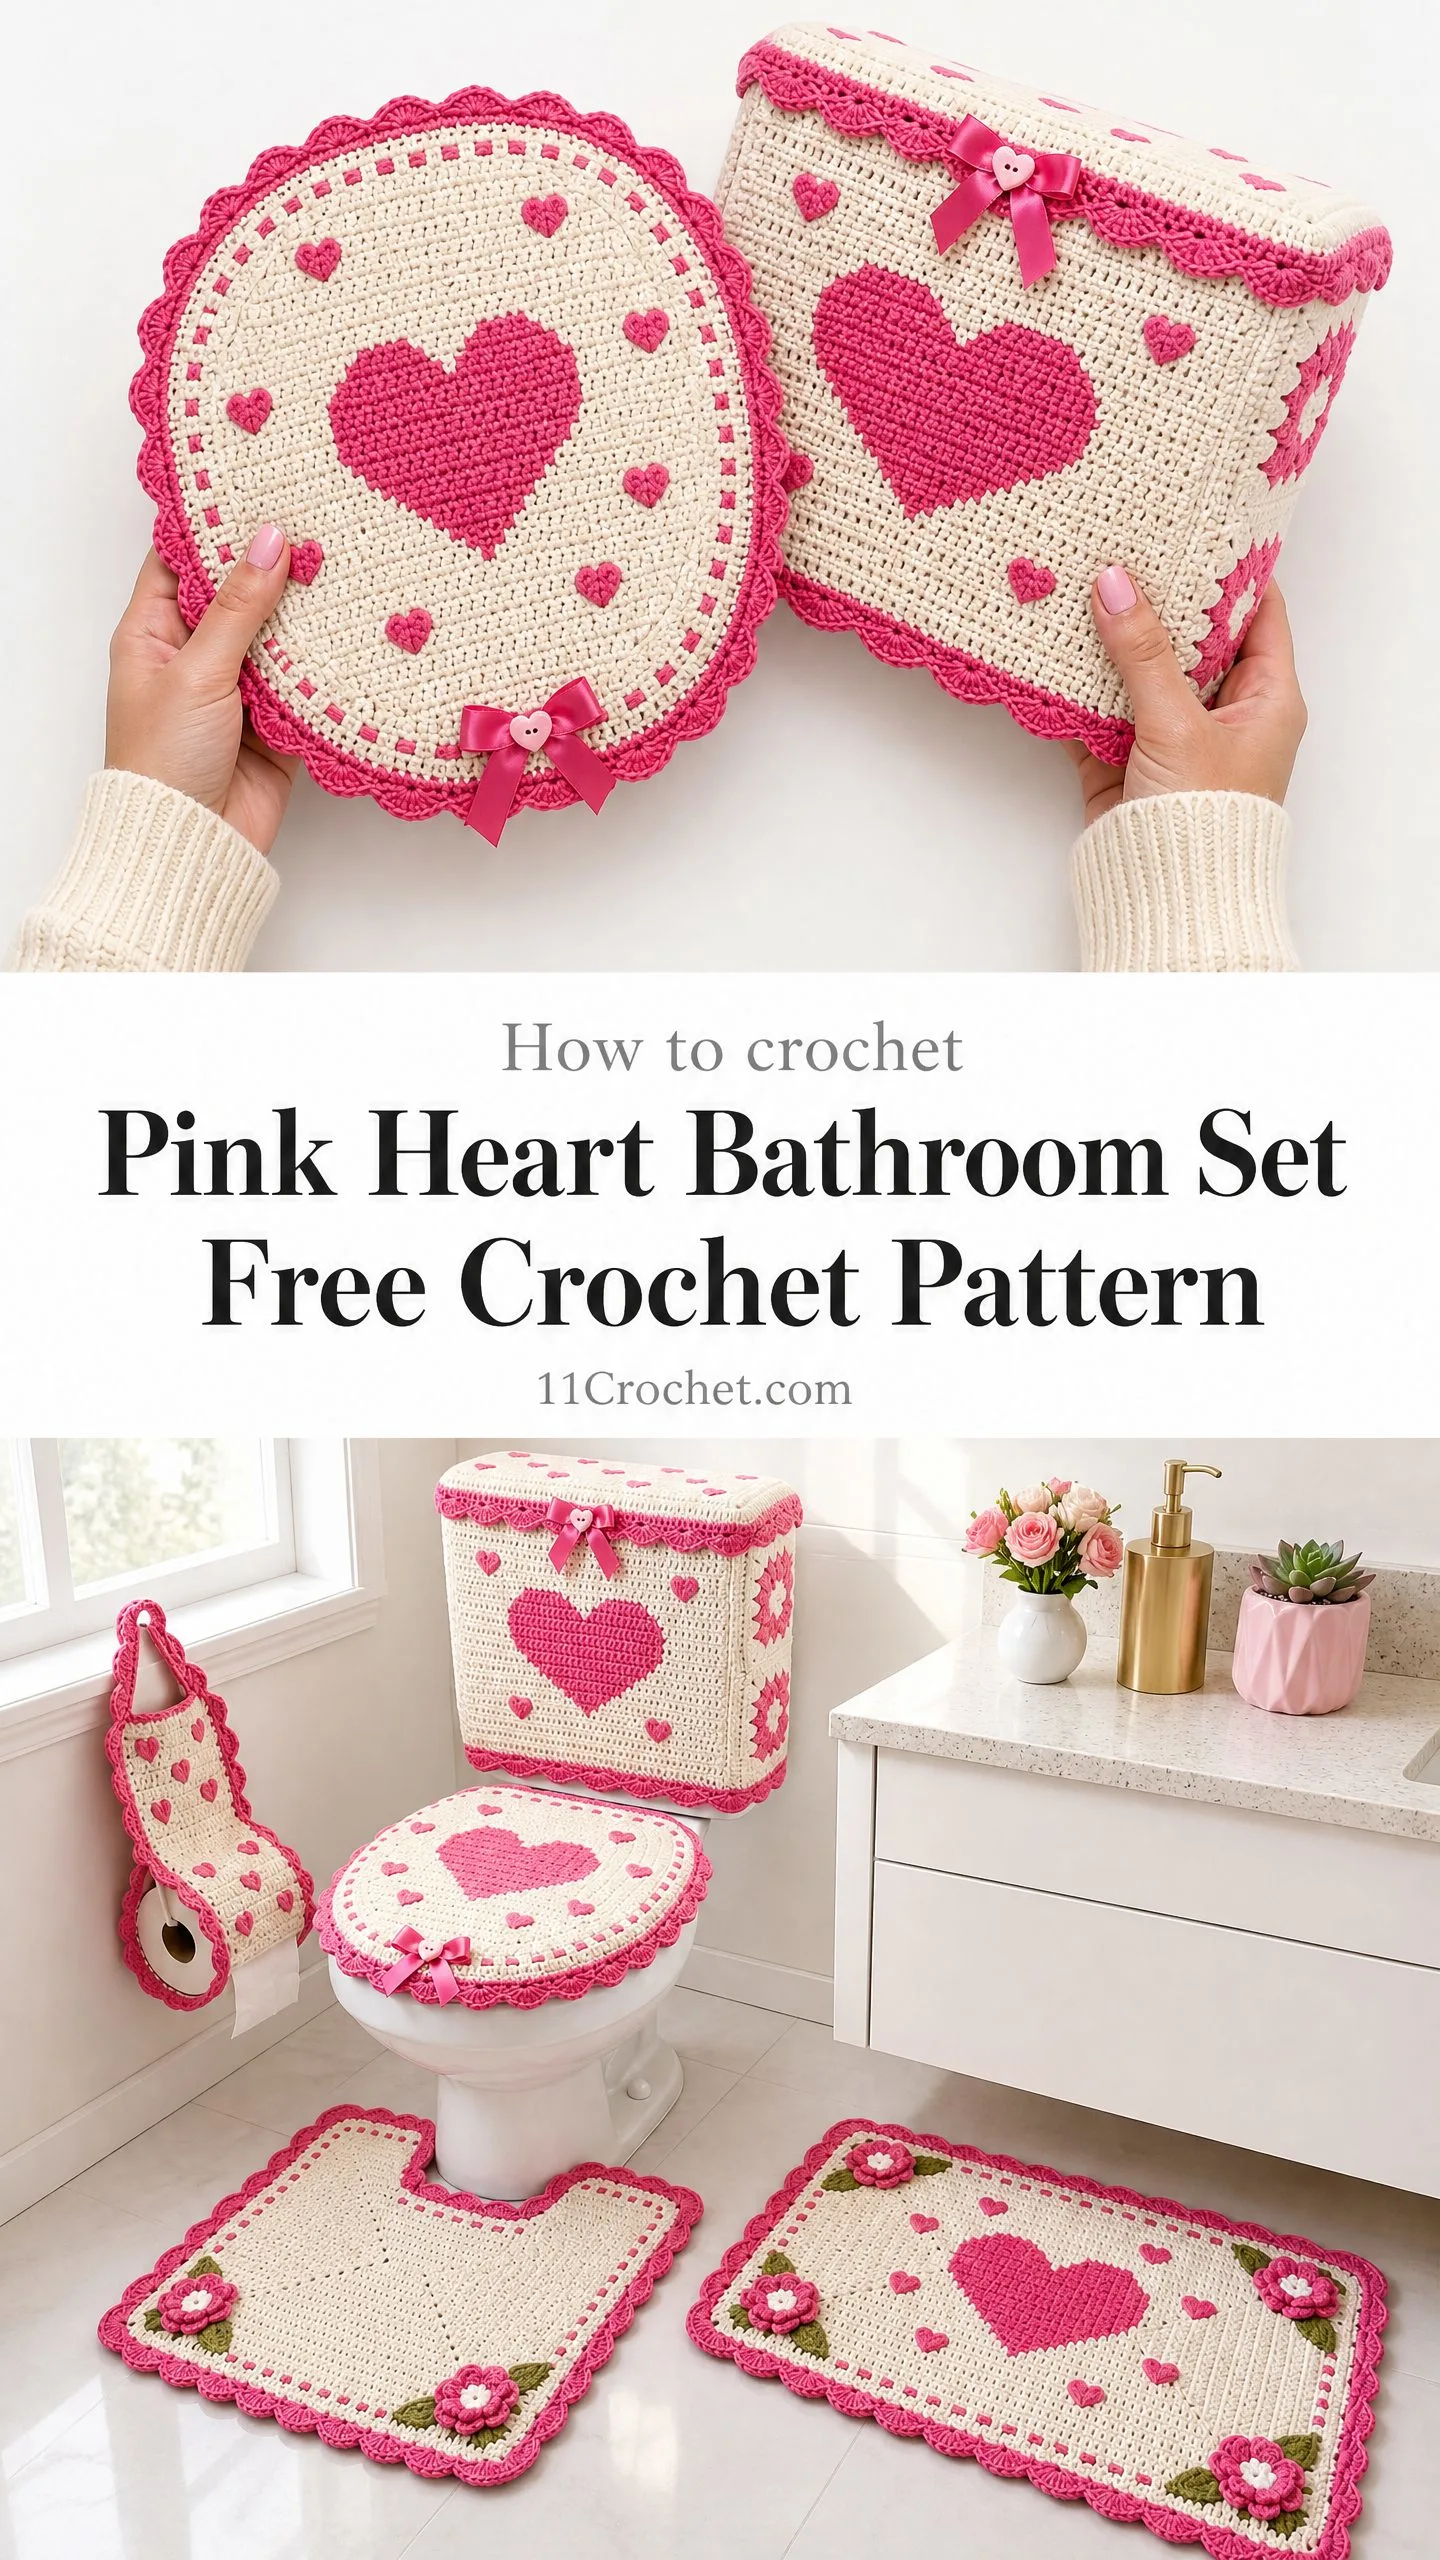
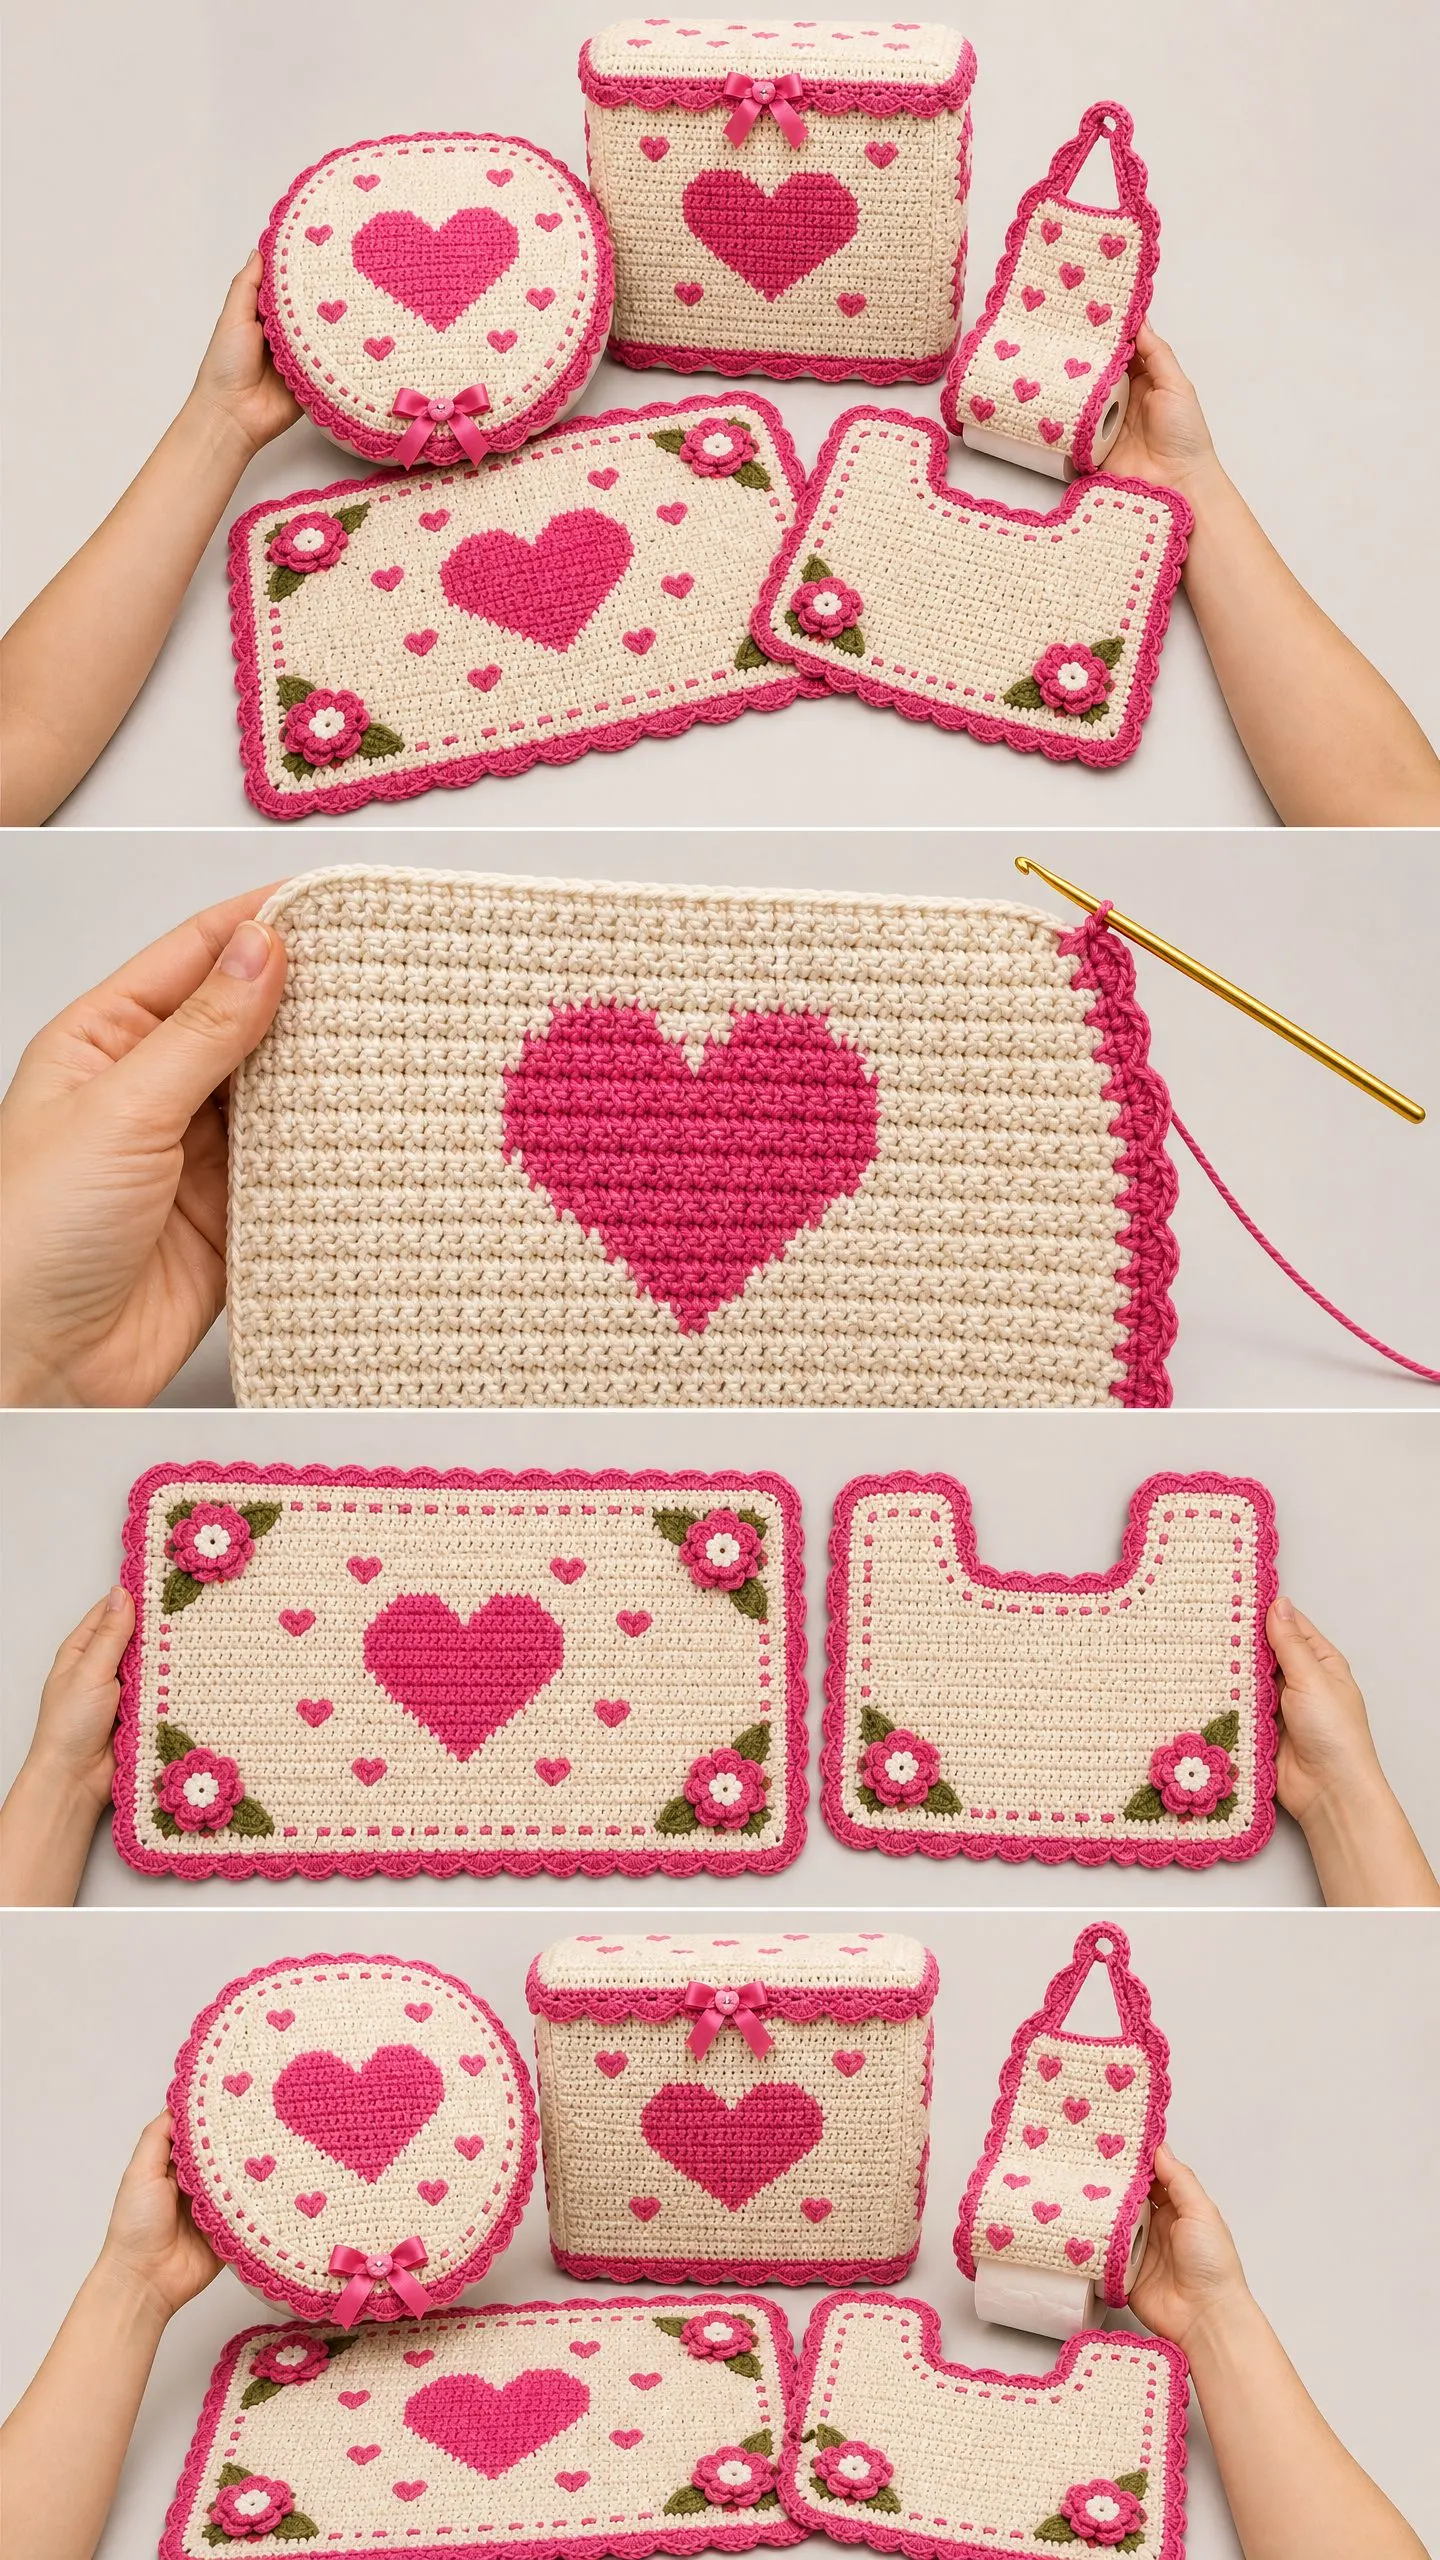
This bathroom set includes five matching pieces that transform any bathroom into a cozy retreat. You will create a toilet tank cover shaped like a fitted box, a toilet seat lid cover with a drawstring channel, a rectangular floor rug, a contour rug with a U-shaped cutout, and a toilet paper holder that hangs on the wall.
Every piece features the same design elements. Cream backgrounds with hot pink heart motifs worked in tapestry crochet. Scalloped borders in hot pink. Crocheted flowers with olive green leaves tucked into corners. Small pink satin bows with heart buttons as the finishing touch.
The construction varies by piece. The tank cover uses five flat panels seamed together. The seat cover is worked flat with shaping and a border added afterward. The rugs are simple flat rectangles and contour shapes. The toilet paper holder works as a flat hanging piece with a decorative frame.
Skill Level and Time Investment
I would rate this pattern as intermediate to advanced. You need comfort with tapestry crochet color changes, working in the round, shaping, seaming, and adding surface embellishments. If you are a beginner who can work tension-consistent single crochet and follow color charts, you can absolutely complete this set with patience.
Plan for approximately 35 to 50 hours for the complete set. Here is the breakdown by piece:
You do not need to make everything at once. Start with the seat cover to practice the techniques, then work your way up to the tank cover.
Finished Measurements
Tank Cover: approximately 8 inches wide x 7 inches tall x 14 inches long (20 cm x 18 cm x 36 cm). This fits a standard residential toilet tank. You can adjust width and length by adding or subtracting 4-stitch increments to maintain the pattern repeat.
Seat Cover: approximately 14 inches wide x 17 inches long (36 cm x 43 cm), fitting a standard elongated toilet seat lid.
Rectangular Floor Rug: approximately 20 inches wide x 26 inches long (51 cm x 66 cm).
Contour Rug: approximately 20 inches wide x 20 inches long (51 cm x 51 cm) with a U-shaped cutout approximately 7 inches wide x 6 inches deep (18 cm x 15 cm).
Toilet Paper Holder: approximately 7 inches wide x 9 inches tall (18 cm x 23 cm).
Materials You Will Need
Yarn
You will use worsted weight cotton or cotton-blend yarn (Category 4) in three colors:
Yarn Suggestions:
Lion Brand 24/7 Cotton in Ecru and Magenta works beautifully. This mercerized cotton holds stitch definition, washes well, and creates firm fabric perfect for rugs.
Paintbox Yarns Simply DK Cotton in Paper White and Hot Pink achieves gauge at 4.0 mm with tighter tension, giving crisp tapestry motifs.
Drops Safran in Off-White and Cerise offers excellent stitch clarity for colorwork and is widely available internationally.
Important: Use any smooth worsted weight cotton or cotton-acrylic blend. Avoid chenille, bouclé, or fuzzy yarns. The heart tapestry motifs will be obscured with textured yarn. Always swatch for gauge before beginning.
Hook
US Size G-6 (4.0 mm) or size needed to obtain gauge.
Notions
Gauge
20 single crochet (sc) x 22 rows = 4 inches x 4 inches (10 cm x 10 cm) in single crochet with Color A using a US G-6 (4.0 mm) hook, after blocking.
Gauge is critical for the tank cover fit. Swatch and adjust hook size if needed. For rugs, gauge may be slightly relaxed (one hook size larger) to achieve a softer drape.
Abbreviations
Special Stitches and Techniques
Tapestry Single Crochet
This technique lets you carry both CA and CB simultaneously so you do not need to weave in ends between color changes within a row.
Step 1: Work with the active color as normal sc. Insert hook, pull up a loop, complete the stitch.
Step 2: Lay the inactive (carried) yarn along the top of the previous row’s stitches.
Step 3: When working each sc, crochet over the carried yarn, enclosing it inside the new stitch.
Step 4: To switch colors mid-row, work the current stitch until two loops remain on hook. Drop the current color (do not cut). Pick up the new color and draw it through both loops to complete the stitch. The new color is now active. Lay the old color along the row and continue enclosing it.
Step 5: Maintain even, consistent tension on the carried yarn to prevent puckering.
Scallop Edging
This edging is worked across any finished edge in CB.
Step 1: Join CB with a sl st to any corner stitch.
Step 2: Ch 1, sc in same stitch.
Step 3: Sk 1 st, work 5 dc in next st (shell made).
Step 4: Sk 1 st, sc in next st.
Step 5: Rep Steps 3 and 4 across edge.
Step 6: At corners, work (sc, ch 2, sc) in the corner stitch, then continue scallop pattern.
Note: The stitch count of any edge receiving scallop edging must be a multiple of 4 plus 1 for the pattern to end symmetrically. Adjust by adding or skipping one stitch at the beginning of the edging round if needed.
3D Small Heart (worked separately, then attached)
Step 1: With CB, make a magic ring.
Step 2: Ch 2, 2 hdc in ring, 2 dc in ring, tr in ring, 2 dc in ring, 2 hdc in ring, ch 2, sl st in ring. Pull ring closed. (10 sts + 2 ch-2 sp)
Step 3: Fasten off, leaving a 6 inch tail for attaching. Sew to fabric surface.
Crocheted Flower (worked separately, then attached)
Step 1: With CB, make a magic ring.
Step 2: Ch 1, work 6 sc into ring, sl st to first sc to join. Pull ring closed. (6 sc)
Step 3: (Ch 3, 2 dc in same st, ch 3, sl st in same st, sl st in next st) 6 times. 6 petals made.
Step 4: Fasten off CB, join CA to back of any petal base. Work (ch 3, sl st in same st) 6 times through back loops of the Round 2 sts to create a second layer of smaller white petals behind the pink petals. Fasten off CA.
Step 5: With CC, embroider or chain a few sts at center if desired. Attach flower to fabric.
Crocheted Leaf (worked separately, then attached)
Step 1: With CC, ch 9.
Step 2: Sl st in 2nd ch from hook, sc in next 2 ch, hdc in next 2 ch, sc in next 2 ch, sl st in last ch.
Step 3: Do not turn. Working into the other side of the foundation chain: sl st in first ch, sc in next 2, hdc in next 2, sc in next 2, sl st in last ch.
Step 4: Fasten off, leaving tail for sewing. (One leaf = approx 1.5 inches / 4 cm long)
Pattern Notes Before You Begin
1. All pieces use US single crochet terminology throughout.
2. The tapestry sc technique is used for all heart motifs. Carry the unused color on every row where a color change occurs within that row.
3. Heart charts are provided as row-by-row color sequences. CA = cream, CB = hot pink. Read RS rows from right to left, WS rows from left to right when working flat. When working in the round, read all rounds from right to left.
4. The tank cover is constructed in pieces (top panel, front panel, back panel, two side panels) and seamed together, then edged.
5. Stitch counts appear at the end of each row or round in parentheses.
6. Turn at the end of every flat row unless otherwise stated.
7. Chain-1 turning chains do not count as a stitch throughout this pattern.
8. Block all pieces before assembling and adding embellishments.
Heart Motif Charts
Large Heart Chart (24 stitches wide x 18 rows tall)
This chart is centered on each panel. The numbers indicate how many stitches to work in each color, reading across the row.
Small Heart Chart (6 stitches wide x 5 rows tall)
Section 1: Toilet Tank Cover Pattern
The tank cover consists of five flat panels: Top, Front, Back, and two Side panels. After blocking and seaming, scallop edging and embellishments are added.
Top Panel
With CA, ch 71.
Row 1 (RS): Sc in 2nd ch from hook and in each ch across. Turn. (70 sc)
Row 2 (WS): Ch 1, sc in each st across. Turn. (70 sc)
Rows 3 through 44: Rep Row 2 until piece measures approx 8 inches / 20 cm from foundation. Turn after each row. (70 sc each row)
Fasten off. Top panel measures approx 14 in x 8 in (36 cm x 20 cm). Set aside.
Front Panel (with heart motif)
The front panel features a large center heart in tapestry sc and four small scattered hearts around it.
The center of the panel is at stitch 35-36. Place the 24-st heart motif beginning at stitch 24 and ending at stitch 47. Sts 1-23 and 48-70 remain in CA.
Place small hearts at approximate positions: stitch 4-9 (rows 4-8), stitch 55-60 (rows 4-8), stitch 10-15 (rows 28-32), stitch 50-55 (rows 28-32).
With CA, ch 71.
Row 1 (RS): Sc in 2nd ch from hook and in each ch across. Turn. (70 sc)
Row 2: Ch 1, sc in each st. Turn. (70 sc)
Row 3: Ch 1, sc in each st. Turn. (70 sc)
Row 4 (begin small heart 1 at sts 4-9): Ch 1, sc in sts 1-3 CA, work small heart motif Row 2 over sts 4-9, sc in sts 10-54 CA, work small heart motif Row 2 over sts 55-60, sc in sts 61-70 CA. Turn. (70 sc)
Rows 5 through 8: Continue placing small hearts over these rows per chart, then return to solid CA.
Rows 9 through 13: Ch 1, sc in each st in CA. Turn. (70 sc each row)
Row 14 (begin large heart motif row 1 baseline): Ch 1, sc in each st in CA. Turn. (70 sc)
Row 15 (large heart Row 2): Ch 1, sc in sts 1-23 CA, work large heart motif Row 2 over sts 24-47, sc in sts 48-70 CA. Turn. (70 sc)
Rows 16 through 31: Continue large heart chart Rows 3-18, working CA fill on both sides. On rows 28-32, also incorporate the second set of small hearts at sts 10-15 and 50-55. Turn after each row. (70 sc)
Rows 32 through 38: Ch 1, sc across in CA. Turn. (70 sc each row)
Total rows: 38. Front panel measures approx 14 in wide x 7 in tall (36 cm x 18 cm). Fasten off.
Checkpoint: After completing the front panel, it should measure approximately 14 inches wide and 7 inches tall when blocked flat. The large heart should be clearly centered with its tip pointing downward.
Back Panel
The back panel mirrors the front panel but has only the scattered small hearts and no large center heart.
With CA, ch 71.
Row 1 (RS): Sc in 2nd ch from hook and in each ch across. Turn. (70 sc)
Rows 2 through 3: Ch 1, sc across. Turn. (70 sc each row)
Row 4 (small heart 1 at sts 10-15): Ch 1, sc in sts 1-9 CA, work small heart Row 2 over sts 10-15, sc in sts 16-54 CA, work small heart Row 2 over sts 55-60, sc in sts 61-70 CA. Turn. (70 sc)
Rows 5 through 8: Continue small heart chart at same positions. Turn. (70 sc each row)
Rows 9 through 28: Ch 1, sc across in CA. Turn. (70 sc each row)
Row 29 (second set of small hearts at sts 20-25 and 45-50): Ch 1, sc in sts 1-19 CA, work small heart Row 2 over sts 20-25, sc in sts 26-44 CA, work small heart Row 2 over sts 45-50, sc in sts 51-70 CA. Turn. (70 sc)
Rows 30 through 33: Continue small heart chart. Turn. (70 sc each row)
Rows 34 through 38: Ch 1, sc across in CA. Turn. (70 sc each row)
Fasten off. Back panel measures approx 14 in wide x 7 in tall (36 cm x 18 cm).
Side Panels (make 2)
Each side panel features a large crocheted flower motif (applied separately after panel completion) and small scattered hearts.
With CA, ch 41.
Row 1 (RS): Sc in 2nd ch from hook and in each ch across. Turn. (40 sc)
Row 2: Ch 1, sc across. Turn. (40 sc)
Row 3: Ch 1, sc across. Turn. (40 sc)
Row 4 (small heart at sts 3-8): Ch 1, sc in sts 1-2 CA, work small heart Row 2 over sts 3-8, sc in sts 9-40 CA. Turn. (40 sc)
Rows 5 through 8: Continue small heart chart at sts 3-8. Turn. (40 sc each row)
Rows 9 through 38: Ch 1, sc across in CA. Turn. (40 sc each row)
Fasten off. Side panels measure approx 8 in wide x 7 in tall (20 cm x 18 cm) each.
Tank Cover Assembly
Step 1: Lay the top panel RS up on a flat surface. Align the front panel along one long edge (14 inch edge), RS facing each other. Using CA and yarn needle, whipstitch or sc seam along that edge.
Step 2: Attach the back panel to the opposite long edge of the top panel in the same manner.
Step 3: Attach each side panel to the short edges of the top panel (8 inch edges).
Step 4: Seam the four vertical corners. Join front panel to side panel along each 7 inch vertical edge. Repeat for back to sides.
Step 5: The bottom of the tank cover is open to slip over the tank. Leave bottom open.
Top Edge Trim
Join CB to any top edge corner of the assembled cover.
Round 1: Ch 1, sc evenly around the entire top opening edge, placing 3 sc at each corner. The top edge perimeter is approx 228 sc. Place marker at start. Sl st to first sc to join. (228 sc)
Round 2: Ch 1, work scallop edging around entire top edge as follows: (sk 1, 5 dc in next st, sk 1, sc in next st) around, adjusting at corners as needed to keep edging flat. Sl st to join. Fasten off CB.
Bottom Edge Trim
Join CB to any bottom corner.
Round 1: Ch 1, sc evenly around bottom opening. Sl st to join. (228 sc)
Round 2: Work scallop edging as above. Fasten off CB.
Attach pink satin bow with heart button at top center front, just below the top scallop trim. Attach large crocheted flower to center of each side panel. Surround each flower with 2 crocheted leaves angled outward.
Section 2: Toilet Seat Cover Pattern
The seat cover is worked flat as a rounded rectangle, then a scallop border and drawstring channel are added.
With CA, ch 71.
Row 1 (RS): Sc in 2nd ch from hook and in each ch across. Turn. (70 sc)
Row 2: Ch 1, sc across. Turn. (70 sc)
Row 3: Ch 1, 2 sc in first st, sc to last st, 2 sc in last st. Turn. (72 sc)
Row 4: Ch 1, sc across. Turn. (72 sc)
Row 5: Ch 1, 2 sc in first st, sc to last st, 2 sc in last st. Turn. (74 sc)
Rows 6 through 10: Ch 1, sc across. Turn. (74 sc each row)
Rows 11 through 14: Ch 1, 2 sc in first st, sc to last st, 2 sc in last st. Turn. (After Row 14: 82 sc)
Rows 15 through 30: Ch 1, sc across. Turn. (82 sc each row)
Row 31: Ch 1, sc2tog, sc to last 2 sts, sc2tog. Turn. (80 sc)
Row 32: Ch 1, sc across. Turn. (80 sc)
Row 33: Ch 1, sc2tog, sc to last 2 sts, sc2tog. Turn. (78 sc)
Row 34: Ch 1, sc across. Turn. (78 sc)
Rows 35 through 40: Rep decreasing pattern, decreasing 2 sts every other row. (After Row 40: 72 sc)
Rows 41 through 44: Continue decreasing 2 sts every other row. (After Row 44: 68 sc)
Do not fasten off.
Seat Cover Border
Still with CA, work sc evenly around entire perimeter: across top short edge, down long side, across bottom short edge, up other long side. At corners, work 3 sc. Sl st to join. (approx 220 sc)
Join CB. Work scallop edging round as described in Special Stitches. Fasten off.
Heart Motif on Seat Cover
Using tapestry sc, work the large heart chart centered on the 74-st wide section of the cover (rows 8 through 25), centering the motif at stitch 26 through 49.
Checkpoint: The completed seat cover before edging should measure approximately 14 in wide at the widest point and 17 in long from tip to tip, with visible heart centered in the upper half.
Attach small crocheted flowers (2 total) at lower corners of the seat cover, each with 2 leaves. Attach one small satin bow with button at the top edge center.
Drawstring Channel
With RS facing, join CA to wrong side of bottom edge, approximately 1 inch from scallop border.
Round 1 (channel base): Ch 3, hdc in each st across bottom edge, sl st to first hdc. (approx 68 hdc)
Round 2: Ch 3, BLO hdc in each st around. Sl st to join. Fasten off.
Thread a 24 inch length of CB through the channel to use as a drawstring to gather the cover under the seat lid. Knot ends.
Section 3: Rectangular Floor Rug Pattern
With CA, ch 101.
Row 1 (RS): Sc in 2nd ch from hook and in each ch across. Turn. (100 sc)
Rows 2 through 6: Ch 1, sc across. Turn. (100 sc each row)
Row 7 (begin small hearts at sts 5-10 and 90-95): Ch 1, sc in sts 1-4 CA, work small heart Row 2 over sts 5-10, sc in sts 11-89 CA, work small heart Row 2 over sts 90-95, sc in sts 96-100 CA. Turn. (100 sc)
Rows 8 through 11: Continue small heart charts at same positions per chart rows 3-6. Turn. (100 sc each row)
Row 12: Ch 1, sc across in CA. Turn. (100 sc)
Rows 13 through 20: Ch 1, sc across in CA. Turn. (100 sc each row)
Row 21 (begin large center heart, centered at sts 39-62): Ch 1, sc across in CA. Turn. (100 sc)
Row 22 (large heart Row 2): Ch 1, sc in sts 1-38 CA, work large heart Row 2 over sts 39-62, sc in sts 63-100 CA. Turn. (100 sc)
Rows 23 through 39: Continue large heart chart Rows 3-18 with CA fill on sides. Turn. (100 sc each row)
Rows 40 through 60: Ch 1, sc across in CA, incorporating small hearts at sts 5-10 and 90-95 on rows 51-55. Turn. (100 sc each row)
Rows 61 through 130: Work the symmetric heart and scatter pattern mirrored from the first half. Refer to the row instructions above and work them in reverse order to create the mirrored second half. Turn after each row. (100 sc each row)
Fasten off at end of Row 130. Rug now measures approx 20 in x 23.5 in before border.
Rectangular Rug Border
Join CB to any corner.
Round 1: Ch 1, sc evenly around entire perimeter, placing 3 sc at each corner. Sl st to join. (468 sc)
Round 2: Ch 1, sc around. Sl st to join. (468 sc)
Round 3: Work scallop edging as described in Special Stitches. Fasten off.
Attach crocheted flower at each corner with 2 leaves per flower. Optional: attach non-slip backing to underside for safety.
Care Instructions
Machine wash cold on gentle cycle. Lay flat to dry or tumble dry low. Cotton yarn may shrink slightly with heat, so air drying is recommended. Steam block as needed to restore shape. The satin bows should be removed before washing or spot cleaned separately.
Tips for Success
Tension matters. Keep your tension consistent throughout, especially during tapestry sections. Uneven tension creates puckered hearts.
Block before assembling. This makes seaming much easier and ensures all your pieces match up correctly.
Count your stitches. After every few rows, count your stitches to catch mistakes early. The tapestry sections especially benefit from careful counting.
Practice the tapestry technique. If you have never done tapestry crochet before, make a small swatch practicing the color changes before starting the actual pieces.
Customize the fit. Measure your toilet tank before beginning. Add or subtract stitches in multiples of 4 to adjust the size while keeping the pattern repeat intact.
I hope this pink heart bathroom set brings as much joy to your home as my sister’s vintage set brought to mine. The tapestry hearts look impressive, but once you get into the rhythm, each piece flows smoothly into the next.
If you make this set, I would absolutely love to see it. Save this pattern to your Pinterest boards so you can find it when you are ready to start, and please leave a comment below sharing your progress or finished photos. Happy crocheting!
