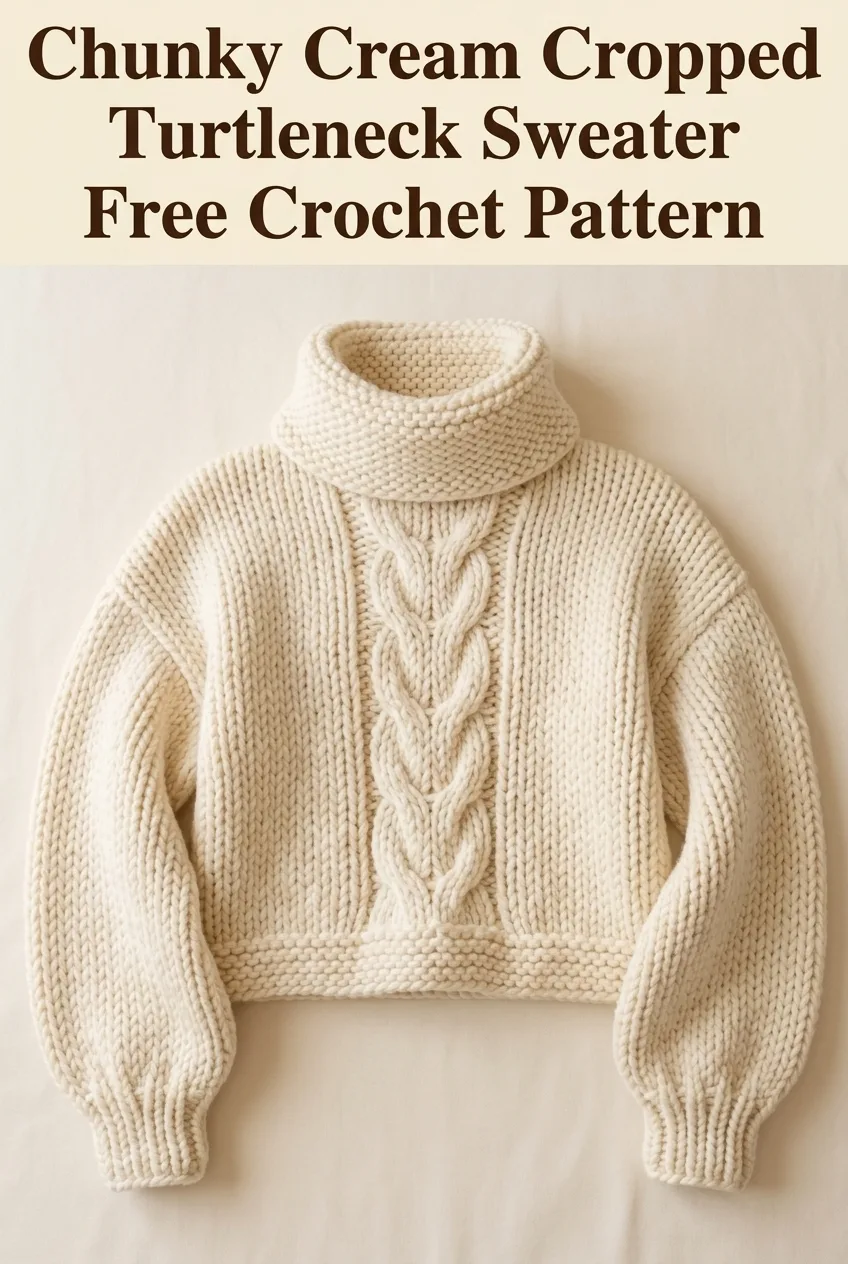
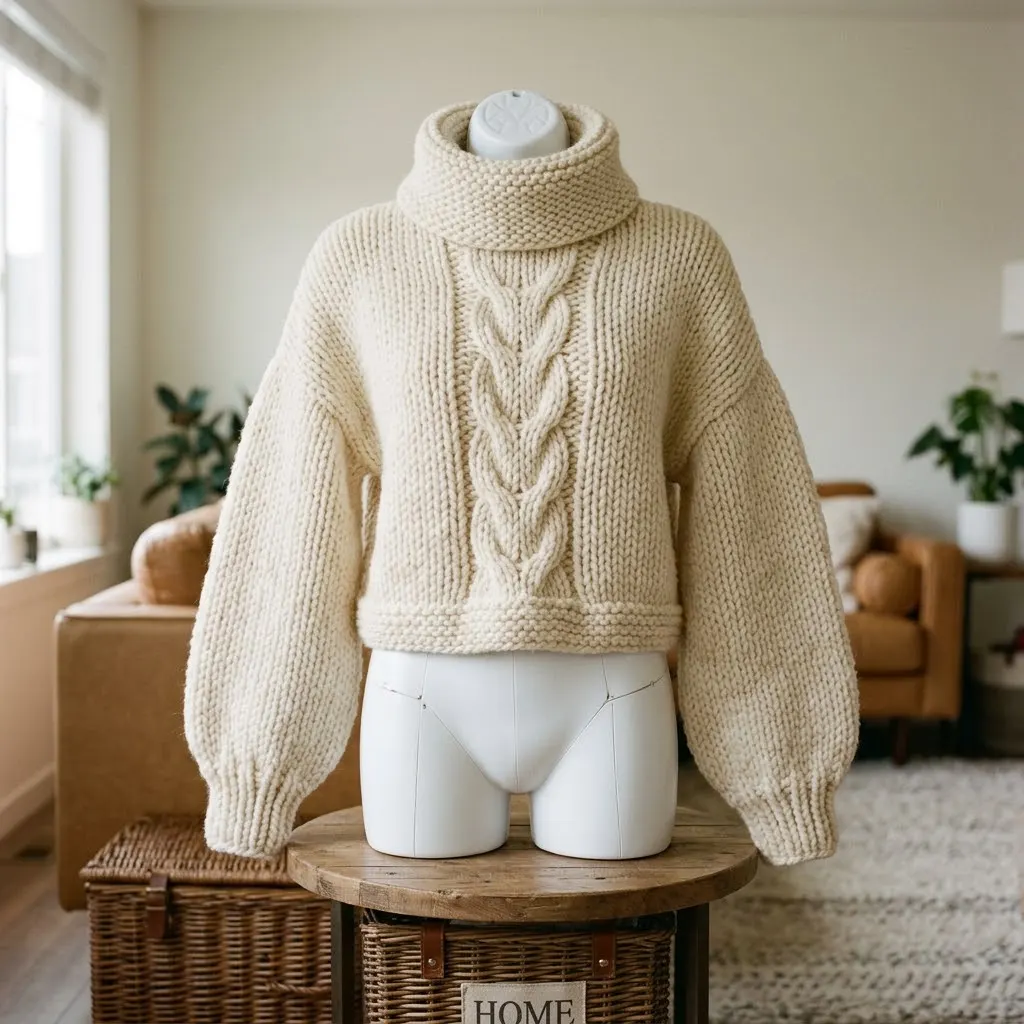
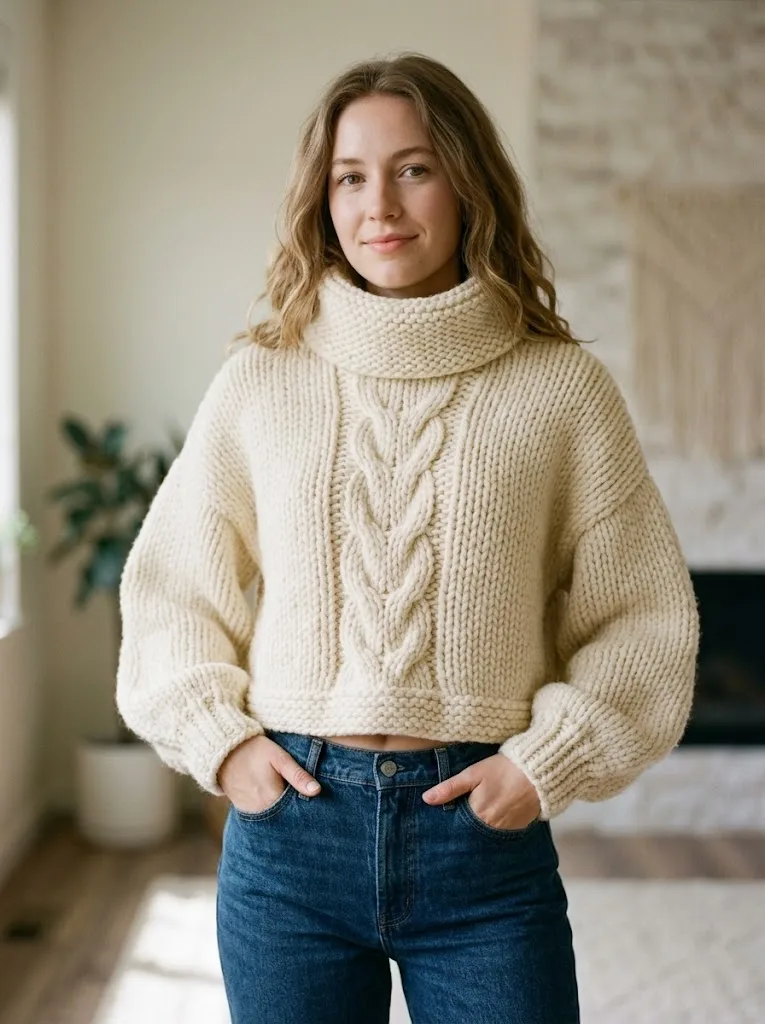
I don’t know about you, but I absolutely love a cozy oversized sweater that looks like it took weeks to make but actually comes together faster than you’d expect. All the warmth, all the style, none of the endless rows that make you question your life choices. This chunky cream cropped turtleneck sweater is exactly that kind of project. It’s the sweater you throw on with your favorite jeans when you want to look effortlessly put together while feeling like you’re wrapped in a cloud.
When I finished this one, I actually wore it around the house for an entire afternoon before I could bring myself to photograph it. It’s that good.
Why You’ll Love This Chunky Turtleneck Sweater Crochet Pattern
This cropped turtleneck sweater crochet pattern gives you a modern, stylish piece that works up surprisingly quickly thanks to super bulky yarn and simple construction. The oversized fit is incredibly forgiving, which means you don’t need to stress about perfect measurements. The dropped shoulders and balloon sleeves give it that relaxed, trendy silhouette you see in high-end knitwear boutiques.
The star of this design is the gorgeous cable detail running down the center front. Now, before you panic and scroll away, let me tell you something. Crochet cables are much easier than they look. They’re really just stitches worked around posts in a specific order. Once you get the rhythm, it becomes almost meditative.
The body is worked mostly in simple stitches that mimic the look of stockinette knitting, giving it that classic sweater aesthetic. The turtleneck collar folds over perfectly without being too bulky, and the ribbed hem and cuffs add just the right amount of structure.
Skill Level
Intermediate
This crochet tutorial is perfect for someone who has mastered the basics and wants to try something a little more challenging. You should be comfortable with:
If you’ve never tried cables before, don’t worry. I’ll walk you through it step by step. This is actually a wonderful first cable project because the chunky yarn makes it easy to see what you’re doing.
Finished Measurements
This pattern is written for a size Medium with an oversized fit.
The cropped length hits right at the natural waist or just below, depending on your torso length. The oversized fit includes about 8 to 10 inches of positive ease, which gives you that cozy, relaxed look.
Materials Needed
Yarn
Super Bulky Weight Yarn (Category 6)
You’ll need approximately 800 to 900 yards (730 to 820 meters) of super bulky yarn. Look for something soft with good stitch definition. Wool or wool blend yarns work beautifully for this project because they hold the cable detail nicely and block well.
The cream color shown is a classic choice, but this sweater would look stunning in any solid or semi-solid color. I’d avoid variegated yarns for this one since they can hide the beautiful cable work.
Suggested yarns:
Hook
Size N/P (10mm) crochet hook for the main body and sleeves
Size M/L (9mm) crochet hook for the ribbing and collar
Always check your gauge and adjust hook size as needed. This is especially important for a garment since fit matters.
Notions
Gauge
8 stitches and 10 rows = 4 inches (10 cm) in the main stitch pattern using the larger hook
Please, please take time to check your gauge. I know it’s tempting to skip this step, but with a garment, gauge can make the difference between a sweater that fits beautifully and one that could fit two of you. Make a small swatch, measure it, and adjust your hook size if needed.
Abbreviations and Stitch Definitions
Let me break down all the stitches you’ll need for this chunky turtleneck sweater crochet pattern:
Ch = Chain: Yarn over, pull through the loop on your hook. This creates the foundation for your work.
Sl st = Slip stitch: Insert hook, yarn over, pull through both the stitch and the loop on your hook in one motion. Used for joining and creating a tight, flat stitch.
Sc = Single crochet: Insert hook into stitch, yarn over and pull up a loop (2 loops on hook), yarn over and pull through both loops.
Hdc = Half double crochet: Yarn over, insert hook into stitch, yarn over and pull up a loop (3 loops on hook), yarn over and pull through all 3 loops at once.
Dc = Double crochet: Yarn over, insert hook into stitch, yarn over and pull up a loop (3 loops on hook), yarn over and pull through 2 loops, yarn over and pull through remaining 2 loops.
FPdc = Front post double crochet: Yarn over, insert hook from front to back to front around the post (vertical part) of the stitch below, complete as a regular double crochet. This creates raised texture on the front of your work.
BPdc = Back post double crochet: Yarn over, insert hook from back to front to back around the post of the stitch below, complete as a regular double crochet. This creates raised texture on the back of your work.
Dec = Decrease: Work two stitches together to reduce your stitch count by one.
Inc = Increase: Work two stitches into the same stitch to add one stitch.
Special Techniques
Cable Cross (4-Stitch Cable)
This is where the magic happens. The cable is created by working front post stitches in a specific order to make them cross over each other.
4-Stitch Left Cross (4LC):
Skip the next 2 stitches, work FPdc around each of the following 2 post stitches, then go back and work FPdc around each of the 2 skipped stitches, working in front of the stitches you just made.
4-Stitch Right Cross (4RC):
Skip the next 2 stitches, work FPdc around each of the following 2 post stitches, then go back and work FPdc around each of the 2 skipped stitches, working behind the stitches you just made.
Don’t worry if this sounds confusing right now. When you get to the cable rows, take it slowly and you’ll see exactly how the stitches twist around each other. It’s actually really satisfying to watch the cable form.
Pattern Instructions
Back Panel
With the larger hook, ch 46.
Row 1: Hdc in 3rd ch from hook and in each ch across. Turn. (44 hdc)
Row 2: Ch 2 (does not count as a stitch throughout), hdc in each st across. Turn. (44 hdc)
Rows 3 through 36: Repeat Row 2.
Your back panel should measure approximately 18 inches long and 22 inches wide. If it doesn’t, check your gauge and adjust as needed.
Shoulder Shaping:
Row 37: Ch 2, hdc in first 12 sts. Leave remaining sts unworked. Turn. (12 hdc)
Row 38: Ch 2, hdc in each st across. Fasten off. (12 hdc)
Skip the center 20 stitches (this creates the neck opening). Join yarn in the next stitch.
Row 37 (second shoulder): Ch 2, hdc in same st and in remaining 11 sts. Turn. (12 hdc)
Row 38: Ch 2, hdc in each st across. Fasten off. (12 hdc)
Front Panel with Cable Detail
With the larger hook, ch 46.
Row 1: Hdc in 3rd ch from hook and in each ch across. Turn. (44 hdc)
Row 2: Ch 2, hdc in first 16 sts, dc in next 12 sts (this is your cable panel), hdc in remaining 16 sts. Turn. (44 sts)
Row 3 (Cable Setup): Ch 2, hdc in first 16 sts, FPdc around next 4 dc, hdc in next 4 sts, FPdc around next 4 dc, hdc in remaining 16 sts. Turn. (44 sts)
Row 4: Ch 2, hdc in first 16 sts, BPdc around next 4 post sts, hdc in next 4 sts, BPdc around next 4 post sts, hdc in remaining 16 sts. Turn. (44 sts)
Row 5 (Cable Cross Row): Ch 2, hdc in first 16 sts, work 4LC over next 4 post sts, hdc in next 4 sts, work 4RC over next 4 post sts, hdc in remaining 16 sts. Turn. (44 sts)
Rows 6 through 8: Repeat Row 4.
Row 9: Repeat Row 5 (Cable Cross Row).
Continue alternating between 3 rows of post stitches (like Row 4) and 1 cable cross row (like Row 5) until you have completed approximately 32 rows total.
Rows 33 through 36: Work even in established pattern.
Shoulder Shaping:
Work shoulder shaping exactly as for the back panel.
Sleeves (Make 2)
The sleeves are worked from the cuff up with gradual increases to create the balloon shape.
With the larger hook, ch 22.
Row 1: Hdc in 3rd ch from hook and in each ch across. Turn. (20 hdc)
Rows 2 through 4: Ch 2, hdc in each st across. Turn. (20 hdc)
Row 5 (Increase Row): Ch 2, 2 hdc in first st, hdc to last st, 2 hdc in last st. Turn. (22 hdc)
Rows 6 through 8: Ch 2, hdc in each st across. Turn. (22 hdc)
Continue working 3 rows even followed by 1 increase row until you have 36 stitches.
Work even until sleeve measures approximately 16 inches from the beginning.
Rows (Decrease for Cap):
Next Row: Ch 2, hdc2tog, hdc to last 2 sts, hdc2tog. Turn. (34 hdc)
Work 1 row even.
Repeat these 2 rows twice more. (30 hdc)
Fasten off, leaving a long tail for seaming.
Bottom Ribbing
With the smaller hook, ch 9.
Row 1: Sc in 2nd ch from hook and in each ch across. Turn. (8 sc)
Row 2: Ch 1, sc in back loop only of each st across. Turn. (8 sc)
Repeat Row 2 until ribbing measures approximately 44 inches (or the full circumference of your sweater body).
Fasten off, leaving a long tail for seaming.
Cuff Ribbing (Make 2)
With the smaller hook, ch 7.
Row 1: Sc in 2nd ch from hook and in each ch across. Turn. (6 sc)
Row 2: Ch 1, sc in back loop only of each st across. Turn. (6 sc)
Repeat Row 2 until ribbing measures approximately 8 inches.
Fasten off, leaving a long tail for seaming.
Turtleneck Collar
With the smaller hook, ch 11.
Row 1: Sc in 2nd ch from hook and in each ch across. Turn. (10 sc)
Row 2: Ch 1, sc in back loop only of each st across. Turn. (10 sc)
Repeat Row 2 until collar measures approximately 22 inches (or fits comfortably around the neck opening).
Fasten off, leaving a long tail for seaming.
Assembly and Finishing
This is where your sweater comes to life. Take your time with the seaming for a professional finish.
1. Block your pieces. Lay them flat, spritz with water, and pin to measurements. Let dry completely. This step makes a huge difference in how polished your finished sweater looks.
2. Seam the shoulders. Using a mattress stitch or whip stitch, join the front and back panels at the shoulders.
3. Attach the sleeves. Find the center of each sleeve cap and pin it to the shoulder seam. Pin the rest of the sleeve evenly around the armhole opening. Seam in place.
4. Close the side seams and sleeve seams. Starting at the bottom of the body, seam up the side, continue along the underarm, and down the sleeve to the cuff. Repeat on the other side.
5. Attach the bottom ribbing. Seam the short ends of the ribbing together to form a loop. Then whip stitch the ribbing to the bottom edge of the sweater body, stretching slightly to fit.
6. Attach the cuff ribbing. Seam the short ends of each cuff together, then attach to the sleeve openings.
7. Attach the collar. Seam the short ends of the collar together. Whip stitch one edge of the collar to the neck opening. The collar will naturally fold over.
8. Weave in all ends. I like to weave ends along seams where they’re less visible.
Styling Tips for Your Chunky Cropped Sweater
This chunky cream cropped turtleneck sweater is incredibly versatile. The cropped length pairs perfectly with high-waisted jeans, skirts, or over a flowy midi dress. The oversized fit means it layers beautifully over fitted long-sleeve shirts in cooler weather.
The neutral cream color goes with absolutely everything, but if you made this in a bold color like mustard, forest green, or burgundy, it would be equally stunning.
Care Instructions
Because this sweater is made with bulky yarn, it’s important to care for it properly to keep it looking beautiful.
Final Thoughts on This Chunky Turtleneck Sweater Crochet Pattern
I truly hope you love making this cropped turtleneck sweater as much as I loved designing it. There’s something so satisfying about creating a wearable piece that looks like it came from a boutique but was made entirely by your own hands. The cables add just enough visual interest to keep things exciting, and the chunky yarn means you’ll see progress quickly.
Thank you so much for choosing this pattern. It means the world to me that you’re here, ready to create something beautiful. If you make this sweater, I would absolutely love to see it. Tag me on Instagram or share a photo in my Facebook group. Seeing your creations is honestly the best part of sharing patterns.
If this chunky cream cropped turtleneck sweater pattern is calling your name but you’re not quite ready to start today, go ahead and save it to your Pinterest boards so you can find it easily later. And please drop a comment below if you give it a try. I love hearing how your projects turn out and answering any questions along the way. Happy crocheting, friend.
