
Baby dresses look complicated. All those delicate shells, that pretty lace skirt, those tiny crocheted roses. I get it. You see something this sweet and think it must require years of experience and some kind of crochet wizardry.
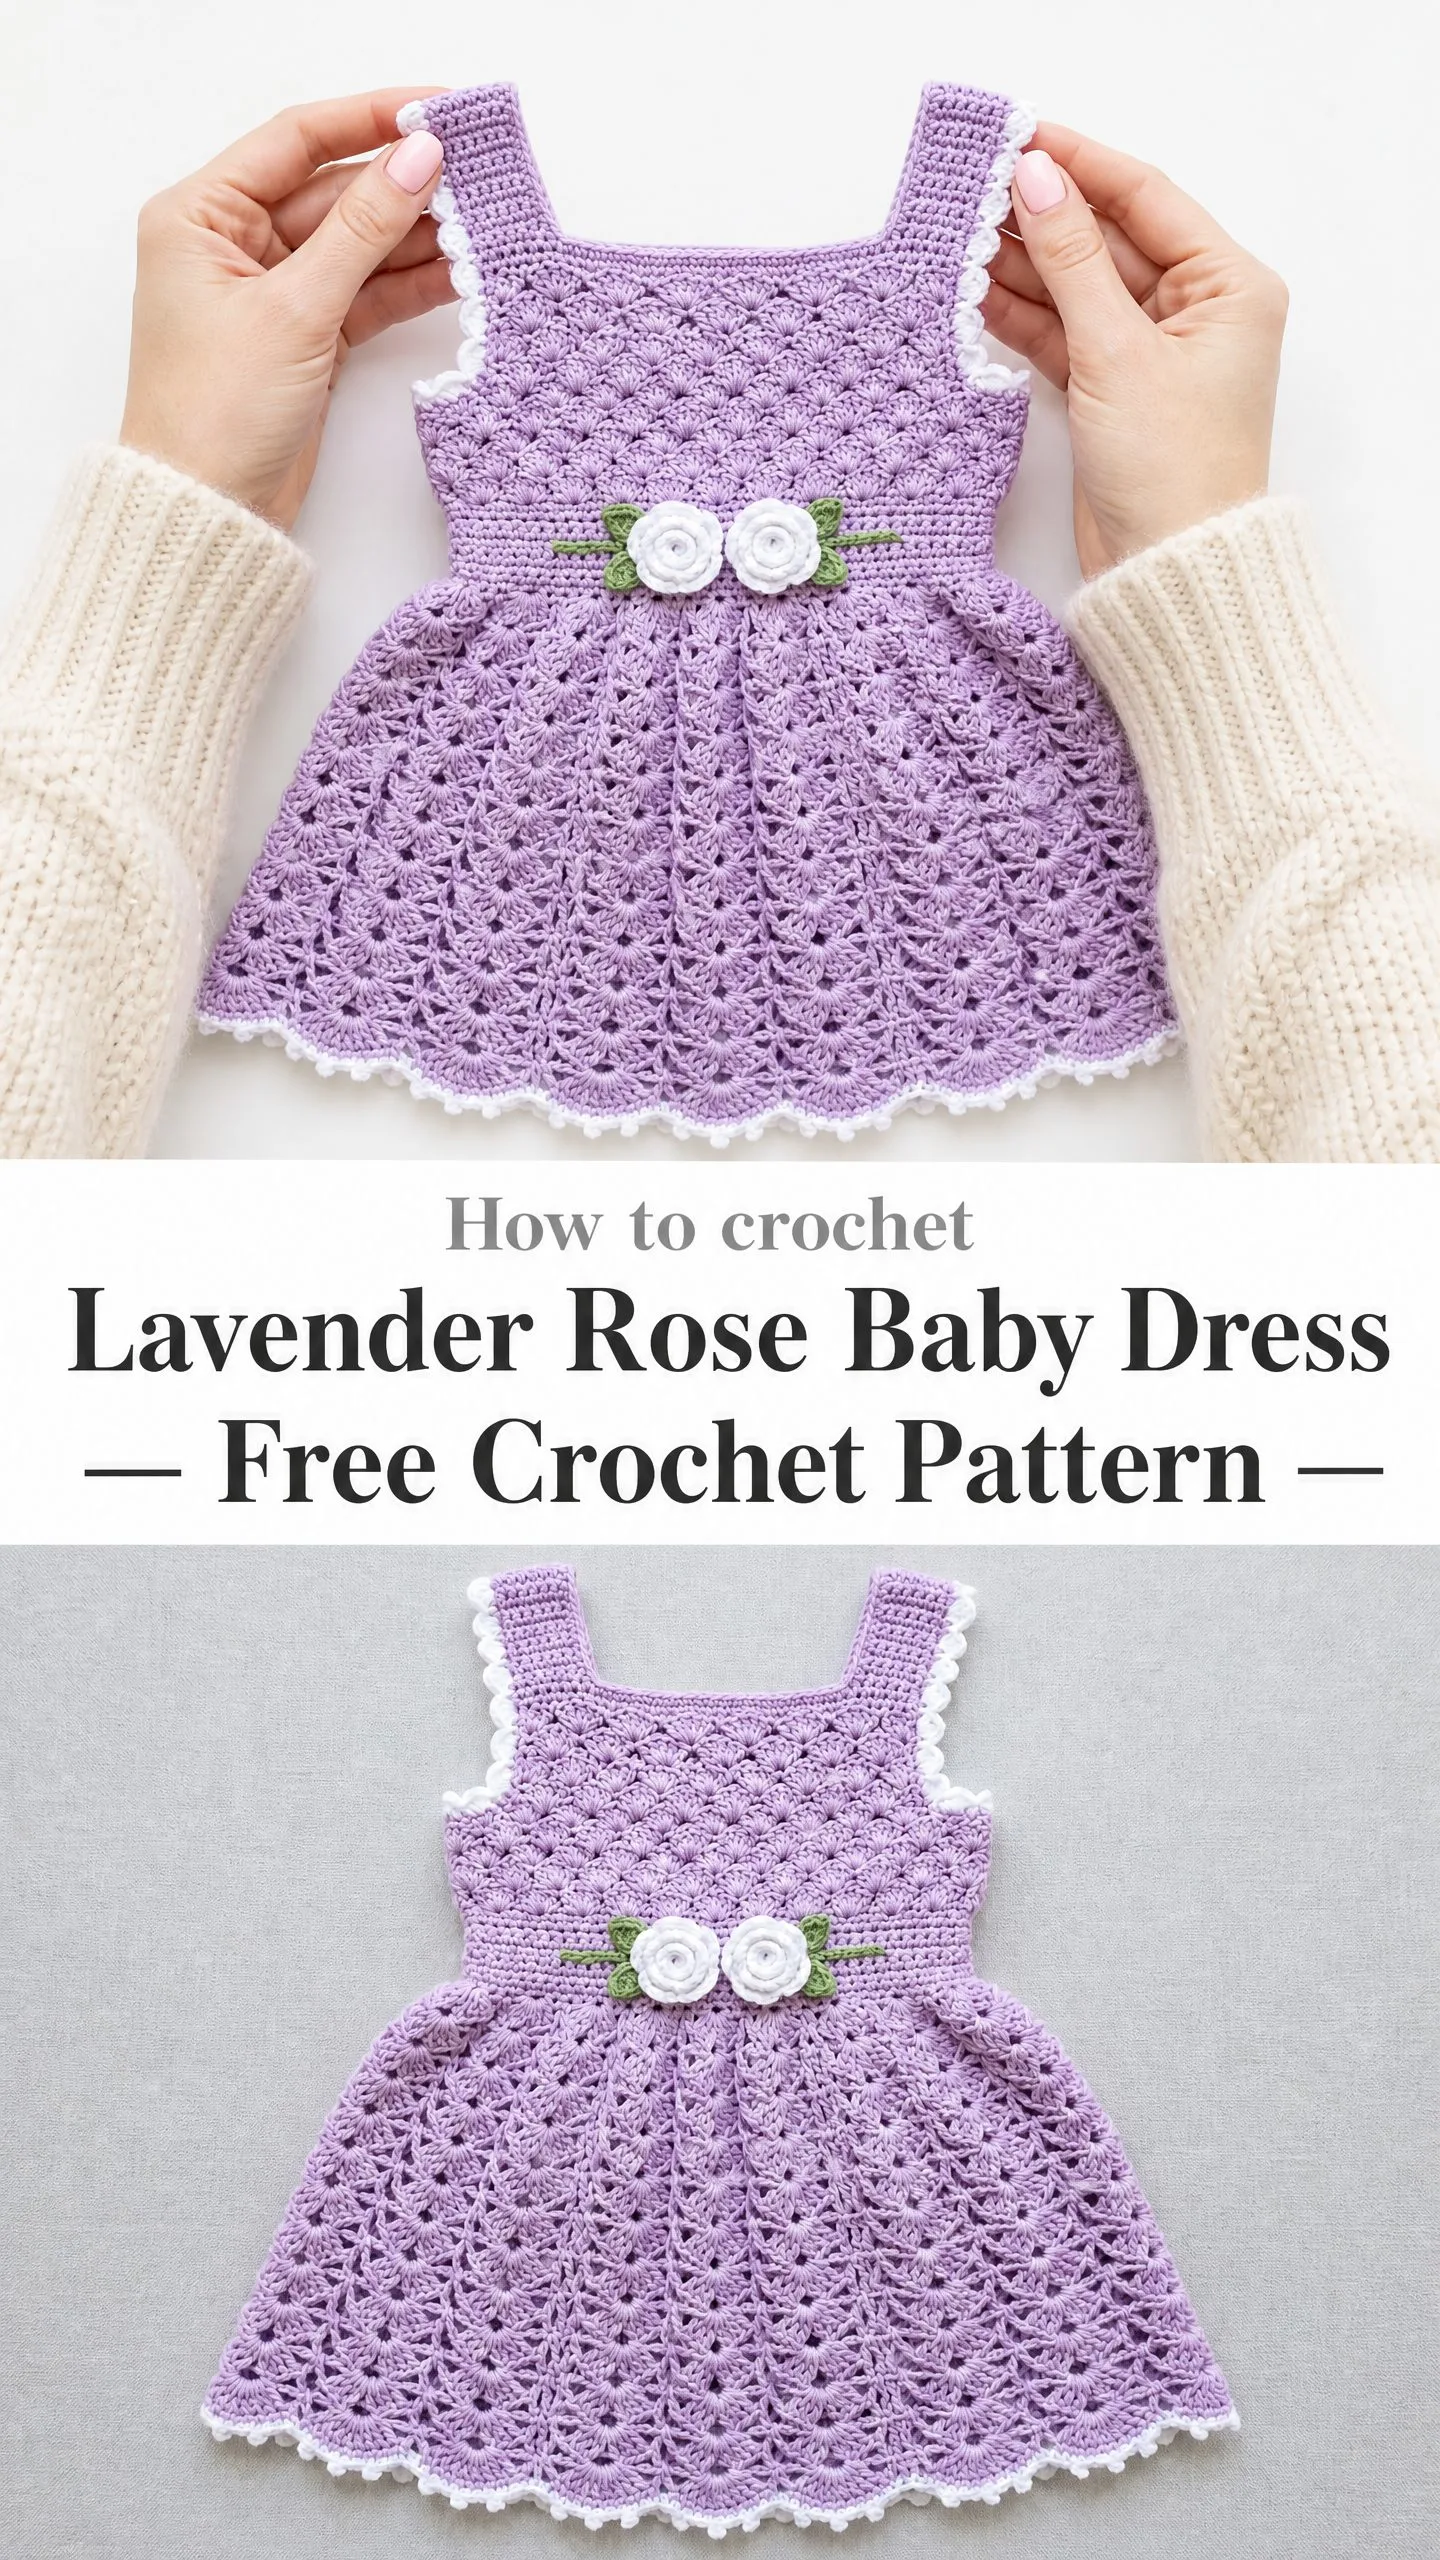
But here is the truth. If you can work a double crochet and follow a simple repeat, you can absolutely make this dress. The shell stitch bodice? It is just five double crochets worked into one stitch. The lacy skirt? A straightforward fan pattern that repeats the same way every single round. Even those adorable roses are nothing more than a strip of double crochets rolled into a spiral.
I have broken this crochet pattern down into manageable sections with plenty of checkpoints along the way. Whether you are an intermediate crocheter ready for your first garment or someone who has made dozens of baby items, this step by step tutorial will walk you through every single stitch.
Why You Will Love This Lavender Rose Baby Dress
This little dress has everything I look for in a baby garment pattern. The bodice uses a dense shell texture that provides good coverage and structure. The skirt transitions into an open fan lace that creates beautiful movement and drape. Wide shoulder straps frame a square neckline that looks polished without any fussy shaping.
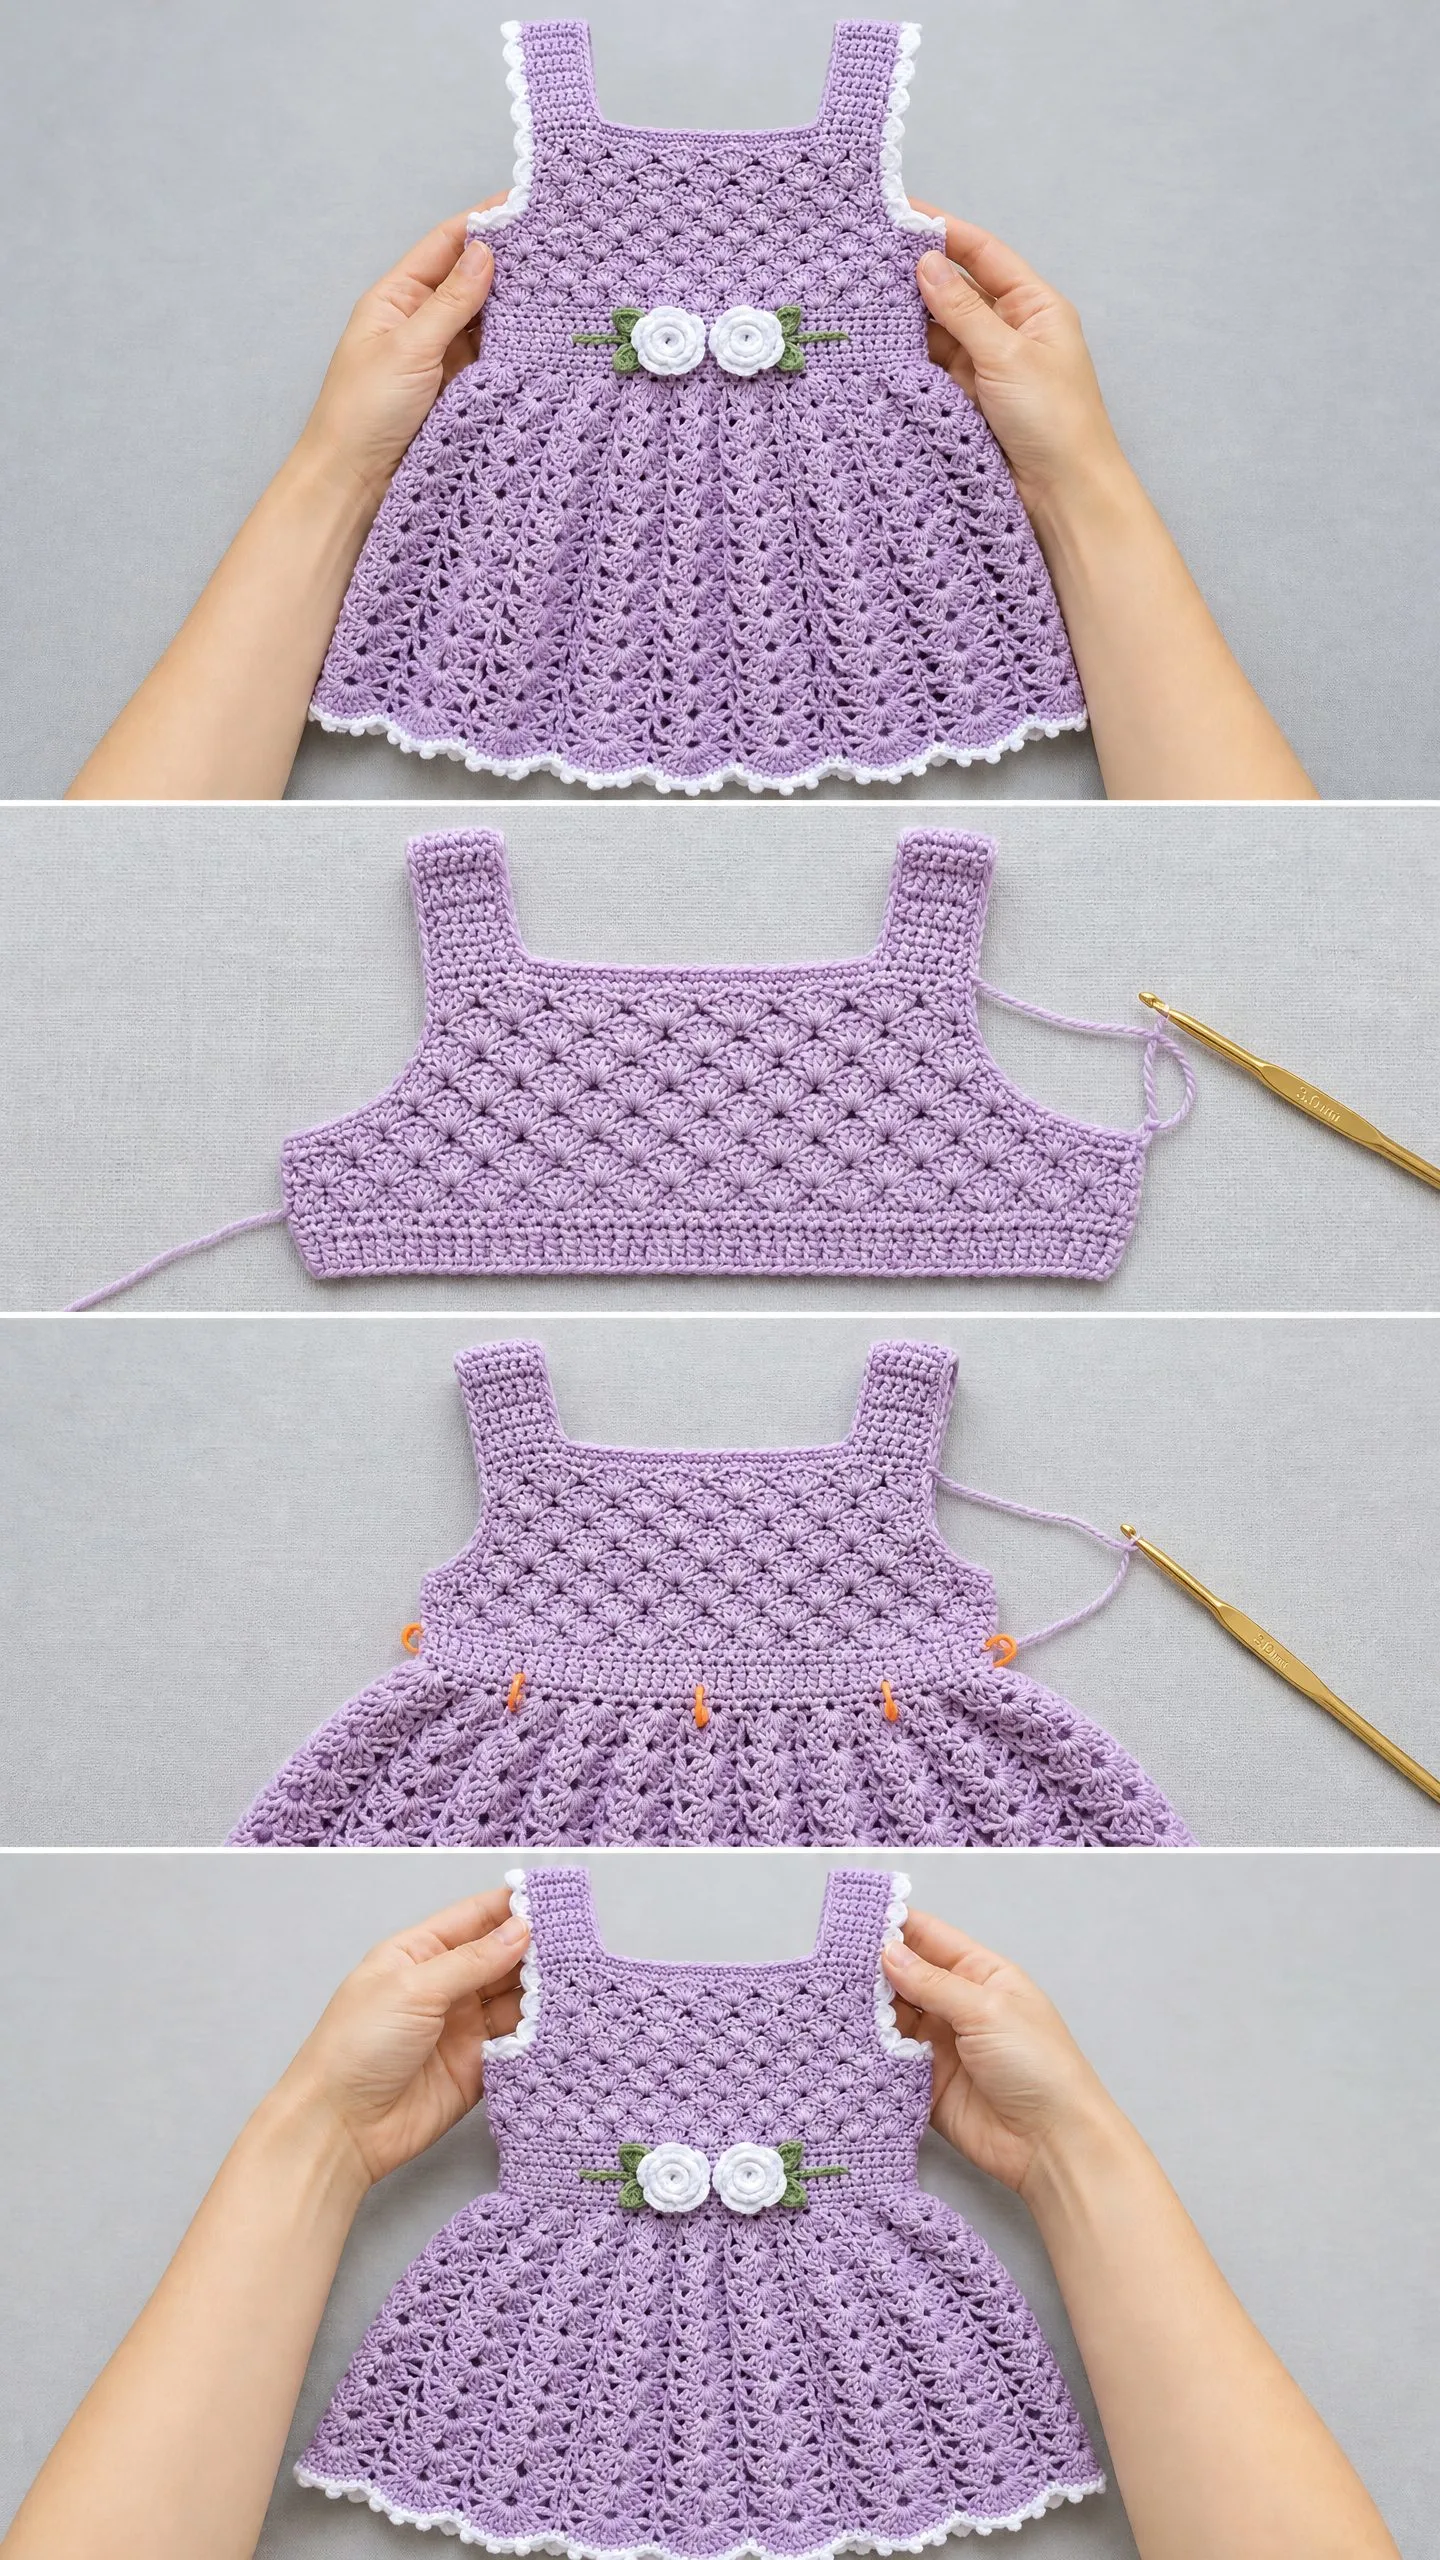
The construction is clever too. You work the bodice flat in two panels, seam them at the shoulders and sides, then join at the empire waist to work the skirt seamlessly in the round. No picking up stitches along curved edges. No complicated armhole shaping. Just straightforward crochet that builds into something genuinely impressive.
The white picot edging adds a crisp professional finish. Those sweet crocheted roses at the waistline take maybe fifteen minutes each and transform the whole piece. This is absolutely a dress people will ask you about. They will assume you bought it somewhere fancy.
Finished Measurements
This pattern is written for size 6 to 12 months.
Chest circumference: 18 inches or 46 cm (lying flat, each panel measures 9 inches or 23 cm)
Length from shoulder to hem: 13 inches or 33 cm
Strap width: 1.5 inches or 3.8 cm
Intended fit: Babies with approximately 17 to 19 inch or 43 to 48 cm chest measurement
Materials Needed
Yarn: Approximately 350 yards or 320 meters of DK weight yarn (CYCA 3) in lavender as your main color. You will also need approximately 50 yards or 46 meters in white for the contrast trim and roses. A small amount of green yarn is needed for the leaves.
Hook: US Size E-4 or 3.5 mm crochet hook
Notions:
Yarn Suggestions for This Baby Dress Crochet Pattern
Paintbox Yarns Simply DK works beautifully here. It is 100% acrylic with excellent stitch definition, machine washable, and widely available. Use 3 skeins in Dusty Lilac and 1 skein in Paper White.
Lion Brand Pound of Love is an economical choice if you want to make multiple dresses or have yarn left for future projects. It is ultra soft and machine washable. One skein covers both colors with plenty to spare.
Drops Baby Merino is a premium option for natural fiber lovers. This 100% superwash merino has gorgeous drape against baby skin. Use 2 skeins for the main color and 1 for contrast. Hand wash cold and lay flat to dry.
Any DK weight yarn that meets gauge will work. Avoid heavily textured or fuzzy yarns because they will obscure the lace pattern.
Gauge
Getting gauge right matters for a garment. Take time to swatch before you begin.
In shell stitch pattern (bodice): 16 stitches and 10 rows equals 4 inches or 10 cm
In fan lace pattern (skirt): One complete 6 stitch fan repeat equals 1.5 inches or 3.8 cm wide. 4 rounds of fan lace equals 1.75 inches or 4.5 cm tall.
If your swatch is too big, go down a hook size. Too small, go up a hook size.
Abbreviations and Stitch Definitions
Let me walk you through every abbreviation you will encounter in this crochet tutorial. I am defining each one in plain English so nothing catches you off guard.
ch = chain. Yarn over and pull through the loop on your hook.
sl st = slip stitch. Insert hook, yarn over, pull through both the stitch and the loop on your hook in one motion.
sc = single crochet. Insert hook, yarn over, pull up a loop (2 loops on hook), yarn over, pull through both loops.
hdc = half double crochet. Yarn over, insert hook, yarn over, pull up a loop (3 loops on hook), yarn over, pull through all 3 loops.
dc = double crochet. Yarn over, insert hook, yarn over, pull up a loop (3 loops on hook), yarn over, pull through 2 loops (2 loops remain), yarn over, pull through remaining 2 loops.
tr = treble crochet. Yarn over twice, insert hook, yarn over, pull up a loop (4 loops on hook), then yarn over and pull through 2 loops three separate times.
sk = skip. Pass over the indicated stitch without working into it.
st(s) = stitch or stitches
sp = space
ch-sp = chain space. The gap created by a chain in the previous row or round.
t-ch = turning chain
RS = right side. The side of the fabric that faces outward when worn.
WS = wrong side. The side that faces the body.
MC = main color (lavender)
CC = contrast color (white)
rep = repeat
rem = remaining
beg = beginning
Special Stitches for This Pattern
Shell Stitch (Used in Bodice)
Work 5 double crochets all into the same stitch or space. That is one shell. When the pattern says "shell," you work 5 dc into whatever stitch or space is indicated. The shells create that beautiful scalloped texture you see in the bodice.
Fan Lace Stitch (Used in Skirt)
Each fan consists of 2 dc, ch 2, 2 dc all worked into a chain 2 space. Between fans, you work a chain 2 space anchored with a single crochet into the chain space between fans from the previous round.
The repeat unit is: sc into ch-sp, ch 2, work (2 dc, ch 2, 2 dc) into next ch-sp, ch 2. This creates the open lacy texture of the skirt.
Picot Edging
This gives that delicate pointed trim around the neckline, armholes, and hem.
Step 1: Insert hook into stitch and draw up a loop.
Step 2: Chain 3.
Step 3: Slip stitch back into the first chain of the 3 chain you just made.
Step 4: Single crochet into the next stitch.
Repeat these steps across or around the edge.
Crocheted Rose
Chain 36.
Row 1: Work 2 dc in the 4th chain from hook, then work 3 dc in each chain across. (99 dc)
Fasten off, leaving a 10 inch tail. Roll the strip into a spiral with the top edge curling outward naturally. Use the tail to stitch through the base of the spiral several times to secure. The finished rose should measure approximately 0.75 inches or 2 cm in diameter.
Leaf (Make 4)
Using green yarn or CC, chain 8.
Row 1: Sc in 2nd ch from hook, hdc in next, dc in next 2, hdc in next, sc in next, sl st in last ch. Do not turn. Working along the opposite side of the foundation chain: sc in next, hdc in next, dc in next 2, hdc in next, sc in next, sl st in last. (14 sts around)
Fasten off, leaving a tail for sewing.
Pattern Notes Before You Begin
Read through these notes. They will save you confusion later.
1. The dress is worked from the top of the back bodice downward. Back and front bodice panels are worked flat, then joined at shoulders and sides. The skirt is worked in the round.
2. The bodice shell pattern creates dense structured fabric. The fan lace skirt creates an open flared silhouette.
3. In the bodice, chain 3 at the beginning of each row counts as the first dc. In skirt rounds, chain 3 counts as first dc.
4. The dress has an open back by design. The straps are wide enough to allow easy dressing without buttons or closures.
5. White picot edging is applied after the main dress is complete.
6. Stitch count checkpoints are provided throughout. Check your counts before moving to the next section.
How to Crochet the Lavender Rose Baby Dress
Section 1: Back Bodice Panel
The back bodice begins at the top back neckline and is worked downward in rows.
Using MC, chain 40.
Row 1 (RS): Dc in 4th ch from hook (the ch 3 counts as first dc). Sk 2 ch, shell in next ch, sk 2 ch, dc in next ch. Repeat from to 6 times total. Turn. (7 dc posts, 6 shells, 37 dc total)
Rows 2 through 12: Ch 3, turn. Shell in center dc of next shell, dc in next single post. Repeat from to across, ending with shell in center dc of last shell, dc in top of t-ch. Turn. (37 dc per row)
After Row 12, fasten off leaving a 24 inch tail for seaming.
Section 2: Front Bodice Panel
Work exactly as Back Bodice, Rows 1 through 12. Fasten off, leaving a 24 inch tail for seaming.
Section 3: Joining the Bodice Panels
Lay both panels with RS facing outward. The top edges (Row 1) become the neckline. The bottom edges (Row 12) become the empire waistline.
Strap placement: Each strap spans approximately 6 stitches on the outer edges of each panel.
Left strap: Using your yarn needle, whip stitch the leftmost 6 dc of the front panel top edge to the leftmost 6 dc of the back panel top edge.
Right strap: Seam the rightmost 6 dc of front to rightmost 6 dc of back.
The center stitches on each panel remain open as the front and back necklines.
Side seams: Using mattress stitch, seam the left side edges together from Row 3 down to Row 12. Leave Rows 1 and 2 open as part of the armhole. Repeat for the right side.
Section 4: Empire Waistline and Skirt Join
With RS facing, join MC at any side seam along the bottom edge of the joined bodice.
Round 1: Ch 3 (counts as dc). Work dc evenly around the entire bottom edge of the bodice, working approximately 74 dc total (37 from front panel plus 37 from back panel). Join with sl st to top of ch 3. (74 dc)
Round 2 (Increase Round): Ch 3. Dc in same st. Dc in next 3 sts, 2 dc in next st. Repeat from to around. Join with sl st. (approximately 92 dc)
Round 3 (Set up Fan Lace): Ch 5 (counts as dc plus ch 2). Sk 2 sts. Work (2 dc, ch 2, 2 dc) in next st, ch 2, sk 2 sts, sc in next st, ch 2, sk 2 sts. Repeat from to around, adjusting final stitches as needed to complete the round evenly. Join with sl st to 3rd ch of ch 5.
Section 5: Fan Lace Skirt
Continue working the fan lace pattern in rounds.
Rounds 4 through 20: Ch 5 (counts as dc plus ch 2). Work (2 dc, ch 2, 2 dc) into the ch 2 sp at center of next fan, ch 2, sc into the ch 2 sp between fans, ch 2. Repeat from to around. Join with sl st.
The skirt will naturally flare as you work. After Round 20, the skirt should measure approximately 8 to 9 inches from empire waist to hem.
Fasten off MC.
Section 6: White Picot Edging
Hem edging: Join CC at any point along the bottom edge of the skirt. Work picot edging around the entire hem: sc in next st, ch 3, sl st in first ch (picot made), sc in next st. Repeat from to around. Join with sl st. Fasten off.
Neckline edging: Join CC at center back neckline. Work picot edging across the back neckline, up and over the left strap, across the front neckline, up and over the right strap, and back to starting point. Join with sl st. Fasten off.
Armhole edging: Join CC at the bottom of one armhole opening. Work picot edging around the entire armhole opening. Join with sl st. Fasten off. Repeat for second armhole.
Section 7: Roses and Leaves
Make 2 roses following the Crocheted Rose instructions above using white yarn.
Make 4 leaves following the Leaf instructions above using green yarn.
Position the two roses at center front of the empire waistline seam. Arrange 2 leaves on each side of the roses, angling them outward. Using your yarn needle and matching yarn tails, stitch the roses and leaves securely to the dress.
Finishing Your Baby Dress
Weave in all remaining ends with your yarn needle. Take your time with this step. Baby clothes get washed frequently, and secure ends prevent unraveling.
Wet block the dress by soaking it in cool water for about 15 minutes. Gently squeeze out excess water without wringing. Lay flat on a blocking mat or clean towel. Pin the skirt into a nice circular shape and let the shells and fans open up. Allow to dry completely before removing pins.
Tips for Success with This Crochet Pattern
Consistent tension matters. The transition from bodice to skirt involves switching from dense shells to open lace. Take a break between sections if needed so your tension stays even.
Count your shells regularly. It is much easier to fix a mistake in Row 3 than to discover it in Row 10.
Block before adding edging. This helps you see the true size and shape before committing to the final trim.
Make the roses last. They are quick and satisfying. Save them as a reward after finishing the main dress.
Customizing the Size
For a smaller size (3 to 6 months), reduce the foundation chain by 8 stitches (chain 32 instead of 40) and work 5 shells instead of 6. Work 10 rows of bodice instead of 12. Reduce skirt rounds by 2 to 4.
For a larger size (12 to 18 months), increase the foundation chain by 8 stitches (chain 48) and work 7 shells. Add 2 rows to the bodice and 2 to 4 rounds to the skirt.
Always check measurements against a garment that fits the intended baby.
I really hope you enjoy making this sweet little lavender rose baby dress crochet pattern. It is the kind of project that looks so much more complicated than it actually is, and the finished result is absolutely heirloom worthy. If you make one, I would genuinely love to see it. Save this pattern to your Pinterest boards so you can find it when you are ready to start, and please drop a comment below to let me know how yours turns out. Happy crocheting!
