These sweet little snakes are about to become your new favorite project. I’m so excited to share this plush snake amigurumi crochet pattern with you because it hits that perfect sweet spot. Simple enough for confident beginners, satisfying enough for experienced crocheters who want a relaxing make.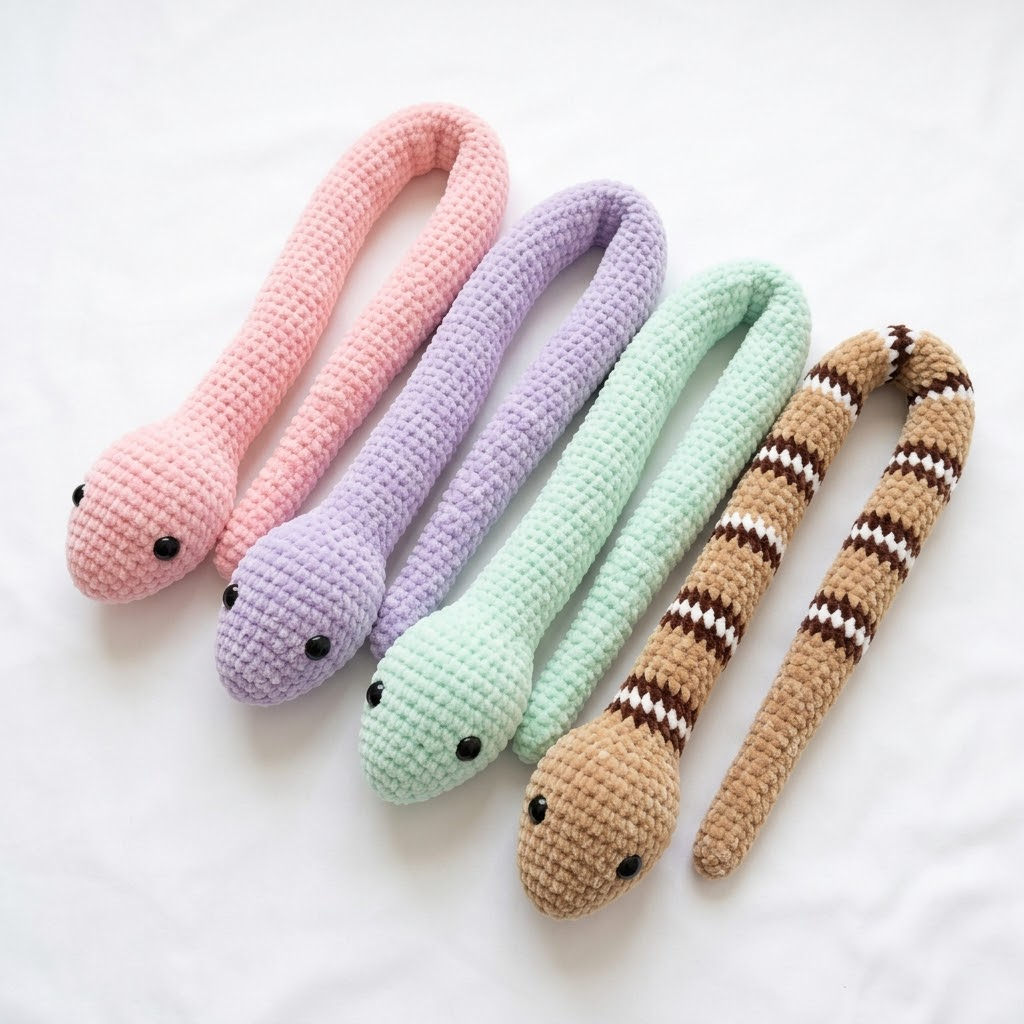
Looking at these cuddly serpents, you can see they work up in soft chenille yarn with that signature velvety texture everyone loves. The construction is beautifully straightforward. You are essentially crocheting one long tube that tapers at both ends. No seaming multiple pieces together. No complicated shaping. Just pure meditative rounds of single crochet.
Whether you make them in solid pastels like the pink, lavender, and mint versions or add stripes like that gorgeous tan and brown snake, these little guys measure approximately 16 to 18 inches long when finished. Perfect for gifting, nursery decor, or honestly just keeping on your couch because they make you smile.
Let me walk you through everything you need to bring these adorable amigurumi snakes to life.
Materials You Will Need for This Snake Crochet Pattern
Yarn:
- Approximately 50 to 70 grams of chenille or velvet yarn per snake (I recommend Himalaya Dolphin Baby or similar)
- For the striped version: two contrasting colors, roughly 35 grams each
Hook:
- 4.0mm crochet hook (adjust if needed to achieve tight stitches with no stuffing showing through)
Notions:
- One pair of 8mm or 9mm black safety eyes
- Polyester fiberfill stuffing
- Tapestry needle
- Stitch marker
- Scissors
Gauge:
Exact gauge is not critical for amigurumi, but your stitches should be tight enough that stuffing does not peek through. If you see white fiberfill between stitches, go down a hook size.
Skill Level and Techniques
This plush snake amigurumi pattern is beginner friendly with some experience. You should feel comfortable working in continuous rounds and know how to increase and decrease.
Stitches and abbreviations used:
- Magic ring (MR): An adjustable starting ring that pulls closed with no hole in the center. You wrap yarn around your fingers, pull through a loop, then work your first stitches into that ring.
- Chain (ch): The foundation stitch. Yarn over, pull through the loop on your hook. That is one chain.
- Single crochet (sc): Insert hook into stitch, yarn over and pull up a loop (two loops on hook), yarn over and pull through both loops. That is one single crochet.
- Increase (inc): Work two single crochet stitches into the same stitch. This adds one stitch to your count.
- Invisible decrease (invdec): Insert hook through the front loops only of the next two stitches, yarn over and pull through both front loops, yarn over and pull through both loops on hook. This creates a neater decrease than the standard method, especially important with chunky yarn.
- Slip stitch (sl st): Insert hook, yarn over, pull through stitch and loop on hook in one motion. Used to join or fasten off.
Do not worry if invisible decrease feels awkward at first. It gets easier after a few tries, and it really does make the decreases less visible on plush yarn.
Understanding the Construction
Before you dive in, let me explain how this snake comes together. It helps to picture the whole process.
You will start at the tail, working a small point that gradually widens. Then you will crochet a long body section with consistent stitch counts. Finally, you will shape the head with increases to create that slightly wider, rounded look, then decrease back down to close.
The entire snake is worked in continuous rounds. This means you do not join at the end of each round. You just keep spiraling. Use a stitch marker to track where each round begins. Move it up as you go.
Stuff the snake as you work. Do not wait until the end. With a long narrow tube like this, it is much easier to add small amounts of fiberfill every few inches. Pack it firmly but not so tight that the shape distorts.
Step by Step Crochet Pattern for the Plush Snake Amigurumi
The Tail
Round 1: Make a magic ring, work 4 sc into the ring. Pull closed. (4 sts)
Round 2: Inc in each st around. (8 sts)
Round 3: Sc in each st around. (8 sts)
Round 4: *Sc 1, inc* repeat around. (12 sts)
Round 5: Sc in each st around. (12 sts)
Round 6: *Sc 2, inc* repeat around. (16 sts)
Round 7: Sc in each st around. (16 sts)
Round 8: *Sc 3, inc* repeat around. (20 sts)
Round 9: Sc in each st around. (20 sts)
Round 10: *Sc 4, inc* repeat around. (24 sts)
Rounds 11 to 12: Sc in each st around. (24 sts)
You now have your tapered tail section. The snake should already be taking shape.
The Body
This is the easy part. Pure repetition. Put on a podcast and enjoy.
Rounds 13 to 70: Sc in each st around. (24 sts)
That is approximately 58 rounds of consistent single crochet. Your body section will measure roughly 12 to 13 inches depending on your tension.
Stuffing reminder: Add fiberfill every 10 to 15 rounds. Use the back of your hook or a chopstick to push stuffing down into the tail and distribute evenly.
Want a longer snake? Simply add more rounds here. Each round adds about a quarter inch of length.
Making the striped version? Change colors every 3 to 4 rounds for bold stripes. Carry the unused color loosely up the inside, or cut and rejoin for cleaner color changes. The tan and brown snake in the photos shows stripes approximately 3 rounds each.
The Head
Now we widen slightly to create that sweet rounded head shape.
Round 71: *Sc 3, inc* repeat around. (30 sts)
Round 72: Sc in each st around. (30 sts)
Round 73: *Sc 4, inc* repeat around. (36 sts)
Rounds 74 to 80: Sc in each st around. (36 sts)
This gives you a nice plump head section, about 7 rounds at the widest point.
Installing Safety Eyes
Stop here to attach the safety eyes. This is much easier while you can still reach inside the head.
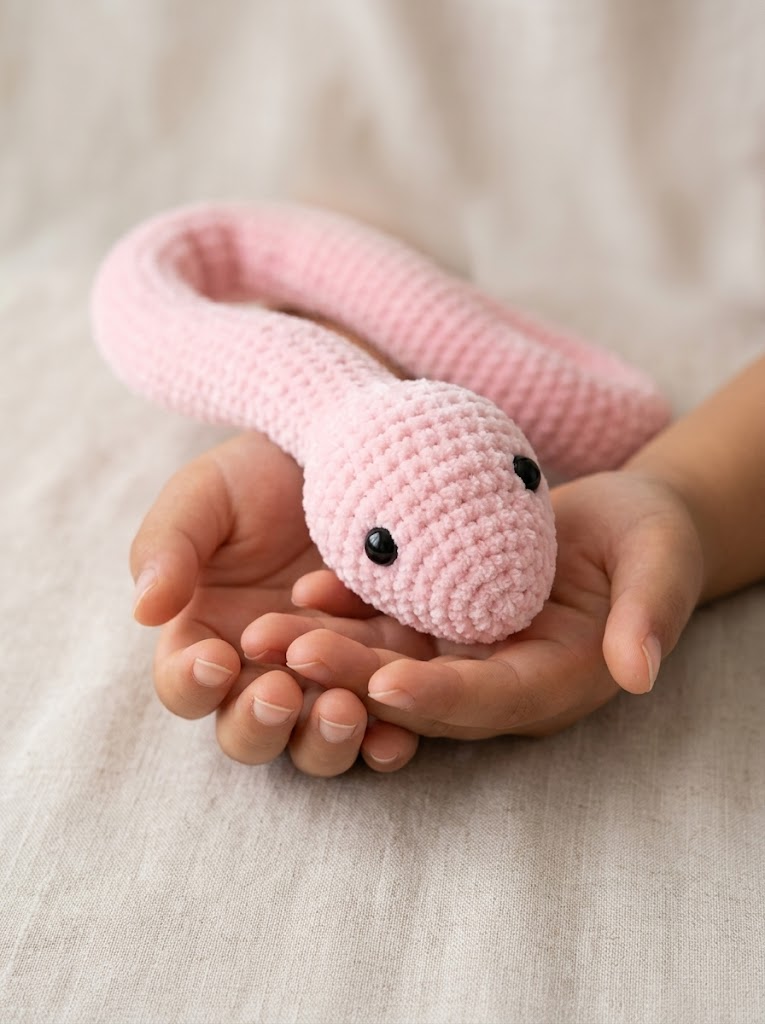
Position the eyes on Round 76 or 77, approximately 6 to 8 stitches apart. The snakes in the photos have their eyes placed closer to the front and slightly angled, giving them that adorable curious expression.
Push the post through from the outside, then secure the washer firmly on the inside. Give each eye a gentle tug to make sure it is locked in place.
Tip for chenille yarn: The plush fibers can make it tricky to see your stitches clearly. Use good lighting and take your time positioning the eyes. A slight asymmetry adds character, so do not stress about perfection.
Closing the Head
Round 81: *Sc 4, invdec* repeat around. (30 sts)
Round 82: Sc in each st around. (30 sts)
Round 83: *Sc 3, invdec* repeat around. (24 sts)
Round 84: *Sc 2, invdec* repeat around. (18 sts)
Stuff the head firmly now. You want a nice rounded shape.
Round 85: *Sc 1, invdec* repeat around. (12 sts)
Round 86: Invdec around. (6 sts)
Add any final bits of stuffing.
Fasten off: Cut yarn leaving a 6 inch tail. Thread through your tapestry needle, weave through the front loops of the remaining 6 stitches, pull tight to close the hole. Weave in the end securely and bury it inside the body.
Finishing Your Amigurumi Snake
Your plush snake is essentially done at this point. Here are a few finishing touches:
Weave in the starting tail: Use your tapestry needle to bury the magic ring tail inside the snake body. No loose ends showing.
Shape the body: Gently bend and curve the snake into a natural pose. The chenille yarn holds shape nicely, so you can create gentle curves.
Fluff the stitches: Chenille yarn can look a bit flattened after handling. Use a soft brush or your fingers to gently lift the fibers and restore that velvety texture.
Tips for Working with Chenille Yarn
Chenille and velvet yarns create the most huggable amigurumi, but they have some quirks. Here is what I have learned:
Stitch visibility: Those fluffy fibers hide your stitches. Go slowly, use good lighting, and feel for the stitch posts if you cannot see them clearly. Your stitch marker is your best friend.
Frogging is frustrating: Ripping back chenille yarn often damages the fibers and creates bald patches. Try to catch mistakes early. If you need to frog multiple rounds, the yarn may not look the same when reworked.
Hook choice: A hook with a defined throat (like a Clover Amour or Tulip Etimo) grabs chenille better than a shallow inline hook.
Tension consistency: Keep your tension firm and even. Loose stitches show more stuffing and create an uneven surface.
Customization Ideas for Your Snake Crochet Pattern
The basic pattern works beautifully as written, but here are some ways to make it your own:
Add a forked tongue: Crochet a small red or pink tongue using worsted weight yarn and a 3.0mm hook. Chain 6, slip stitch back, chain 4, slip stitch back, chain 2, fasten off. Sew it to the underside of the head near the tip.
Embroider details: Add nostrils with small french knots in black yarn. Or stitch a simple smile line.
Make a rainbow: Use scraps from your stash to create a gradient or rainbow snake.
Size variations: Use DK weight yarn and a 3.5mm hook for a smaller snake, or jumbo chenille and a 6.0mm hook for a giant cuddly version.
Who Is This Plush Snake Pattern Perfect For?
These amigurumi snakes make wonderful gifts for kids who love unusual stuffies. They are also surprisingly popular with adults who appreciate the quirky charm. Great for baby shower gifts (just make sure those safety eyes are secured properly), nursery decor, or anyone who thinks snakes are actually pretty cute when they are made of yarn.
The repetitive body section makes this a fantastic TV project. Once you get past the shaping, you can crochet on autopilot while watching your favorite show.
Wrapping Up This Snake Amigurumi Crochet Tutorial
Thank you so much for choosing this pattern for your next project. I really hope you enjoy making these sweet plush snakes as much as I enjoyed designing them. There is something so satisfying about watching that long body grow round after round.
If you make one (or five, because they are a little addictive), I would absolutely love to see your finished snakes. Tag me on Instagram or share in our Facebook group. Seeing your creations genuinely makes my day.
Happy crocheting, friend. You have got this.
