
I have been wanting to design jewelry that feels both delicate and substantial for ages. When I finally sat down to create these lace butterfly earrings, I had very specific goals in mind. They needed to look intricate enough to impress, work up quickly enough to make multiples, and use techniques that intermediate crocheters already know.
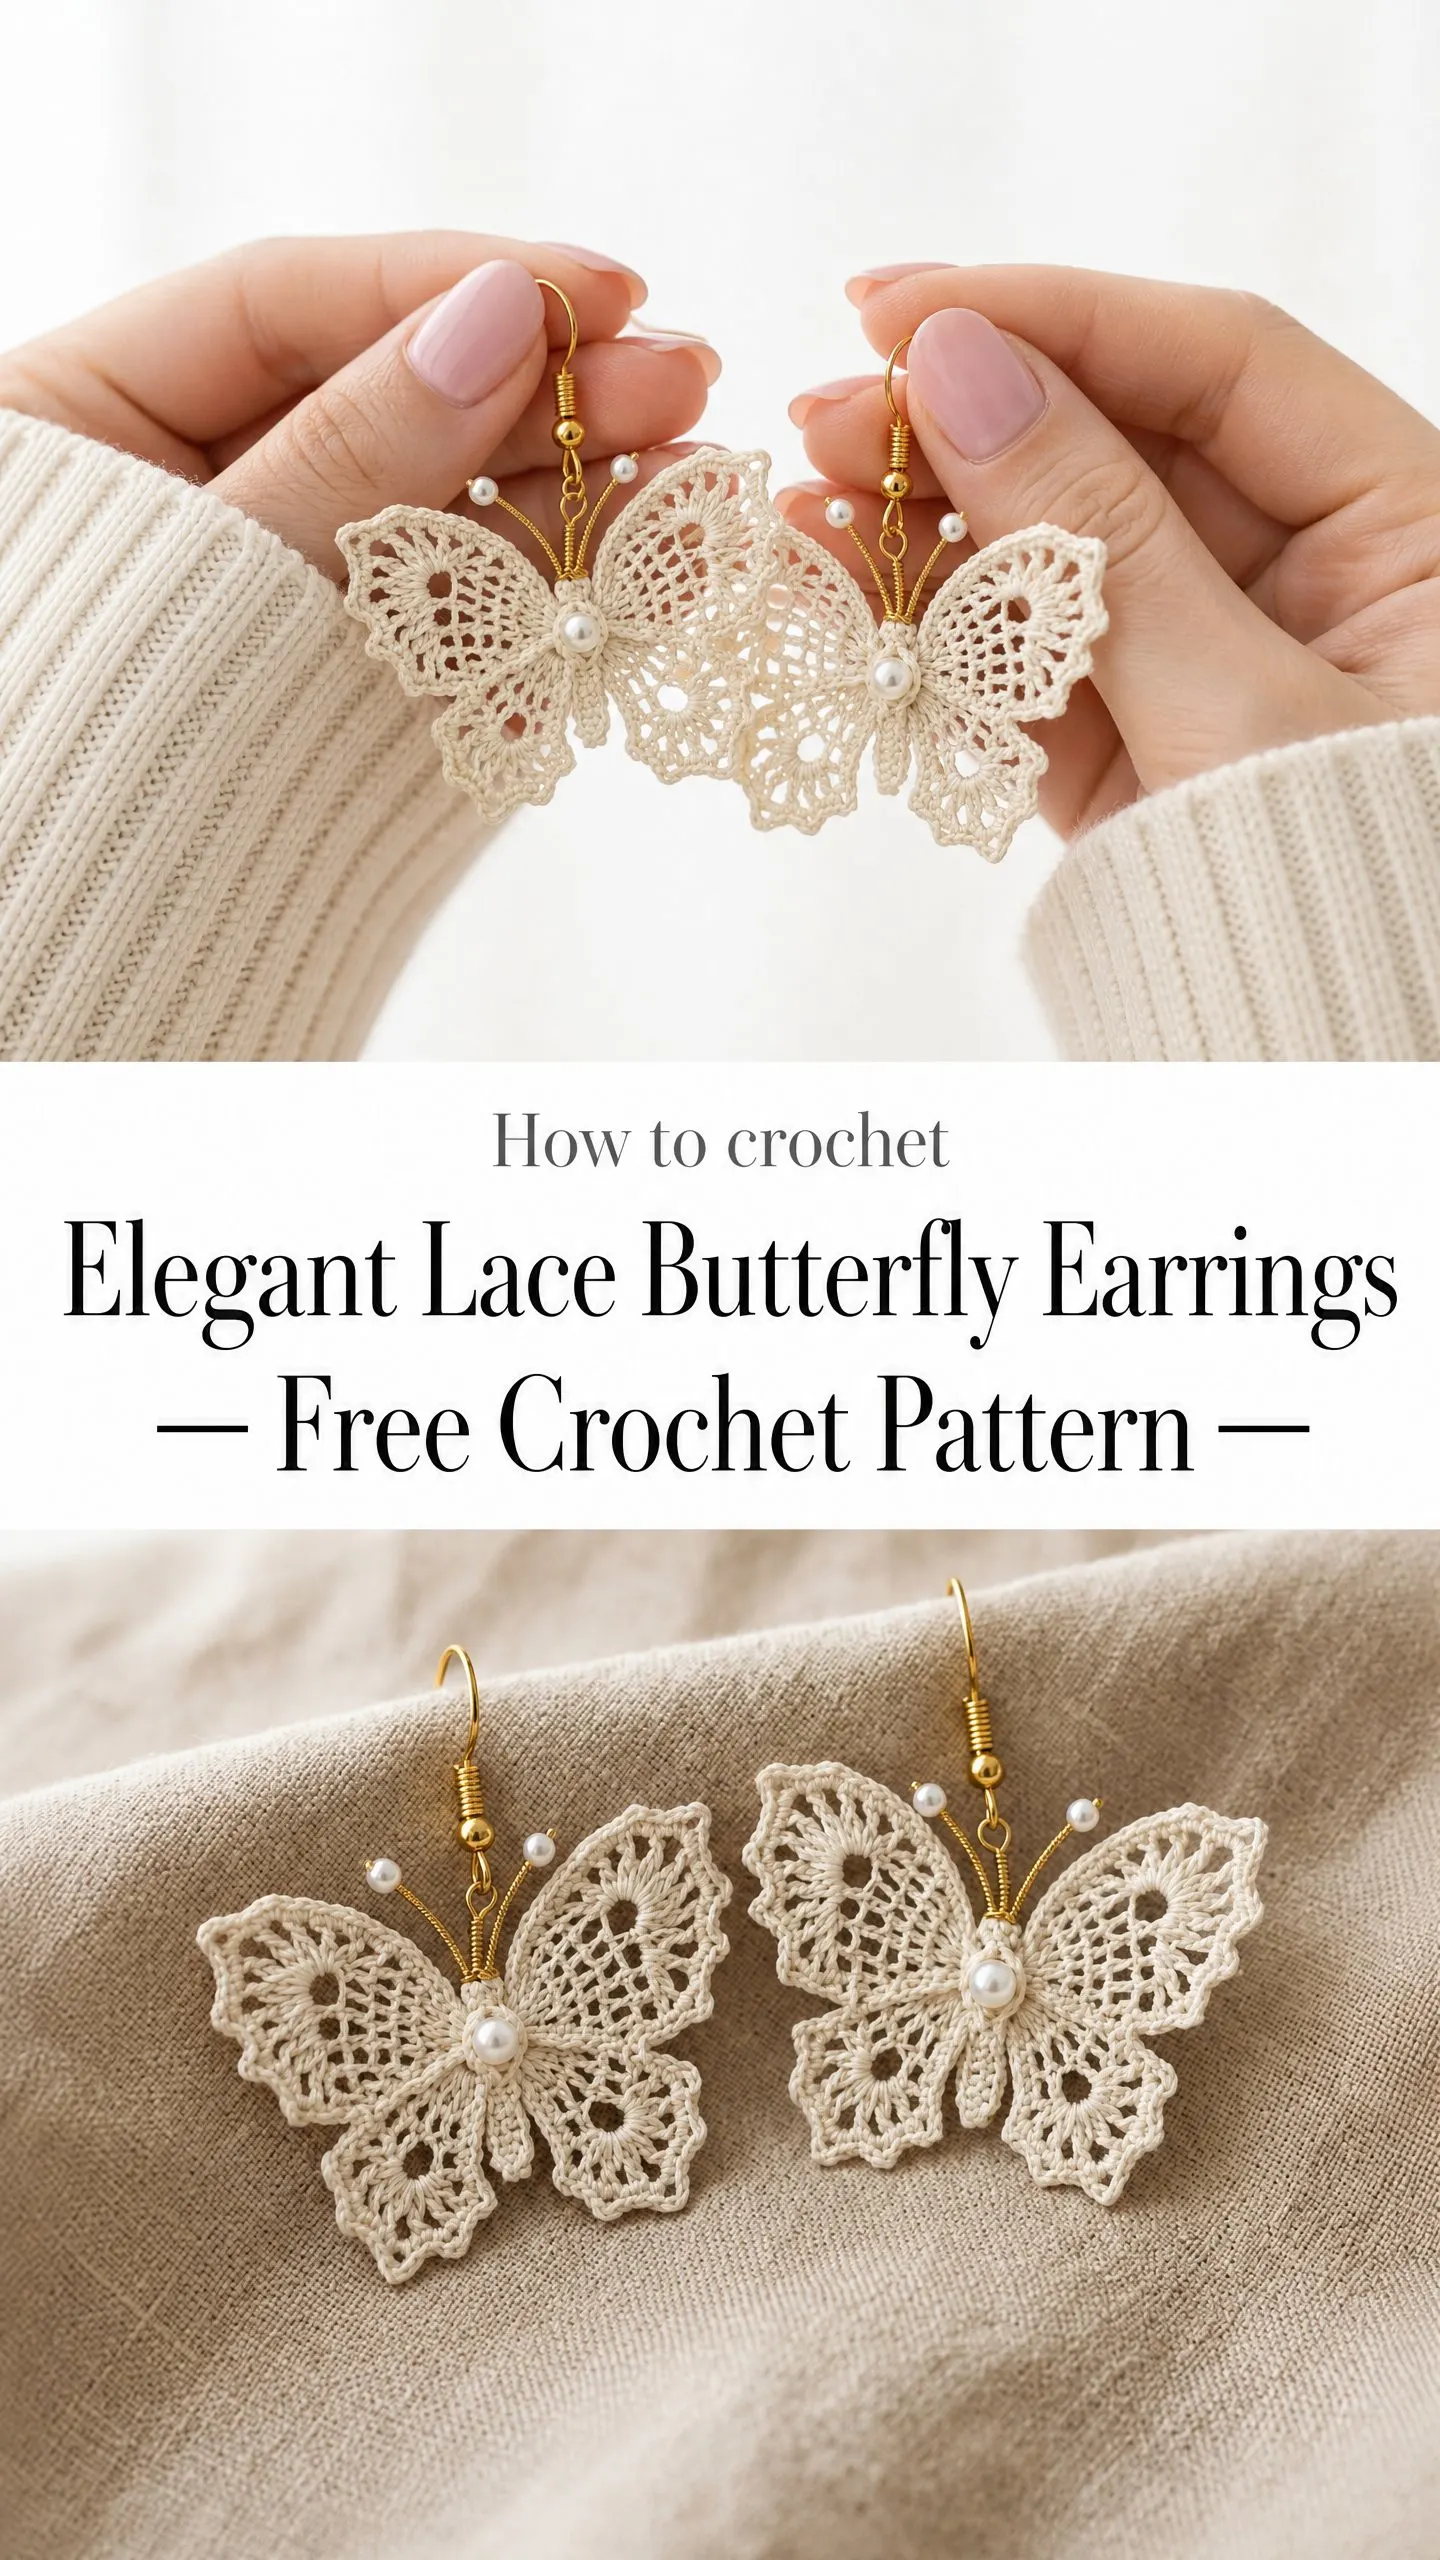
The combination of thread crochet with pearl accents and gold hardware created exactly the vintage-meets-modern aesthetic I was chasing. Every shell, every picot, every tiny chain space contributes to that airy, romantic silhouette.
I am SO pleased with how these turned out. They look like something you would find in a boutique, but they come straight from your own hook.
Why You Will Love This Crochet Pattern
These butterfly earrings hit a sweet spot that is hard to find in jewelry patterns. They are delicate without being fragile. They are detailed without being overwhelming. And they use stitches you probably already know, just on a smaller scale.
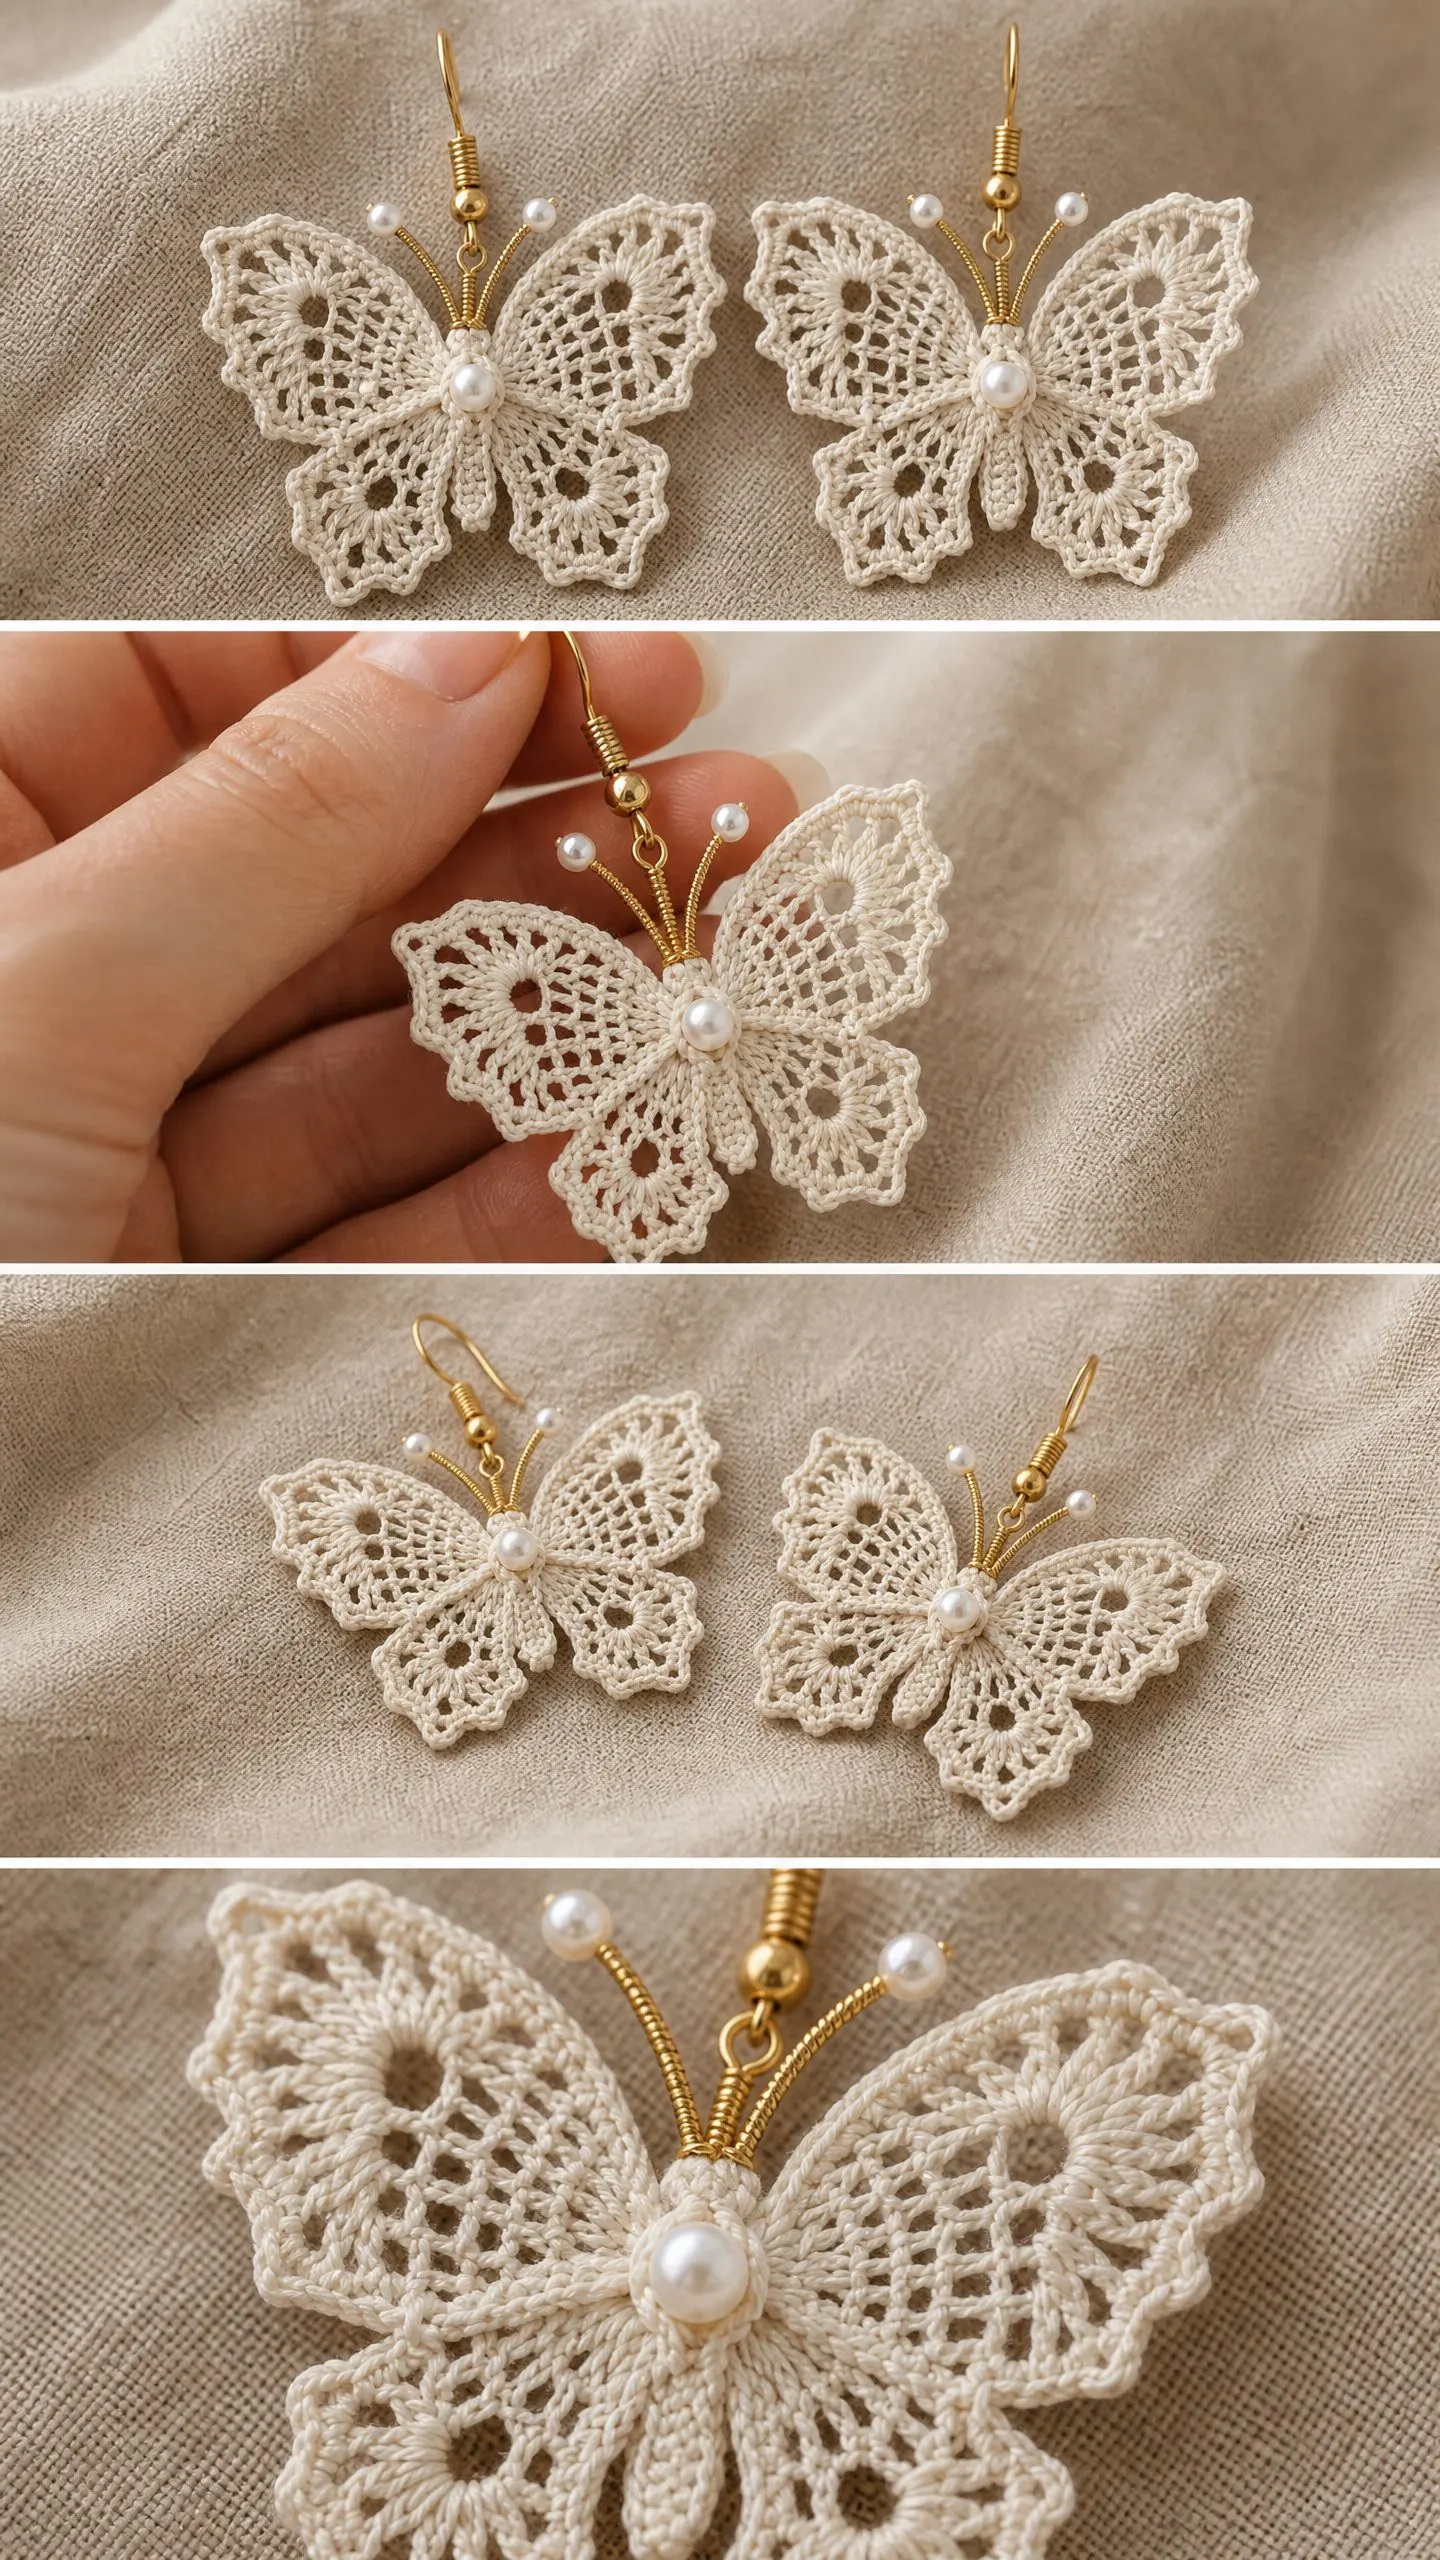
The finished butterflies measure approximately 2.25 inches wide by 1.75 inches tall, making them a statement piece without weighing down your ears. The total earring length from the top of the ear wire to the bottom of the butterfly is about 3.25 inches.
What makes this crochet tutorial special is the construction method. Each butterfly is worked flat in a single piece. You start at the center body and work outward to form the upper wings, then return to the center to create the lower wings. No seaming. No joining separate pieces. Just continuous, flowing lacework.
Skill Level and Time Investment
I am going to be honest with you. This pattern is labeled intermediate, and that rating is accurate. You will need comfort with working into chain spaces, forming picots, counting lace repeats, and maintaining even tension with fine thread.
If you have never done thread crochet before, I would recommend practicing with a simple doily or coaster pattern first. The small hook and thin thread take some getting used to.
That said, if you have made lace before, you will find this pattern completely approachable. No advanced techniques are required. Everything here builds on fundamental stitches.
Time estimate: Approximately 2 to 3 hours per pair, not including finishing and assembly. If you are experienced with thread crochet, you might finish a pair in 90 minutes.
Materials You Will Need
Let me walk you through everything required to make these gorgeous earrings.
Thread
Size 10 crochet cotton thread in natural cream or off-white. You will need approximately 15 yards per earring, so 30 yards total for the pair.
Yarn suggestions:
1. Aunt Lydia’s Classic Crochet Thread Size 10, Natural color. This is widely available, has consistent twist, and gives excellent stitch definition for lace work.
2. DMC Traditions Crochet Thread Size 10, Ecru. Smooth and tightly twisted. Holds picots crisp after blocking.
3. Lizbeth Size 10 Crochet Cotton by Handy Hands, Antique White. Slightly softer hand but still produces clean lace stitch definition.
Substitution note: Use any size 10 crochet cotton thread in a natural or cream colorway. Avoid mercerized threads with excessive sheen if you prefer a matte, vintage look. Do not substitute thicker thread or yarn without adjusting hook size and accepting a larger finished butterfly.
Hook
US Steel Hook Size 7 (1.65 mm)
Notions
Gauge
After blocking: 9 double crochet stitches and 4 rows = 1 inch (2.5 cm) using size 10 crochet cotton and a 1.65 mm steel hook.
Exact gauge is not critical for this project, but maintaining consistent tension ensures both earrings match each other. Work a small swatch and compare your butterflies side by side after blocking.
Abbreviations and Stitch Definitions
Let me define every stitch you will encounter. If you are new to any of these, read through this section carefully before starting.
ch = chain. Wrap yarn over hook, pull through loop on hook.
sl st = slip stitch. Insert hook, yarn over, pull through both the stitch and the loop on hook in one motion.
sc = single crochet. Insert hook, yarn over, pull up a loop (2 loops on hook), yarn over, pull through both loops.
hdc = half double crochet. Yarn over, insert hook, yarn over, pull up a loop (3 loops on hook), yarn over, pull through all 3 loops.
dc = double crochet. Yarn over, insert hook, yarn over, pull up a loop (3 loops on hook), yarn over, pull through 2 loops, yarn over, pull through remaining 2 loops.
tr = treble crochet. Yarn over twice, insert hook, yarn over, pull up a loop (4 loops on hook), yarn over, pull through 2 loops three times.
dtr = double treble crochet. Yarn over three times, insert hook, yarn over, pull up a loop, yarn over, pull through 2 loops four times.
sp = space
ch-sp = chain space
sk = skip
rep = repeat
rem = remaining
RS = right side
WS = wrong side
yo = yarn over
beg = beginning
st/sts = stitch/stitches
lp = loop
[ ] = work all instructions within brackets into the same stitch or space
( ) = stitch count at end of row or round
Special Stitches
These special stitches appear throughout the pattern. Take a moment to understand each one before you begin.
Picot: Chain 3, slip stitch into the first chain made (the chain closest to your hook base). This creates a small decorative loop that forms the scalloped edge detail along the wing borders.
Shell: Work 5 double crochets into the same stitch or chain space. This stitch creates the rounded petal-like sections visible on the lower wings.
Large Shell: Work 7 double crochets into the same stitch or chain space. Used for the widest lower wing sections.
V-stitch: Work 1 double crochet, chain 2, 1 double crochet into the same stitch or chain space. Used to open up lace sections within the wings.
Beginning Shell: Chain 3 (counts as first double crochet), work 4 more double crochets into the same stitch or space indicated. This replaces a Shell at the beginning of a segment.
Pattern Notes Before You Begin
1. Each butterfly is worked flat in a single piece. You will begin at the center top of the butterfly body and work outward to form the upper wings, then return to the center to work the lower wings.
2. The butterfly is symmetrical. The left and right wings of each pair are mirror images worked within the same flat piece.
3. Do not turn the work between wing sections unless the instructions specifically state to turn. Most sections are worked along the foundation or into existing stitches without turning.
4. The pattern is written for one earring. Repeat all steps for the second earring.
5. Chain 3 at the beginning of a row or segment counts as 1 double crochet throughout, unless stated otherwise.
6. After working the butterfly, the piece will be lightly blocked before assembly. Blocking dramatically improves the lace definition.
7. The antennae are created separately using wire and are attached after blocking.
8. Read through the full pattern before beginning. Understanding the construction order prevents confusion during the wing sections.
9. All stitch counts appear in parentheses at the end of each row or round.
10. Stitch markers may be placed at the beginning and end of each wing section to help track repeats.
Step by Step Crochet Instructions
Butterfly Body and Upper Wings
The butterfly begins with a small foundation that forms the body center and launches into the upper wings from either side. You will work the right upper wing first, then the left upper wing.
Body Foundation
Row 1 (Foundation Row): Ch 6, sl st into first ch to form a ring. Ch 1, work 8 sc into the ring. Do not join. Leave the ring as a flat foundation. (8 sc)
Note: You will now work the right upper wing outward from this foundation.
Right Upper Wing
Identify the 4 stitches on the right half of your foundation row as your working base for the right wing.
Row 2 (Right Wing, Row 1): Working into the 4 rightmost sc of the foundation ring (stitches 1 through 4), join thread with sl st into stitch 1. Ch 5 (counts as dc plus ch 2), sk next st, dc into next st, ch 2, sk next st, dc into next st. Turn. (3 dc, 2 ch-2 sp)
Row 3 (Right Wing, Row 2): Sl st into first ch-2 sp, ch 3 (counts as dc), 4 dc into same ch-2 sp (Shell made), ch 2, Shell into next ch-2 sp, ch 1, dc into top of turning ch. Turn. (2 Shells of 5 dc each, 1 ch-2 sp between, 1 dc at end) (13 dc, 1 ch-2 sp, 1 ch-1 sp)
Row 4 (Right Wing, Row 3): Ch 1, sl st into first dc (top of end dc), ch 4 (counts as tr), tr into same st, ch 3, sc into ch-2 sp between Shells, ch 3, [tr, ch 2, tr] into top of 3rd dc of next Shell (center dc), ch 3, sc into sp after last Shell, ch 3, [tr, ch 2, tr] into top of turning ch. Turn. (4 tr worked as pairs, 2 sc, 4 ch-3 sp, 2 ch-2 sp)
Row 5 (Right Wing, Row 4): Ch 1, sc into first tr, 3 sc into ch-2 sp, sc into next tr, [sc, ch 3, sc] into next sc (picot arch formed over sc), sc into next tr, 3 sc into ch-2 sp, sc into next tr, [sc, ch 3, sc] into next sc, sc into next tr, 3 sc into ch-2 sp, sc into next tr. Turn. (19 sc, 2 ch-3 picot arches)
Row 6 (Right Wing, Row 5, Outer Scallop Edge): Ch 1, sc into first sc, [picot, sk 1 sc, sc into next sc] across all sc, working picot into each ch-3 arch by sc into arch, picot, sc into arch. End with sc into last sc. Do not turn. Fasten off leaving a 6-inch tail. (Approximately 10 picots along outer wing edge)
Checkpoint: Your right upper wing should be a gently rounded lace fan shape extending to the right of the body foundation, approximately 1 inch wide and 0.75 inch tall.
Left Upper Wing
Row 2L (Left Wing, Row 1): With RS facing, join thread with sl st into stitch 8 of the foundation (leftmost sc). Ch 5 (counts as dc plus ch 2), sk next st, dc into next st, ch 2, sk next st, dc into next st. Turn. (3 dc, 2 ch-2 sp)
Row 3L: Sl st into first ch-2 sp, ch 3 (counts as dc), 4 dc into same ch-2 sp (Shell made), ch 2, Shell into next ch-2 sp, ch 1, dc into top of turning ch. Turn. (2 Shells of 5 dc each, 1 ch-2 sp, 1 end dc) (13 dc, 1 ch-2 sp)
Row 4L: Ch 1, sl st into first dc, ch 4 (counts as tr), tr into same st, ch 3, sc into ch-2 sp between Shells, ch 3, [tr, ch 2, tr] into center dc of next Shell, ch 3, sc into sp after last Shell, ch 3, [tr, ch 2, tr] into top of turning ch. Turn. (4 paired tr, 2 sc, 4 ch-3 sp, 2 ch-2 sp)
Row 5L: Ch 1, sc into first tr, 3 sc into ch-2 sp, sc into next tr, [sc, ch 3, sc] into next sc, sc into next tr, 3 sc into ch-2 sp, sc into next tr, [sc, ch 3, sc] into next sc, sc into next tr, 3 sc into ch-2 sp, sc into next tr. Turn. (19 sc, 2 ch-3 picot arches)
Row 6L: Ch 1, sc into first sc, [picot, sk 1 sc, sc into next sc] across, working picot into each ch-3 arch as before. End with sc into last sc. Do not turn. Fasten off leaving a 6-inch tail. (Approximately 10 picots along outer wing edge)
Checkpoint: Both upper wings are complete. They should be symmetrical, each extending approximately 1 inch to their respective sides. The body foundation ring sits centered between them.
Lower Wings
The lower wings are larger than the upper wings. They are worked from the bottom half of the body foundation, extending downward and outward to create the classic butterfly silhouette with wider lower wings.
Right Lower Wing
Row 1R-Lower: With RS facing, join thread into stitch 5 of the foundation ring (first stitch of lower half). Ch 6 (counts as dc plus ch 3), sk 1 st, dc into next st (stitch 7). Turn. (2 dc, 1 ch-3 sp)
Row 2R-Lower: Ch 3 (counts as dc), 6 dc into ch-3 sp (Large Shell begun), dc into top of turning ch. Turn. (8 dc)
Row 3R-Lower: Ch 4 (counts as tr), tr into first dc, ch 2, sk 2 dc, [dc, ch 2, dc] into next dc (V-stitch), ch 2, sk 2 dc, [tr, ch 2, tr] into last dc (turning ch top). Turn. (6 dc/tr, 3 ch-2 sp)
Row 4R-Lower: Ch 1, sc into first tr, [3 sc into ch-2 sp, sc into next st] three times, 3 sc into last ch-2 sp, sc into top of turning ch. Turn. (16 sc)
Row 5R-Lower: Ch 5 (counts as dc plus ch 2), sk 2 sc, dc into next sc, [ch 2, sk 2 sc, dc into next sc] 4 times. Turn. (6 dc, 5 ch-2 sp)
Row 6R-Lower: Ch 3 (counts as dc), [Shell into next ch-2 sp, ch 1] 4 times, Shell into last ch-2 sp, dc into top of turning ch. Turn. (5 Shells of 5 dc each, 4 ch-1 sp, 2 end dc) (27 dc total)
Row 7R-Lower (Scallop and Picot Edge): Ch 1, sc into first dc, [ch 3, sk 2 dc, sc into next dc, ch 3, sc into ch-1 sp] 4 times, ch 3, sk 2 dc, sc into next dc, ch 3, sc into last dc. Turn. (9 ch-3 sp, 10 sc)
Row 8R-Lower (Final Picot Edge): Ch 1, [sc into sc, picot, 3 sc into ch-3 sp, picot] across, ending sc into last sc. Do not turn. Fasten off. (9 picots along lower wing outer edge)
Left Lower Wing
Row 1L-Lower: With RS facing, join thread into stitch 8 of the foundation ring (last stitch of lower half, working in the opposite direction from the right lower wing). Ch 6 (counts as dc plus ch 3), sk 1 st, dc into next st (stitch 6). Turn. (2 dc, 1 ch-3 sp)
Row 2L-Lower: Ch 3 (counts as dc), 6 dc into ch-3 sp, dc into top of turning ch. Turn. (8 dc)
Row 3L-Lower: Ch 4 (counts as tr), tr into first dc, ch 2, sk 2 dc, [dc, ch 2, dc] into next dc (V-stitch), ch 2, sk 2 dc, [tr, ch 2, tr] into last dc. Turn. (6 dc/tr, 3 ch-2 sp)
Row 4L-Lower: Ch 1, sc into first tr, [3 sc into ch-2 sp, sc into next st] three times, 3 sc into last ch-2 sp, sc into top of turning ch. Turn. (16 sc)
Row 5L-Lower: Ch 5 (counts as dc plus ch 2), sk 2 sc, dc into next sc, [ch 2, sk 2 sc, dc into next sc] 4 times. Turn. (6 dc, 5 ch-2 sp)
Row 6L-Lower: Ch 3 (counts as dc), [Shell into next ch-2 sp, ch 1] 4 times, Shell into last ch-2 sp, dc into top of turning ch. Turn. (27 dc total)
Row 7L-Lower: Ch 1, sc into first dc, [ch 3, sk 2 dc, sc into next dc, ch 3, sc into ch-1 sp] 4 times, ch 3, sk 2 dc, sc into next dc, ch 3, sc into last dc. Turn. (9 ch-3 sp, 10 sc)
Row 8L-Lower: Ch 1, [sc into sc, picot, 3 sc into ch-3 sp, picot] across, ending sc into last sc. Do not turn. Fasten off. (9 picots along lower wing outer edge)
Checkpoint: All four wing sections are complete. Your flat butterfly should measure approximately 2.25 inches wide across the widest point of the lower wings and approximately 1.75 inches tall from top of upper wings to bottom of lower wings. The lower wings are noticeably larger and wider than the upper wings.
Body Center Detail
Weave in all thread tails securely. Using a sewing needle and matching thread, attach the 6 mm pearl bead to the center of the body foundation ring on the front (RS) of the butterfly. Pass the needle through the ring several times and through the bead to secure firmly. Knot and trim thread.
Finishing and Blocking Your Butterfly Earrings
Step 1 (Weave Ends): Weave in all thread tails using a tapestry needle. Trim excess.
Step 2 (Wet Block): Soak each butterfly in cool water with a small drop of wool wash or plain water for 5 minutes. Gently press out excess water in a clean towel without wringing.
Step 3 (Pin and Dry): Place the butterfly RS up on a foam blocking board. Use rust-proof pins to stretch and open each wing section to its fullest lace definition. Pin the picot points outward to emphasize the scalloped edge. Allow to dry completely (at least 4 hours or overnight).
Step 4 (Stiffen, Optional): For extra crispness and durability, lightly mist blocked butterfly with fabric stiffener spray while still pinned. Allow to dry fully before unpinning.
Step 5 (Antenna Assembly): Cut 4 lengths of gold wire each approximately 1.5 inches long. Thread one small 3 mm pearl bead onto one end of each wire. Using round-nose pliers, make a small loop at the pearl end to secure the bead. Bend each wire gently into a slight curve. You will use 2 antennae per butterfly.
Step 6 (Attach Antennae): Thread both antennae through the top center of the body foundation ring (the same area where the ear wire will attach), positioning them to splay outward and upward slightly to resemble natural butterfly antennae. Using flat-nose pliers, twist the base ends of the two antennae wires together beneath the foundation ring. Trim excess wire.
Step 7 (Attach Ear Wire): Open the jump ring using two pairs of pliers with a side-to-side twisting motion, never pulling apart. Pass the jump ring through the twisted antenna wire base and also through the loop of the gold fish-hook ear wire. Close the jump ring securely.
Step 8 (Final Check): Hold the earring by the ear wire and allow it to hang freely. Adjust the jump ring or antenna base as needed so the butterfly hangs level and faces forward.
Size Customization Tips
To make the butterflies slightly larger (approximately 2.75 inches wide): Use size 10 thread with a slightly larger steel hook such as a size 5 (1.9 mm) and add one additional row of shells to the lower wing before the picot edge row.
To make the butterflies smaller (approximately 1.75 inches wide): Use size 20 crochet cotton thread with a size 10 steel hook (1.15 mm). Reduce the lower wing shell row by omitting one repeat and close the picot edge one row earlier.
If working larger or smaller, always make both earrings with the same hook and tension to ensure the pair matches.
Care Instructions
Hand wash in cool water with mild soap. Gently reshape while damp and allow to air dry flat. Do not machine wash, machine dry, bleach, or iron. Remove earrings before swimming, showering, or applying hairspray or perfume to prolong the life of the thread and gold-tone hardware. Store flat or hanging in a jewelry box to prevent the lace from being crushed.
Final Thoughts on This Lace Butterfly Earrings Crochet Pattern
These elegant lace butterfly earrings are the kind of project that makes you feel like a true artisan. The combination of delicate thread work, shimmering pearls, and gold hardware creates jewelry that looks far more complicated than it actually is to make.
Once you complete your first pair, you will probably want to make more. They make incredible gifts for bridesmaids, birthdays, or anyone who appreciates handmade beauty. Try experimenting with different thread colors or pearl sizes to create your own variations.
Thank you so much for choosing this pattern. I truly hope you enjoy making these butterflies as much as I enjoyed designing them.
If you love how your earrings turn out, save this pattern to your Pinterest boards so you can find it again whenever inspiration strikes. And please leave a comment below if you make them. I would absolutely love to see your beautiful creations!
