
I’ve been looking for the perfect handmade accessory pattern to share, and this one stopped me in my tracks. A delicate crochet bracelet covered in layered roses, tiny crystal beads, and a satin ribbon closure. This is my favourite kind of project: small enough to finish in a weekend, stunning enough to wear to a wedding.
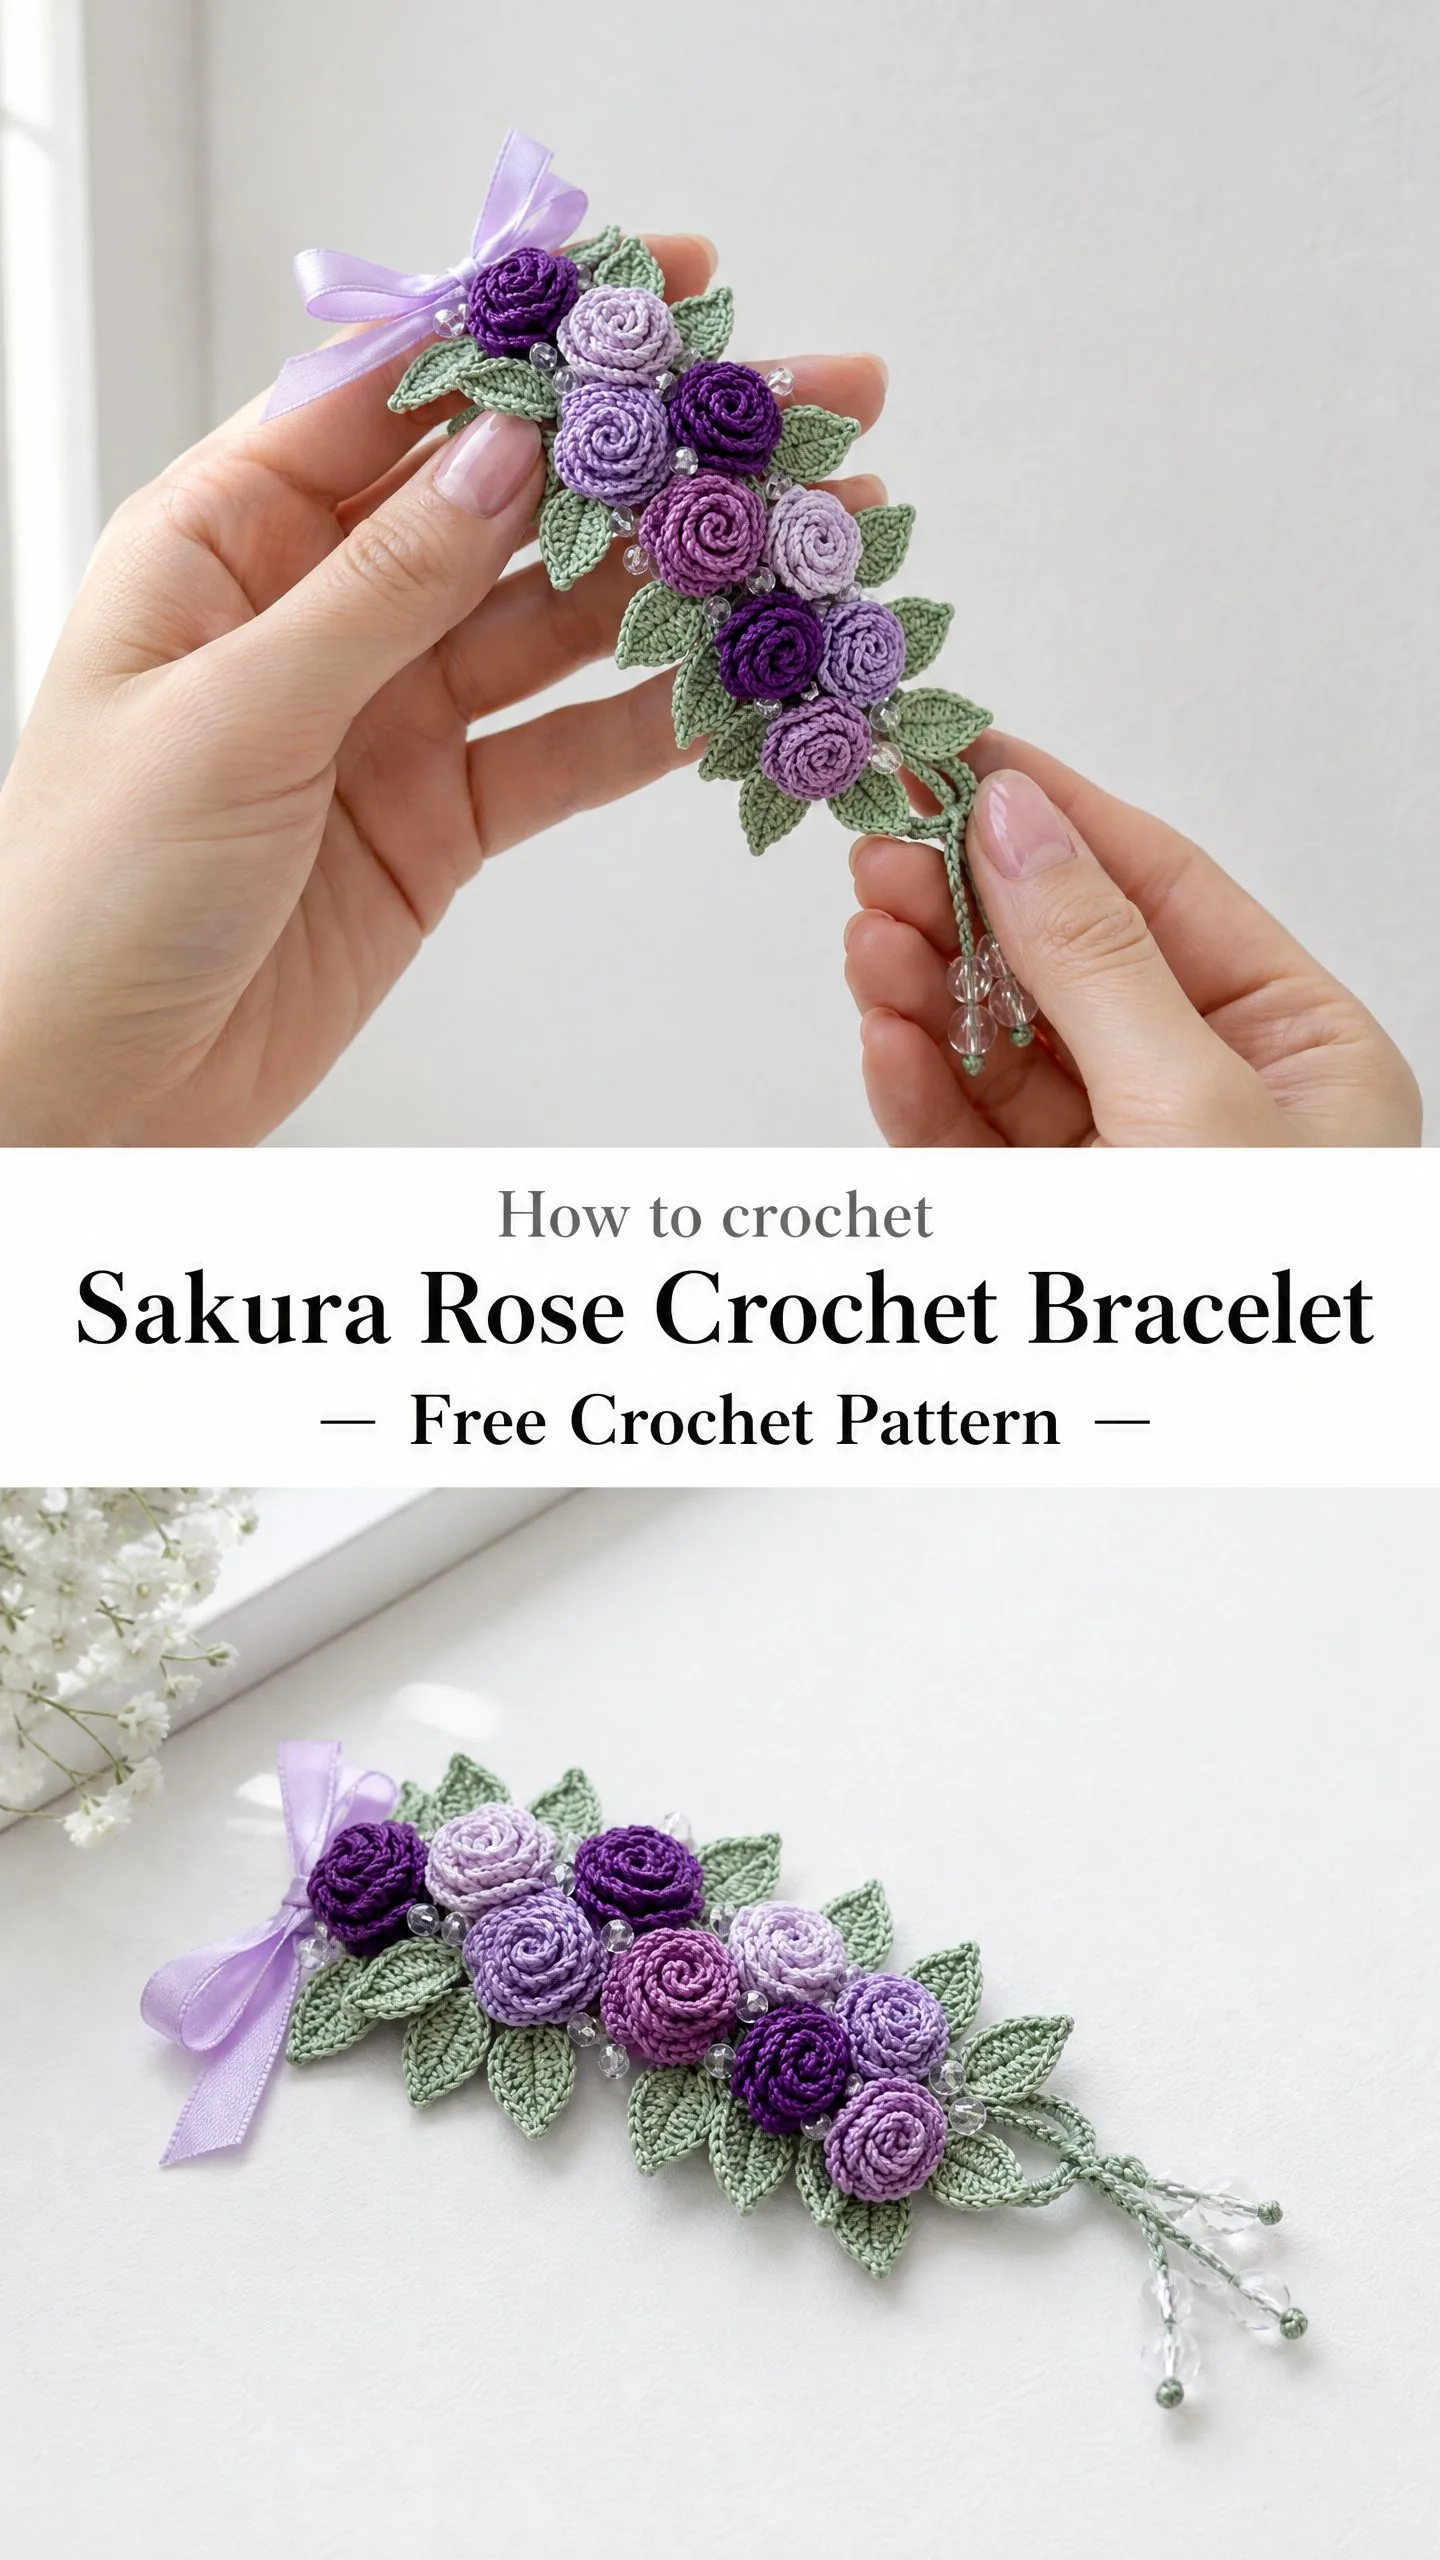
The Sakura Rose Crochet Bracelet combines multiple crochet components into one gorgeous wearable piece. You’ll make a simple lace band, then create individual roses and leaves that get assembled into a cascading floral spray. It sounds fancy, but I promise the techniques are approachable once you understand the building blocks.
If you’ve been wanting to try thread crochet or miniature floral motifs, this bracelet is an excellent introduction. The roses use a clever layered petal technique that creates incredible dimension. The finished piece looks like something from a boutique, but you made it with your own hands.
About This Crochet Bracelet Pattern
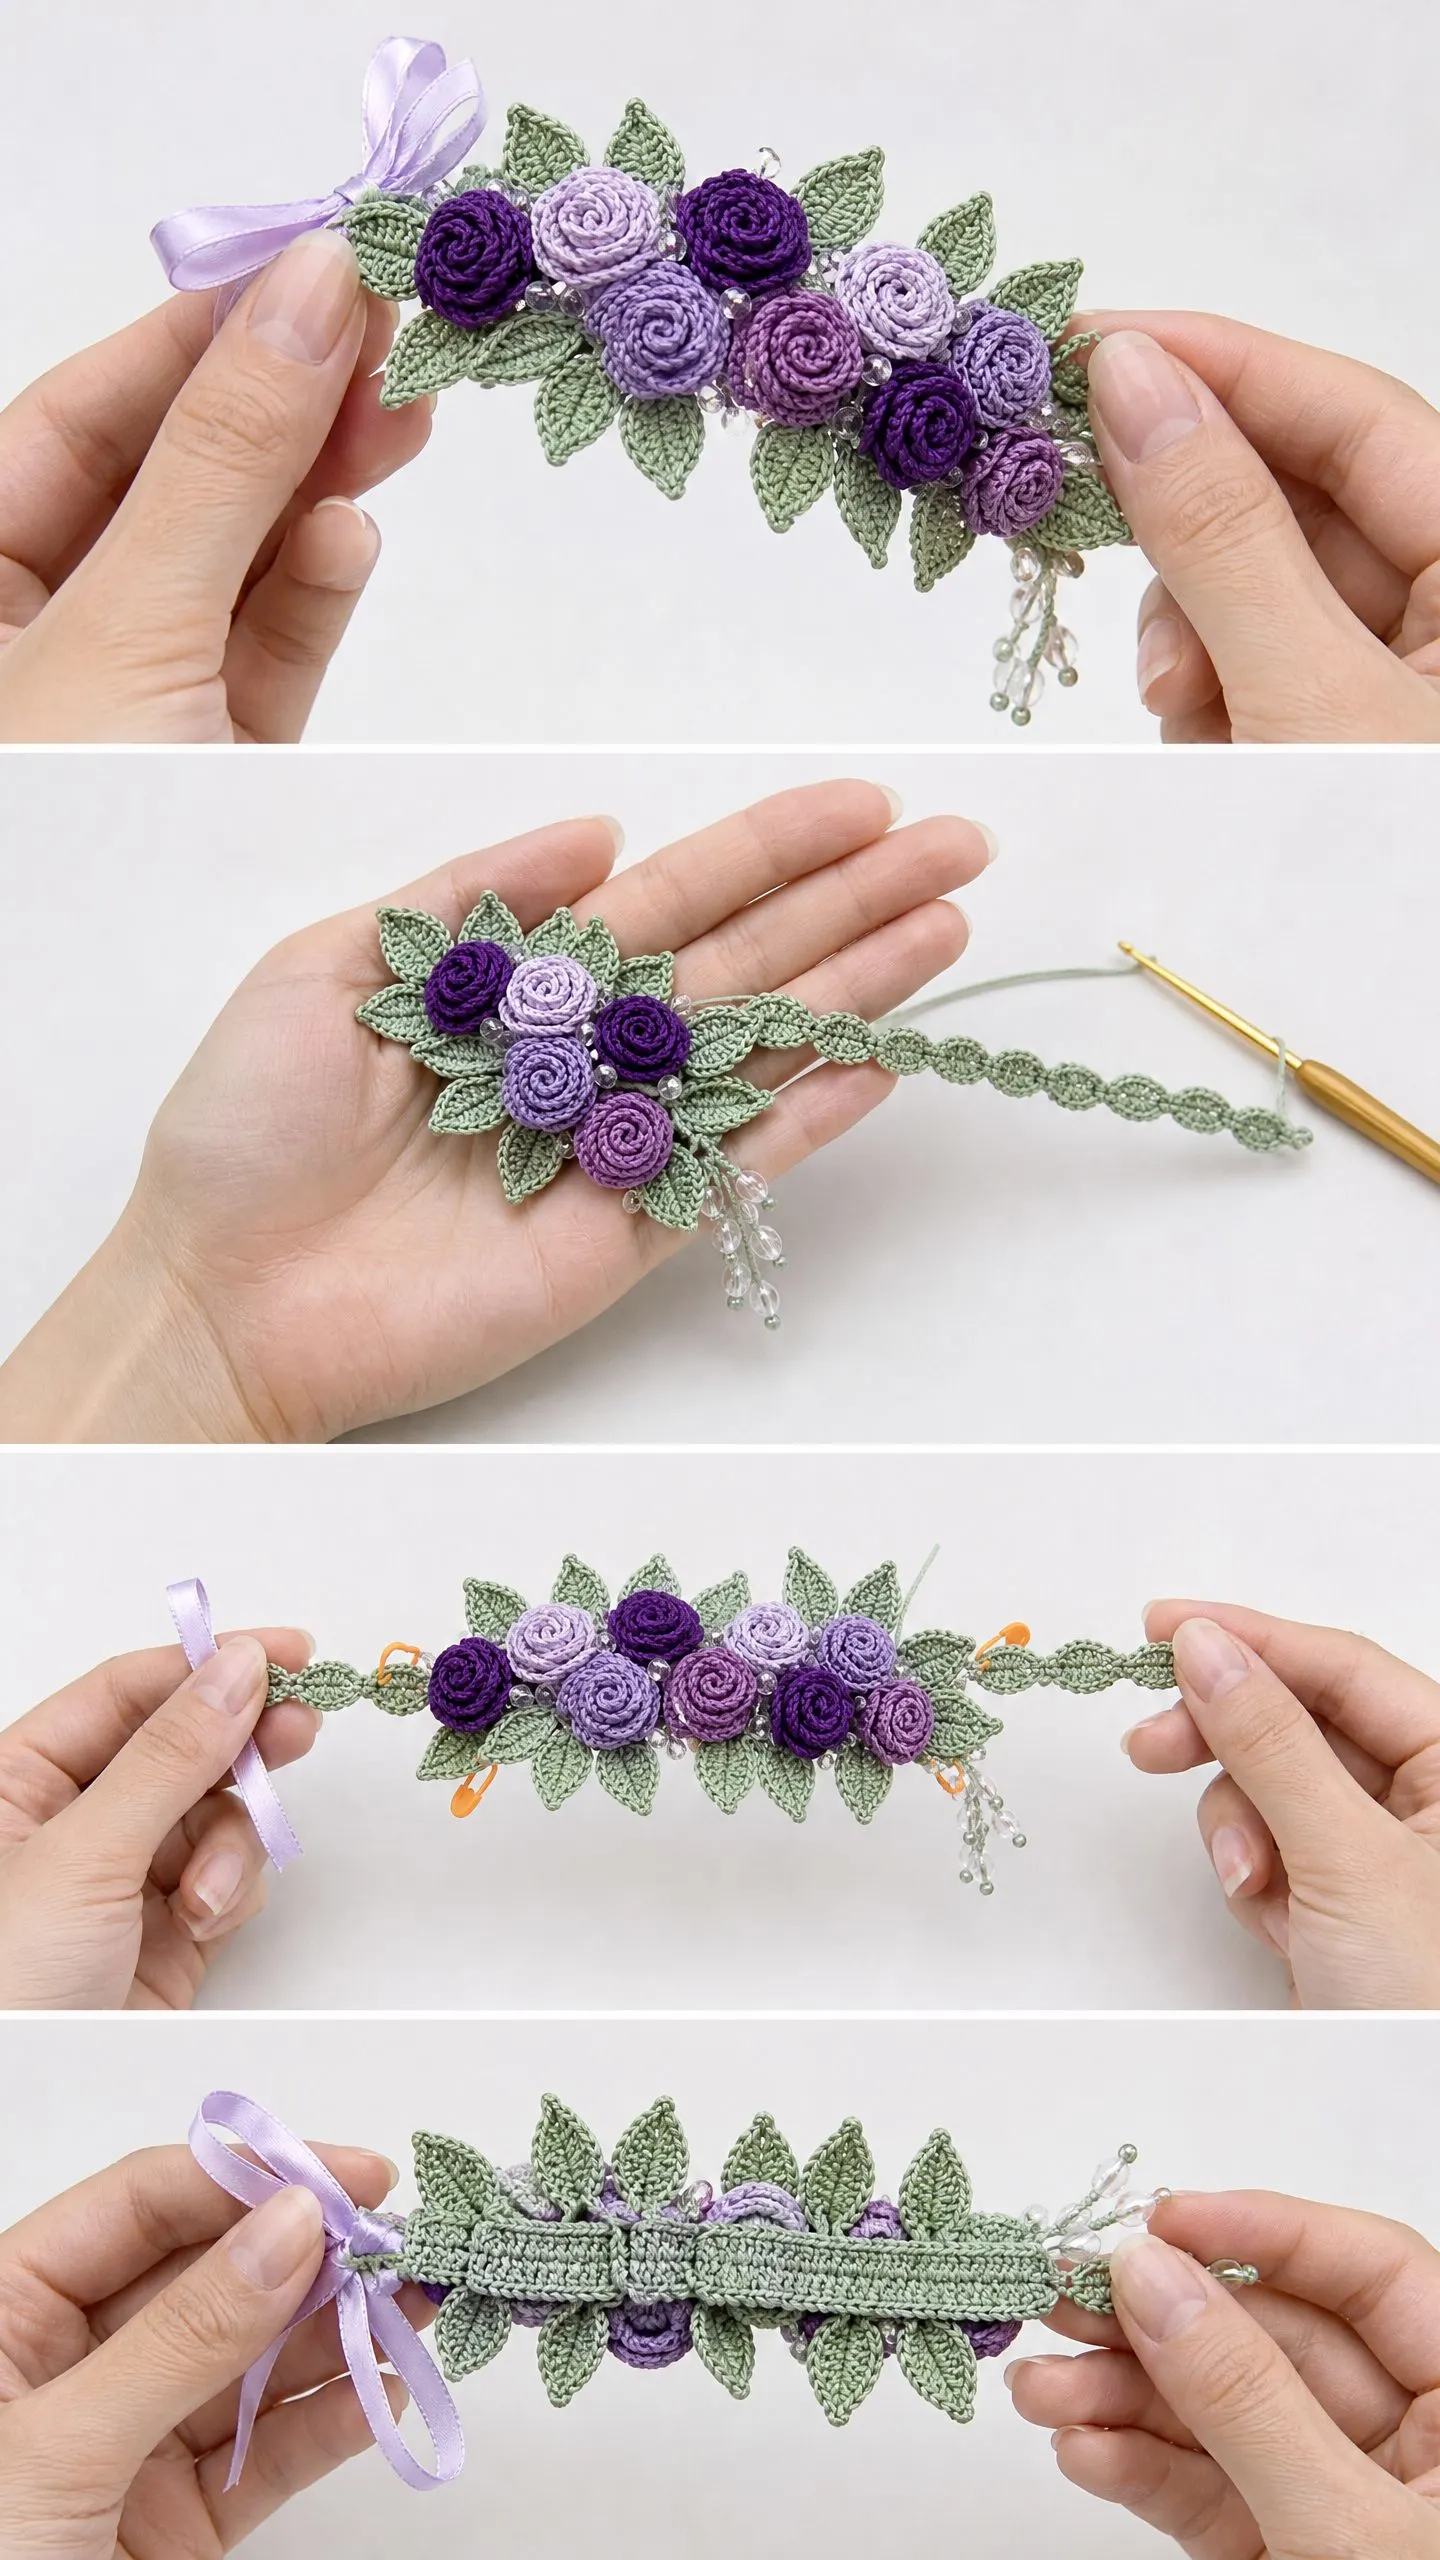
This bracelet consists of several separate elements that come together during assembly. You’ll crochet a filet-style lace band first, then make nine individual roses in two shades of purple, followed by fourteen to sixteen sage green leaves. Beaded dangle chains add sparkle and movement. Everything gets sewn onto the band, and a satin ribbon provides an adjustable tie closure.
The construction method means you can work on components in small sessions. Perfect for keeping in your project bag. The roses especially are tiny and portable.
Skill level: Intermediate. The lace band uses basic stitches and is straightforward. The roses require tight tension control and comfort with working into the front loop only. Assembly requires neat hand sewing skills.
Time estimate: Six to ten hours total. Plan approximately two hours for the band, three to four hours for all nine roses, two hours for the leaves, and one hour for beading and final assembly.
Finished measurements:
The bracelet fits a wrist of approximately 6 to 7.5 inches (15 to 19 cm). Customization tips are included at the end if you need to adjust the size.
Materials Needed
Yarn: Size 10 crochet thread (also called cotton thread size 10 or lace weight)
Recommended thread brands:
Hook: US Steel 7 / 1.65 mm hook. Adjust as needed to match gauge.
Notions:
Substitution note: Any size 10 cotton crochet thread with a smooth, tightly plied construction will work beautifully. Avoid fluffy or fuzzy yarns because the stitch texture of the roses and leaves will be obscured.
Gauge
With size 10 thread and US Steel 7 / 1.65 mm hook:
Gauge matters for overall scale and wearability. Check your rose gauge especially. Roses that are too large will make the bracelet unwieldy.
Abbreviations (US Terms)
Special Stitches
Picot: Chain 3, slip stitch in the 3rd chain from hook. Creates a small decorative bump.
Shell Stitch: Work (2 dc, ch 1, 2 dc) all in the same stitch or space.
Small Petal Stitch: Work (sc, hdc, 3 dc, hdc, sc) all in the same chain space or stitch. This creates one small rounded petal.
Large Petal Stitch: Work (sc, hdc, dc, 2 tr, dc, hdc, sc) all in the same chain space or stitch. This creates one larger, taller petal.
V Stitch: Work (dc, ch 1, dc) all in the same stitch or space.
Pattern Notes
All rounds are worked with the right side facing unless stated otherwise. Do not turn at the end of rounds unless instructed.
The lace band is worked flat in rows with turning chains.
Roses are worked in continuous spiral rounds without joining, except where specified. Use a stitch marker to track the beginning of each round.
For the roses, tight tension is essential. If your roses are ruffling excessively or lying flat instead of curling into a spiral cone, tighten your tension or go down one hook size for the rose components only.
When assembling, lay out all roses and leaves on the band before sewing anything permanently. Take a photo of your layout for reference. This saves so much frustration later.
Step by Step Pattern Instructions
Part One: Lace Band
The band is the foundation of your bracelet. It’s a simple filet-style lace rectangle worked in Color C (sage green).
With Color C, ch 17.
Row 1 (WS): Sc in 2nd ch from hook, sc in each ch across. Turn. (16 sc)
Row 2 (RS): Ch 4 (counts as dc plus ch 1 here and throughout), sk first 2 sts, dc in next st, (ch 1, sk 1, dc in next st) across to last st, dc in last st. Turn. (8 dc posts plus 6 ch-1 spaces)
Row 3: Ch 1, turn. Sc in first dc, sc in each ch-1 sp and each dc across, sc in 3rd ch of turning ch. Turn. (16 sc)
Row 4: Rep Row 2.
Row 5: Rep Row 3. (16 sc)
Rows 6 through 19: Rep Rows 2 and 3 alternately, ending after a Row 3 repeat. (16 sc after every odd row)
You will have completed approximately 19 rows total. The band should measure approximately 1 inch (2.5 cm) wide and 6 inches (15 cm) long at this stage.
Checkpoint: After Row 19, measure your band. If it’s shorter than 6 inches, work additional row pairs until it reaches the correct length. The ribbon will add adjustability.
Row 20 (Edging Row): Ch 1, do not turn. Work sc evenly along the long edge of the band (approximately 1 sc per row end), working 3 sc in each corner, and sc across the starting chain edge, creating a neat border all around. Join with sl st to first sc. Fasten off. Weave in ends.
Ribbon Holes: At each short end of the band, thread the ribbon through the existing lace openings (the ch-1 spaces) so it anchors but remains moveable.
Part Two: Small Rose (Make 5 Total)
Make 3 roses in Color A (deep purple) and 2 roses in Color B (soft lavender). Each small rose measures approximately 5/8 inch (1.6 cm) across when finished.
With chosen color, leave a 6-inch (15 cm) tail, ch 2.
Rnd 1: Work 6 sc in 2nd ch from hook. Do not join. Pm in last st. (6 sc)
Rnd 2: Work 2 sc in each sc around. (12 sc)
Rnd 3: Working in FLO only for this entire round: sl st in first FLO st, (ch 3, in same st work Small Petal Stitch, sl st in next FLO st) 6 times. (6 small petals)
Rnd 4: Working in the BLO of Rnd 2 sts (the unworked back loops from Rnd 3): sl st into first BLO, (ch 4, in same sp work Large Petal Stitch, sl st in next BLO) 6 times. (6 large petals positioned behind small petals)
Fasten off, leaving a 10-inch (25 cm) tail for sewing.
To shape rose: Use your fingers to gently roll the center of the rose, encouraging the petals to curl upward and spiral. The small petals form the center bud. The large petals form the outer layer. If needed, apply a tiny amount of fabric stiffener and allow to dry in the coiled shape.
Part Three: Large Rose (Make 4 Total)
Make 2 roses in Color A (deep purple) and 2 roses in Color B (soft lavender). Each large rose measures approximately 7/8 inch (2.2 cm) across when finished.
With chosen color, leave a 6-inch (15 cm) tail, ch 2.
Rnd 1: Work 6 sc in 2nd ch from hook. Do not join. Pm. (6 sc)
Rnd 2: Work 2 sc in each sc around. (12 sc)
Rnd 3: Work 2 sc in each sc around. (24 sc)
Rnd 4: Working in FLO only: sl st in first st, (ch 3, Small Petal Stitch in same st, sl st in next st) 12 times. (12 small petals)
Rnd 5: Working in BLO of Rnd 3 sts: sl st in first BLO, (ch 4, Large Petal Stitch in same sp, sl st in next BLO) 12 times. (12 large petals)
Fasten off leaving a 10-inch (25 cm) tail. Shape as for small rose.
Total roses: 5 small (3 Color A plus 2 Color B) plus 4 large (2 Color A plus 2 Color B) equals 9 roses total.
Part Four: Small Leaf (Make 8 in Color C)
Each small leaf measures approximately 5/8 inch (1.6 cm) long.
With Color C, ch 8.
Row 1: Sc in 2nd ch from hook, sc in next ch, hdc in next ch, dc in next ch, hdc in next ch, sc in next ch, 3 sc in last ch (this is the leaf tip). Now working back along the other side of the starting chain: sc in next ch, hdc in next ch, dc in next ch, hdc in next ch, sc in next ch, sl st in last ch (this is the leaf base). Do not turn.
Row 2 (Optional texture row): Sl st back to the center of the leaf along the spine. Fasten off leaving a 6-inch (15 cm) tail for sewing.
Part Five: Large Leaf (Make 6 to 8 in Color C)
Each large leaf measures approximately 1 inch (2.5 cm) long.
With Color C, ch 12.
Row 1: Sc in 2nd ch from hook, sc in next 2 ch, hdc in next 2 ch, dc in next 2 ch, hdc in next 2 ch, sc in next ch, 3 sc in last ch (leaf tip). Working back along other side of chain: sc in next ch, hdc in next 2 ch, dc in next 2 ch, hdc in next 2 ch, sc in next 2 ch, sl st in last ch (leaf base).
Fasten off leaving a 6-inch (15 cm) tail for sewing.
Checkpoint: You should have 8 small leaves and 6 to 8 large leaves. Total leaf count: 14 to 16. Lightly steam or apply fabric stiffener and allow to dry flat.
Part Six: Beaded Dangle Chains (Make 4 to 6)
These delicate beaded strings hang from the lower edge of the floral spray.
With Color C, ch 6. Fasten off leaving long tails. Thread a beading needle with sewing thread. String 4 crystal beads onto thread, then 1 green bead at the tip. Knot securely. Attach this beaded thread to the end of the crocheted ch-6 so the beads dangle from the chain tip.
The crocheted chain end will be sewn to the underside of the floral cluster during assembly. Make 4 dangle units minimum, up to 6 for a fuller fringe.
Part Seven: Assembly
Step 1, Layout: Place the finished lace band on a flat surface with the right side up. Position the floral spray along the top surface of the band, centered lengthwise. The spray should cover approximately the center 4 inches (10 cm), leaving about 1.5 inches (4 cm) of bare band at each short end.
Step 2, Leaf Base Layer: Pin large leaves first around the outer perimeter of the spray area, angling them outward like a fan. Pin small leaves in the interior spaces. Sew each leaf base securely to the band using the tail and a tapestry needle.
Step 3, Rose Placement: Arrange roses on top of the leaf layer. Alternate large and small roses. Alternate Color A and Color B for visual balance. The arrangement works well with roses in two staggered rows: a back row of 5 roses and a front row of 4 roses, slightly offset. Pin all roses. Sew each rose through its base tails to the band and through the leaf layer, stitching at least 4 to 6 times for security.
Step 4, Bead Accents: Using a beading needle and thread, scatter 4 to 6 individual crystal beads in the gaps between roses. These add sparkle and fill visual gaps.
Step 5, Dangle Chains: Sew the top end of each beaded dangle chain to the underside of the lower edge of the floral arrangement. Space dangles approximately 3/4 inch (2 cm) apart.
Step 6, Ribbon: Thread the entire 24-inch ribbon through one short end of the band, centered. Use the two long tails to tie the bracelet around the wrist in a bow.
Size Customization Tips
For a larger wrist: Add 2 more row pairs to the band, adding approximately 1/4 inch (6 mm) per row pair. Every 4 extra rows adds approximately 1/2 inch (1.25 cm).
For a smaller wrist: Subtract row pairs in the same increments.
For a wider band: Add 4 stitches to the starting chain (ch 21 instead of ch 17) and adjust all even rows to accommodate 20 working stitches.
For smaller, more delicate roses: Use size 20 crochet thread with a size 12 or 13 steel hook.
Finishing and Care
Weave in all remaining ends securely, working tails back and forth through stitches in at least two directions.
Blocking: Lightly mist the finished bracelet and allow to dry flat. For firmer shaping, apply diluted fabric stiffener (50 percent stiffener, 50 percent water) to roses and leaves only. Shape petals with your fingers while damp and allow to dry completely before wearing.
Care: Hand wash only in cool water with mild soap. Gently squeeze water out without wringing. Reshape and dry flat away from direct sunlight. Remove before swimming or applying lotions. Store flat or rolled gently in a jewelry pouch.
Thank you so much for choosing this pattern. I hope you love making this delicate bracelet as much as I loved designing it. If you complete one, please tag me on Instagram or share a photo in my Facebook group. I genuinely love seeing your finished projects.
If this Sakura Rose Crochet Bracelet is calling your name but you’re not quite ready to start, go ahead and pin this page to your crochet project board on Pinterest. That way you’ll have it saved when the mood strikes. And if you do make one, drop a comment below to let me know how it turned out. I’d love to hear from you.
