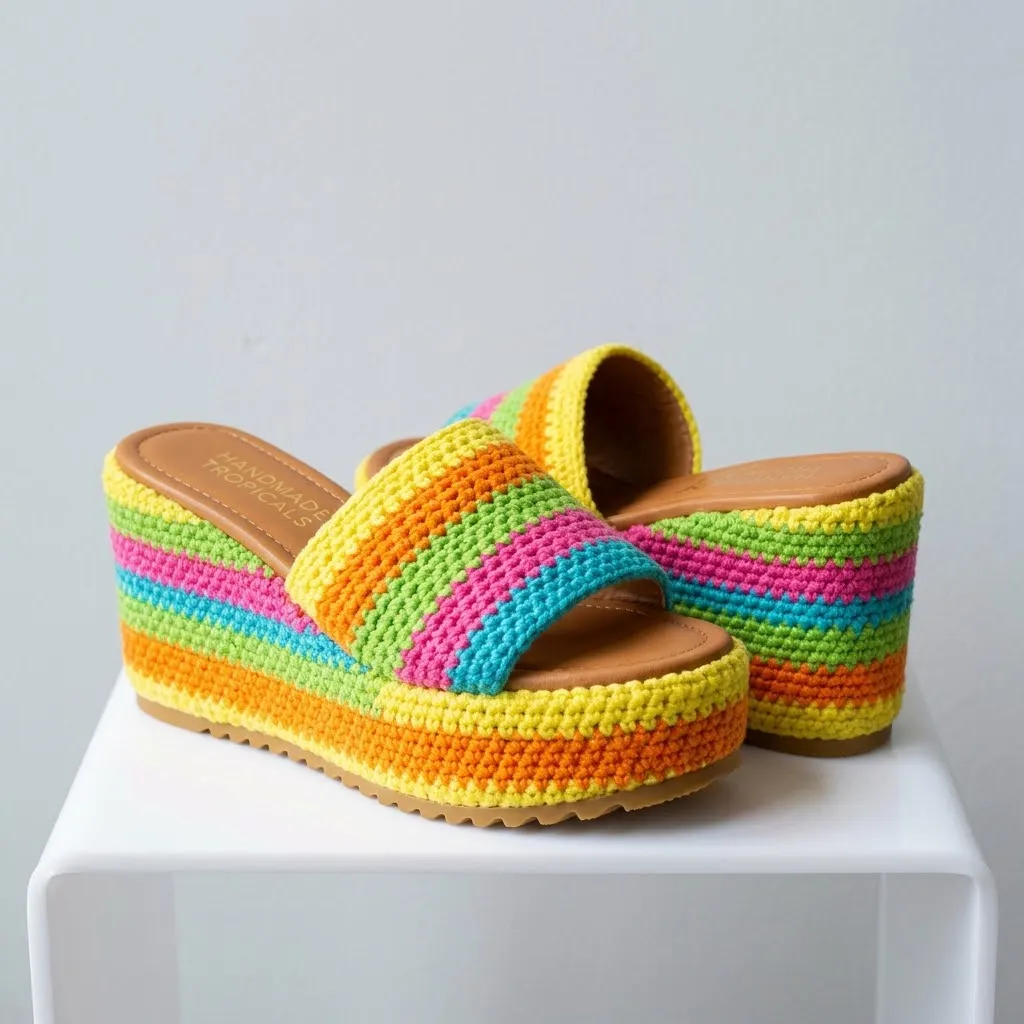
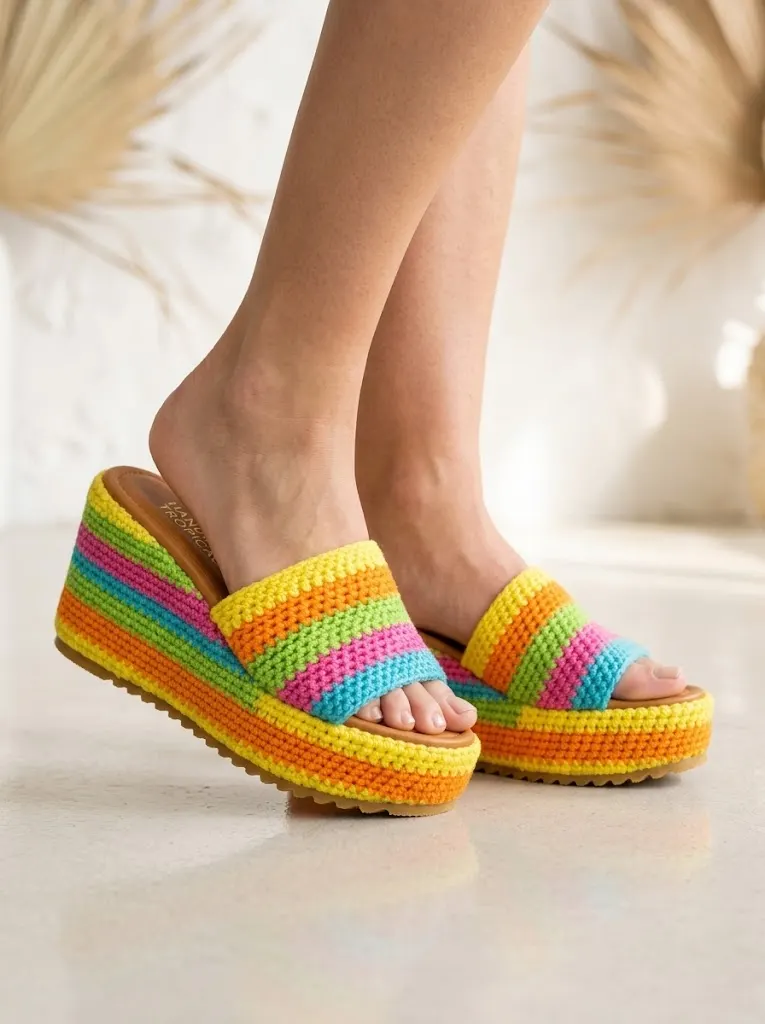
OKAY, can we talk about how UNBELIEVABLY fun these platform wedge sandals are? This is hands down one of the most satisfying crochet projects I have ever made. We’re talking BOLD tropical colors, a statement-making platform wedge, and a finished look that screams summer vacation vibes. You can complete the upper strap portion in just a few hours, and the colorwork is SO much easier than it looks. These make an incredible gift for the fashion-forward crafter in your life, or honestly, just treat yourself. You deserve sandals this cute.

I absolutely love how the bright citrus stripes pop against the tan leather insole and rubber sole base. The whole project comes together using basic stitches you already know, just worked in a clever way to create that structured, professional finish. Whether you’re heading to a beach resort or just want to add some tropical flair to your summer wardrobe, these crochet platform wedge sandals are about to become your new obsession.
Why You’ll Love This Crochet Platform Sandals Pattern
These aren’t your typical crochet slippers. This crochet sandal pattern creates actual wearable footwear with real structure and durability. The secret is working tightly with a smaller hook than you might normally use, which creates a dense, sturdy fabric that holds its shape beautifully.
The colorwork looks impressive, but here’s the thing: it’s just horizontal stripes. No complicated color changes mid-row, no carrying yarn across the back, no chart reading required. You simply switch colors at the start of each new row or round. If you can make a stripe, you can make these sandals.
What makes this pattern special:
Skill Level
Intermediate beginner. You should be comfortable with basic crochet stitches and working in rows. Experience with color changes is helpful but not required. I’ll walk you through everything step by step.
If you’ve never changed colors before, don’t panic. It’s simply finishing your last stitch of one color with the new color yarn. I’ll explain this in detail when we get there.
Finished Measurements
These measurements are for a Women’s US Size 7/8 (EU 38/39). I’ll include notes for adjusting the size throughout the pattern.
Materials Needed
Yarn
You’ll need worsted weight yarn (weight 4) in five tropical colors. I recommend 100% cotton yarn or a cotton blend for breathability and structure. Acrylic works too, but cotton holds its shape better for footwear.
Color quantities (approximate):
Total yarn needed: approximately 200 yards (183 meters) for both sandals.
Tools
Additional Supplies
This is important: you’ll need a platform wedge sole base to attach your crochet work to. These are available from craft suppliers, shoe repair shops, or online marketplaces. Look for soles with pre-punched holes around the edge, or you can use an awl to create holes yourself.
You’ll also need:
Gauge
18 stitches and 20 rows = 4 inches (10 cm) in single crochet, worked tightly.
Gauge matters here! A tight gauge creates the structured fabric you need. If your gauge is too loose, your sandals will stretch and lose their shape. Go down a hook size if needed.
Abbreviations and Stitch Definitions
Let me break down every stitch you’ll use in plain English:
ch = chain. Wrap yarn over hook, pull through loop on hook. This creates your foundation and is used for turning.
sl st = slip stitch. Insert hook, yarn over, pull through both the stitch and the loop on your hook in one motion. Used for joining and invisible movement.
sc = single crochet. Insert hook into stitch, yarn over, pull up a loop (two loops on hook), yarn over, pull through both loops. This is your workhorse stitch for this entire pattern.
st(s) = stitch(es)
RS = right side (the pretty side that faces out)
WS = wrong side (the inside)
Special Techniques
Changing Colors
When you’re about to finish your last single crochet of a color, stop when you have two loops on your hook. Drop the old color, pick up the new color, and pull the new color through both loops to complete the stitch. The new color is now active for your next row.
Don’t cut the old color unless you’re done with it entirely. You can carry unused colors loosely up the side of your work.
Working Tightly
For this project, you want to crochet more tightly than usual. This creates a dense fabric that won’t stretch out when you wear the sandals. If you’re a naturally loose crocheter, drop down one or even two hook sizes.
Pattern Instructions
Platform Side Panel (Make 2 for each sandal, 4 total)
This piece wraps around the sides of your platform wedge sole. The stripes create that gorgeous rainbow effect around the platform.
With Color B (Orange), ch 46.
Row 1 (RS): Sc in 2nd ch from hook and in each ch across. (45 sc)
Row 2: Ch 1, turn. Sc in each st across. (45 sc)
Row 3: Ch 1, turn. Sc in each st across, changing to Color A (Yellow) in last st. (45 sc)
Row 4: With Color A, ch 1, turn. Sc in each st across. (45 sc)
Row 5: Ch 1, turn. Sc in each st across, changing to Color C (Lime Green) in last st. (45 sc)
Row 6: With Color C, ch 1, turn. Sc in each st across. (45 sc)
Row 7: Ch 1, turn. Sc in each st across, changing to Color D (Hot Pink) in last st. (45 sc)
Row 8: With Color D, ch 1, turn. Sc in each st across. (45 sc)
Row 9: Ch 1, turn. Sc in each st across, changing to Color E (Turquoise) in last st. (45 sc)
Row 10: With Color E, ch 1, turn. Sc in each st across. (45 sc)
Row 11: Ch 1, turn. Sc in each st across, changing to Color C (Lime Green) in last st. (45 sc)
Row 12: With Color C, ch 1, turn. Sc in each st across. (45 sc)
Fasten off and weave in ends.
Quick tip: The number of rows you need depends on your platform height. Measure your sole and add or subtract rows as needed. Each row adds approximately 0.2 inches (0.5 cm) of height.
Upper Strap Band (Make 2, one for each sandal)
This is the colorful band that goes across the top of your foot. It’s worked flat, then attached to the platform.
With Color A (Yellow), ch 41.
Row 1 (RS): Sc in 2nd ch from hook and in each ch across. (40 sc)
Row 2: Ch 1, turn. Sc in each st across. (40 sc)
Row 3: Ch 1, turn. Sc in each st across, changing to Color B (Orange) in last st. (40 sc)
Row 4: With Color B, ch 1, turn. Sc in each st across. (40 sc)
Row 5: Ch 1, turn. Sc in each st across. (40 sc)
Row 6: Ch 1, turn. Sc in each st across, changing to Color C (Lime Green) in last st. (40 sc)
Row 7: With Color C, ch 1, turn. Sc in each st across. (40 sc)
Row 8: Ch 1, turn. Sc in each st across, changing to Color D (Hot Pink) in last st. (40 sc)
Row 9: With Color D, ch 1, turn. Sc in each st across. (40 sc)
Row 10: Ch 1, turn. Sc in each st across, changing to Color E (Turquoise) in last st. (40 sc)
Row 11: With Color E, ch 1, turn. Sc in each st across. (40 sc)
Row 12: Ch 1, turn. Sc in each st across, changing to Color C (Lime Green) in last st. (40 sc)
Row 13: With Color C, ch 1, turn. Sc in each st across. (40 sc)
Row 14: Ch 1, turn. Sc in each st across, changing to Color D (Hot Pink) in last st. (40 sc)
Row 15: With Color D, ch 1, turn. Sc in each st across. (40 sc)
Row 16: Ch 1, turn. Sc in each st across, changing to Color B (Orange) in last st. (40 sc)
Row 17: With Color B, ch 1, turn. Sc in each st across. (40 sc)
Row 18: Ch 1, turn. Sc in each st across, changing to Color A (Yellow) in last st. (40 sc)
Row 19: With Color A, ch 1, turn. Sc in each st across. (40 sc)
Row 20: Ch 1, turn. Sc in each st across. (40 sc)
Fasten off, leaving a long tail for sewing.
Edging for Upper Strap (Optional)
For a polished finish, add a round of single crochet edging around the entire strap:
Join Color A at any corner. Work 1 sc in each stitch along the top edge, 3 sc in the corner, 1 sc in each row end along the short side, 3 sc in the corner, 1 sc in each stitch along the bottom edge, 3 sc in the corner, 1 sc in each row end along the remaining short side, 3 sc in the corner. Sl st to first sc to join. Fasten off.
Assembly Instructions
Now comes the fun part. Taking your crocheted pieces and turning them into actual wearable sandals!
Step 1: Attach Side Panels to Platform
Wrap your side panel pieces around the edge of your platform wedge sole. The stripes should run horizontally around the platform.
Using your strong thread or waxed cord, sew through the pre-punched holes in the sole and through the crochet fabric. Work all the way around, keeping the tension firm and even.
Pro tip: Start at the heel and work toward the toe on each side. This helps you adjust the fit as you go.
Step 2: Position the Upper Strap
Place the upper strap across the front portion of the sandal where your toes would slide in. The strap should create a comfortable opening for your foot.
Pin or clip the strap in place before sewing. Try the sandal on (carefully) to check the fit.
Step 3: Attach Upper Strap to Platform
Sew the ends of the upper strap securely to the side panels and platform edge. You want this attachment to be extremely strong, as it bears the weight of your foot entering and exiting the sandal.
Use a whip stitch or mattress stitch through both layers of crochet and into the sole if possible.
Step 4: Finishing Touches
Weave in any remaining yarn ends. Apply fabric glue to the attachment points for extra security if desired. Allow to dry completely before wearing.
Sizing Adjustments
For smaller sizes (US 5/6): Reduce the foundation chain of the side panel to 40 chains. Reduce the upper strap to 35 chains.
For larger sizes (US 9/10): Increase the side panel foundation chain to 50 chains. Increase the upper strap to 45 chains.
Always measure against your actual sole base and adjust accordingly. Your crochet pieces should fit snugly around the sole with minimal stretching.
Care Instructions
Hand wash only in cool water with mild soap. Reshape while damp and allow to air dry completely before wearing. Do not put in the dryer, as heat can warp the sole and shrink the crochet fabric.
Store your crochet platform sandals stuffed with tissue paper to help them hold their shape between wears.
Customization Ideas
The beauty of this crochet wedge sandal pattern is how customizable it is! Here are some ideas:
Troubleshooting Common Issues
My strap is too loose: You may need to crochet more tightly or go down a hook size. The fabric should feel firm, not floppy.
The colors are pooling strangely: This happens sometimes with variegated yarn. Stick with solid colors for the cleanest stripe effect.
My sandal doesn’t fit the sole: Always measure as you go. It’s easier to add or remove rows before assembly than after.
I really hope you love making these Tropical Citrus Crochet Platform Wedge Sandals as much as I loved designing them! They’re such a cheerful project, and wearing handmade shoes is honestly one of the most satisfying feelings ever. Thank you so much for choosing this pattern. If you make a pair, I would absolutely love to see them! Tag me on Instagram or share a photo on Facebook so I can admire your beautiful work.
If this pattern made you smile, go ahead and save it to your Pinterest boards so you can find it when sandal season rolls around. And please drop a comment below if you give these a try. I love hearing how your projects turn out, and your tips help other makers in this community!
