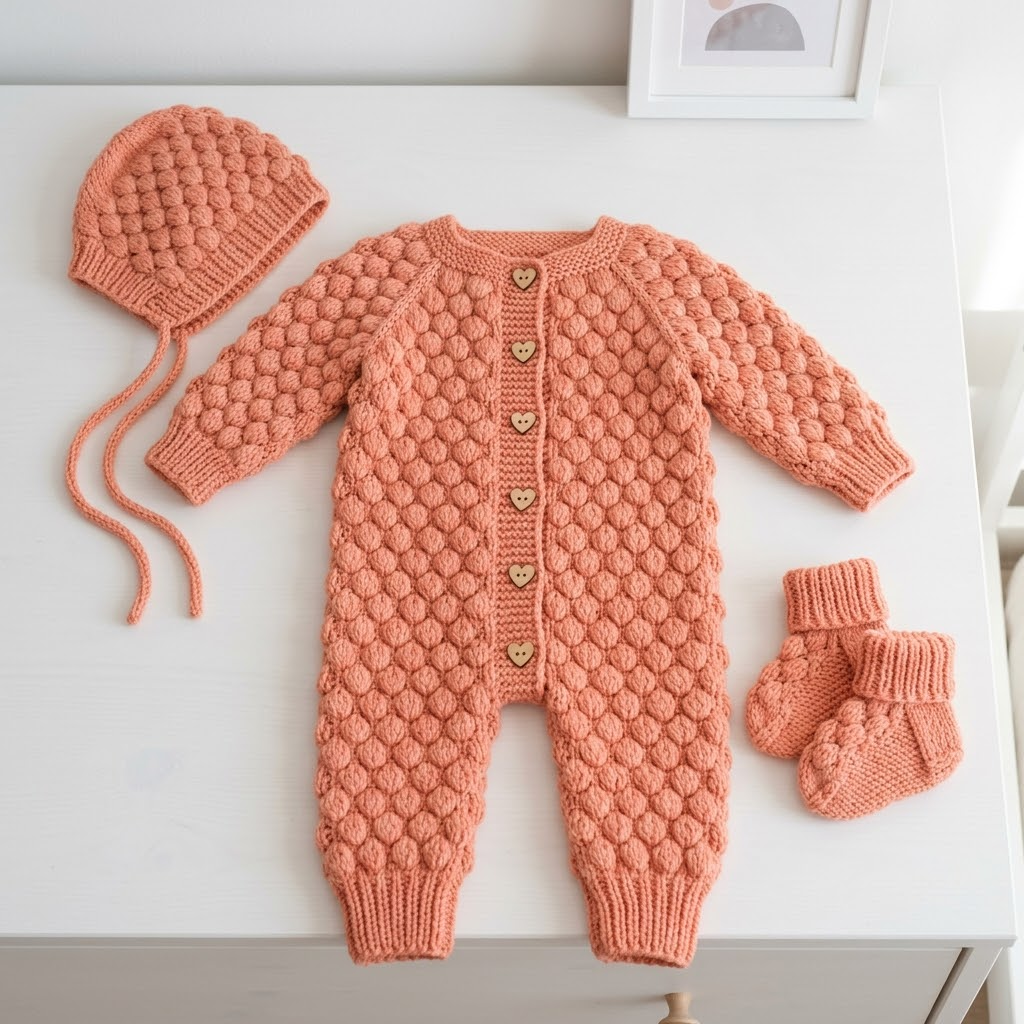
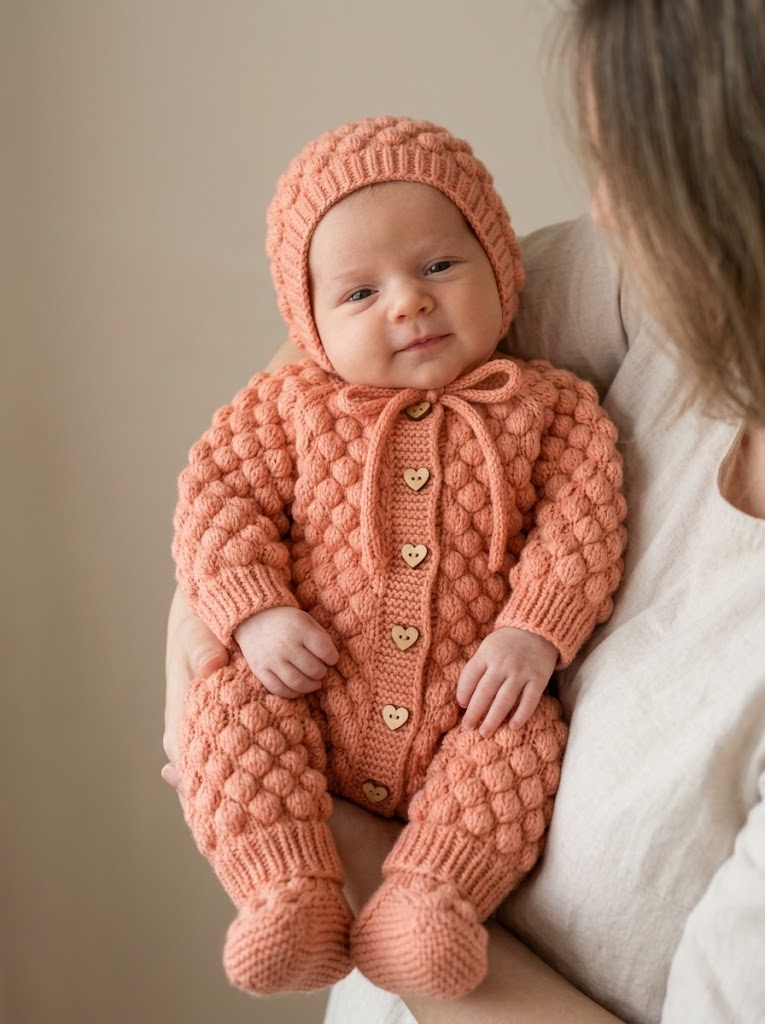
There’s something magical about creating a complete baby outfit from a single skein color. This adorable peach puff stitch baby romper set features a cozy romper, matching bonnet, and tiny booties that will make any new parent swoon. The dimensional bubble texture looks incredibly impressive, but I promise you can absolutely handle this project if you know your basic stitches.
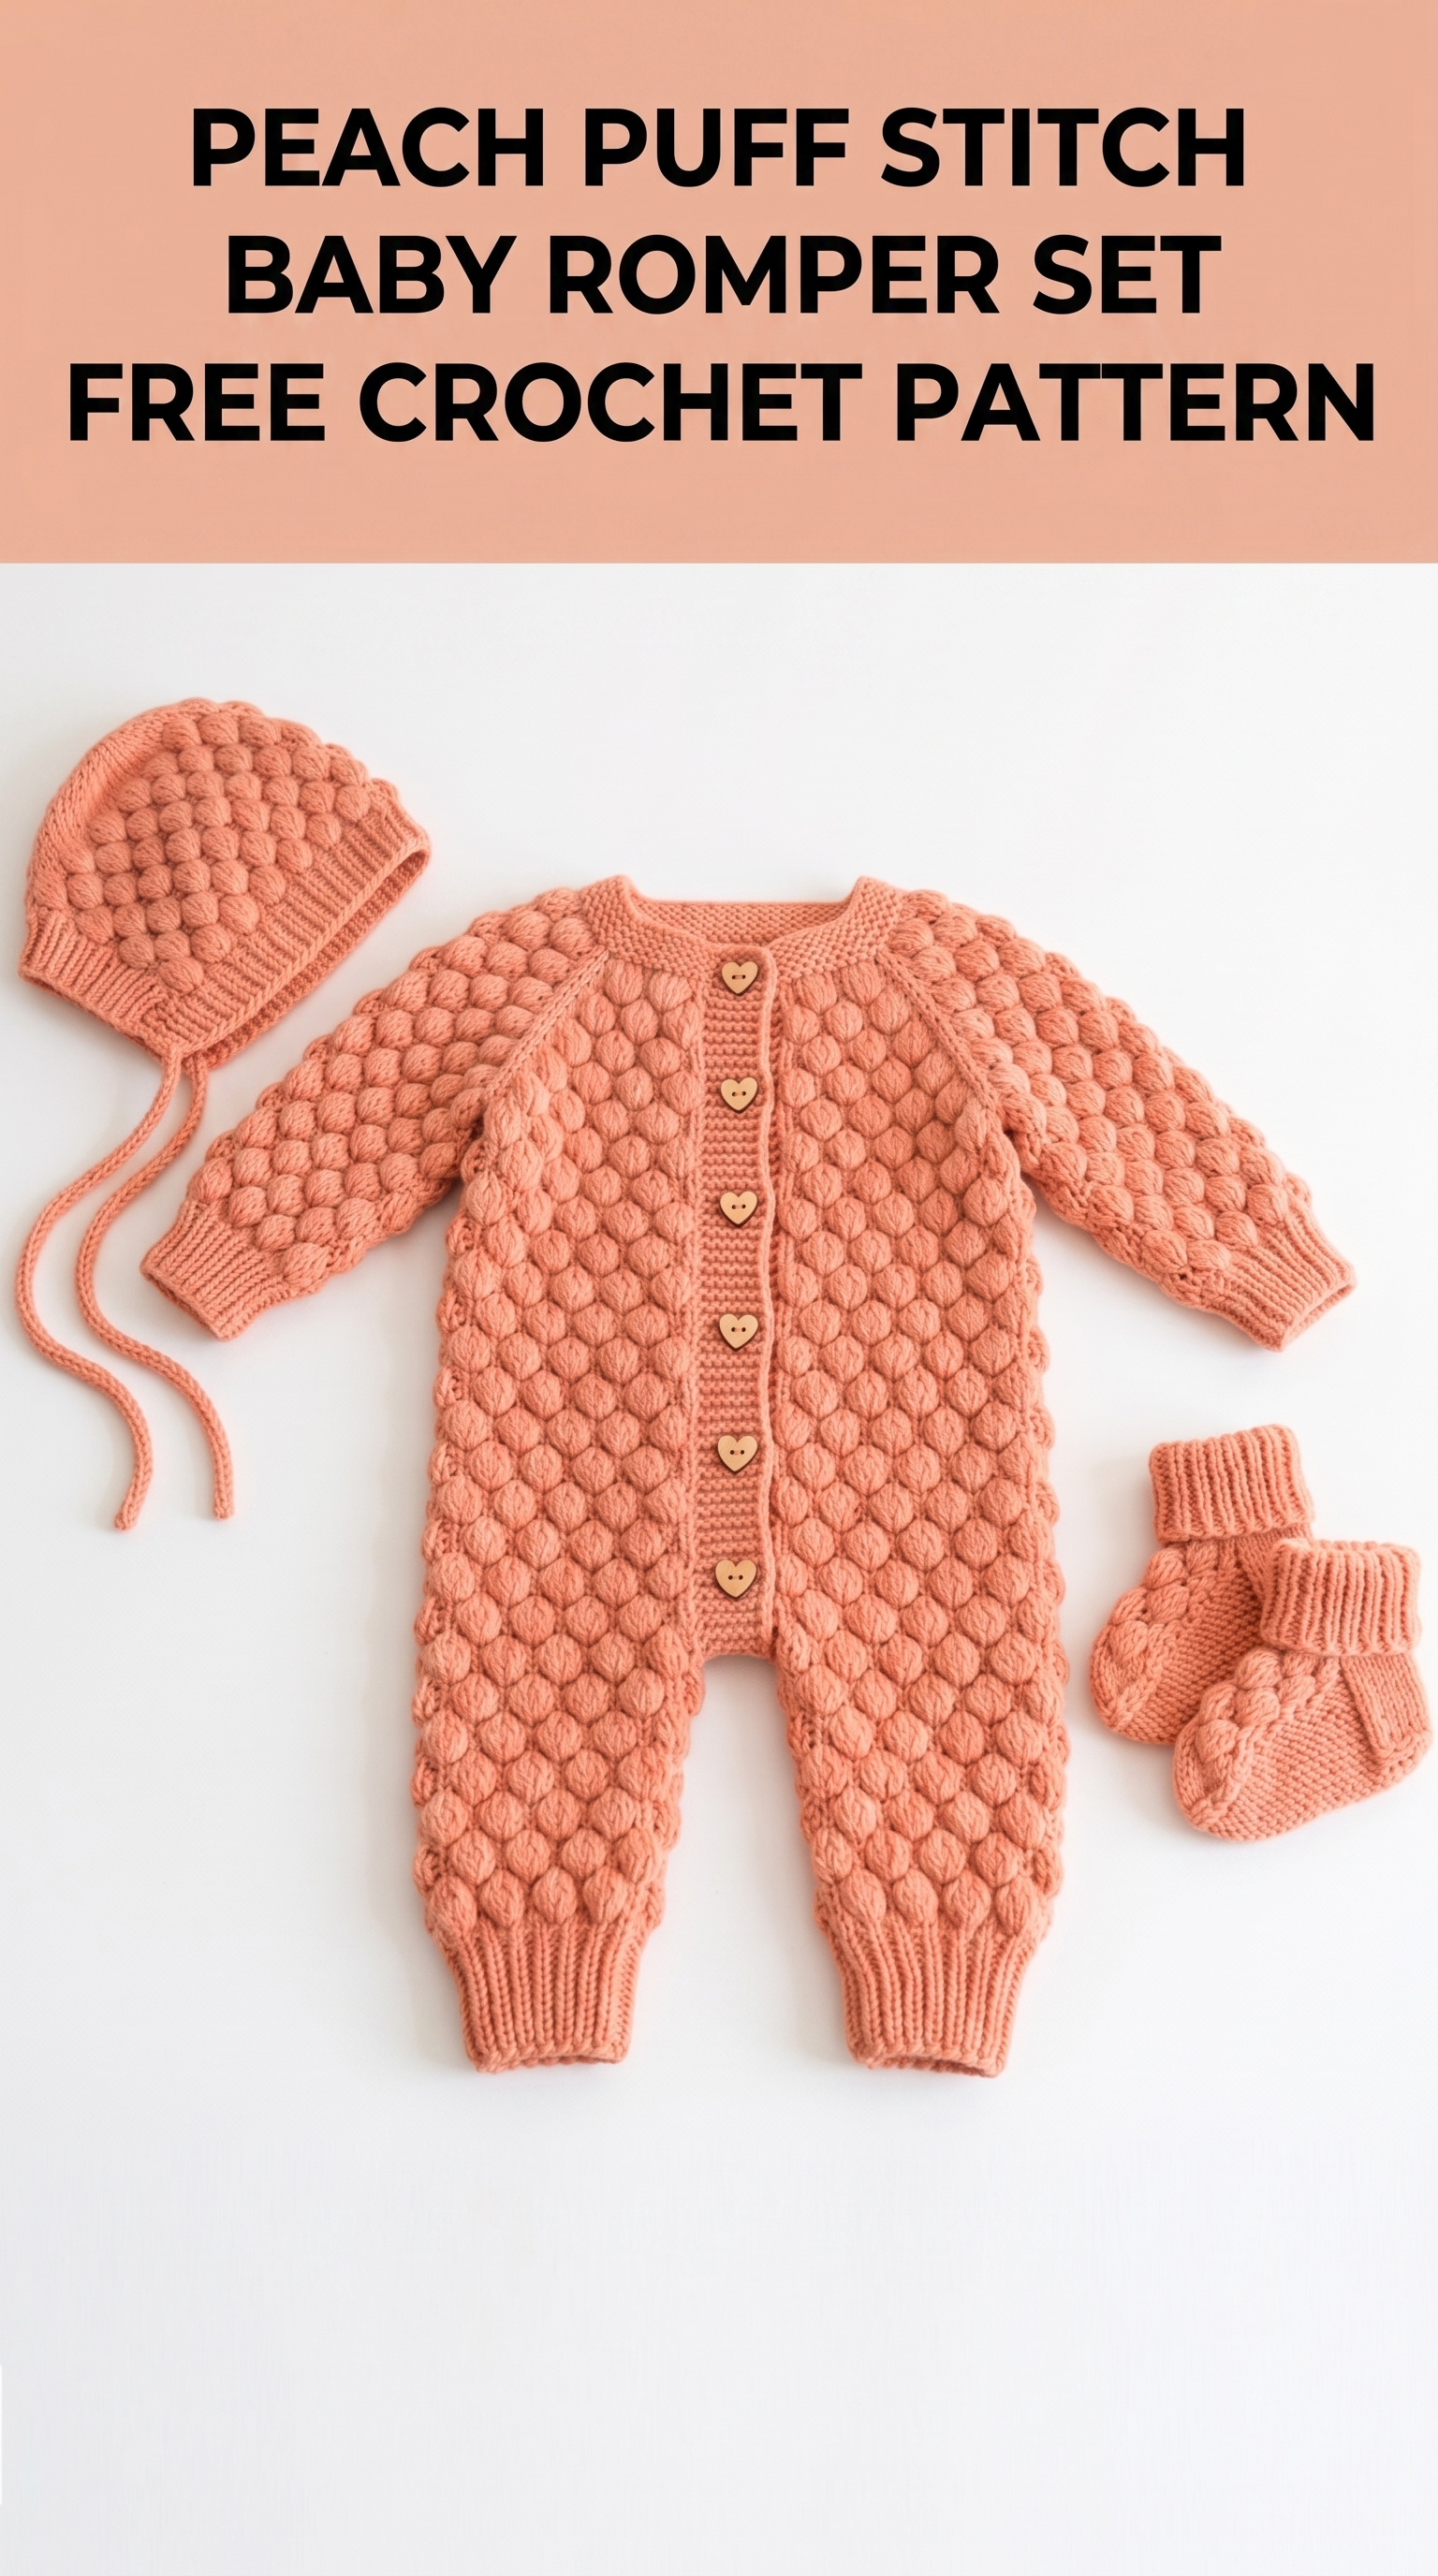
I designed this set with practicality in mind. The front button placket makes diaper changes easy, the bonnet ties stay secure without being fussy, and those booties actually stay on little feet. Whether you’re making this for your own baby, a baby shower gift, or to sell at craft markets, this crochet pattern delivers that heirloom quality everyone loves.
Let me walk you through everything you need to recreate this sweet set from start to finish.
Why This Puff Stitch Baby Set Works So Well
The puff stitch creates those gorgeous rounded bubbles you see covering the romper and bonnet. Unlike bobbles that sit on one side of the fabric, puff stitches create a reversible texture that looks beautiful inside and out. This matters for baby items because little ones have sensitive skin.
The coral peach color photographs beautifully and works for any gender. But this pattern translates wonderfully into soft yellows, mint greens, classic creams, or even variegated yarns if you want something more playful.
I chose to add ribbed cuffs at the wrists, ankles, and bonnet edge. This creates a snug fit that keeps warmth in and keeps the garment from riding up. The ribbing also adds visual contrast that makes the puff stitch sections pop even more.
Materials You Will Need
Before starting this crochet tutorial, gather these supplies:
Yarn:
Hook:
Notions:
Gauge:
Size Information
This pattern fits babies 3 to 6 months old.
Finished Measurements:
For larger or smaller sizes, adjust your hook size or add/subtract pattern repeats.
Abbreviations and Stitch Definitions
Let me define every stitch before we begin. Read through these so you feel confident.
Ch = Chain. Wrap yarn over hook, pull through loop on hook. This creates foundation stitches.
Sl st = Slip stitch. Insert hook, yarn over, pull through stitch AND loop on hook in one motion. Used for joining and invisible movement.
Sc = Single crochet. Insert hook, yarn over, pull up loop (2 loops on hook), yarn over, pull through both loops. Creates short, tight stitches.
Hdc = Half double crochet. Yarn over, insert hook, yarn over, pull up loop (3 loops on hook), yarn over, pull through all 3 loops. Slightly taller than single crochet.
Dc = Double crochet. Yarn over, insert hook, yarn over, pull up loop, yarn over, pull through 2 loops, yarn over, pull through remaining 2 loops. Creates medium height stitches.
PS = Puff stitch. (Yarn over, insert hook, yarn over, pull up loop) 4 times in same stitch (9 loops on hook), yarn over, pull through all 9 loops, ch 1 to close. This creates the dimensional bubble.
BLO = Back loop only. Insert hook under just the back loop of the stitch instead of both loops. Creates ribbed texture.
FLO = Front loop only. Insert hook under just the front loop.
Sk = Skip. Pass over the indicated stitch without working into it.
St(s) = Stitch(es).
Rep = Repeat.
Special Technique: The Puff Stitch
This is the star of our show. Let me break it down step by step because I know it looks intimidating.
1. Yarn over your hook
2. Insert hook into the stitch
3. Yarn over and pull up a loop (keep this loop loose and tall, about half an inch)
4. Repeat steps 1 through 3 three more times in the SAME stitch
5. You now have 9 loops on your hook
6. Yarn over one final time
7. Pull through ALL 9 loops at once
8. Chain 1 to close and secure the puff
Pro tip: Keep your loops loose and even. Tight loops make pulling through nearly impossible. If you struggle, try pulling up taller loops or using a slightly larger hook just for the puff portion.
Peach Puff Stitch Baby Romper Pattern
Back Panel
With 4.0mm hook, ch 44.
Row 1: Sc in 2nd ch from hook and each ch across. (43 sts)
Row 2: Ch 1, turn. Sc in first st, *PS in next st, sk 1, sc in next st* rep across. (43 sts, 14 puffs)
Row 3: Ch 1, turn. Sc in each st across, working 1 sc into the ch-1 space of each puff. (43 sts)
Row 4: Ch 1, turn. Sc in first 2 sts, *PS in next st, sk 1, sc in next st* rep to last st, sc in last st. (43 sts, 13 puffs)
Row 5: Rep Row 3.
Rows 6 through 45: Rep Rows 2 through 5 ten more times. You should have a rectangle measuring approximately 15 inches long.
Leg Openings
Row 46: Ch 1, turn. Sc in first 15 sts. Leave remaining sts unworked. (15 sts) This creates the first leg.
Rows 47 through 56: Continue in established puff pattern on these 15 sts for 10 more rows.
Row 57: Ch 1, turn. Sc2tog, work in pattern to last 2 sts, sc2tog. (13 sts)
Rows 58 through 62: Continue in pattern. (13 sts)
Fasten off first leg.
Second Leg:
Skip center 13 sts of Row 45. Join yarn to next st.
Row 46: Ch 1, sc in same st and next 14 sts. (15 sts)
Rep Rows 47 through 62 as for first leg.
Fasten off.
Front Left Panel
With 4.0mm hook, ch 24.
Row 1: Sc in 2nd ch from hook and each ch across. (23 sts)
Rows 2 through 45: Work in puff stitch pattern as established for back panel.
Rows 46 through 62: Work leg shaping on 15 sts as for back panel.
Fasten off.
Front Right Panel
Work same as Front Left Panel.
Button Band
With 3.5mm hook, ch 7.
Row 1: Sc in 2nd ch from hook and each ch across. (6 sts)
Row 2: Ch 1, turn. Sc in BLO of each st across. (6 sts)
Rows 3 through 90: Rep Row 2.
This creates a ribbed band approximately 15 inches long. Fasten off.
Buttonhole Band
Work Rows 1 through 10 as for button band.
Row 11 (Buttonhole row): Ch 1, turn. Sc in BLO of first 2 sts, ch 2, sk 2, sc in BLO of last 2 sts. (4 sc, ch-2 space)
Row 12: Ch 1, turn. Sc in BLO of first 2 sts, 2 sc in ch-2 space, sc in BLO of last 2 sts. (6 sts)
Rows 13 through 22: Rep Row 2 of button band.
Rows 23, 35, 47, 59, 71, 83: Rep buttonhole row.
Continue in pattern between buttonholes.
Fasten off after Row 90.
Romper Assembly
1. Place back and front panels with right sides together
2. Seam shoulders using whip stitch, leaving center 6 inches open for neckline
3. Seam side edges from underarm to leg opening
4. Seam inner leg edges
5. Sew button band to left front edge
6. Sew buttonhole band to right front edge
7. Attach buttons aligned with buttonholes
Ribbed Cuffs (Make 4)
With 3.5mm hook, ch 9.
Row 1: Sc in 2nd ch from hook and each ch across. (8 sts)
Row 2: Ch 1, turn. Sc in BLO of each st across. (8 sts)
Rows 3 through 30: Rep Row 2.
Join short ends to form a tube. Attach to leg and arm openings with wrong sides together, easing to fit.
Neckline Ribbing
With 3.5mm hook, join yarn at right front neck edge.
Row 1: Work 60 sc evenly around neckline. Join with sl st to first sc.
Rows 2 through 4: Ch 1, sc in BLO of each st around. Join.
Fasten off and weave in ends.
Puff Stitch Bonnet Pattern
With 4.0mm hook, ch 4. Join with sl st to form ring.
Round 1: Ch 1, 8 sc in ring. Join. (8 sts)
Round 2: Ch 1, 2 sc in each st around. Join. (16 sts)
Round 3: Ch 1, *sc, PS, sk 1* rep around. Join. (16 sts, 8 puffs)
Round 4: Ch 1, 2 sc in each st around. Join. (32 sts)
Round 5: Ch 1, *sc, PS, sk 1, sc* rep around. Join. (32 sts)
Round 6: Ch 1, *sc in next st, 2 sc in next st* rep around. Join. (48 sts)
Rounds 7 through 18: Continue in puff pattern without increases.
Rounds 19 through 22: Work in sc around for face opening, working only across back 36 sts, turning at end of each row.
Bonnet Ribbing
With 3.5mm hook, ch 7.
Work in BLO sc for 48 rows. Attach around face opening.
Bonnet Ties (Make 2)
Ch 80. Sl st in 2nd ch from hook and each ch across. Fasten off. Attach to corners of face opening.
Baby Booties Pattern (Make 2)
Sole
With 4.0mm hook, ch 10.
Round 1: 3 sc in 2nd ch from hook, sc in next 7 ch, 5 sc in last ch. Working on opposite side of chain, sc in next 7 ch, 2 sc in same ch as first 3 sc. Join. (24 sts)
Round 2: Ch 1, 2 sc in first 3 sts, sc in next 7, 2 sc in next 5 sts, sc in next 7, 2 sc in last 2 sts. Join. (34 sts)
Round 3: Ch 1, sc in BLO around. Join. (34 sts)
Rounds 4 through 6: Ch 1, sc around. Join. (34 sts)
Round 7 (Toe decreases): Ch 1, sc in first 10 sts, (sc2tog) 7 times, sc in last 10 sts. Join. (27 sts)
Rounds 8 through 12: Continue in puff pattern. (27 sts)
Bootie Cuff
With 3.5mm hook, ch 6.
Work 24 rows in BLO sc. Join to form tube and attach to bootie opening.
Add decorative puff stitch accents on toe if desired.
Finishing Touches
Weave in all ends using your yarn needle. Work ends into the back of puff stitches where they disappear easily.
Block the entire set by laying flat on a towel, spritzing with water, and allowing to dry completely. This evens out your stitches and gives a professional finish.
Sew buttons securely with strong thread, making sure they cannot become a choking hazard. Check buttons before each use.
Care Instructions
Include these care instructions when gifting:
You Did It!
Creating this peach puff stitch baby romper set crochet pattern from scratch takes time and patience, but the result is absolutely worth every stitch. This heirloom quality set makes an unforgettable baby shower gift or a treasured keepsake for your own little one.
I genuinely hope this step by step crochet tutorial gave you everything you needed to succeed. If any section confused you, read it twice slowly. You have got this.
I would absolutely love to see your finished romper sets. Tag me on Instagram or share in my Facebook group. Seeing your creations honestly makes my whole week. Every skill level welcome, wonky puffs and all.
Happy crocheting, friend. Now go make something beautiful for a lucky little baby.
