
I’ve been looking for the perfect statement piece for my dining table for ages. Something that blends classic crochet charm with a bold floral focal point. This blue sunflower table runner is exactly what I had in mind, and I’m thrilled to share it with you today.
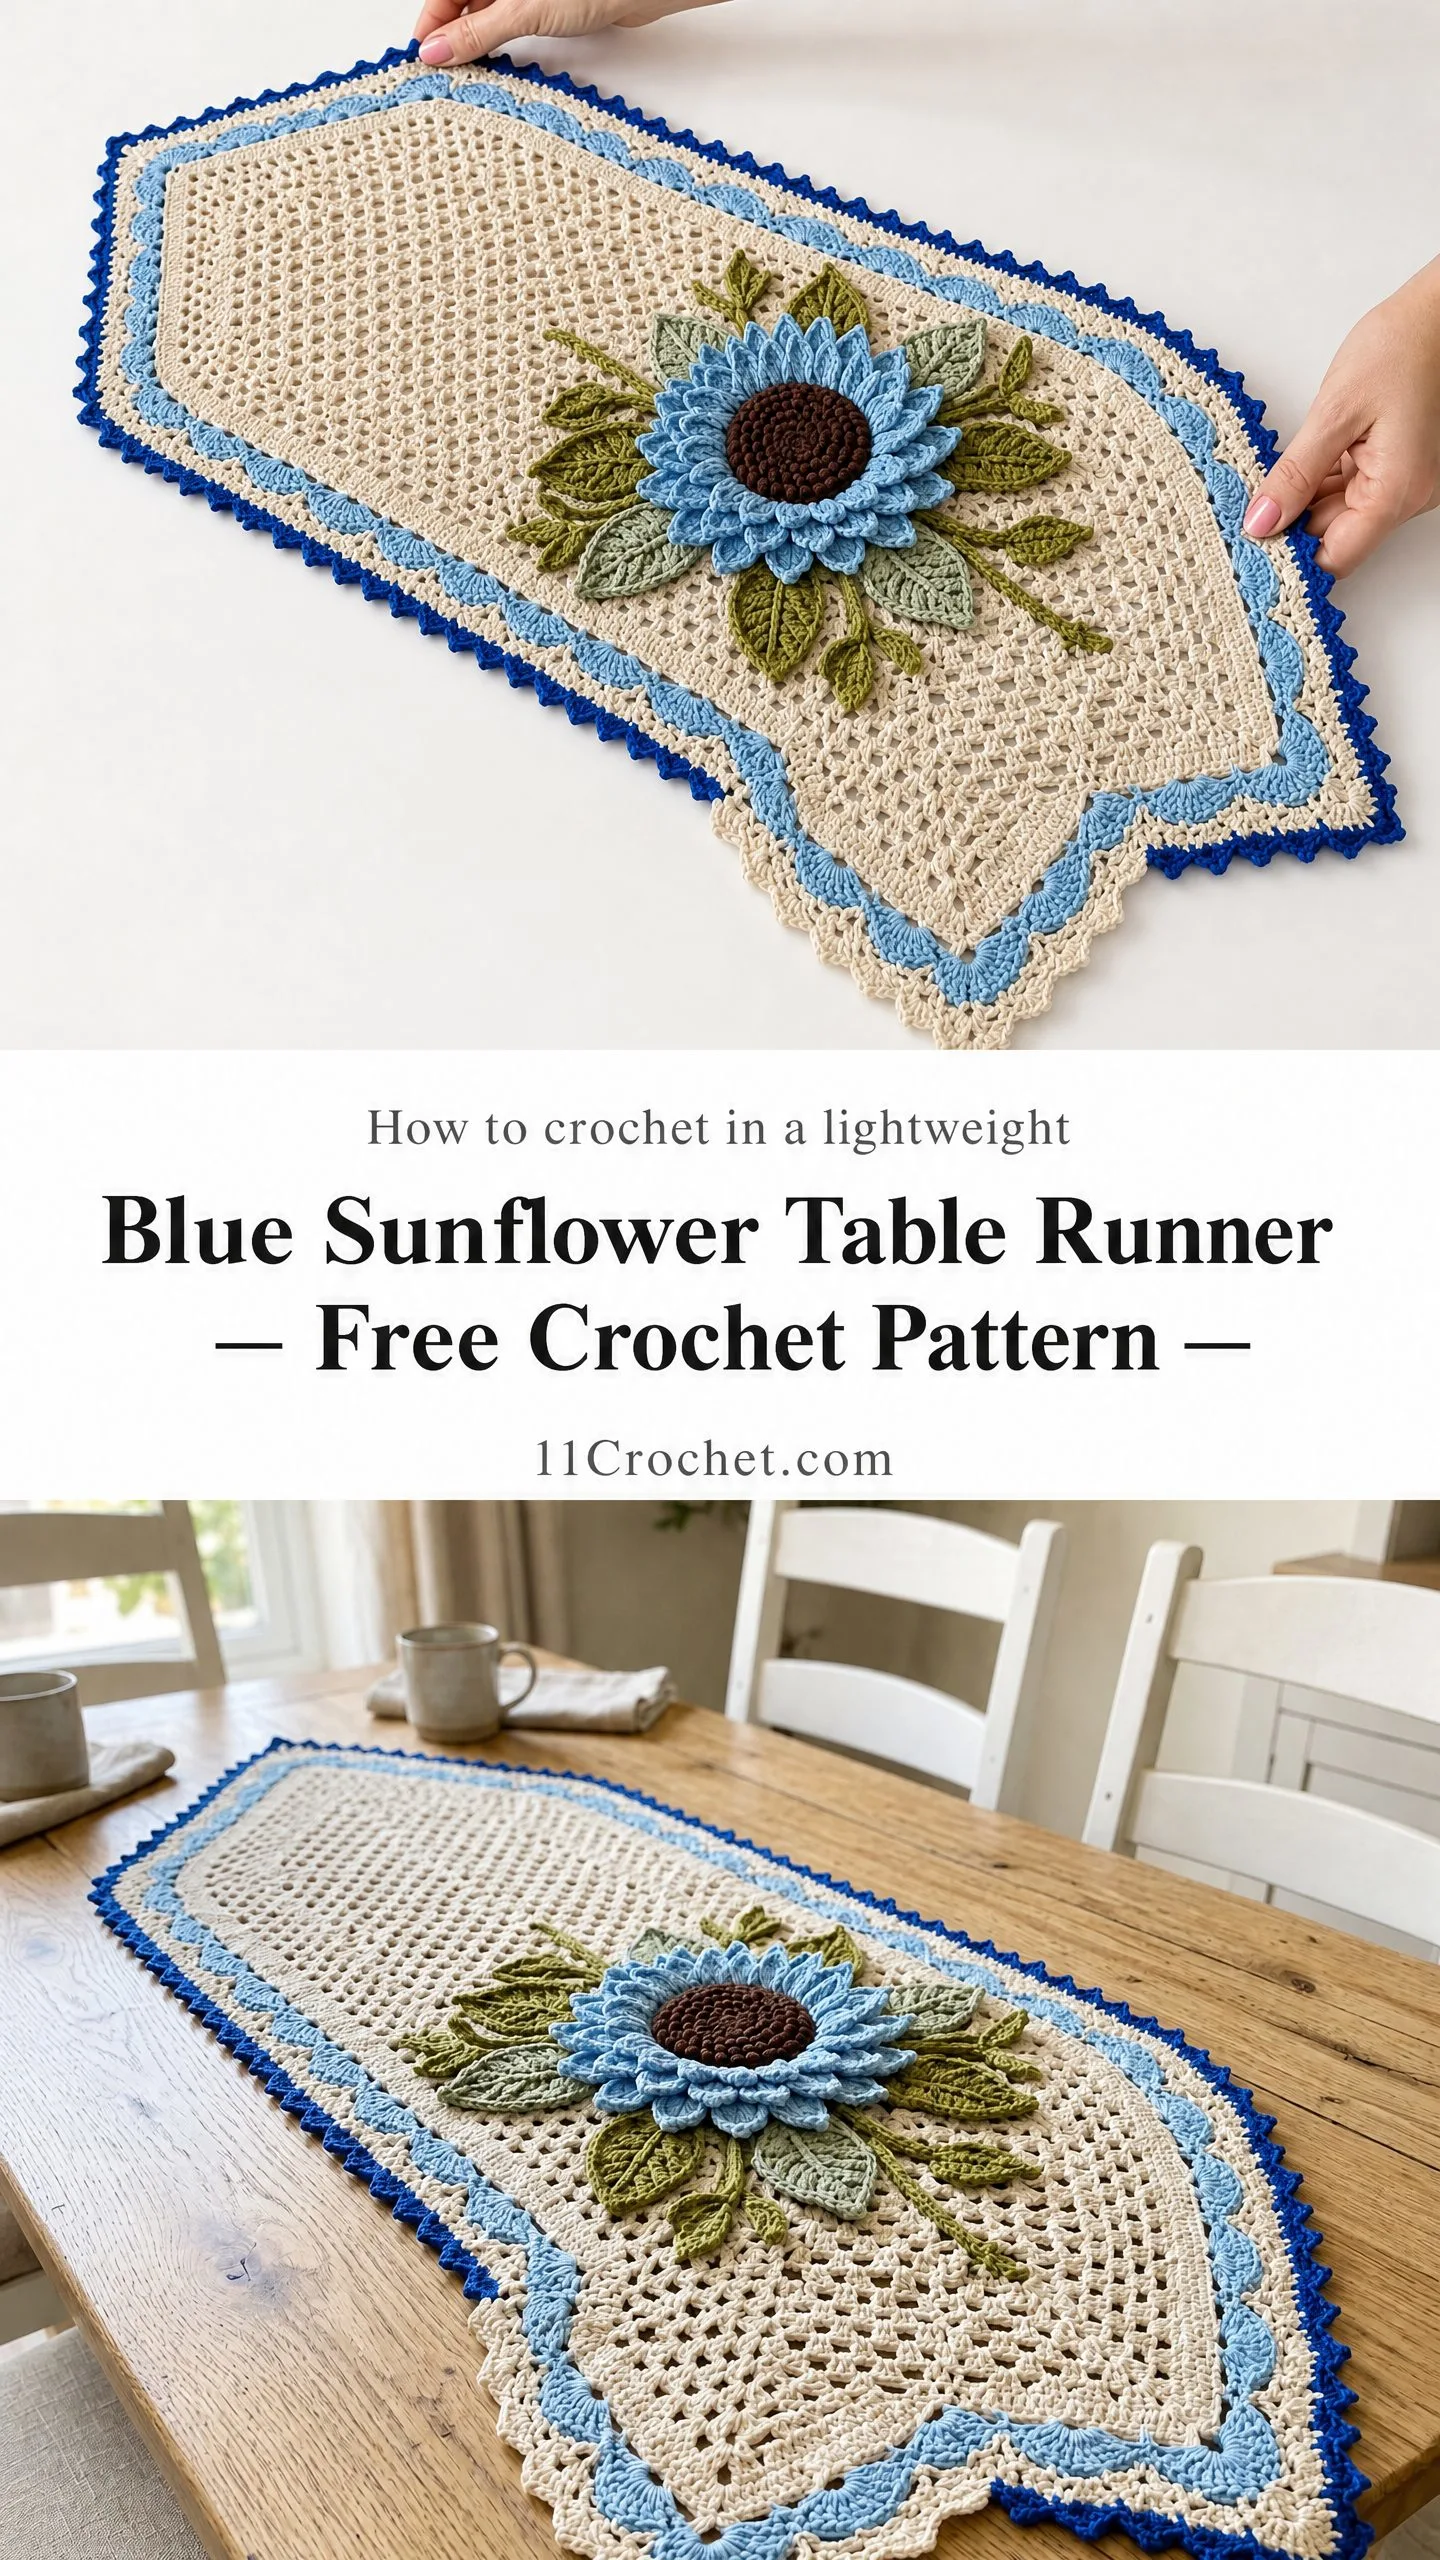
The combination of delicate filet mesh, a layered dimensional flower, and that gorgeous three-tone border creates something truly special. It looks complicated, but I promise we’ll break it down into manageable sections.
Whether you’re decorating for a special occasion or just want to add handmade beauty to your everyday table, this runner delivers. Let’s dive in.
About This Blue Sunflower Table Runner Crochet Pattern
This table runner features an elongated hexagonal shape with angled corners at each short end. The body is worked in classic filet mesh, which creates that lovely open, lacy look you see in vintage linens. A stunning dimensional sunflower sits slightly off-center, surrounded by individual leaf sprigs that fan outward naturally.
The border is where things get really exciting. You’ll work three distinct layers: a cream shell edging closest to the body, a light blue scallop band in the middle, and a royal blue picot edging on the outer edge. The finished piece measures approximately 14 inches wide by 28 inches long when blocked.
The flower itself consists of a brown center dome, 14 flat outer petals in light blue, and a raised inner petal layer. Combined with six large leaves and two smaller leaves in olive green, the appliqué measures about 5 inches across at its widest point.
Skill Level
This pattern is rated intermediate to advanced. The filet mesh base and shaped border are fairly straightforward if you’ve worked lace or doily patterns before. The dimensional flower requires comfort working in the round, creating multiple petal layers, and attaching appliqués.
If you’ve never tried filet crochet, don’t let that stop you. The mesh is simply alternating double crochet stitches and chain spaces. Once you get the rhythm, it works up almost automatically. Take your time with the flower components and you’ll be fine.
Time Estimate
Plan for approximately 18 to 25 hours total. Here’s how that breaks down:
This isn’t a quick weekend project, but every hour you put in shows in the finished piece. It makes an incredible gift or heirloom-quality home décor item.
Materials Needed
Yarn
You’ll need five colors of smooth cotton yarn or crochet thread:
Yarn Suggestions
Option 1: Aunt Lydia’s Classic Crochet Thread Size 10 (100% mercerized cotton, 350 yd per ball). This gives a crisp, heirloom-quality finish. You’ll need 2 balls of Color A, 1 ball each of Colors B, C, and D, and a partial ball of Color E. Use a US Size 7 (1.65 mm) steel crochet hook.
Option 2: Paintbox Yarns Cotton DK (100% cotton, 137 yd per 50 g ball). This creates a softer, more casual runner. You’ll need 3 balls of Color A, 2 balls of Color B, 1 ball each of Colors C and D, and a partial ball of Color E. Use a US Size G-6 (4.0 mm) hook.
Option 3: Lion Brand 24/7 Cotton (100% cotton, 186 yd per 100 g ball). Durable and machine washable. You’ll need 3 balls of Color A, 1 ball each of Colors B, C, and D, and a small amount of Color E. Use a US Size G-6 (4.0 mm) hook.
Substitution tip: Stick to smooth, plied cotton. Fuzzy or textured yarns will obscure the pretty mesh pattern.
Additional Materials
Gauge
With Color A and your chosen hook:
18 mesh squares by 18 mesh rows = 4 inches by 4 inches (10 cm by 10 cm) in filet mesh pattern
Alternatively: 10 dc (double crochet) = 2 inches; 10 rows = 2 inches
Gauge matters for this pattern. The runner base measures approximately 63 mesh squares wide at the center and 63 mesh rows long before shaping. Swatch first and adjust your hook size up or down to match.
Abbreviations
Here are all the abbreviations you’ll encounter, with plain-English definitions:
Special Stitches
Filet Mesh Square (Open)
Ch 1, sk 1 st or ch-sp, dc in next dc. Each open square contains 2 dc with a ch-1 space between them. This creates the lacy grid pattern.
Filet Mesh Square (Solid)
Dc in ch-sp, dc in next dc. Each solid square contains 2 dc side by side with no gap.
Picot
Ch 3, sl st in first ch made. This creates a small decorative loop for the outer border.
Shell Stitch
Work 5 dc in the same stitch or space. Used in the inner border edging.
Scallop
Ch 3, sc in same sp, skip 2 sts, (sc, ch 3, sc) in next sp. Creates the wave-like middle border band.
Petal (Flat, for Layer 1)
Ch 10, hdc in 3rd ch from hook, dc in next 5 ch, hdc in next ch, sc in last ch, turn. Working along opposite side of chain: sc in first ch, hdc in next ch, dc in next 5 ch, hdc in next ch, sl st in last ch, sl st to base. One petal made.
Petal (Raised, for Layer 2)
MR, ch 3, work 15 dc in ring, join, tighten ring. Round 2: (ch 5, sk 1 dc, sc in next dc) repeat around to create pointed raised petals. Join with sl st.
Leaf
Ch 15, sc in 2nd ch from hook, hdc in next ch, dc in next 3 ch, tr in next ch, dc in next 3 ch, hdc in next ch, sc in next ch, sl st in last ch. Working along opposite side of foundation chain: sl st in first ch, sc in next ch, hdc in next ch, dc in next 3 ch, tr in next ch, dc in next 3 ch, hdc in next ch, sc in next ch, sl st to base.
Pattern Notes Before You Begin
1. The runner is worked from one short end to the other in rows.
2. The hexagonal shape comes from increasing at each end for the first 7 rows, working straight for 45 rows, then decreasing for the final 7 rows.
3. The border is worked in rounds after completing the base. Fasten off and rejoin in the appropriate color between rounds.
4. The sunflower has a brown center, 14 flat petals, and 10 to 12 raised petals. Leaves are made separately.
5. Turning chain: Ch 4 at the beginning of each filet mesh row. This counts as 1 dc plus ch 1 (your first open mesh square). Work the final dc of each row into the 3rd ch of the previous row’s turning chain.
6. Place a stitch marker at the center of your foundation chain and at each corner of the angled ends for reference.
7. Right side is where you’ll attach the flower.
Step-by-Step Instructions
Base: Runner Body
Foundation Chain
With Color A, ch 104.
This chain yields 50 open mesh squares plus turning chain setup. After Row 1, you’ll have 51 dc with 50 ch-1 spaces between them.
Row 1 (RS)
Dc in 6th ch from hook (counts as first open mesh square), (ch 1, sk 1 ch, dc in next ch) across, turn.
(51 dc, 50 ch-1 sp = 50 open mesh squares)
Row 2
Ch 4 (counts as dc, ch 1 throughout pattern), sk first ch-sp, dc in next dc, (ch 1, dc in next dc) across, ending dc in 3rd ch of t-ch, turn.
(51 dc, 50 ch-1 sp = 50 open mesh squares)
Shaping Section A: Increasing (Rows 3 to 9)
Each row adds 1 open mesh square at each end, increasing width by 2 squares per row. This creates the angled short ends.
Row 3
Ch 7, dc in 6th ch from hook, ch 1, dc in first dc of previous row, (ch 1, dc in next dc) across, ch 1, dc in 3rd ch of t-ch, ch 4, dc in same st (corner increase worked), turn.
The ch-7 at the beginning adds 1 open mesh square at the left end. Working (ch 4, dc) at the right end adds 1 open mesh square there.
(53 dc, 52 ch-1 sp = 52 open mesh squares)
Row 4
Ch 7, dc in 6th ch from hook, ch 1, dc in first dc, (ch 1, dc in next dc) across, ch 1, dc in 3rd ch of t-ch, ch 4, dc in same st, turn.
(55 dc, 54 ch-1 sp = 54 open mesh squares)
Row 5
Ch 7, dc in 6th ch from hook, ch 1, dc in first dc, (ch 1, dc in next dc) across, ch 1, dc in 3rd ch of t-ch, ch 4, dc in same st, turn.
(57 dc, 56 ch-1 sp = 56 open mesh squares)
Row 6
Ch 7, dc in 6th ch from hook, ch 1, dc in first dc, (ch 1, dc in next dc) across, ch 1, dc in 3rd ch of t-ch, ch 4, dc in same st, turn.
(59 dc, 58 ch-1 sp = 58 open mesh squares)
Row 7
Ch 7, dc in 6th ch from hook, ch 1, dc in first dc, (ch 1, dc in next dc) across, ch 1, dc in 3rd ch of t-ch, ch 4, dc in same st, turn.
(61 dc, 60 ch-1 sp = 60 open mesh squares)
Row 8
Ch 7, dc in 6th ch from hook, ch 1, dc in first dc, (ch 1, dc in next dc) across, ch 1, dc in 3rd ch of t-ch, ch 4, dc in same st, turn.
(63 dc, 62 ch-1 sp = 62 open mesh squares)
Row 9
Ch 7, dc in 6th ch from hook, ch 1, dc in first dc, (ch 1, dc in next dc) across, ch 1, dc in 3rd ch of t-ch, ch 4, dc in same st, turn.
(65 dc, 64 ch-1 sp = 64 open mesh squares)
Checkpoint: After Row 9, your piece should measure approximately 2 inches tall and 14.2 inches wide at the widest row. The angled corners should slope evenly from the narrow foundation edge.
Straight Body Section (Rows 10 to 54)
Work even in filet mesh with no increases or decreases. Repeat Row 2 for all 45 rows.
Rows 10 through 54
Ch 4, (dc in next dc, ch 1) across, dc in 3rd ch of t-ch, turn.
(65 dc, 64 ch-1 sp = 64 open mesh squares per row)
Checkpoint: After Row 54, the straight body section should measure approximately 9 inches long. Total runner length at this point should be approximately 11 inches from the foundation edge.
Shaping Section B: Decreasing (Rows 55 to 61)
This is the mirror image of Shaping Section A. Each row removes 1 open mesh square from each end.
Row 55
Sl st across first dc and first ch-sp (skip first open mesh square), ch 4, dc in next dc, (ch 1, dc in next dc) across to last dc of row (do not work into t-ch of previous row), turn. Leave last dc and ch-sp unworked.
(63 dc, 62 ch-1 sp = 62 open mesh squares)
Row 56
Sl st across first dc and first ch-sp, ch 4, dc in next dc, (ch 1, dc in next dc) across, leaving last dc unworked, turn.
(61 dc, 60 ch-1 sp = 60 open mesh squares)
Row 57
Sl st across first dc and first ch-sp, ch 4, dc in next dc, (ch 1, dc in next dc) across, leaving last dc unworked, turn.
(59 dc, 58 ch-1 sp = 58 open mesh squares)
Row 58
Sl st across first dc and first ch-sp, ch 4, dc in next dc, (ch 1, dc in next dc) across, leaving last dc unworked, turn.
(57 dc, 56 ch-1 sp = 56 open mesh squares)
Row 59
Sl st across first dc and first ch-sp, ch 4, dc in next dc, (ch 1, dc in next dc) across, leaving last dc unworked, turn.
(55 dc, 54 ch-1 sp = 54 open mesh squares)
Row 60
Sl st across first dc and first ch-sp, ch 4, dc in next dc, (ch 1, dc in next dc) across, leaving last dc unworked, turn.
(53 dc, 52 ch-1 sp = 52 open mesh squares)
Row 61
Sl st across first dc and first ch-sp, ch 4, dc in next dc, (ch 1, dc in next dc) across, leaving last dc unworked, turn.
(51 dc, 50 ch-1 sp = 50 open mesh squares)
Do not fasten off. The body now has both short ends matching in width (50 squares each) and the long sides are straight.
Checkpoint: After Row 61, your full base should measure approximately 14 inches wide at center and approximately 13.5 inches tall (before border). Lay flat and confirm symmetry of the angled ends.
Border Instructions
The border is worked in 3 successive rounds around the entire outer perimeter of the base. Work with RS facing throughout all border rounds.
Border Round 1 (Inner Cream Shell Edging)
Join Color A with sl st at any corner.
The perimeter consists of:
Work around the entire perimeter:
At each straight long-side edge: work 1 sc in each row-end dc post, placing sc evenly. (61 sc per long side)
At each straight short end: work 1 sc in each dc and 1 sc in each ch-1 sp across. (101 sc per short end)
At each angled corner section: work 1 sc per row-end st along the 7 angled rows, placing 2 sc at the outermost corner point. (approximately 9 sc per corner section including the 2-sc corner)
Join with sl st to first sc.
(Total perimeter sc: approximately 360 sc)
Now work the shell edging:
Round 1a: Ch 1, sc in same st, sk 2 sts, 5 dc shell in next st, sk 2 sts, sc in next st; rep (sk 2, shell in next, sk 2, sc in next) around, adjusting spacing at corners to keep work flat, join with sl st to first sc.
(60 shells, 60 sc)
Border Round 2 (Middle Light Blue Scallop)
Fasten off Color A. Join Color B with sl st in center dc of any shell.
Round 2: Ch 1, sc in same st (center of shell), ch 3, sc in next sc between shells, ch 3; rep (sc in center dc of shell, ch 3, sc in sc between shells, ch 3) around, join with sl st to first sc.
(120 sc, 120 ch-3 sp)
Border Round 3 (Outer Royal Blue Picot)
Fasten off Color B. Join Color C with sl st in any ch-3 sp.
Round 3: (Sc, hdc, dc, hdc, sc) in each ch-3 sp around, working picot (ch 3, sl st in first ch) after the center dc of each 5-st group.
(600 sts plus 120 picots)
Join with sl st to first sc. Fasten off Color C. Weave in end.
Checkpoint: After all 3 border rounds, the total runner should measure approximately 14 inches wide and 28 inches long when blocked. The layered border should show cream shells closest to the body, light blue arches in the middle, and royal blue scalloped picot edging on the outside.
Sunflower Center
With Color E and MR (magic ring):
Round 1: Ch 1, work 6 sc in ring, pull tight, join with sl st. (6 sc)
Round 2: Ch 1, 2 sc in each sc around, join. (12 sc)
Round 3: Ch 1, (sc in next sc, 2 sc in next sc) around, join. (18 sc)
Round 4: Ch 1, (sc in next 2 sc, 2 sc in next sc) around, join. (24 sc)
Round 5: Ch 1, (sc in next 3 sc, 2 sc in next sc) around, join. (30 sc)
Round 6: Ch 1, (sc in next 4 sc, 2 sc in next sc) around, join. (36 sc)
Round 7: Ch 1, working in back loop only, sc in each sc around, join. This creates a ridge that defines the top of the center dome and the base of petal attachment. (36 sc)
Fasten off, leaving a long tail for sewing. The center should measure approximately 1.5 inches in diameter.
Sunflower Layer 1 (Flat Outer Petals)
Make 14 petals separately using Color B.
For each petal:
With Color B, ch 10.
Row 1: Hdc in 3rd ch from hook, dc in next 5 ch, hdc in next ch, sc in last ch.
Turn. Working along opposite (bottom) side of foundation chain:
Row 2: Sc in first ch, hdc in next ch, dc in next 5 ch, hdc in next ch, sl st in last ch.
Sl st through both base loops of the ch-10 start to close petal base.
Fasten off, leaving a 10-inch tail.
Make 14 petals total. Each petal is approximately 1.5 inches long and 0.75 inches wide at its widest point.
Sunflower Layer 2 (Raised Inner Petals)
With Color B and MR:
Round 1: Ch 3 (counts as dc), work 11 dc in ring, join with sl st to top of ch-3. Tighten ring. (12 dc)
Round 2: Ch 1; (ch 5, sk next dc, sc in next dc) 6 times, ending last sc in joining sl st; ch 5, join with sl st to first ch-5 sp. (6 ch-5 lps)
Round 3: In each ch-5 lp work (sc, hdc, 3 dc, hdc, sc). (6 raised petals, 48 sts total)
Round 4 (optional deeper layer): Working behind Round 3 petals into the skipped dc sts of Round 1, sl st to each skipped dc, ch 7, sl st to next skipped dc; repeat around. Work (sc, hdc, 4 dc, hdc, sc) in each ch-7 lp. (6 longer back petals)
Fasten off, leaving long tail.
Leaves
Make 6 large leaves using Color D.
For each large leaf:
With Color D, ch 15.
Sc in 2nd ch from hook, hdc in next ch, dc in next 3 ch, tr in next ch, dc in next 3 ch, hdc in next ch, sc in next ch, sl st in last ch.
Working along opposite side of foundation ch:
Sl st in first ch, sc in next ch, hdc in next ch, dc in next 3 ch, tr in next ch, dc in next 3 ch, hdc in next ch, sc in next ch, sl st to base ch.
Surface detail: With Color D threaded on tapestry needle, work a chain of slip stitches (or running stitch) along the center of each leaf to create the midrib vein.
Fasten off, leaving long tail.
Make 6 large leaves. Each measures approximately 2 to 2.5 inches long.
Make 2 small leaves:
With Color D, ch 10, work as above with proportionally fewer stitches:
Sc in 2nd ch from hook, hdc in next ch, dc in next 2 ch, tr in next ch, dc in next 2 ch, hdc in next ch, sl st in last ch. Work return side identically. Fasten off.
Make 2 small leaves. Each measures approximately 1.5 inches long.
Assembly
Step 1: Arrange the 6 large leaves and 2 small leaves on the runner surface, approximately 8 to 9 inches from one short end (placed off-center toward that end). Fan the leaves outward from a central point, 3 on each side, with smaller leaves tucked near the center base. Pin in place.
Step 2: Using Color D tails and tapestry needle, sew each leaf to the runner by stitching through the mesh openings, anchoring at the leaf base, tip, and midpoint. The leaves should appear to emerge from beneath the flower.
Step 3: Layer 1 petals: Arrange the 14 flat petals in a ring around the central attachment point, evenly spaced. Sew each petal base firmly to the runner using the long yarn tail, stitching through the mesh.
Step 4: Layer 2 raised center: Position the raised petal piece on top of the flat petal layer, centering it over the petal ring. Sew down through the mesh at several points around the perimeter of the raised piece.
Step 5: Brown center dome: Position the Color E center circle on top of the raised petals. Using the long tail, sew the brown center down firmly, stitching around the outer edge and through the center, pulling slightly to maintain dome shape.
Step 6: Weave in all remaining ends.
Checkpoint: The finished flower assembly should measure approximately 5 inches in diameter at the widest ring of flat petals. The leaf arrangement should span approximately 7 to 8 inches tip to tip. The center point of the flower should sit approximately 8 to 9 inches from the nearest short end of the runner.
Size Customization Tips
To make the runner longer: Add additional rows to the straight body section (Rows 10 to 54). Each extra row adds approximately 0.22 inches to the length. To add 4 more inches of length, add approximately 18 rows.
To make the runner wider: Add more open mesh squares to the foundation chain and to each Shaping Section A row. Each open mesh square adds approximately 0.22 inches to the width. Add squares in pairs (one each side) to maintain symmetry.
To make a placemat version: Work a foundation chain of ch 52, work 7 increasing rows to establish angled corners reaching 35 squares wide, work 12 straight rows, then 7 decreasing rows. Apply the same 3-round border. Attach a simplified single-layer flower with 3 to 4 leaves.
Finishing and Blocking
1. Weave in all ends securely on the WS, working each tail in two opposite directions for at least 1 inch.
2. Hand-wash the completed runner in cool water with a small amount of gentle wool or cotton wash. Do not wring. Gently press between two clean towels to remove excess water.
3. Pin the runner to a blocking board, RS up, pulling gently to the stated dimensions: 14 inches wide at center, 28 inches long overall. Use rust-proof T-pins every 1 to 1.5 inches along the entire perimeter. Pin each picot point individually.
4. Apply blocking spray or diluted starch liberally. For a crisper finish suitable for display, use spray starch at medium-heavy concentration.
5. Allow to dry completely before unpinning (12 to 24 hours depending on humidity).
6. The 3D flower and leaves will soften slightly during blocking. This is normal and desirable. Do not flatten the flower center during pinning.
Care Instructions
Machine wash on delicate cycle in a mesh laundry bag with cool water only if your yarn is machine-washable (verify your specific yarn’s care label). Remove promptly and reshape by hand.
For thread-weight cotton (size 10 thread): hand wash only in cool water, reshape, and block lightly after each wash.
Do not tumble dry. Lay flat to dry.
Do not iron directly over the 3D flower appliqué. If pressing is needed for the flat body, use a pressing cloth and a low-heat iron with steam, held just above the surface.
Store rolled rather than folded to prevent permanent crease lines.
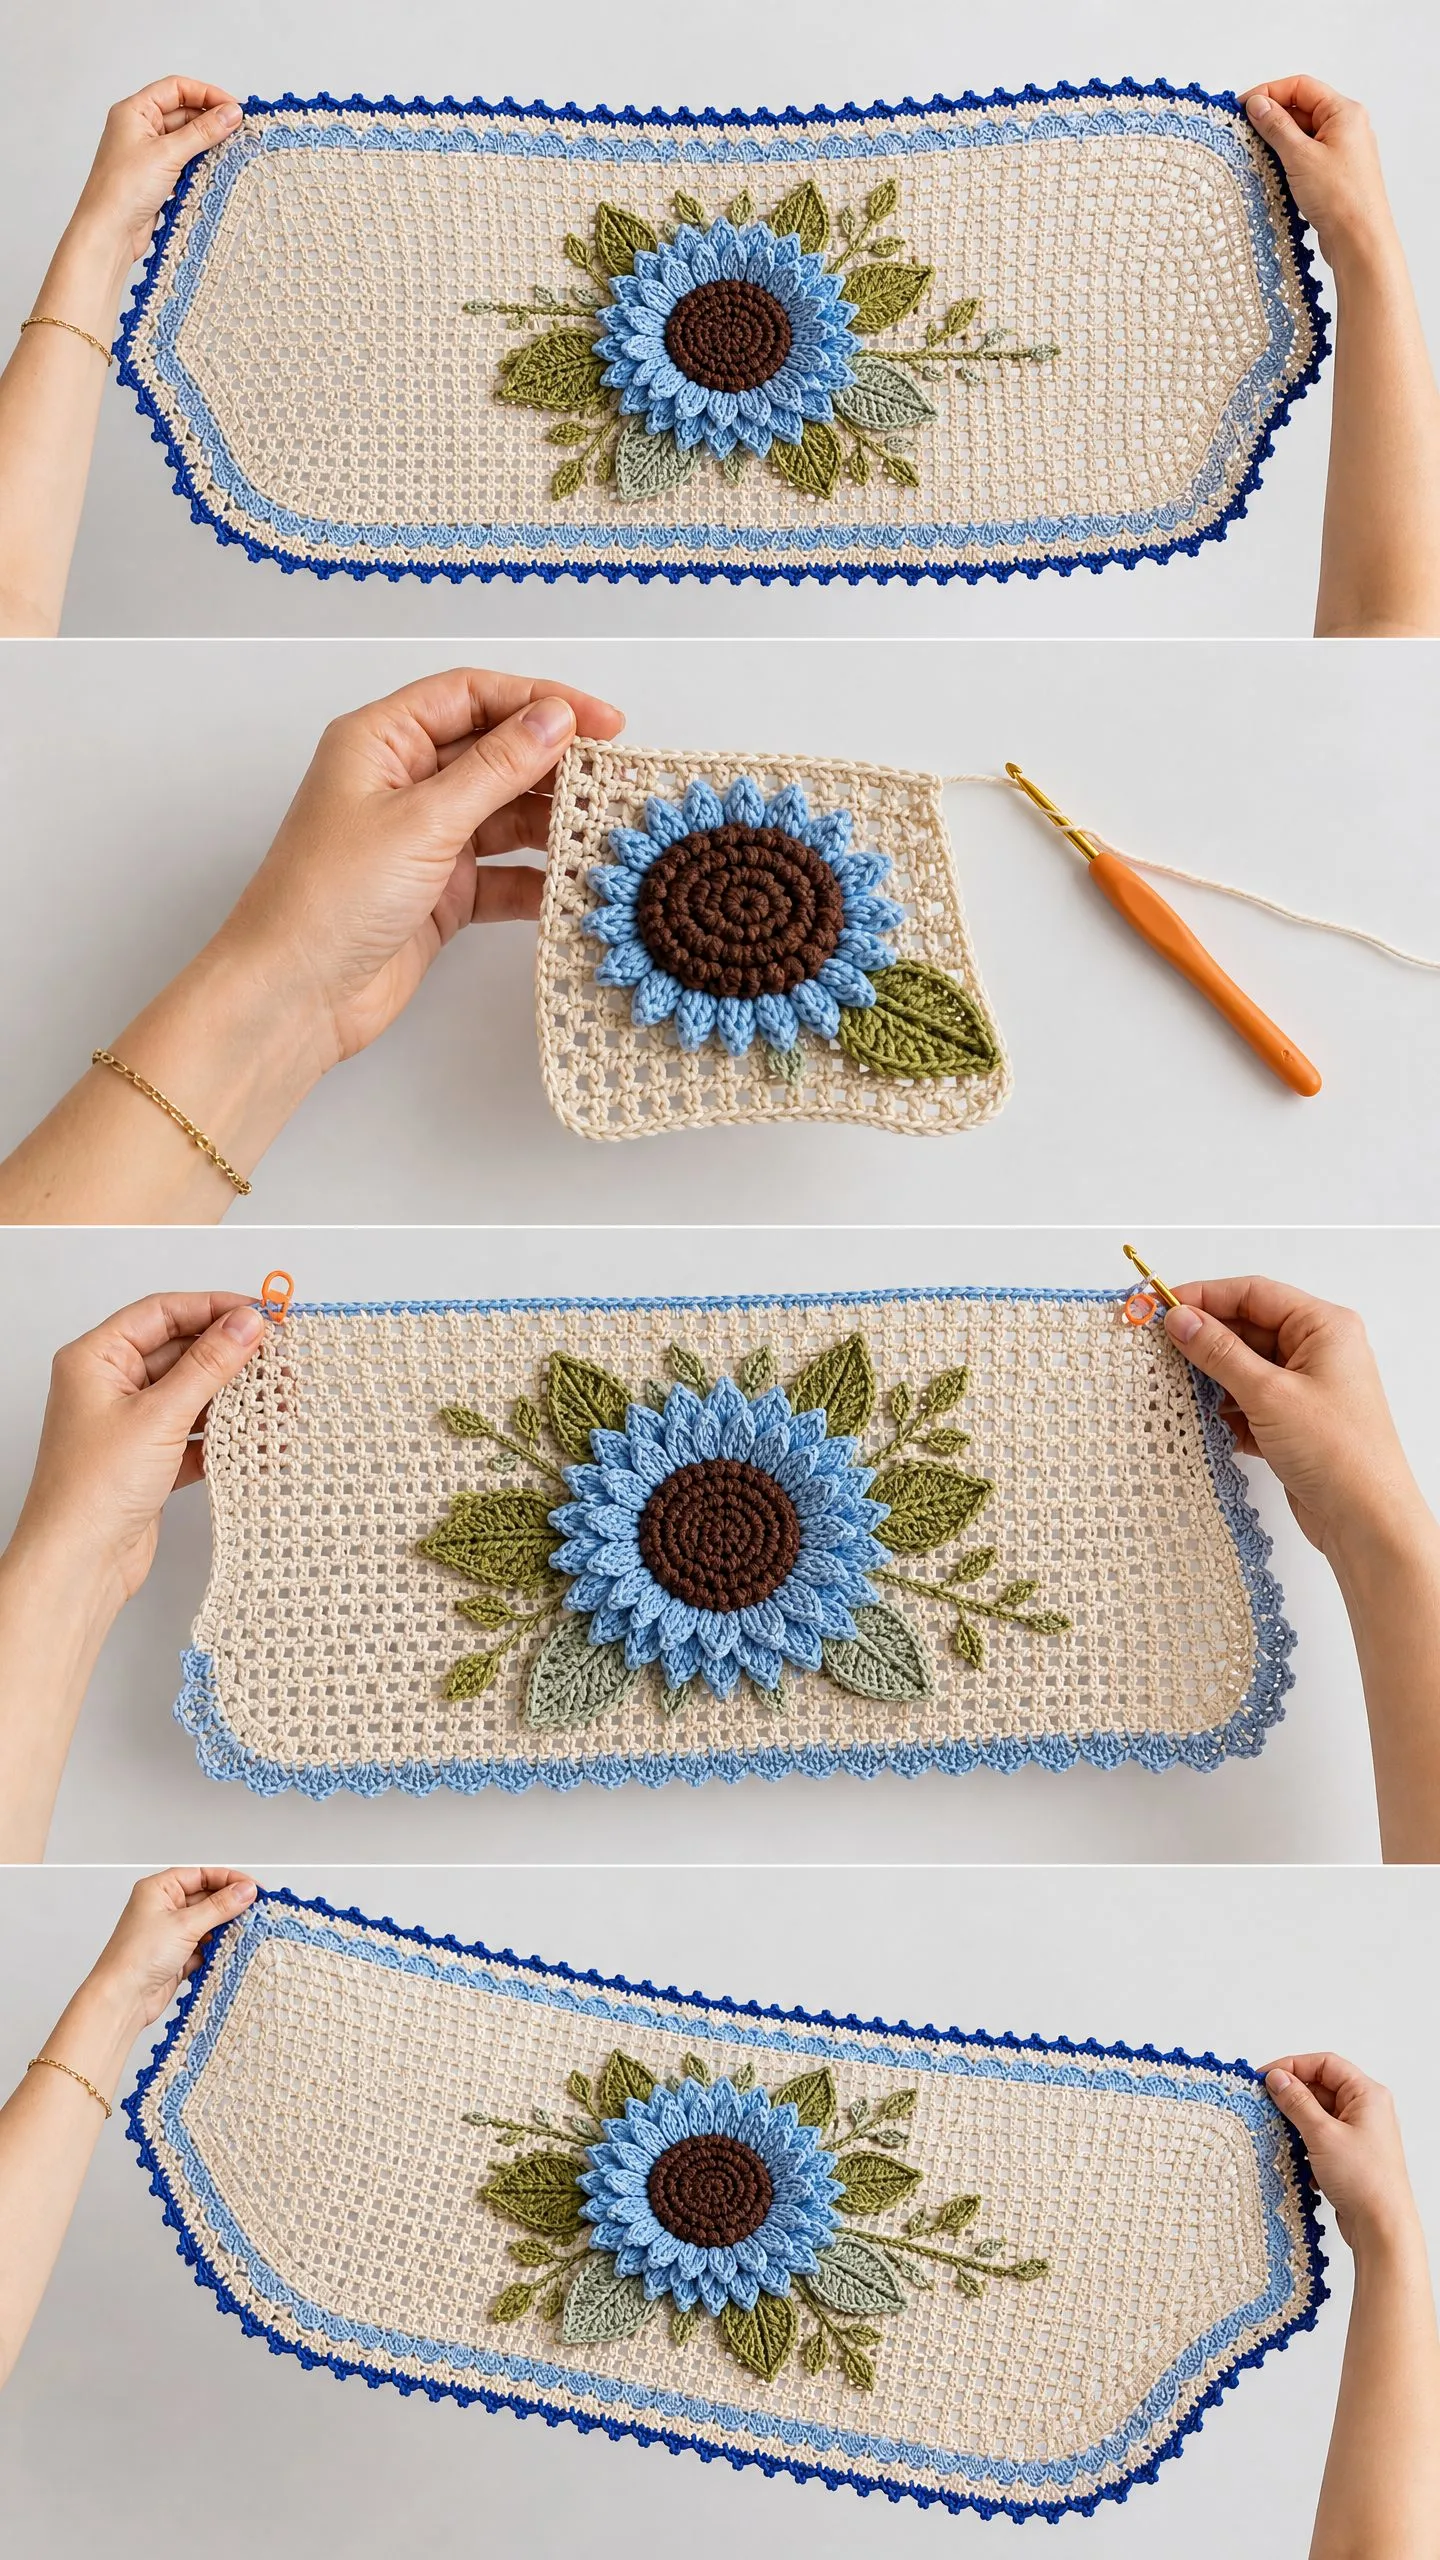
Final Thoughts on This Blue Sunflower Table Runner Crochet Pattern
This project is a labor of love, and the results are absolutely worth every stitch. The combination of classic filet mesh, dimensional floral work, and that stunning layered border creates a piece that will become an heirloom in your home.
Take your time with each section. The mesh base works up rhythmically once you get going. The flower components are fun to make individually. And watching everything come together during assembly is genuinely satisfying.
I hope you enjoy making this crochet table runner as much as I enjoyed designing it. Thank you so much for choosing this pattern for your next project.
If you make this runner, I would absolutely love to see your finished piece. Tag me on Instagram or share a photo in my Facebook group. Nothing makes my day quite like seeing your beautiful creations come to life.
Don’t forget to save this blue sunflower table runner crochet pattern to your Pinterest boards so you can find it easily when you’re ready to start. And if you do make it, please drop a comment below. I’d love to hear how it turned out for you.
