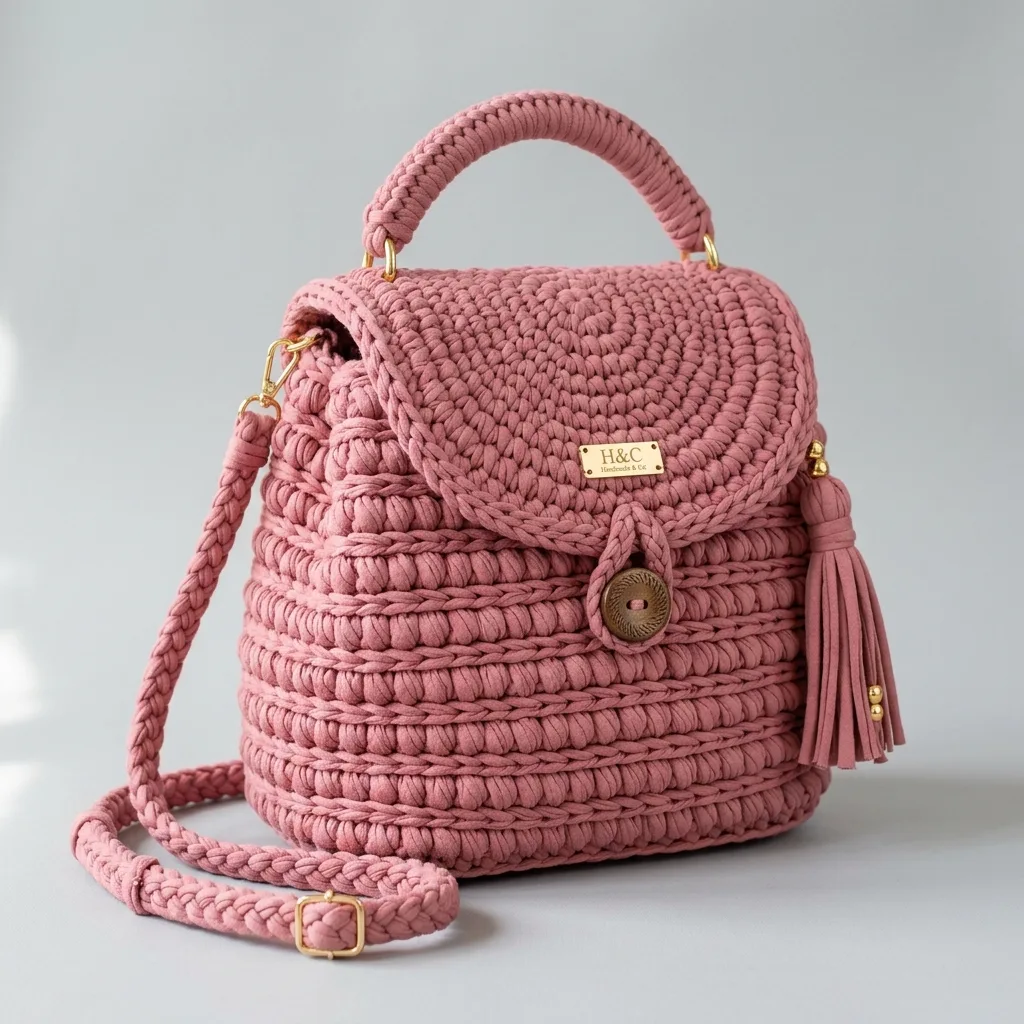
I’ve been on the hunt for a backpack pattern that looks like it came straight from a boutique window, and this one absolutely delivers. After sorting through dozens of options, this Dusty Rose Tassel Backpack became my top pick for anyone wanting a polished handmade bag with serious style. The sculpted ridges, that gorgeous rounded flap, and the gold hardware make it look far more expensive than a DIY project has any right to look.
Get the Ad-Free PDF Pattern
You can find the free pattern below, or you can purchase the ad-free printable PDF from my shop.
Get the Printable PDF →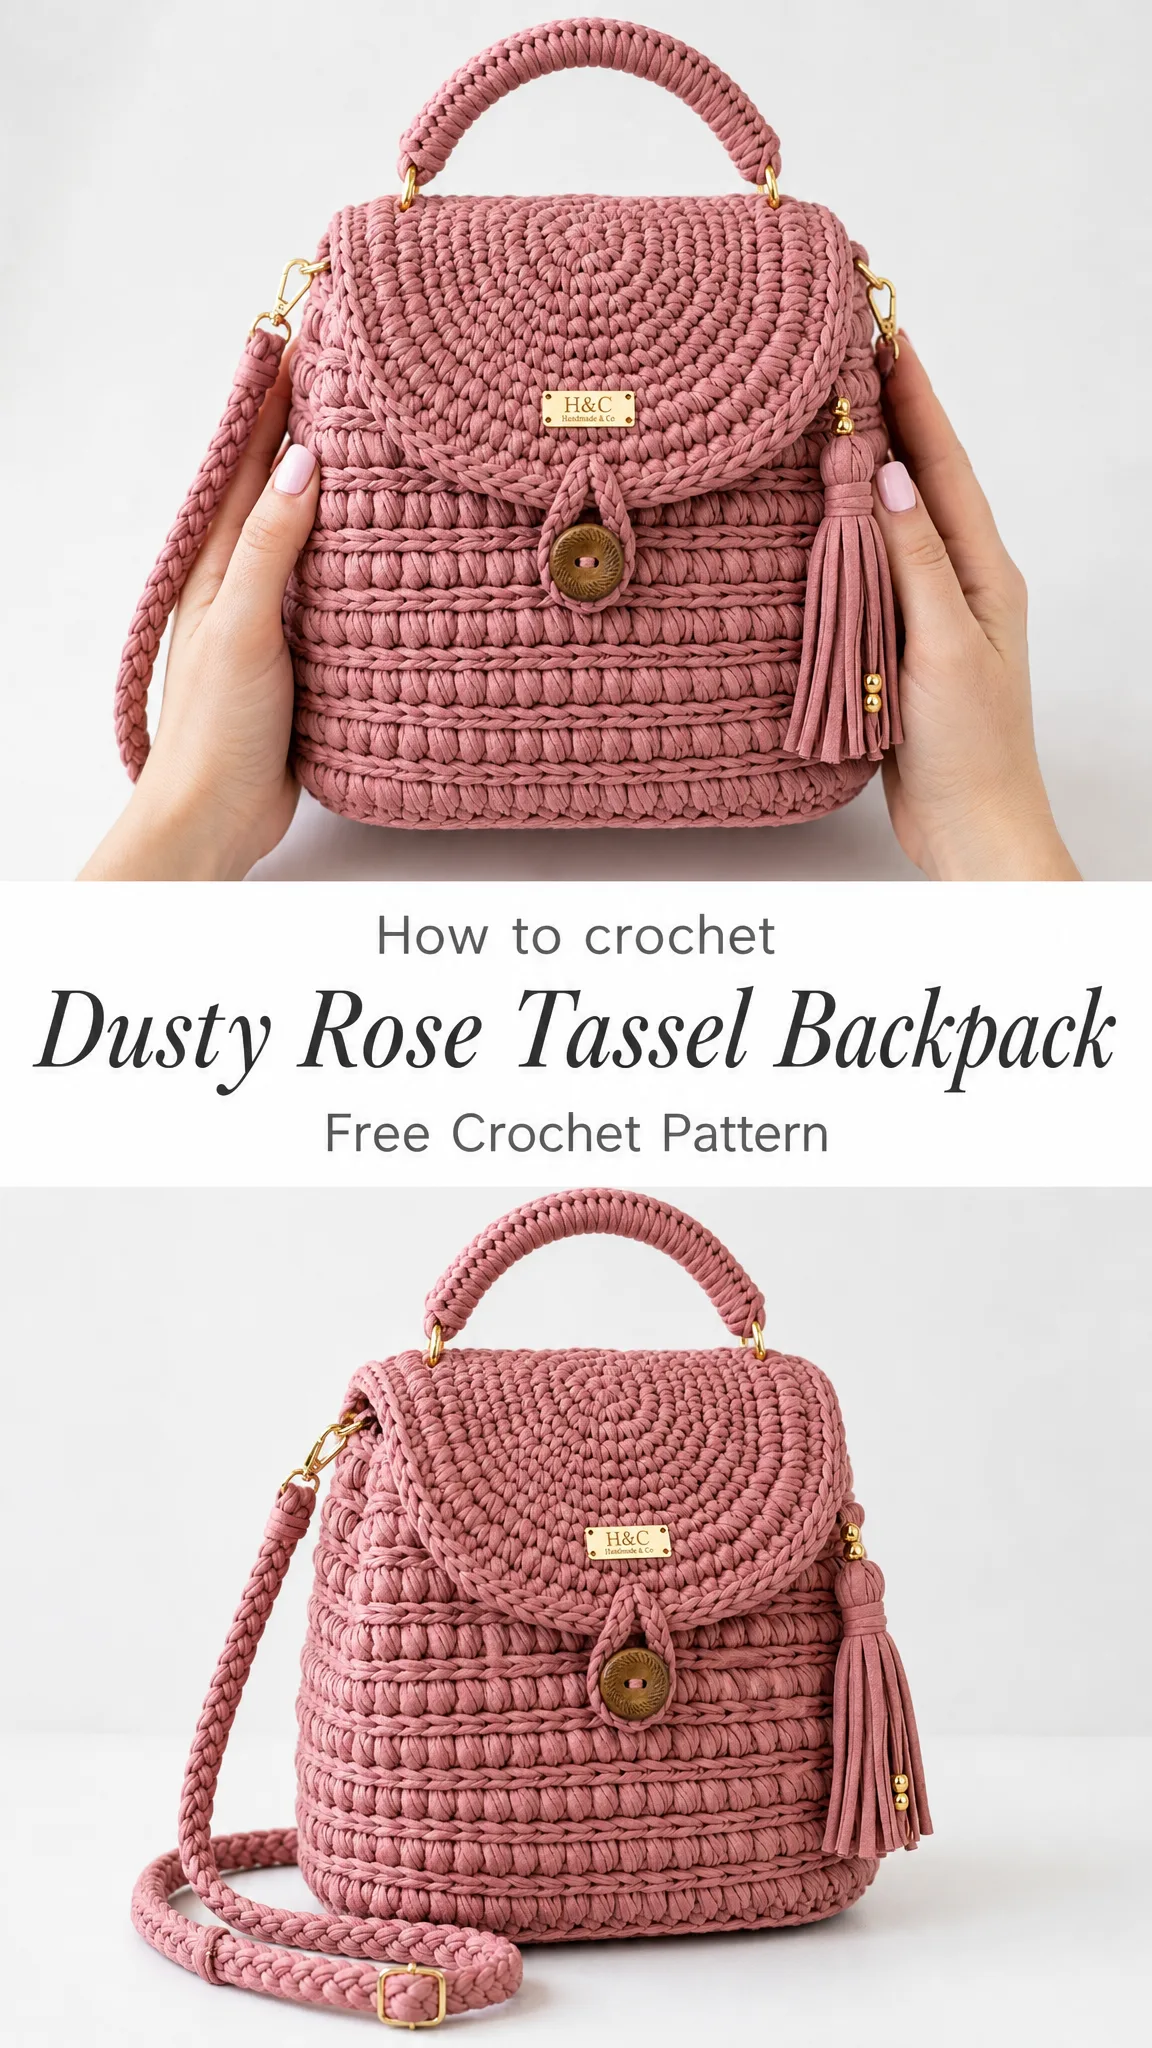
This textured crochet backpack combines soft cotton cord with clever construction techniques to create something genuinely special. You’ll work a rounded rectangle base, build the body upward with ridged texture, crochet the flap separately, then add all the finishing touches like braided straps, a top handle, and a statement tassel. The whole thing is worked with firm tension so it keeps that boxy backpack shape you see in high-end bags.
The finished size comes out to approximately 8.5 inches wide, 8.75 inches tall, and 3 inches deep. Perfect for carrying your everyday essentials without looking like you’re hauling a hiking pack around town.
Skill Level and Time Commitment
This pattern is rated intermediate, which means you should be comfortable with basic crochet stitches and ready to try a few special techniques. Don’t let that scare you off if you’re an ambitious beginner, though. The special stitches are all explained clearly, and the modular construction means you’re never juggling too many things at once.
Time estimate: Plan for about 8 to 11 hours of crocheting, plus extra time for finishing and blocking. I recommend spreading this across several sessions rather than trying to marathon through it. Your hands will thank you, and you’ll make fewer mistakes when you’re not fatigued.
Materials You’ll Need
Gather everything before you start. Nothing kills momentum like stopping mid-row to hunt for supplies.
Yarn:
Hook:
Hardware:
Notions:
Optional extras:
Yarn Substitution Ideas
The pattern suggests several alternatives depending on the look you want:
Hoooked Zpagetti or similar T-shirt yarn gives you a soft, plush backpack with that trendy jersey texture.
Bobbiny Junior 3 mm cord held double creates a firm, rounded stitch that holds its shape beautifully.
Lion Brand Rewind held double works well if you want a lighter bag with more drape.
Here’s the key: choose a smooth cord that makes a dense, non-floppy fabric. If your yarn is thinner than recommended, hold multiple strands together and measure your swatch frequently.
Gauge Information
Gauge: 9.5 stitches and 7.5 rounds equals 4 inches (10 cm) in the body texture after light blocking.
This is important: swatch in the round, because firm cord changes gauge when turned flat. A flat swatch will lie to you, and your finished bag will come out the wrong size.
Abbreviations and Stitch Definitions
Let me walk you through every abbreviation you’ll encounter. I’m including plain-English definitions because even experienced crocheters sometimes need a refresher on less common stitches.
ch = chain. The foundation loops you make at the start.
BLO = back loop only. When you look at the top of a stitch, you’ll see two loops. The back loop is the one farther from you. Working into just this loop leaves the front loop exposed, creating texture.
FO = fasten off. Cut your yarn and pull the tail through the last loop to secure it.
rep = repeat. Do the bracketed instructions again.
rnd(s) = round(s). When you’re working in a continuous spiral or joined circle rather than back and forth rows.
RS = right side. The side of your work that faces outward when the project is finished.
sc = single crochet. Insert your hook, yarn over and pull up a loop (2 loops on hook), yarn over and pull through both loops. One single crochet completed.
sc2tog = single crochet 2 together. This is a decrease. Insert hook in next stitch, pull up a loop, insert hook in following stitch, pull up a loop (3 loops on hook), yarn over and pull through all 3 loops. You’ve turned 2 stitches into 1.
sl st = slip stitch. Insert hook, yarn over, pull through the stitch and the loop on your hook in one motion. Often used to join rounds or move yarn without adding height.
st(s) = stitch(es)
wsc = waistcoat single crochet, also called split single crochet. This creates a lovely knit-like V texture.
Special Stitches Explained
These techniques give the backpack its distinctive look. Take time to practice them before diving into the pattern.
Waistcoat Single Crochet (wsc)
Insert your hook into the center V of the next single crochet, sliding under both vertical legs of the stitch (not into the top loops like usual). Yarn over, pull up a loop to the height of the round, yarn over and pull through both loops.
The trick is keeping your tension relaxed enough to enter the center of the stitch. If you’re struggling to find the V, you might be crocheting too tightly.
BLO Slip Stitch Ridge
Insert hook through the back loop only of the next stitch, yarn over and pull through the stitch and the loop on the hook in one motion.
Work these loosely. I can’t stress this enough. If you work them too tight, the next round becomes a nightmare to work into, and your bag will pull inward and distort. The goal is leaving accessible top loops for the following round.
Romanian Cord
This creates the dense, braided straps and handle that make the backpack look so professional.
Chain 2, single crochet in the second chain from the hook. Turn the work clockwise, insert hook under the side bar, pull up a loop, yarn over and pull through both loops. Continue turning clockwise and working under the two side bars to create a dense braided cord.
The rhythm takes a few inches to click, but once you’ve got it, you can make yards of beautiful cord almost without thinking.
Pattern Notes Before You Begin
Read these through before starting. They’ll save you confusion later.
Left-Handed Crocheters
You’ll work the same stitch counts. Your rounds travel in the opposite direction, so place side markers by measurement rather than by visual direction. When it comes time to attach the tassel, put it on whichever side looks best when the backpack is worn.
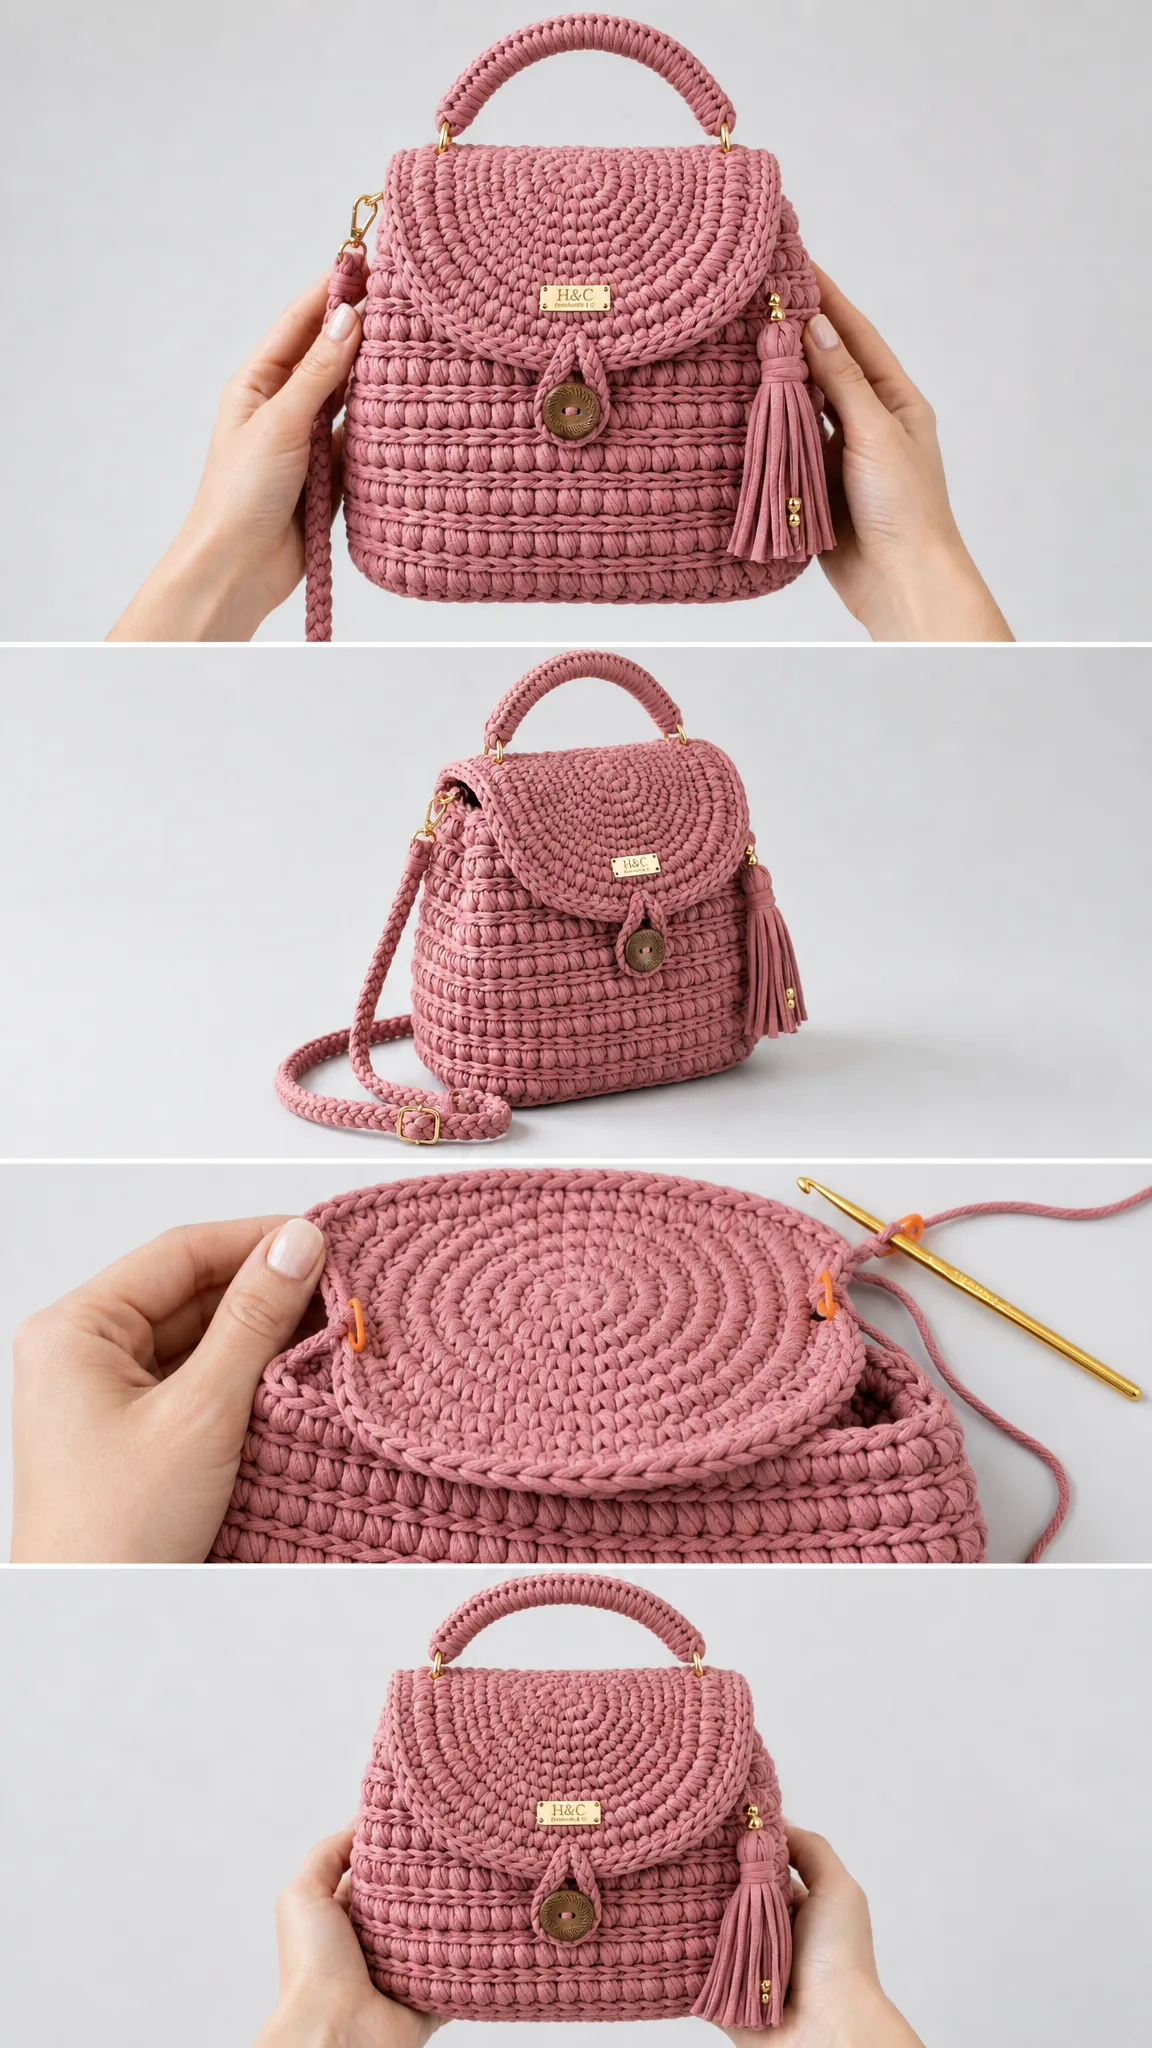
The Base
The base is worked flat first, then bordered with a setup round that you’ll build the body from.
| Row/Round | Instruction | Count |
|---|---|---|
| Row 1 | Ch 20. Sc in 2nd ch from hook and each ch across. Turn. | 19 sc |
| Rows 2-7 | Ch 1, sc across. Turn after each row. | 19 sc |
| Setup rnd | Ch 1, sc across Row 7, place 7 sc evenly down side edge, sc across foundation edge, place 7 sc evenly up side edge. Join. | 52 sc |
Checkpoint: Your base should measure about 8.25 x 3 inches (21 x 7.5 cm) after the setup round. Only add or remove one base row before the setup round if your depth differs by more than 1/2 inch (1.25 cm). Small variations are normal and won’t affect the final result significantly.
Textured Body
Now the fun begins. This is where those gorgeous ridges come from.
| Round(s) | Instruction | Count |
|---|---|---|
| 1 | Ch 1. Working BLO, sc around to turn the base upward. Join. | 52 sc |
| 2 | Ch 1. Wsc around. Join. | 52 wsc |
| 3 | Ch 1. Sl st BLO around loosely. Join. | 52 sl sts |
| 4 | Ch 1. Sc around through both top loops of Round 3. Join. | 52 sc |
| 5-19 | Repeat Rounds 2-4 five more times. You will have 6 raised ridge bands total. | 52 sts each rnd |
| 20 | Ch 1. Sc around. Join and FO, leaving a long tail for shaping the top edge if desired. | 52 sc |
Checkpoint: Your body from the base fold to the top edge should measure about 8.75 inches (22 cm) tall. The front panel should look slightly wider than each side panel, with ridges stacked evenly all the way around.
Optional Liner or Shaper
For a truly boutique finish, cut plastic canvas slightly smaller than the base and cover it with fabric. Slip it into the bag before final strap placement. This keeps the bottom flat and structured even when you’re carrying heavy items.
Rounded Flap
Work the flap flat from the top edge down. Leave a 16-inch (40 cm) tail at the beginning for sewing later.
| Row | Instruction | Count |
|---|---|---|
| 1 | Ch 32. Sc in 2nd ch from hook and each ch across. Turn. | 31 sc |
| 2-7 | Ch 1, sc across. Turn. | 31 sc |
| 8 | Ch 1, sc2tog, sc in 27 sts, sc2tog. Turn. | 29 sc |
| 9 | Ch 1, sc2tog, sc in 25 sts, sc2tog. Turn. | 27 sc |
| 10 | Ch 1, sc2tog, sc in 23 sts, sc2tog. Do not turn. | 25 sc |
| Edging | Sc evenly down side, 3 sc in lower corner, sc across lower curve, ch 8 for button loop at center, continue sc around, 3 sc in opposite lower corner, sc up side and across top. FO. | Approx. 78 edge sts + loop |
Flap Motif
The flap in the photos has beautiful concentric arcs on the surface. Here’s how to recreate them:
With a long strand, surface crochet three shallow arcs centered on the flap. Make one arc about 2 inches (5 cm) wide, one about 3.25 inches (8 cm) wide, and one about 4.5 inches (11.5 cm) wide. Follow the rows like a smile shape and keep the arcs flat against the surface. Weave ends to the wrong side.
Checkpoint: Your flap should be about 7.75 inches (19.5 cm) wide at the top and 4.5 inches (11.5 cm) deep before sewing. It should cover approximately the top third of the front panel when attached.
Handle, Shoulder Straps, and Tassel
These finishing elements take your backpack from "handmade project" to "where did you buy that?"
Top Handle
Make one Romanian cord 13 inches (33 cm) long. Thread each end through a D-ring, fold back 1 inch (2.5 cm), and sew securely with matching yarn. Stitch the D-rings to the top back corners of the bag, about 1 inch (2.5 cm) in from each side.
Shoulder Straps
Make two Romanian cords, each 34 inches (86.5 cm) long. Alternatively, you can braid 3 strands of cord to that length for a different look.
Attach a swivel clasp or ring to each top side. Sew the lower strap ends to the lower back corners. Add a slider if you want adjustability, which is handy if multiple people will wear the backpack or if you like to change strap length based on your outfit.
Button Tab
Ch 10, sc in 2nd ch from hook and each ch across. FO.
Wrap the strip around the button base if needed for extra security, then sew the button to the center front about 1.5 inches (4 cm) below the top edge. Test the flap loop before knotting your ends to make sure the button and loop align properly.
Side Tassel
Cut twelve 8-inch (20 cm) strands. Fold them through a small ring, wrap tightly 3/4 inch (2 cm) below the fold with another strand of yarn, knot securely, and trim ends even. Attach to one side ring near the flap. Add two small beads if desired for extra flair.
Assembly and Finishing
You’re in the home stretch. Take your time with these final steps.
1. Pin the flap to the back top edge, centered so it hangs over the front panel. Sew through the top row of the flap and the back top edge only, keeping the opening fully usable.
2. Steam block lightly from the wrong side, or cover with a towel and press gently. Do not flatten the raised ridges. You’ve worked hard for that texture.
3. Shape the corners by hand while the fabric is slightly damp. Let the bag dry completely while stuffed with clean towels to hold its shape.
4. Attach the handle, straps, button, and tassel. Tug firmly on every hardware attachment point before using the bag to make sure everything is secure.
Care Instructions
Spot clean with cool water and mild soap. Lay flat to dry while stuffed with towels to preserve the shape. Avoid soaking heavy cord, which can stretch under its own weight and distort your beautiful work.
Troubleshooting Common Issues
Even experienced crocheters run into problems sometimes. Here are quick fixes for the most common issues:
Body narrows after ridge rounds: Work your slip stitches looser, or go up one hook size for ridge rounds only.
Flap curls at the edges: Add one more single crochet edging round, placing 3 sc at each lower corner to add weight and help it lay flat.
Bag slouches when worn: Add a base shaper and tighten your strap attachment points.
Button loop too loose: Remove 1 to 2 chains from the loop, or sew the button slightly lower on the bag front.
Size Customization Tips
Want a different size? Here’s how to adjust:
For a wider bag: Add chains to the foundation in multiples of 2. Each added chain increases width by about 0.42 inches (1 cm) at this gauge.
For a taller bag: Repeat Rounds 6 through 8 once more before Round 24. Each repeat adds about 1.6 inches (4 cm) of height.
For a deeper bag: Add one more base increase round before starting the body, placing 5 increases evenly around the curved ends.
You Did It!
Thank you so much for choosing this pattern for your next project. I genuinely love seeing what people create, and this backpack looks stunning in every color I’ve seen it made in. If you give this pattern a try, I’d be thrilled if you’d share a photo on Instagram or Facebook and tag me so I can admire your work.
Save this pattern to your Pinterest boards so you can find it whenever inspiration strikes, and please drop a comment below if you make one. I love hearing about your color choices, any modifications you tried, and how the finished backpack turned out. Happy crocheting!
Want a Quick & Easy Printable Version?
Get a clean, beautifully formatted PDF of this pattern — easy to follow step by step, ready to print or save on any device. No scrolling, no distractions, just the pattern.
Get the Printable PDF →