This poncho is SUPER impressive, and honestly? It works up WAY faster than it looks. If you have been eyeing granny square garments but felt intimidated, this is your sign to dive in. You are basically making a bunch of cozy little squares, joining them together, and adding a gorgeous ribbed neckband. That is it! The whole project takes about 14 to 18 relaxed hours, which means you could easily finish this in a weekend crochet marathon or spread it out over a couple of weeks. The warm cream to cocoa color palette makes this poncho perfect for fall and winter, and it makes an absolutely stunning handmade gift.
Get the Ad-Free PDF Pattern
You can find the free pattern below, or you can purchase the ad-free printable PDF from my shop.
Get the Printable PDF →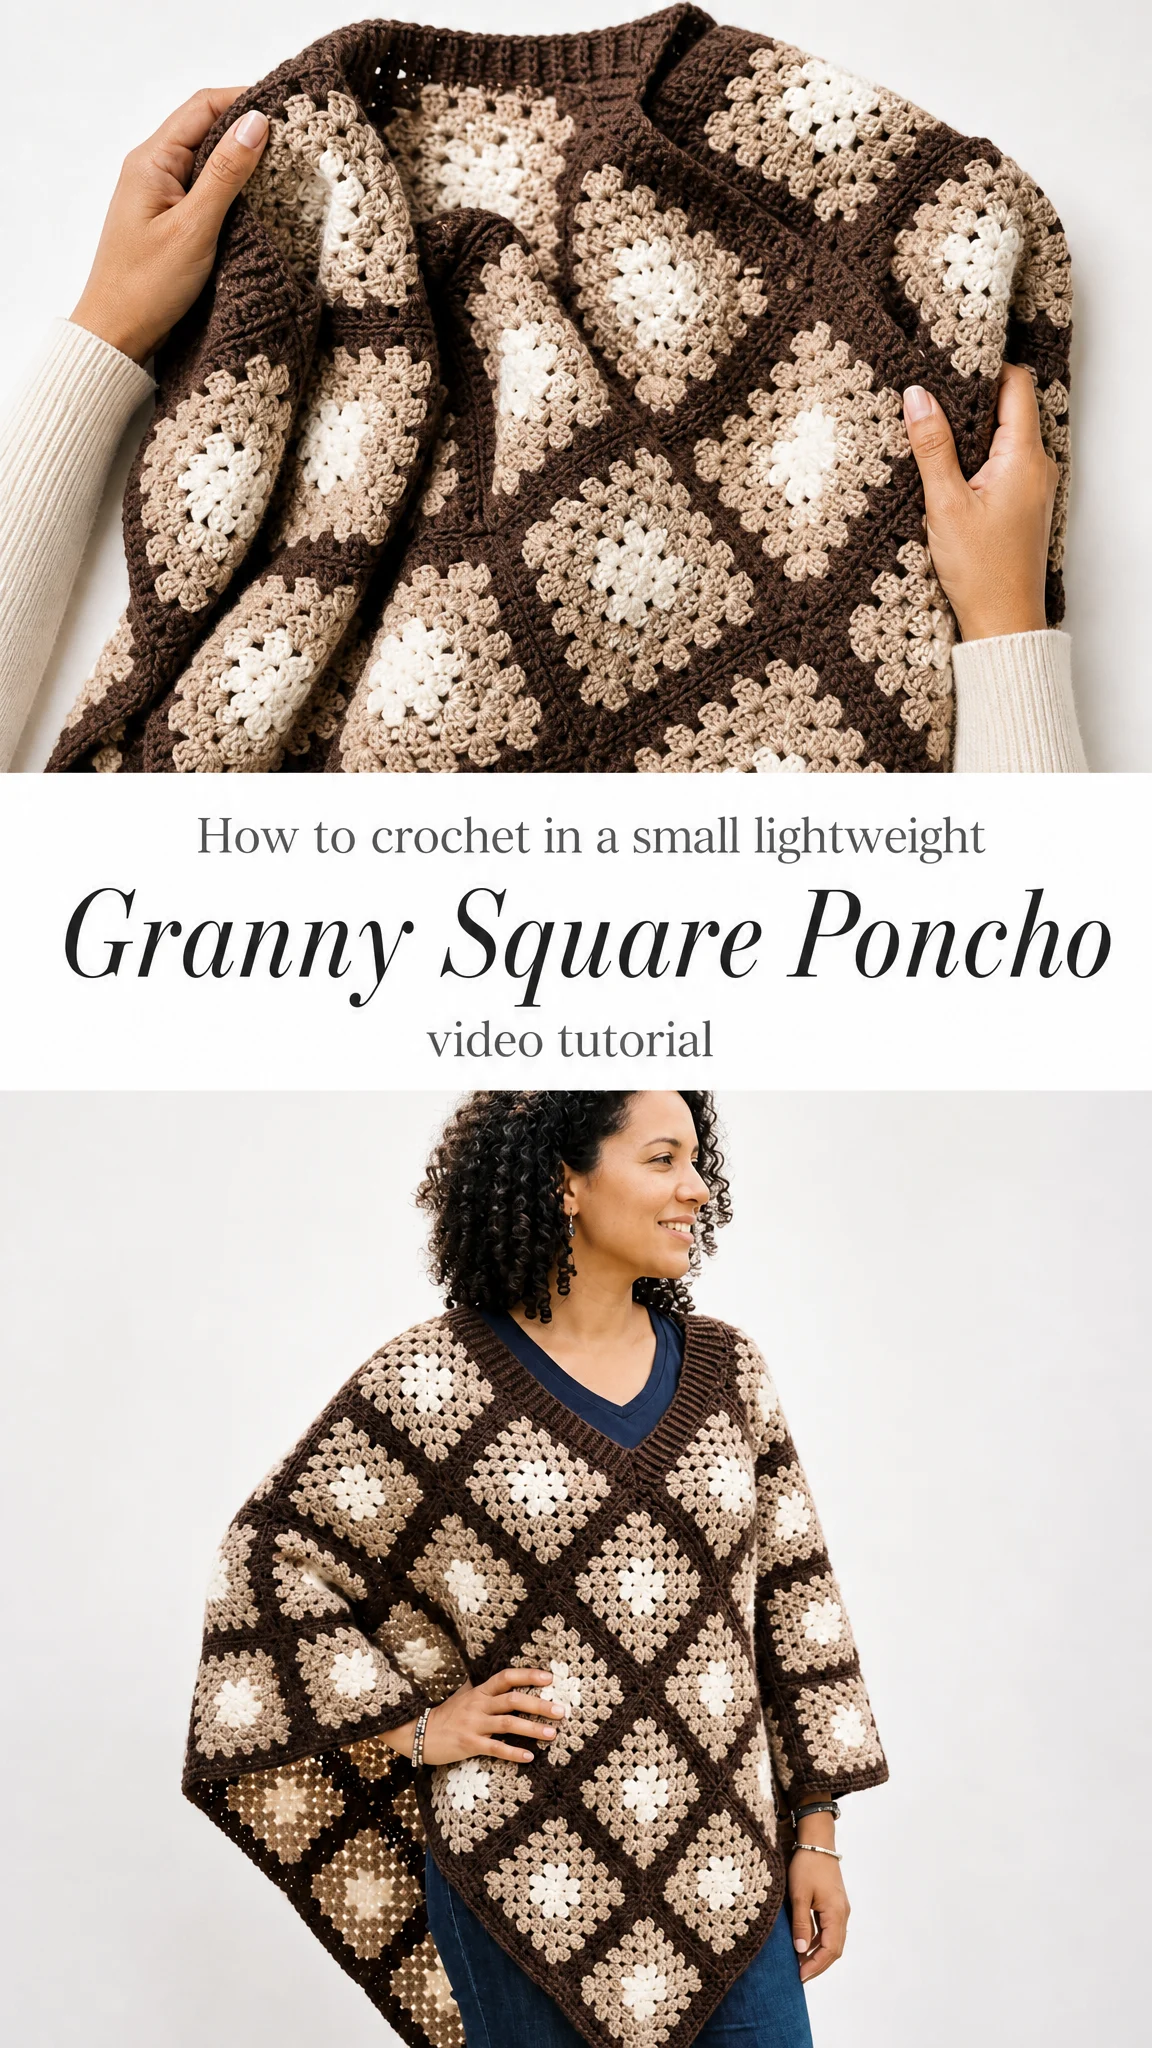
Why You Will Love This Granny Square Poncho Pattern
Let me tell you what makes this granny square poncho crochet pattern so satisfying to make. First, the classic granny square is one of the most beginner friendly motifs in crochet. If you can chain, double crochet, and slip stitch, you have everything you need. Second, the diagonal diamond layout creates that gorgeous vintage aesthetic without any complicated construction. Third, the ribbed look V neckline elevates the whole piece from homemade to handcrafted.
The finished poncho measures about 33 inches across from sleeve point to sleeve point and 25 inches from shoulder to lower point. It fits up to about a 54 inch chest with generous drape, making it wonderfully inclusive. One size, lots of cozy.
Materials You Will Need
Before you start crocheting, gather these supplies. Having everything ready makes the process so much more enjoyable.
Yarn: Worsted weight or aran weight yarn, category 4. You will need three colors in the following amounts:
Some great yarn options include Lion Brand Heartland, Scheepjes Chunky Monkey, or Paintbox Yarns Simply Aran. Any smooth category 4 yarn that blocks to the stated motif size will work beautifully. Look for yarn with enough body to hold the square grid and enough softness for comfortable wear around your neck.
Hook: US H-8 or 5.0 mm, or whatever size you need to match gauge.
Tools: Locking stitch markers, yarn needle, pins or blocking wires, tape measure, scissors.

Gauge
Getting your gauge right is essential for this project. A small difference multiplied across all those squares can really change the finished poncho size.
Motif gauge: One completed 6 round square after the single crochet edging should measure 5.5 inches by 5.5 inches or 14 cm by 14 cm when blocked.
Stitch gauge: 13 double crochets and 7 granny rounds equals 4 inches or 10 cm in granny pattern when blocked.
Important checkpoint: Make one test square and block it before crocheting all 40 motifs. This small step saves so much potential frustration later.
Abbreviations and Stitch Definitions
Let me walk you through every abbreviation used in this pattern. Even if you are an experienced crocheter, having these definitions handy keeps things clear.
UK crocheters please note: US double crochet equals UK treble crochet. US single crochet equals UK double crochet.
Special Techniques
Granny cluster: Work 3 double crochets into the indicated space. The chain 1 spaces between clusters create that signature open, lacy texture.
Corner: Work 3 double crochets, chain 2, then 3 more double crochets all into the same corner space.
Join as you go option: On the final single crochet edging round, replace the center single crochet of a 3 single crochet corner (or a side single crochet) with a slip stitch into the matching stitch of the neighboring motif, then continue the single crochet edging.
Back loop ribbed look band: Work half double crochet rounds through the back loop only after the foundation round. This technique creates that soft raised texture you see at the V neck opening.
Color Recipe for Each Square
Consistency is key for that beautiful diamond rhythm across your poncho. Follow this color sequence for every single square:
How to Crochet the Full Granny Squares
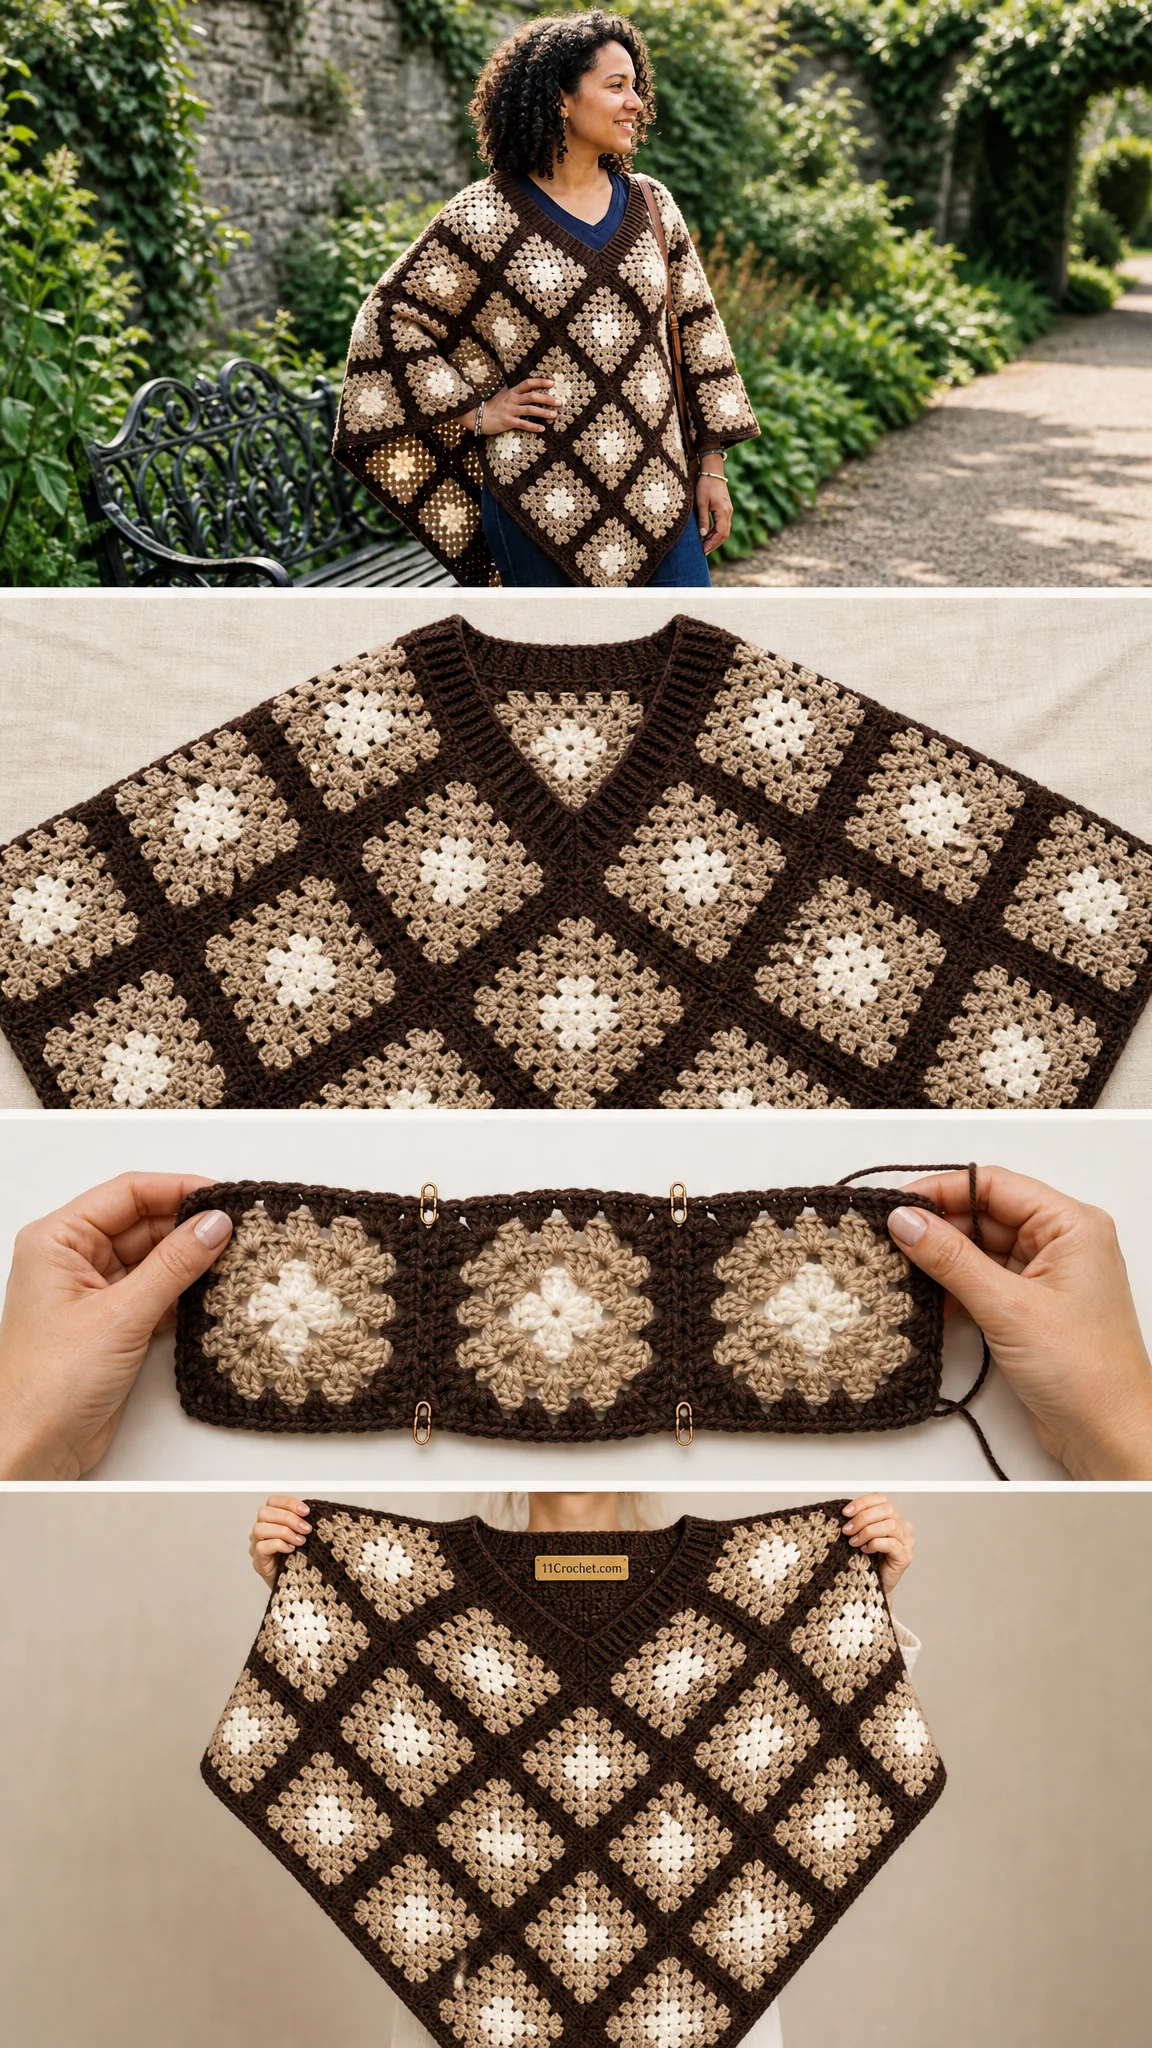
You will make 40 full squares total. Each one finishes at 5.5 inches or 14 cm after blocking. I recommend making all your squares before assembly so you can balance color placement and tension across the whole poncho.
Round 1 (Cream): In a magic ring, chain 3 (counts as first double crochet), work 2 double crochets, chain 2. *Work 3 double crochets, chain 2.* Repeat from * to * three more times. Slip stitch to top of beginning chain. You have 4 clusters with 12 double crochets total.
Round 2 (Taupe): Slip stitch to corner space. Chain 3, work 2 double crochets, chain 2, then 3 double crochets in the same corner space. Work a corner (3 dc, ch 2, 3 dc) in each remaining corner space. Slip stitch to join. You have 8 clusters with 24 double crochets.
Round 3 (Taupe): Work a corner in each corner space. Work 3 double crochets in each side chain 1 space. Slip stitch to join. You have 12 clusters with 36 double crochets.
Round 4 (Dark chocolate): Repeat Round 3 logic, adding 1 side cluster per side. You have 16 clusters with 48 double crochets.
Round 5 (Taupe): Repeat Round 3 logic, adding 1 side cluster per side. You have 20 clusters with 60 double crochets.
Round 6 (Dark chocolate): Repeat Round 3 logic, adding 1 side cluster per side. You have 24 clusters with 72 double crochets.
Round 7 (Dark chocolate, single crochet edging): Work 3 single crochets in each corner chain 2 space. Work 1 single crochet in each double crochet and 1 single crochet in each chain 1 space around. Slip stitch to join and fasten off. You have 104 single crochets.
How to Crochet the Half Square Triangles
You will make 8 half square triangles. These fill the upper neckline and side shoulder edges so your poncho keeps that clean diamond grid look without bulky folded corners.
Row 1: In a magic ring, chain 3, work 2 double crochets, chain 2, work 3 double crochets, chain 2, work 3 double crochets. Turn. You have 3 clusters with 9 double crochets.
Row 2: Chain 3, work 2 double crochets in first space, chain 1. Work a corner in center chain 2 space. Chain 1, work 3 double crochets in last space. Turn. You have 4 clusters with 12 double crochets.
Row 3: Chain 3, work 2 double crochets in first space, chain 1, work 3 double crochets in next space, chain 1. Work a corner in center. Chain 1, work 3 double crochets in next space, chain 1, work 3 double crochets in last space. Turn. You have 6 clusters with 18 double crochets.
Row 4: Continue as established, adding 1 side cluster before and after the center corner. You have 8 clusters with 24 double crochets.
Row 5: Continue as established. You have 10 clusters with 30 double crochets.
Row 6: Continue as established. You have 12 clusters with 36 double crochets.
Row 7 (Single crochet edging): Work 3 single crochets in center corner and 1 single crochet in each double crochet and chain space along edges. Place 2 single crochets in each top corner. Fasten off. You have 56 single crochets.
Blocking Before Joining
This step makes such a difference in your finished poncho. Pin each full square to 5.5 inches or 14 cm. Pin each half motif to a matching diagonal half square shape. Steam block or wet block gently and allow to dry completely.
Checkpoint: 4 joined square widths should measure about 22 inches or 56 cm before the panel is turned on point.
Assembling the Front Panel
Lay 20 full squares right side up in 5 diagonal rows:
Add 4 half motifs along the upper edge to smooth the shoulder line and frame the V neckline.
Using dark chocolate yarn, whipstitch through back loops only or slip stitch through matching back loops to join.
Assembling the Back Panel
Repeat the same layout as the front panel, but keep the upper back edge shallower. Place the half motifs so the back neck sits about 1.5 inches or 4 cm higher than the front V.
Checkpoint: Each panel should measure about 23 inches or 58.5 cm wide across the upper shoulder line and about 25 inches or 63.5 cm from upper shoulder to lower point.
Joining Shoulders and Sides
Place both panels wrong sides together. Join from each shoulder point toward the neckline for 5.5 inches or 14 cm on each side. This leaves a V opening of about 25 inches or 63.5 cm around.
For the side edges, join from underarm level downward for 5.5 to 8 inches or 14 to 20 cm if you want a more secure poncho. Leave completely open for maximum cape like drape.
Pro tip: Try the poncho on before fastening the side seams. The open sides create that soft flowing shape. Short side joins keep it in place without turning it into a fitted sweater.
The Ribbed Look V Neck Band
Neckline foundation round: With dark chocolate yarn and right side facing, join yarn at back neck. Work single crochets evenly around the neckline at a pick up ratio of about 3 single crochets for every 4 row end stitches and 1 single crochet in each motif edging stitch. Place 3 single crochets in the front V point. Adjust by 2 to 4 stitches if needed so the neck lies flat. Target count: 112 single crochets.
Round 1: Chain 1, single crochet in each stitch around, placing 3 single crochets in center front V stitch. Join. You have 114 single crochets.
Round 2: Chain 2, half double crochet in back loop only around, placing 3 half double crochets in center V stitch. Join. You have 116 half double crochets.
Round 3: Chain 2, half double crochet in back loop only around, placing 3 half double crochets in center V stitch. Join. You have 118 half double crochets.
Round 4: Chain 1, single crochet in back loop only around, placing 3 single crochets in center V stitch. Join and fasten off. You have 120 single crochets.
Lower Hem and Sleeve Edges
Join dark chocolate yarn at one lower point. Work 1 single crochet in each motif edging stitch and 3 single crochets in each outer point around all lower and side edges. Work 1 additional round of single crochet if you want a firmer frame.
Keep the edge relaxed. If it cups inward, add an extra single crochet at each outside point. If it ripples, skip 1 single crochet every 10 to 12 stitches along straight sections.
Optional Fringe
Cut 10 inch or 25.5 cm strands in dark chocolate and taupe. Attach one 2 strand fringe bundle to every other single crochet along the lower points only. Trim evenly after steaming for a polished finish.
Customization Options
To make it wider: Add one full square to each outer side of both panels. Each added square increases the cross body width by about 5.5 inches or 14 cm and requires about 42 yards or 38 meters total yarn in the color recipe.
To make it longer: Add one diagonal row at the lower front and back point. Each added row deepens the poncho by about 3.9 inches or 10 cm when worn on point.
To adjust the neckline: For a smaller neck opening, join the shoulder seams farther toward the center before working the band. For a deeper V, leave more front motifs unjoined and keep the 3 stitch increase at the V point on every band round.
Troubleshooting Common Issues
Squares differ in size: Block all motifs to the same 5.5 inch or 14 cm measurement. If a motif is more than 0.25 inches or 6 mm off, remake it with adjusted tension.
Neck band ripples: Use fewer pick up stitches along row ends or work the final single crochet round with a smaller hook.
Neck band pulls too tight: Add 4 to 8 single crochets evenly in the foundation round before the half double crochet band.
Poncho twists after joining: Lay both panels flat and confirm all right sides face the same direction before sewing the shoulder seams.
Seams feel bulky: Whipstitch through back loops only, or use a flat slip stitch join with relaxed tension.
Finishing Your Poncho
1. Weave in all ends on the wrong side, following the direction of the nearest seam or cluster.
2. Steam block seams gently from the wrong side.
3. Pin the lower front and back points sharply so the diamond silhouette dries cleanly.
4. Try on and adjust side joins if desired.
5. Let the poncho rest flat overnight before wearing.
Blocking checkpoint: After final blocking, the lower points should hang smoothly, the V neckline should sit flat without flipping, and the motif grid should read as even diamonds across front and back.
Care Instructions
Hand wash in cool water or machine wash on a gentle cycle if your yarn label allows. Lay flat to dry, reshaping the V neck and lower points. Store folded rather than hung to prevent stretching over time.
Final Thoughts on This Granny Square Poncho Crochet Pattern
I hope you love making this granny square poncho as much as I loved putting together this crochet tutorial. The combination of classic granny squares with that modern V neckline creates something truly special. Whether you are making this for yourself or as a handmade gift, the warm brown tones work with practically everything in your closet.
Thank you so much for choosing this pattern! If you make this poncho, I would absolutely love to see your finished project. Tag me on Instagram or share a photo on Facebook so I can admire your beautiful work.
If this granny square poncho pattern caught your eye, go ahead and save it to your Pinterest boards so you can find it whenever you are ready to start. And please drop a comment below if you make one. I love hearing which color combinations you choose!
Want a Quick & Easy Printable Version?
Get a clean, beautifully formatted PDF of this pattern — easy to follow step by step, ready to print or save on any device. No scrolling, no distractions, just the pattern.
Get the Printable PDF →