This is a cozy drop-shoulder pullover with a knit-look texture, openwork sleeve details, raised blue flowers, embroidered vines, and wooden button centers. The main fabric uses half double crochet through the back loop. The construction involves four flat pieces seamed together. Intermediate skill level required.
Get the Ad-Free PDF Pattern
You can find the free pattern below, or you can purchase the ad-free printable PDF from my shop.
Get the Printable PDF →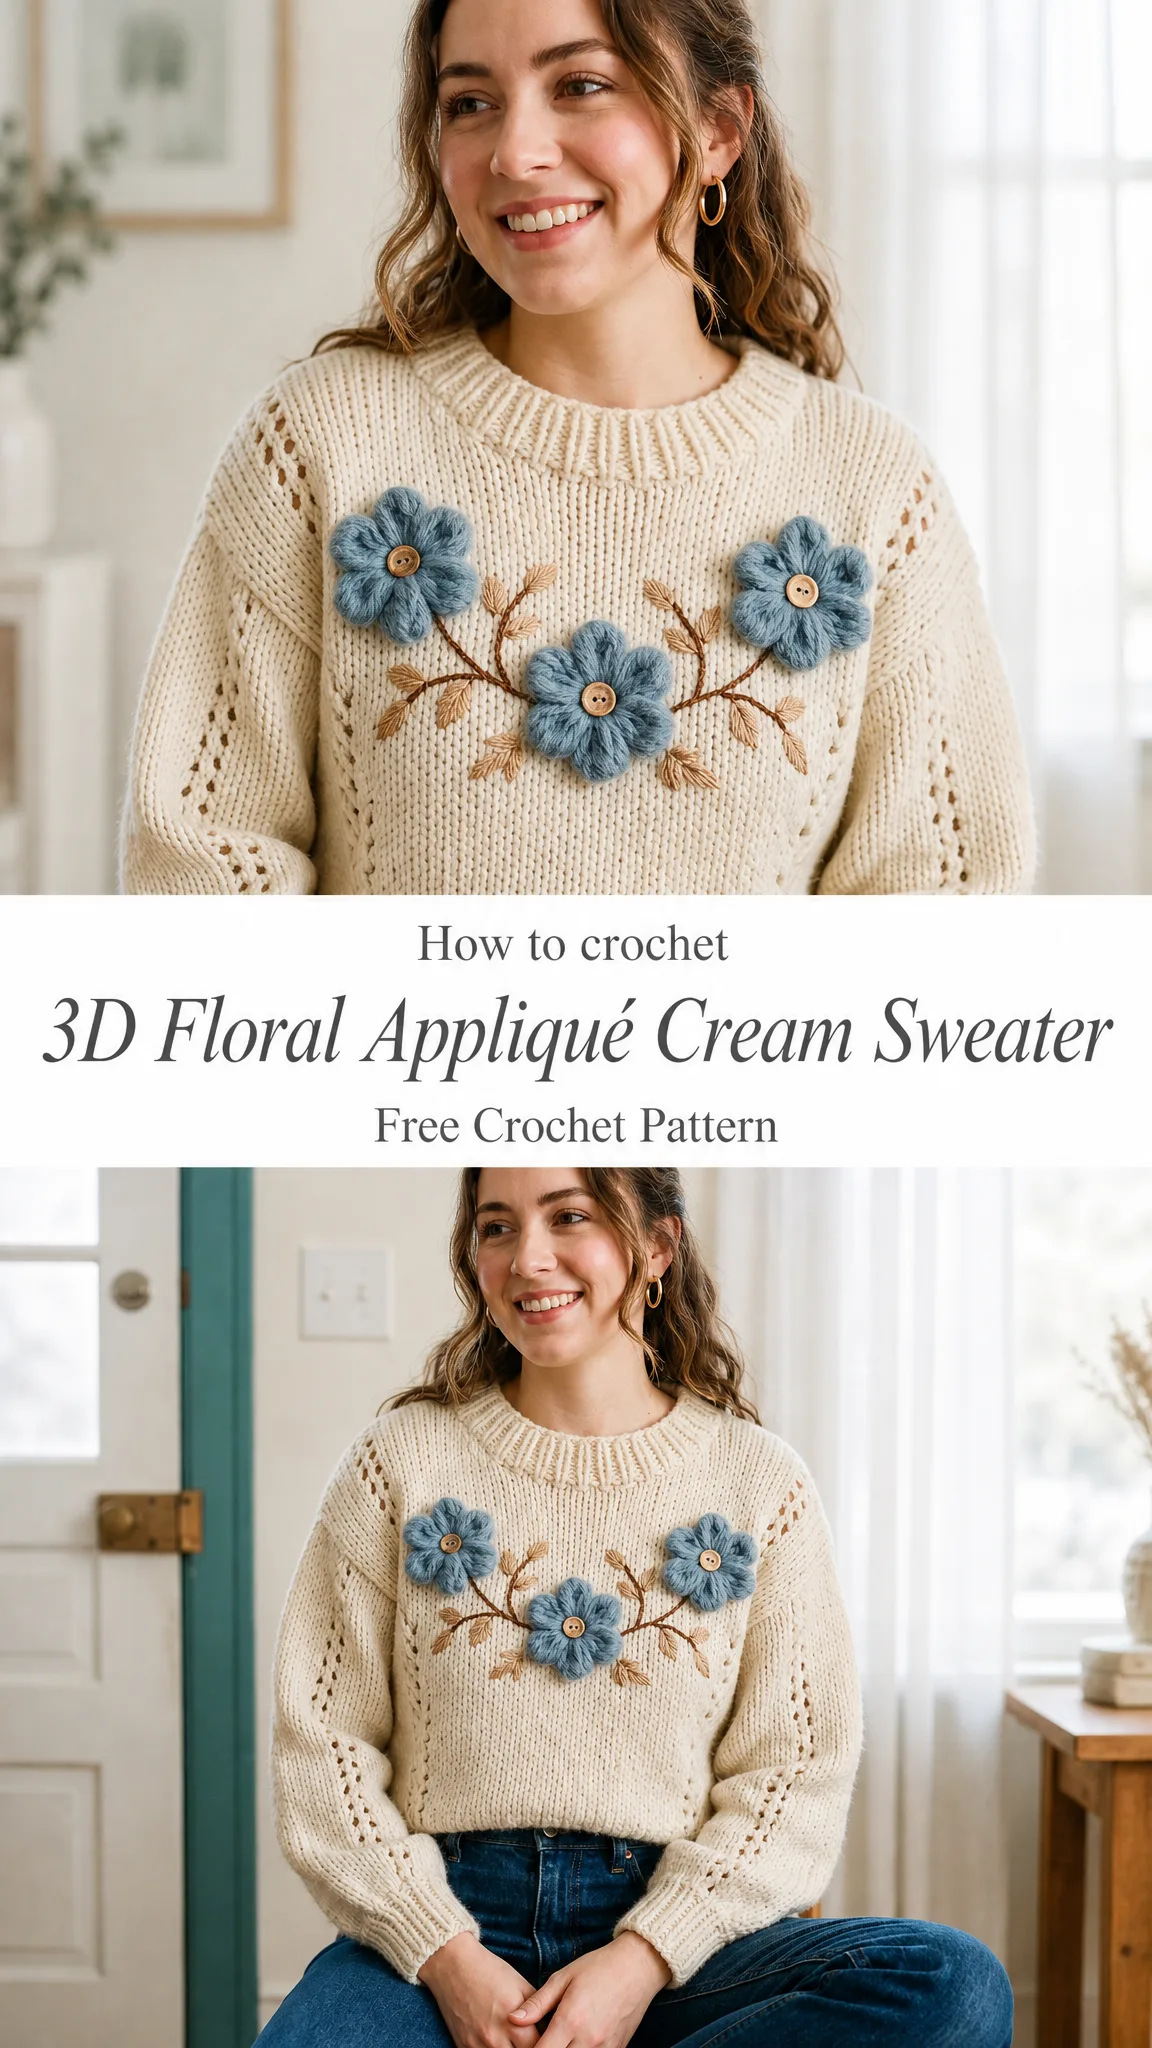
I fell in love with this sweater the moment I saw those dimensional flowers pop off the cream fabric. The combination of that soft, knit-look texture with the bold floral appliqués creates something truly special. You will work garment seaming, ribbing, neckline pickup, appliqué placement, and simple embroidery to bring this beauty to life.
Why This Sweater Pattern Works So Well
The genius of this design lies in its straightforward construction. You are essentially making four rectangles, which means no complicated shaping until you reach the front neckline. The half double crochet through the back loop (hdc BLO) creates those gorgeous horizontal ridges that mimic stockinette knitting. If you have ever wished your crochet looked more like knitting, this technique delivers exactly that effect.
The drop-shoulder silhouette is forgiving and comfortable. It fits a range of body types beautifully, and the relaxed ease makes it perfect for layering over tees or wearing alone on mild days.
Finished Measurements
This pattern creates one adult relaxed size with the following dimensions:

Materials You Will Need
Yarn
Main color: 900 yards / 823 meters of worsted-weight cream yarn
Flowers: 60 yards / 55 meters of dusty blue yarn
Embroidery: 25 yards / 23 meters of tan or camel yarn
Centers: 3 small wooden buttons, about 5/8 inch / 15 mm
Yarn Suggestions
The pattern recommends these options:
For substitution, choose a worsted or light aran yarn that meets gauge after blocking. For a lighter sweater, use a wool/acrylic blend. For more drape, use a softer merino blend.
Hooks and Tools
Gauge
12 hdc BLO x 10 rows = 4 inches / 10 cm after blocking with the larger hook
Ribbing gauge: 8 slip stitches BLO = approximately 2 inches / 5 cm tall
You must swatch and match both stitch and row gauge before starting. This step is essential for garment construction.
Stitch Abbreviations and Definitions
BLO means back loop only. You insert your hook under just the back loop of the stitch instead of both loops.
ch means chain. This is your foundation and turning stitch.
dc means double crochet. Yarn over, insert hook, pull up a loop, yarn over and pull through two loops twice.
hdc means half double crochet. Yarn over, insert hook, pull up a loop, yarn over and pull through all three loops at once.
MR means magic ring. This adjustable loop creates a tight center for working in the round.
rep means repeat.
rnd means round.
RS means right side, which is the public-facing side of your work.
sc means single crochet. Insert hook, pull up a loop, yarn over and pull through both loops.
sl st means slip stitch. Insert hook, yarn over, pull through stitch and loop on hook in one motion.
sp means space.
st(s) means stitch or stitches.
WS means wrong side.
UK note: US sc equals UK dc. US dc equals UK tr.
Special Stitches for This Pattern
Slip stitch BLO rib: Insert hook in back loop only, yarn over, pull through stitch and loop on hook. Keep your loops relaxed so the ribbing stretches properly.
hdc BLO: Yarn over, insert hook in back loop only, yarn over and pull up a loop, yarn over and pull through all 3 loops.
Increase: Work 2 hdc in the same stitch.
hdc2tog: Yarn over, insert hook in next stitch, pull up a loop, yarn over, insert hook in next stitch, pull up a loop, yarn over and pull through all 5 loops.
Petal loop: Chain 4, slip stitch in the next single crochet to anchor one loop.
Important Pattern Notes
The chain 1 at row starts does not count as a stitch. Body and sleeves are worked flat and seamed with the right side facing out. Keep your BLO rows consistent because the ridge texture is part of the design. Mark the first and last stitch of every row to keep edges straight. Try on before final sleeve seaming and adjust side seam height if needed.
How to Crochet the Back Panel
Using the smaller hook, chain 9.
Rib Row 1: Slip stitch in 2nd chain from hook and each chain across. Turn. (8 sl sts)
Rib Rows 2 through 58: Chain 1, slip stitch BLO across. Turn. (8 sl sts)
After Row 58, your ribbing should measure about 19.25 inches / 49 cm wide and 2 inches / 5 cm tall.
Set-Up Row: Rotate to work across the long edge. With the larger hook, chain 1, work 1 hdc into the end of each rib row. Turn. (58 hdc)
Rows 1 through 50: Chain 1, hdc BLO across. Turn. (58 hdc)
At Row 50, body fabric above rib measures about 20 inches / 51 cm.
How to Crochet the Front Panel
Work as for Back Panel through Row 38. (58 hdc)
Shape the Front Neck
Left shoulder Row 39: Chain 1, hdc BLO in first 20 stitches. Turn. (20 hdc)
Left shoulder Rows 40 through 50: Chain 1, hdc BLO across. Turn. (20 hdc) Fasten off.
Right shoulder Row 39: With RS facing, skip center 18 stitches, join yarn in next stitch, chain 1, hdc BLO in last 20 stitches. Turn. (20 hdc)
Right shoulder Rows 40 through 50: Chain 1, hdc BLO across. Turn. (20 hdc) Fasten off.
Checkpoint: Each panel is approximately 19.25 inches / 49 cm wide. Full sweater bust after seaming is approximately 38.5 inches / 98 cm. Front neckline opening spans 18 center stitches plus pickup along both vertical neck edges.
How to Crochet the Sleeves (Make 2)
Using the smaller hook, chain 9.
Cuff Row 1: Slip stitch in 2nd chain from hook and each chain across. Turn. (8 sl sts)
Cuff Rows 2 through 28: Chain 1, slip stitch BLO across. Turn. (8 sl sts)
The cuff is about 9.25 inches / 23.5 cm around before seaming.
Set-Up Row: Rotate to work across long edge. With larger hook, chain 1, work 1 hdc into the end of each cuff row. Turn. (28 hdc)
Rows 1 through 4: Chain 1, hdc BLO across. Turn. (28 hdc)
Row 5: Chain 1, 2 hdc BLO in first stitch, hdc BLO across to last stitch, 2 hdc BLO in last stitch. Turn. (30 hdc)
Rows 6 through 8: Chain 1, hdc BLO across. Turn. (30 hdc)
Row 9: Increase at both ends as Row 5. (32 hdc)
Rows 10 through 12: Chain 1, hdc BLO across. (32 hdc)
Row 13: Increase at both ends. (34 hdc)
Rows 14 through 16: Chain 1, hdc BLO across. (34 hdc)
Row 17: Increase at both ends. (36 hdc)
Rows 18 through 20: Chain 1, hdc BLO across. (36 hdc)
Row 21: Increase at both ends. (38 hdc)
Rows 22 through 24: Chain 1, hdc BLO across. (38 hdc)
Row 25: Increase at both ends. (40 hdc)
Rows 26 through 28: Chain 1, hdc BLO across. (40 hdc)
Row 29: Increase at both ends. (42 hdc)
Rows 30 through 32: Chain 1, hdc BLO across. (42 hdc)
Row 33: Increase at both ends. (44 hdc)
Row 34: Chain 1, hdc BLO across. (44 hdc) Fasten off.
Checkpoint: Sleeve top is about 14.5 to 14.75 inches / 37 cm wide, designed to fit the 18-row armhole opening on front and back combined.
Assembly and Neckband Instructions
Shoulders
With right sides together, seam each 20-stitch shoulder of the front to 20 stitches at the outer edges of the back. Leave the center 18 back stitches open for the back neck.
Side Seams
With right sides together, seam from bottom rib through Body Row 32 on each side. Leave Rows 33 through 50 open for armholes. Each armhole opening is about 7.25 inches / 18.5 cm deep per side edge, or about 14.5 inches / 37 cm around the sleeve seam line.
Set the Sleeves
Fold each sleeve lengthwise with right sides together and seam from cuff to underarm. Pin sleeve top evenly around armhole, matching sleeve seam to side seam and sleeve center to shoulder seam. Sew in place with a whipstitch or mattress stitch.
Neckband
With smaller hook and RS facing, join yarn at left shoulder.
Pick up: 18 sc across back neck, 9 sc down left front neck edge, 18 sc across front neck, 9 sc up right front neck edge. (54 sc)
Rnd 2: Chain 2, *front post double crochet around next stitch, back post double crochet around next stitch; repeat from * around, slip stitch to join. (54 sts)
Rnds 3 through 5: Repeat Rnd 2. (54 sts) Fasten off.
Neckband height is about 1.25 inches / 3 cm.
Openwork Sleeve Lines
The sample look uses the natural seam-side ridges and small eyelets formed by relaxed BLO tension. For a more open sleeve stripe, work every 6th sleeve row as: chain 1, hdc in first 2 stitches, *chain 1, skip 1, hdc in next stitch* across to last 2 stitches, hdc in last 2 stitches. On the next row, hdc in each hdc and chain-1 space.
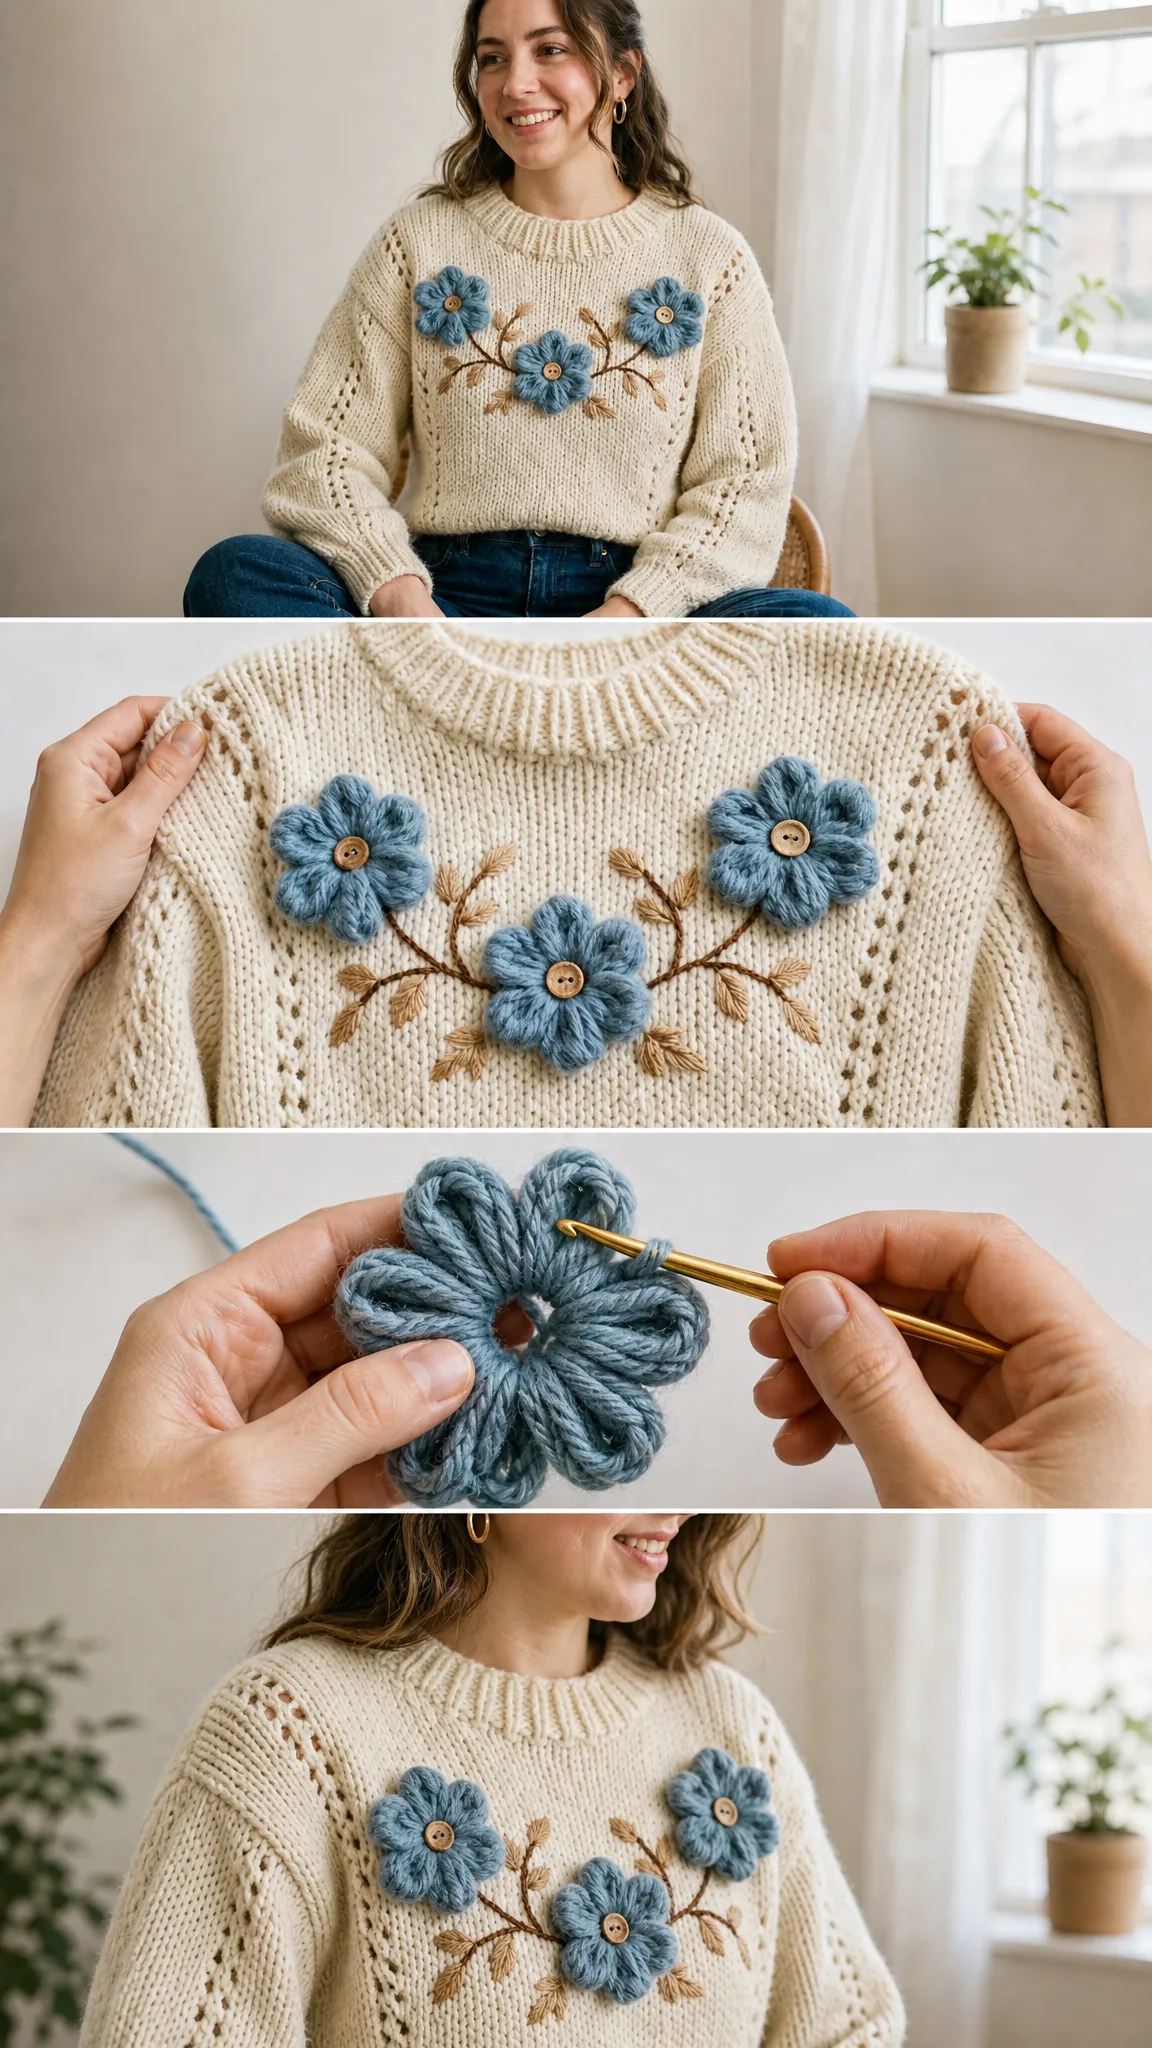
3D Floral Appliqués Tutorial
Large Flower (Make 3)
Use blue yarn and smaller hook.
Rnd 1: Magic ring, chain 1, 6 sc in ring, slip stitch to first sc. (6 sc)
Rnd 2: *Chain 4, slip stitch in next sc; repeat from * around. (6 ch-4 loops)
Rnd 3: In each loop work: sc, hdc, 3 dc, hdc, sc. Slip stitch to first sc. (42 petal sts)
Rnd 4: Working behind petals, *chain 5, slip stitch around post of next Rnd 1 sc; repeat from * around. (6 back loops)
Rnd 5: In each back loop work: sc, hdc, 4 dc, hdc, sc. Slip stitch to first sc. (48 petal sts)
Fasten off, leaving a long sewing tail.
Leaves (Make 12)
With tan yarn, chain 7.
Single crochet in 2nd chain from hook, hdc in next chain, dc in next 2 chains, hdc in next chain, 3 sc in last chain. Rotate to work opposite side of chain: hdc in next chain, dc in next 2 chains, hdc in next chain, sc in last chain, slip stitch to first sc. Fasten off. (14 sts around)
Placement Guide
Place flowers across the upper front: one centered 3 inches / 7.5 cm below the neckband, and one on each side about 4 inches / 10 cm from center. Embroider curved tan stems between flowers with chain stitch or backstitch. Add six leaves per side of the center flower. Sew one button to each flower center through all layers.
Motif Checkpoint: Each finished flower measures about 3 inches / 7.5 cm across. The three-flower spray should span about 13 to 14 inches / 33 to 36 cm across the chest.
Finishing and Care Instructions
Blocking
Weave in all ends except appliqué sewing tails. Steam block or wet block panels lightly before final seaming if needed. After assembly, reshape the neckline and sleeve seams with gentle steam. Do not flatten the raised flowers. Cup them with your fingers while steaming around them.
Final Finishing
Sew appliqués securely around flower centers and at a few hidden points behind petals. Tack vines and leaves flat. Weave in remaining ends on the inside. Try on and adjust any underarm seam tension before trimming tails.
Care
Hand wash in cool water or machine wash gentle if your yarn allows. Lay flat to dry. Reshape flowers while damp. Avoid hanging the sweater when wet.
Troubleshooting Common Issues
If your edges slant, count every row and mark first and last stitches.
If your ribbing is too tight, work slip stitches loosely or use a larger hook for rib only.
If your neckband ruffles, pick up fewer stitches along vertical front neck edges.
If your neckband pulls in, pick up 1 to 2 extra stitches on each front neck edge.
If your flowers look flat, add the optional back-petal round and sew only the center plus a few hidden tacks.
Size Customization Tips
This design is a rectangle-based drop-shoulder pullover, so small changes are simple when gauge is matched.
Width: At gauge, each extra 3 stitches adds about 1 inch / 2.5 cm to one panel width, or 2 inches / 5 cm to finished bust. Add or remove stitches in pairs to keep shoulders balanced.
Length: Add or remove body rows before the neckline shaping. Every 10 rows changes length by about 4 inches / 10 cm. Keep front and back row counts identical.
Sleeves: For wider upper sleeves, continue increasing at both ends every 4th row until the sleeve top matches your armhole seam line. For longer sleeves, add plain rows before Row 34.
Neckline: For a smaller neck, leave fewer center front stitches unworked and pick up fewer stitches. For a wider neck, leave more center stitches unworked. Keep back shoulders at 20 stitches each so shoulder seams match.
Left-Handed Crocheters
Work the written instructions as stated. Your flower vine will mirror naturally. Place the three flowers in the same positions across the front before sewing so the finished layout stays balanced.
Time Estimate
Plan for about 14 to 18 hours, depending on your seaming speed and decorative finishing. The body panels work up quickly, but the assembly and embroidery details take time to do well.
I hope you enjoy making this beautiful floral sweater as much as I enjoyed sharing it with you. If you create one, I would absolutely love to see it! Save this pattern to your Pinterest boards so you can find it when you are ready to start, and please leave a comment below to let me know how yours turns out.
Want a Quick & Easy Printable Version?
Get a clean, beautifully formatted PDF of this pattern — easy to follow step by step, ready to print or save on any device. No scrolling, no distractions, just the pattern.
Get the Printable PDF →