
If you have been searching for a stunning handmade dress to wear to a summer wedding, garden party, or special occasion, this is the pattern for you. This red and cream chevron lace dress combines classic pineapple stitch motifs with a flattering A-line silhouette, creating a garment that looks like it came straight from a high-end boutique. The fitted bodice gives way to a flowing lace skirt with bold chevron stripes and a gorgeous scalloped hem.
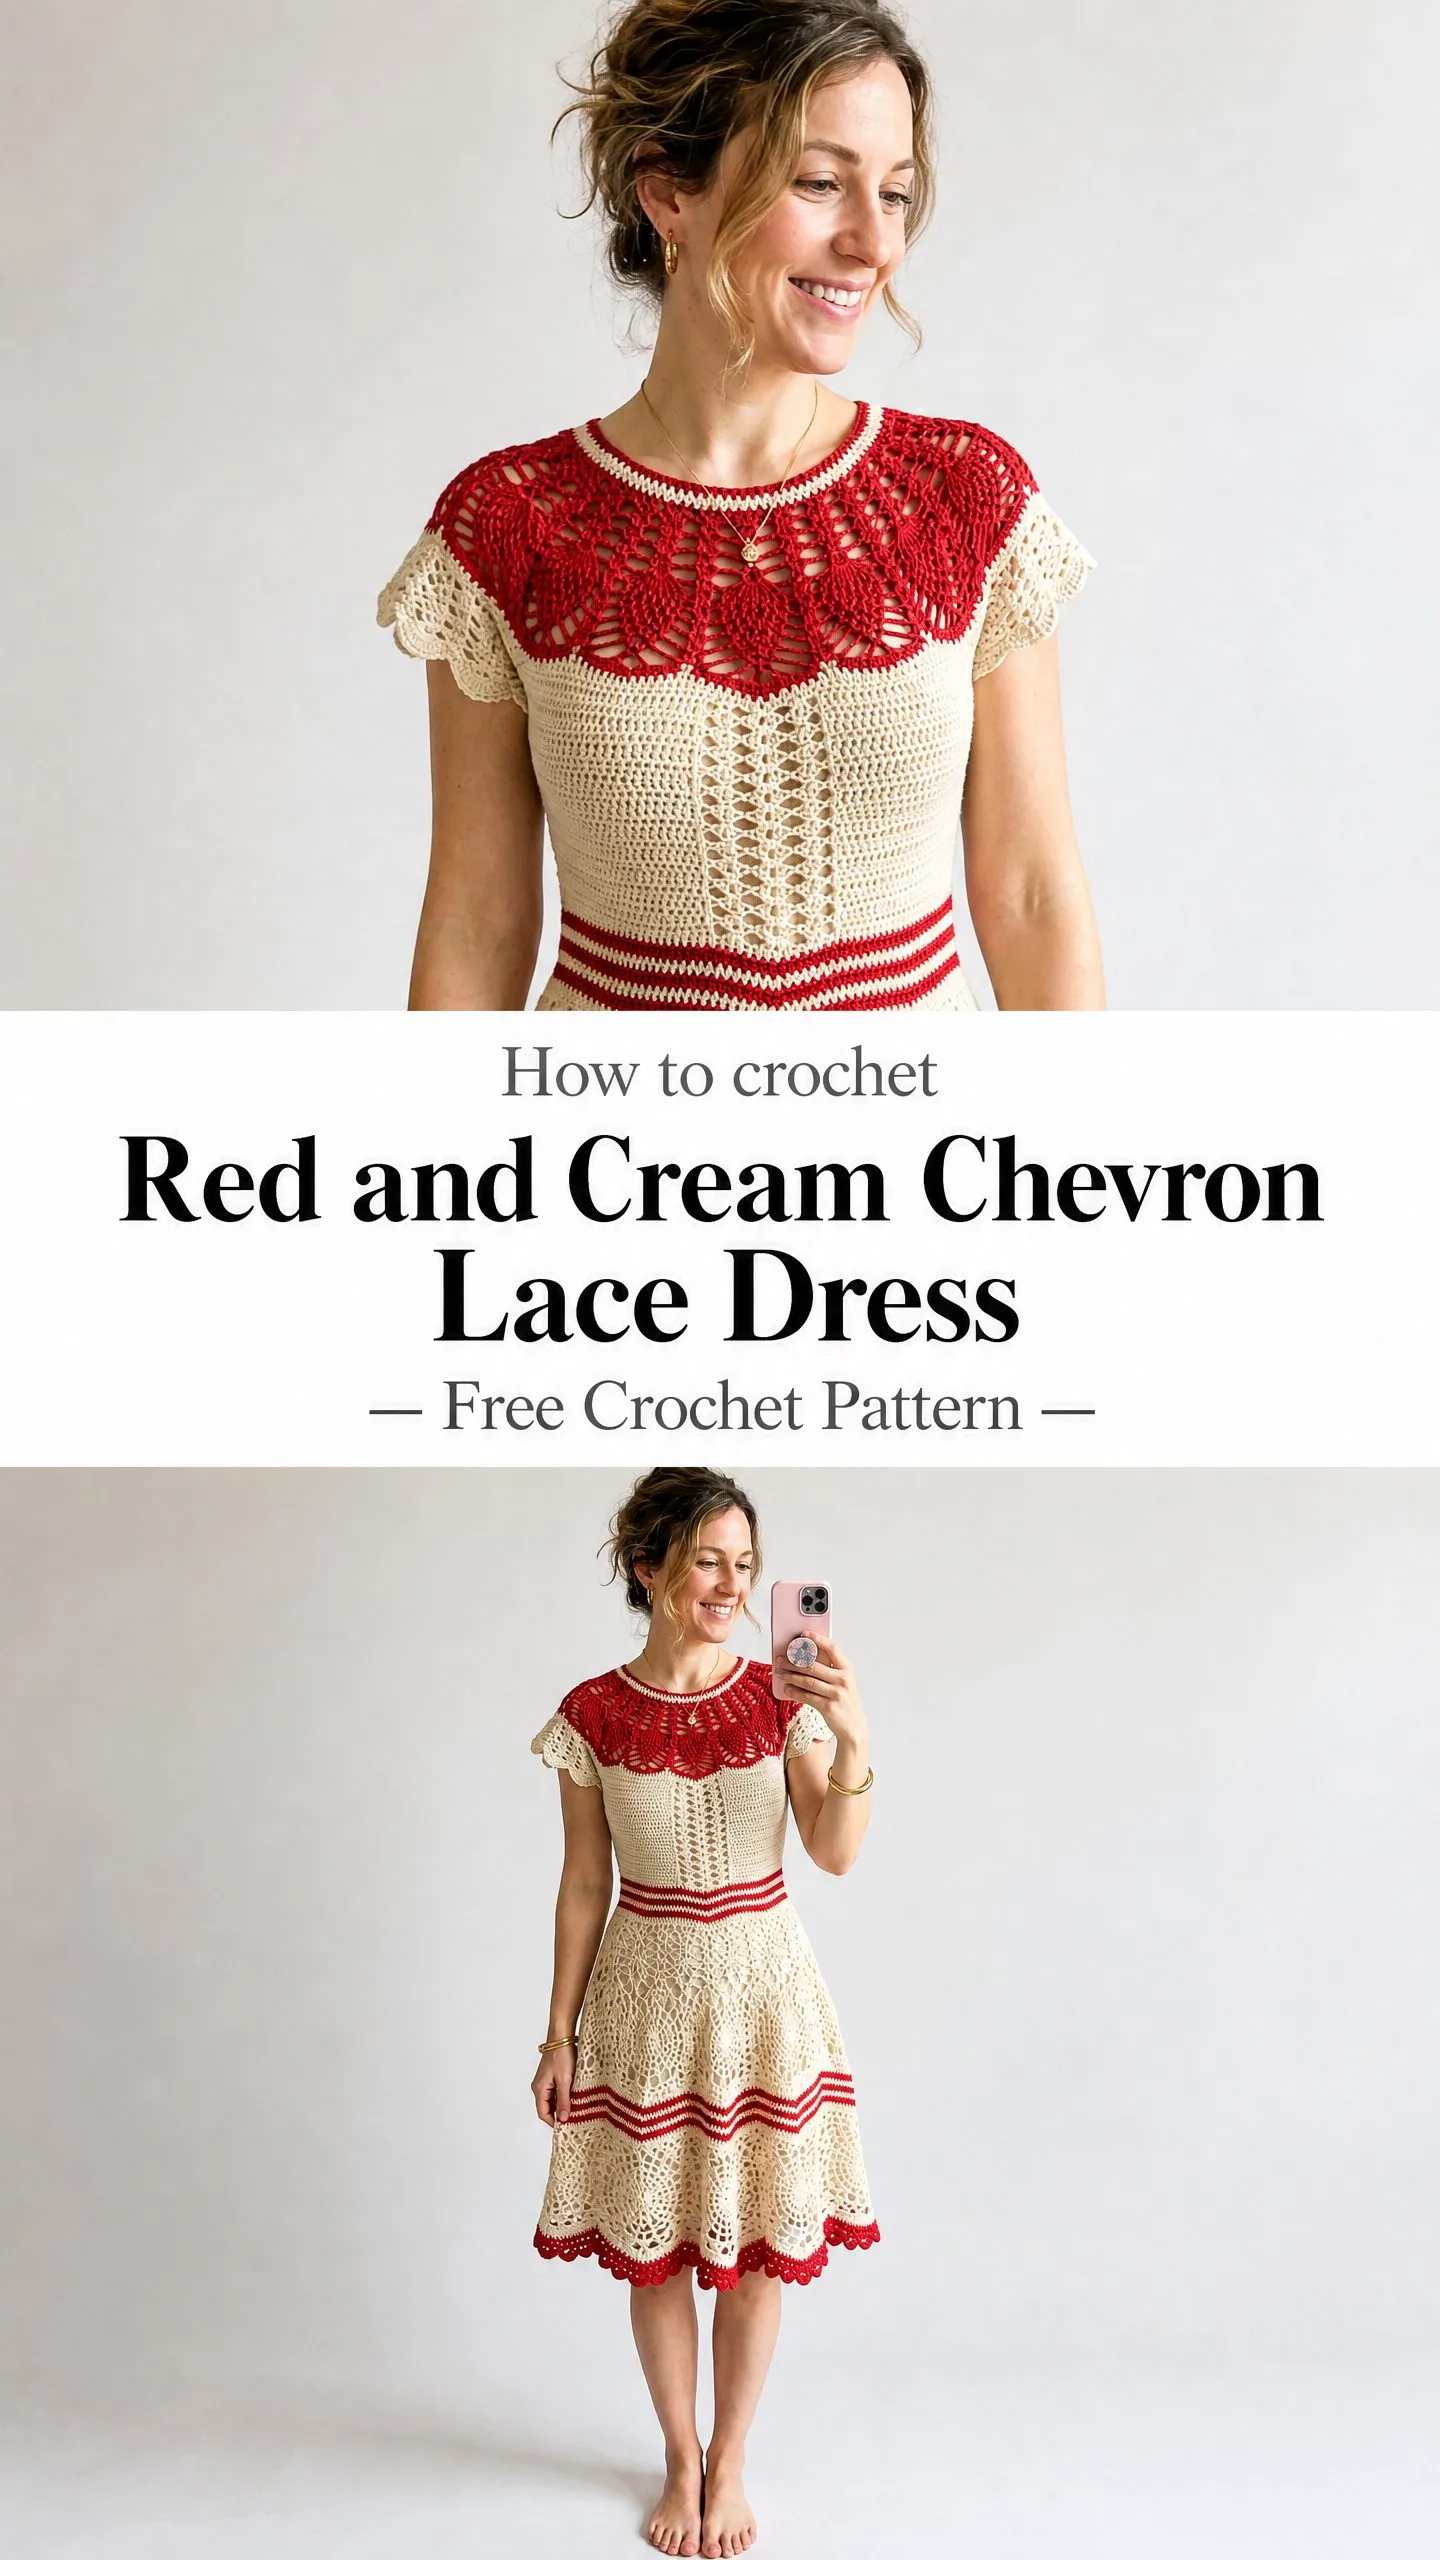
This crochet dress pattern uses DK weight cotton yarn and features several stitch techniques including pineapple shells, V-stitches, and chevron decreases. It works up from the top down in joined rounds, making it easier to try on as you go. The finished piece makes an unforgettable statement for any dressy event and would be a treasured handmade gift for someone special.
Fair warning: this is an advanced pattern that requires experience with lace garment construction and pineapple stitch work. But if you are ready for a challenge that results in a truly show-stopping piece, keep reading for the complete step-by-step crochet tutorial.
About This Crochet Dress Pattern
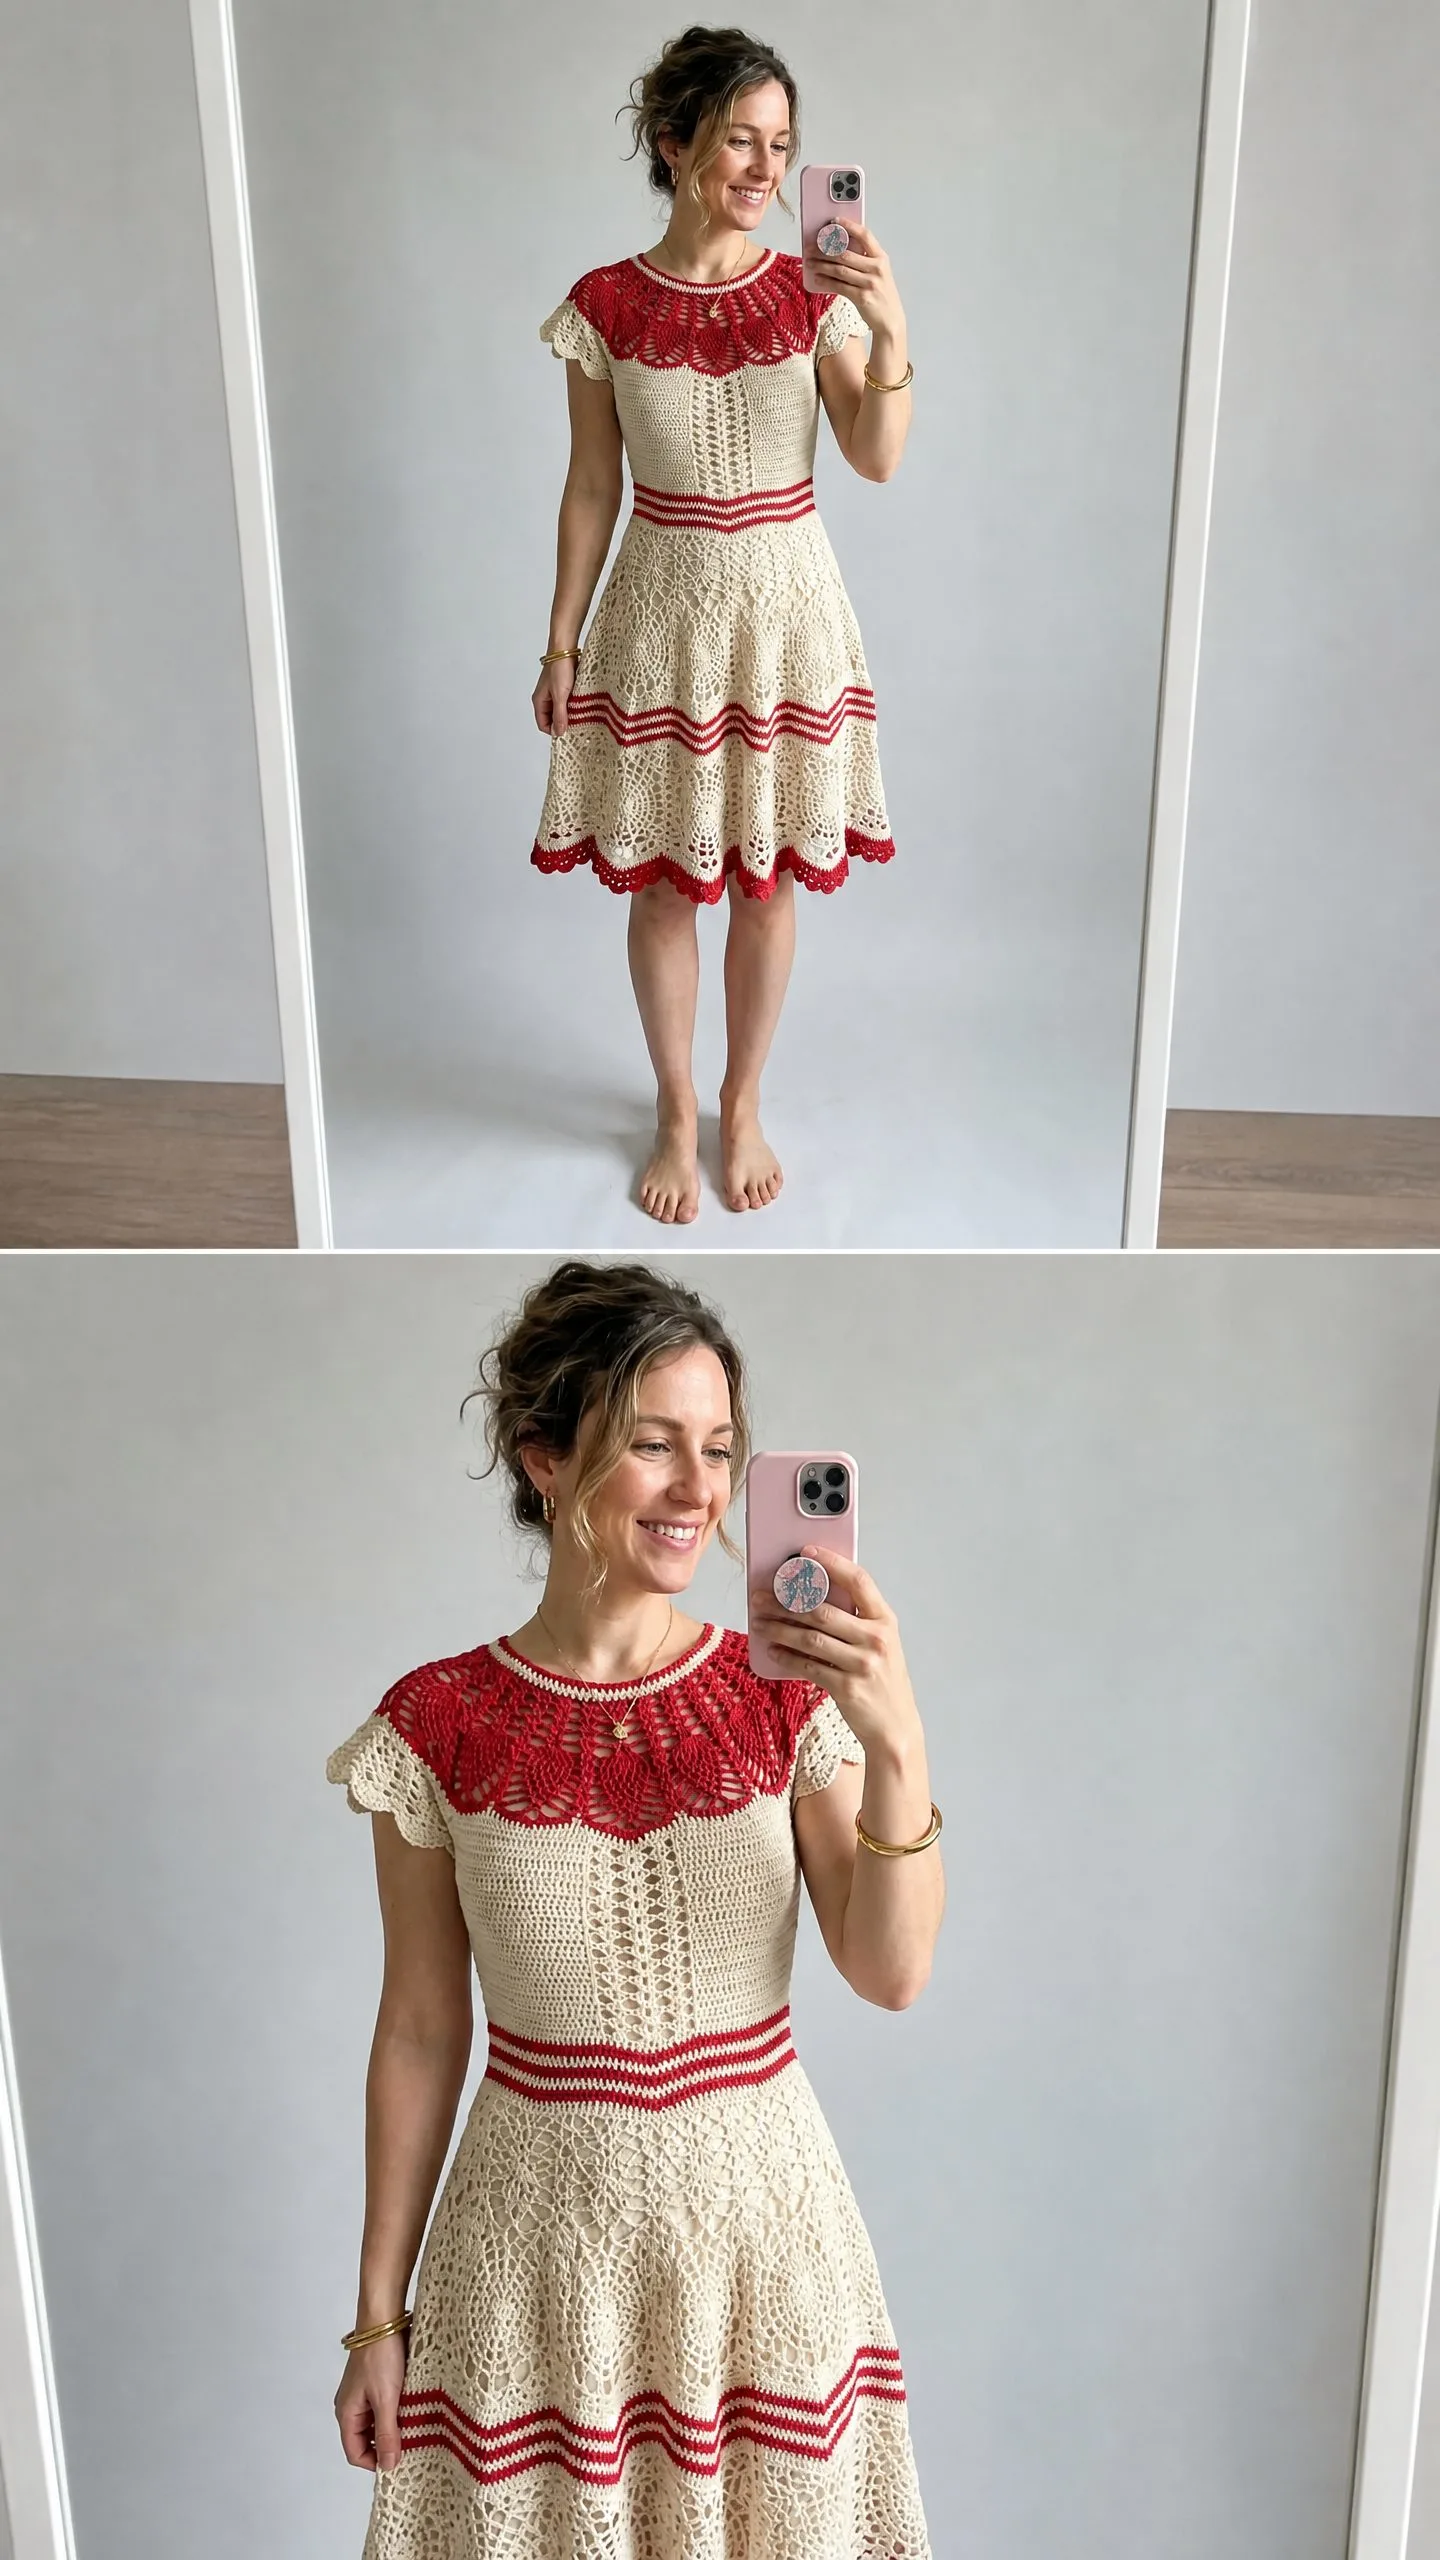
This dress features several distinct sections that come together beautifully. The red pineapple-stitch yoke is worked in the round from the neckline down, creating those stunning fan shapes you see at the shoulders. Cap sleeves finish with delicate scalloped edging. The cream bodice uses vertical V-stitch columns for texture and a fitted look. A striped waistband in red and cream defines the waist before the full A-line skirt begins.
The skirt is where this pattern really shines. Two tiers of pineapple lace panels are separated by bold chevron stripe accents that create sharp V-shaped angles. The hem finishes with a red scalloped border that echoes the sleeve edging.
The color palette is simple but striking: cream serves as the main color (MC) and red is the contrast color (CC). This combination gives the dress a vintage, almost folk-art quality while remaining thoroughly modern and wearable.
Skill Level
Advanced. This crochet pattern requires fluency with pineapple stitch construction, working in the round seamlessly, precise color changes, and top-down yoke shaping. You need to be comfortable reading lace charts conceptually, managing multiple stitch pattern transitions, and executing even tension across color changes.
The pineapple motifs in the yoke require counting large shell-and-chain combinations carefully. This pattern is not suitable for beginners or confident intermediate crocheters who are unfamiliar with lace garment construction.
Time Estimate
Plan for approximately 80 to 120 hours total depending on your experience with lace patterns, yarn handling, and speed. The yoke alone may take 15 to 20 hours given the pineapple stitch complexity. Budget additional time for blocking, which is essential for this design.
Finished Size
This pattern is written for a size Medium, fitting a 36-inch (91.5 cm) bust, 28-inch (71 cm) natural waist, and 38-inch (96.5 cm) hip.
Finished garment measurements:
Size customization tips are included at the end of the pattern.
Materials Needed
Yarn:
Hook:
Notions:
Yarn Suggestions
Suggestion 1: Paintbox Yarns Simply DK (100% cotton, 137 yards / 125 meters per 50 g skein). This yarn offers consistent tension, excellent stitch definition for lace, and good colorfast properties important for the red color work. You will need approximately 11 skeins MC and 3 skeins CC.
Suggestion 2: Lion Brand 24/7 Cotton (100% mercerized cotton, 186 yards / 170 meters per 100 g skein). Mercerized cotton gives the dress a slight sheen that complements the lace beautifully. You will need approximately 8 skeins MC and 3 skeins CC.
Suggestion 3: Drops Safran (70% cotton, 30% polyamide, 175 yards / 160 meters per 50 g skein). The polyamide content adds elasticity that helps the bodice maintain shape. You will need approximately 9 skeins MC and 3 skeins CC.
Substitution note: Choose a DK weight yarn that is smooth, tightly plied, and primarily cotton or cotton-blend. Avoid fuzzy or halo yarns, as they will obscure the pineapple and lace stitch detail. The yarn must be colorfast since the red and cream sit adjacent and will be blocked together. Always check that your substitute yarn achieves the listed gauge before beginning.
Gauge
With E-4 hook and MC, in single crochet (sc):
20 stitches and 24 rows = 4 in / 10 cm
With E-4 hook and MC, in pineapple lace stitch pattern (as used in skirt):
Gauge is critical for garment fit. Adjust hook size as needed to match gauge before beginning the body of the dress. If your gauge is tighter, go up a hook size. If looser, go down a hook size.
Abbreviations
Special Stitches
Pineapple Shell (used in yoke and skirt)
Step 1: Work 7 dc all into the same stitch or chain space.
Step 2: This cluster of 7 dc constitutes one pineapple shell base.
In the yoke, the shells are formed over chain spaces in an expanding fan pattern. In the skirt, they sit above accumulating decreases that shape the pineapple form.
Pineapple Body Decrease (dc2tog across pineapple rows)
Step 1: Yarn over, insert hook into first stitch, pull up a loop, yarn over, pull through 2 loops on hook (2 loops remain).
Step 2: Yarn over, insert hook into next stitch, pull up a loop, yarn over, pull through 2 loops on hook (3 loops remain).
Step 3: Yarn over, pull through all 3 loops. One stitch decreased.
This is worked repeatedly across the pineapple to narrow it row by row.
Picot (used in scallop hem edging)
Step 1: Chain 3.
Step 2: Slip stitch into the first chain made.
One picot complete.
Scallop Shell (used in cap sleeve edging and hem border)
Step 1: Work 5 dc into the same stitch or space.
Step 2: This group of 5 dc constitutes one scallop shell.
V-stitch (used in bodice column texture)
Step 1: Work 1 dc into the designated stitch.
Step 2: Chain 1.
Step 3: Work 1 dc into the same stitch.
One V-stitch complete.
Chevron Decrease Row (used in chevron band)
This creates the sharp angle in the chevron stripe.
Step 1: Work the stitches up to the center-decrease point of the chevron angle.
Step 2: Draw up a loop in each of the next 3 stitches (4 loops on hook for sc3tog).
Step 3: Yarn over and pull through all 4 loops.
One sc3tog decrease complete, creating the valley of the chevron.
Chevron Increase Point
Step 1: Work 3 sc into the same stitch at the peak of the chevron.
This creates the peak of the chevron angle.
Pattern Notes Before You Begin
The dress is worked from the top down in joined rounds unless otherwise stated. The yoke is worked in the round with no turning, so the right side faces you throughout.
The back keyhole opening is created during the yoke setup round by working two separate flat sections for 2 rows, then rejoining. Instructions for this are included in the yoke section.
Color changes are made by completing the last yarn-over of the final stitch of the current color with the new color, then continuing. Always carry the unused color or cut and rejoin depending on the length of color runs. For the waistband and chevron stripes, cut and rejoin is recommended for clean color work on the right side.
Stitch counts at the end of each round are given in parentheses immediately after the instructions for that round.
Join each round with a slip stitch to the first stitch of the round unless otherwise noted. Do not turn unless instructed.
The skirt pineapple pattern is written over a 14-stitch repeat. The total skirt circumference at the beginning of the skirt is 280 stitches, giving exactly 20 full pineapple repeats. Verify this checkpoint before beginning the skirt.
Step-by-Step Crochet Instructions
Part 1: Neckline Setup and Back Keyhole
The neckline opening has a circumference of approximately 22 in / 56 cm. With MC and E-4 hook, begin with a foundation chain.
Row 1 (Keyhole Left Back Flat Section):
Chain 57. This is the neckline edge. Turn.
Row 2:
Ch 1, sc in each ch across to last ch. Do not work into last ch (this is the keyhole gap). Turn. (56 sc)
The keyhole is formed by leaving the two back neckline halves unjoined for 2 rows. After the 2-row flat opening, the round is closed.
Row 3 (Keyhole Right Back Flat Section, separate yarn):
With a second ball of MC, attach yarn to the beginning of Row 1 chain on the opposite edge. Ch 1, sc in each of the first 56 ch. Turn. (56 sc)
Row 4:
Ch 1, sc in each sc across. (56 sc)
Now join the two halves into a continuous round. With RS facing, work across the right back edge, continue around the neckline, and join to the left back edge.
Round 1 (Joining Round):
Ch 1. Beginning at the back right keyhole edge, sc evenly around the full neckline. Work 56 sc across back right, 56 sc across front, 56 sc across back left, 2 sc at each short keyhole edge turn. Join to first sc with sl st. (172 sc)
If your neckline measurement varies, adjust this number in multiples of 4 for the pineapple repeat to work correctly in the yoke. 172 is divisible by 4 and allows for the yoke expansion.
Part 2: Red Pineapple Yoke
The yoke is worked in CC (red) for the entire section. Change to CC at the beginning of Round 2. The yoke builds from the neckline outward, expanding with pineapple fans.
Round 2 (CC, Neckline Edge Round):
Join CC. Ch 3 (counts as dc), dc in each sc around. Join with sl st to top of ch-3. (172 dc)
Round 3 (Pineapple Fan Setup):
Ch 4 (counts as dc, ch 1). Skip 1 st. (Dc, ch 1) in each st around. Join to 3rd ch of ch-4. (172 dc, 172 ch-1 spaces)
Round 4 (Shell Base Round):
Sl st into first ch-1 sp. Ch 3 (counts as dc). Work 6 more dc into same ch-1 sp (7 dc shell made). Ch 2. Skip 3 ch-1 sps. Rep (7 dc shell in next ch-1 sp, ch 2, skip 3 ch-1 sps) around. Join to top of ch-3.
Number of shells: 172 divided by 4 = 43 shells. (43 shells of 7 dc, 43 ch-2 sps)
Total stitch equivalent: 43 x 7 = 301 dc plus 43 x 2 = 86 chains = 387 sts/chains total in round.
Round 5 (Pineapple Row 1):
Sl st to center of shell (4th dc of 7-dc shell). Ch 3 (counts as dc). Work (dc, ch 1) 5 times, then 1 dc in same center dc (creating ch-1 sps across top of shell, 6 ch-1 sps). Ch 2. Sc in ch-2 sp between shells. Ch 2. Rep around. Join.
Per repeat: 7 dc with 6 ch-1 sps across each shell top, plus ch-2, sc, ch-2.
(43 shell tops of 7 dc with 6 ch-1 sps, 43 sc, 86 ch-2 sps)
Round 6 (Pineapple Row 2, Narrowing):
Sl st into first ch-1 sp. Ch 3 (counts as dc). (Dc in next ch-1 sp) 5 times (6 dc total worked into the 6 ch-1 sps, beginning a decrease row by working only into the sps and not the dc). Ch 3. Sk sc from previous rnd. Ch 3. Rep around. Join.
(43 groups of 6 dc, 86 ch-3 sps)
Round 7 (Pineapple Row 3):
Sl st to top of first dc. Ch 3. Dc2tog (next 2 dc). (Dc in next dc) twice. Dc2tog (next 2 dc). Ch 4. Sc in ch-3 sp. Ch 4. Rep around. Join.
Per repeat: 5 dc (beginning to narrow pineapple). (43 groups of 5 dc, 43 sc, 86 ch-4 sps)
Round 8 (Pineapple Row 4):
Sl st to top of first dc. Ch 3. Dc2tog. Dc in center dc. Dc2tog. Ch 5. Sc in sc from prev rnd. Ch 5. Rep around. Join.
Per repeat: 4 dc, 1 sc, 2 ch-5 sps. (43 groups of 4 dc, 43 sc, 86 ch-5 sps)
Round 9 (Pineapple Row 5):
Sl st to first dc. Ch 3. Dc2tog over next 3 dc (dc3tog: yo, insert into 1st dc, yo, pull through 2 lps, yo, insert into 2nd dc, yo, pull through 2 lps, yo, insert into 3rd dc, yo, pull through 2 lps, yo pull through all 4 lps). Ch 3. 7 dc into sc from prev rnd (new shell begins at sc point, expanding yoke downward). Ch 3. Rep around. Join.
Per repeat: 1 dc3tog (tip of pineapple closing), ch 3, 7-dc shell, ch 3.
(43 dc3tog tips, 43 shells of 7 dc, 86 ch-3 sps)
Round 10 (Second Fan Expansion Row):
Ch 4 (counts as dc, ch 1). Work into center dc of each shell: (dc, ch 1) into each dc of shell (7 ch-1 sps across each shell). Work sc in dc3tog tip. Ch 2. Rep around. Join.
Per repeat: 7 dc with 6 ch-1 sps, 1 sc at pineapple tip, ch-2 sp.
Total dc in this round: 43 x 7 = 301 dc plus ch-1 sps and sc.
Round 11 (Begin Second Layer Pineapples, adding expansion increases):
Between each shell, work 3 sc into ch-2 sp (expansion point). Rep pineapple narrowing sequence across each shell top as established.
This round introduces 43 x 3 = 129 additional stitches distributed between shells.
Work 6 dc into the 6 ch-1 sps of each shell top (narrowing pineapple row 2). Ch 2. Sc in 2nd of 3 sc. Ch 2. Rep around. Join.
Total sts in this round: (43 x 6 dc) + (43 x 1 sc) + (43 x 4 chain sts) = 258 dc + 43 sc + 172 chains = 473 stitch elements.
Rounds 12 through 16: Continue narrowing the upper pineapple layer exactly as established in Rounds 7 through 9, while leaving the 3-sc expansion clusters as plain sc joining sts. By the end of Round 16, each pineapple is complete with a dc3tog tip, and the round count is ready for the underarm division.
Round 16 stitch count at underarm division level:
The yoke at this point has 43 pineapple points (dc3tog) and 43 expansion cluster sc groups. Work 1 sc into each dc3tog tip and 1 sc into the center sc of each 3-sc expansion cluster, and 2 sc across each ch-3 sp. This transition round creates an even sc round for dividing front, back, and sleeves.
Round 17 (Transition / Underarm Division Round):
In MC (change to MC). Sc around entire yoke, working 1 sc per dc or sc, and 1 sc per chain space. Aim to end this round with exactly 240 sc total. If needed, sc2tog or add 1 sc at inconspicuous points to reach 240. (240 sc)
CHECKPOINT: After completing Round 17, the yoke should measure approximately 7 in / 18 cm from the neckline edge. The yoke circumference at this point should be approximately 48 in / 122 cm when lightly stretched for a relaxed fit.
Part 3: Underarm Division and Cap Sleeves
Round 18 (Divide for Body and Sleeves):
Mark stitches as follows: first 90 sts = back, next 30 sts = left sleeve, next 90 sts = front, last 30 sts = right sleeve.
At each underarm point, chain 6 to bridge the sleeve sts and maintain body circumference.
Work as follows: Sc in each of 90 back sts. Chain 6 (bridging left sleeve 30 sts, skip those 30 sts). Sc in each of 90 front sts. Chain 6 (bridging right sleeve 30 sts, skip those 30 sts). Join to first sc. (180 sc plus 12 chain bridge sts = 192 working sts for body)
Round 19 (Body Setup):
Sc in each of 90 sc across back. Sc in each of 6 chain bridge sts. Sc in each of 90 sc across front. Sc in each of 6 chain bridge sts. Join. (192 sc)
CAP SLEEVES (work each sleeve separately):
Rejoin CC to the 30 sleeve sts plus pick up from the 6 underarm chain bridge sts on each side of the sleeve opening for 42 total sts per sleeve cap.
Sleeve Round 1 (CC):
Join CC to sleeve sts. Sc around all 30 sleeve sts plus 6 underarm bridge sts (picking up 3 from each side). Join. (42 sc)
Sleeve Round 2 (CC):
Ch 1. Sc in each sc around. Join. (42 sc)
Sleeve Round 3 (Scallop Edging in CC):
Ch 1. Sc in first sc. Skip 1 sc. 5 dc in next sc. Skip 1 sc. Sc in next sc. Rep (skip 1, 5 dc shell in next, skip 1, sc in next) around. Join with sl st. Fasten off. Weave in ends.
Number of scallop repeats: 42 divided by 6 = 7 repeats. (7 scallop shells complete)
Work second sleeve identically.
Part 4: Bodice
The bodice is worked in the round in MC using V-stitch columns for a vertical texture. The bodice begins at 192 sts and gently tapers to 144 sts at the natural waist to create the fitted silhouette.
Round 1 (MC, Bodice Begin):
Ch 3 (counts as dc). Dc in same st. Ch 1. Skip 1 st. (V-st in next st, ch 1, skip 1 st) around. Join to top of ch-3.
Number of V-sts: 192 divided by 3 (V-st uses 2 sts with 1 skip) = 64 V-sts. (64 V-sts, 64 ch-1 sps)
Round 2:
Sl st into ch-1 sp of first V-st. Ch 3 (counts as dc). Dc in same sp. Ch 1. (V-st in next ch-1 sp of each V-st, ch 1) around. Join. (64 V-sts, 64 ch-1 sps)
Rounds 3 through 8: Rep Round 2. (64 V-sts each round)
Round 9 (Waist Shaping Decrease Round 1):
Work V-sts as established but every 8th V-st, work a dc2tog instead of a V-st (eliminating 1 V-st). 8 decreases made.
64 minus 8 = 56 V-sts. (56 V-sts, 56 ch-1 sps)
Round 10 through 12: Work V-sts in established pattern over 56 V-sts. (56 V-sts each round)
Round 13 (Waist Shaping Decrease Round 2):
Every 7th V-st, work dc2tog instead of V-st. 8 decreases made.
56 minus 8 = 48 V-sts. (48 V-sts, 48 ch-1 sps)
Round 14 through 16: Work even in V-st pattern. (48 V-sts each round)
Transition to sc for waistband:
Round 17 (Transition Round):
Ch 1. Sc into each dc and into each ch-1 sp around.
48 V-sts x 2 dc = 96 dc, plus 48 ch-1 sps = 144 total sts. (144 sc)
CHECKPOINT: After Round 17, the bodice should measure approximately 7 in / 18 cm from the underarm row. The waist circumference should be approximately 29 in / 73.5 cm.
Part 5: Waistband Stripe
The waistband is worked in sc stripes alternating CC and MC for 2 in / 5 cm depth. Each round is 144 sc.
Round 1 (CC): Ch 1. Sc in each sc around. Join. (144 sc)
Round 2 (CC): Ch 1. Sc in each sc around. Join. (144 sc)
Round 3 (MC): Ch 1. Sc in each sc around. Join. (144 sc)
Round 4 (CC): Ch 1. Sc in each sc around. Join. (144 sc)
Round 5 (CC): Ch 1. Sc in each sc around. Join. (144 sc)
Round 6 (MC): Ch 1. Sc in each sc around. Join. (144 sc)
Round 7 (CC): Ch 1. Sc in each sc around. Join. (144 sc)
Round 8 (CC): Ch 1. Sc in each sc around. Join. (144 sc)
Fasten off CC. Join MC. This is the last stripe round. Proceed to skirt with MC. Total waistband depth approximately 2 in / 5 cm at gauge. (144 sc at end of waistband)
CHECKPOINT: The full bodice plus waistband from underarm to bottom of waistband should measure approximately 9 in / 23 cm.
Part 6: Skirt Increase Round
Before beginning the skirt lace, increase from 144 sc to 280 sc to allow 20 full pineapple repeats of 14 sts each.
Increase needed: 280 minus 144 = 136 additional sts over 144 sts.
Round 1 (Skirt Increase Round A, MC):
Ch 1. (2 sc in next sc, sc in next sc) around. Join. (216 sc)
Round 2 (Skirt Increase Round B, MC):
Ch 1. (2 sc in next sc, sc in next sc, sc in next sc) around. Join. (288 sc)
Round 3 (Skirt Adjustment Round, MC):
Ch 1. Sc around, working sc2tog 8 times evenly spaced (roughly every 36 sts). Join. (280 sc)
Part 7: Skirt Tier One, Pineapple Lace
The pineapple lace skirt is worked in MC over 280 sts in 20 repeats of 14 sts each.
Round 1 (Arch Foundation, MC):
Ch 6 (counts as dc, ch 3). Skip 3 sc. Dc in next sc. Ch 3. Skip 3 sc. Dc in next sc. Ch 5. Skip 5 sc. Dc in next sc. Ch 3. Skip 3 sc. Dc in next sc. Ch 3. Skip 3 sc. Rep from (dc in next sc, ch 3, skip 3, dc in next sc, ch 5, skip 5, dc in next sc, ch 3, skip 3, dc in next sc, ch 3, skip 3) around. Join to 3rd ch of ch-6.
Per 14-st repeat: 4 dc with ch-3 and ch-5 sps. 20 repeats. (80 dc, 20 ch-5 arches, 60 ch-3 sps)
Round 2 (Shell Placement Round, MC):
Sl st into first ch-3 sp. Ch 3 (counts as dc). 2 dc in same ch-3 sp. Ch 2. 9 dc in ch-5 arch (pineapple shell). Ch 2. 3 dc in next ch-3 sp. Ch 1. 3 dc in next ch-3 sp. Ch 2. Rep (9 dc shell in ch-5 arch, ch 2, 3 dc in ch-3 sp, ch 1, 3 dc in ch-3 sp, ch 2) around. Join to top of ch-3.
Per repeat: 3+9+3+3 = 18 dc, plus ch sps. 20 repeats. (360 dc total plus chain sps)
Round 3 (Pineapple Row 1 of 7, Begin decreasing shell):
Sl st to ch-2 sp. Ch 3. 2 dc in ch-2 sp. Ch 2. Dc in first dc of 9-dc shell. (Ch 1, dc in next dc) 8 times across shell (9 dc with 8 ch-1 sps). Ch 2. 3 dc in ch-2 sp. Ch 1. Sc in ch-1 sp. Ch 1. Rep around. Join.
Per repeat: 3+9+3 = 15 dc (plus 8 ch-1 sps across pineapple, 2 ch-2 sps, 2 ch-1 sps, 1 sc). 20 repeats.
Round 4 (Pineapple Row 2):
Sl st to ch-2 sp. Ch 3. 2 dc in ch-2 sp. Ch 2. Sc in first ch-1 sp of pineapple. (Ch 3, sc in next ch-1 sp) 7 times (8 sc total, 7 ch-3 sps between). Ch 2. 3 dc in ch-2 sp. Ch 5 (skip sc). Rep around. Join.
Per repeat: 3+3 = 6 dc, 8 sc, 7 ch-3 sps, 2 ch-2 sps, 1 ch-5 sp.
Round 5 (Pineapple Row 3):
Sl st to ch-2 sp. Ch 3. 2 dc in ch-2 sp. Ch 2. Sc in first ch-3 sp. (Ch 3, sc in next ch-3 sp) 6 times (7 sc total, 6 ch-3 sps). Ch 2. 3 dc in ch-2 sp. Ch 5. Rep around. Join.
Round 6 (Pineapple Row 4):
Sl st to ch-2 sp. Ch 3. 2 dc in ch-2 sp. Ch 2. Sc in first ch-3 sp. (Ch 3, sc in next ch-3 sp) 5 times (6 sc, 5 ch-3 sps). Ch 2. 3 dc in ch-2 sp. Ch 5.
