
This pattern is GORGEOUS and I am SO excited to share it with you! The Ombre Sunset Baby Dress is one of those projects that looks incredibly impressive but breaks down into totally manageable steps. You can complete it in about 12 to 18 hours, and the finished dress makes the most stunning baby shower gift or newborn photo prop.
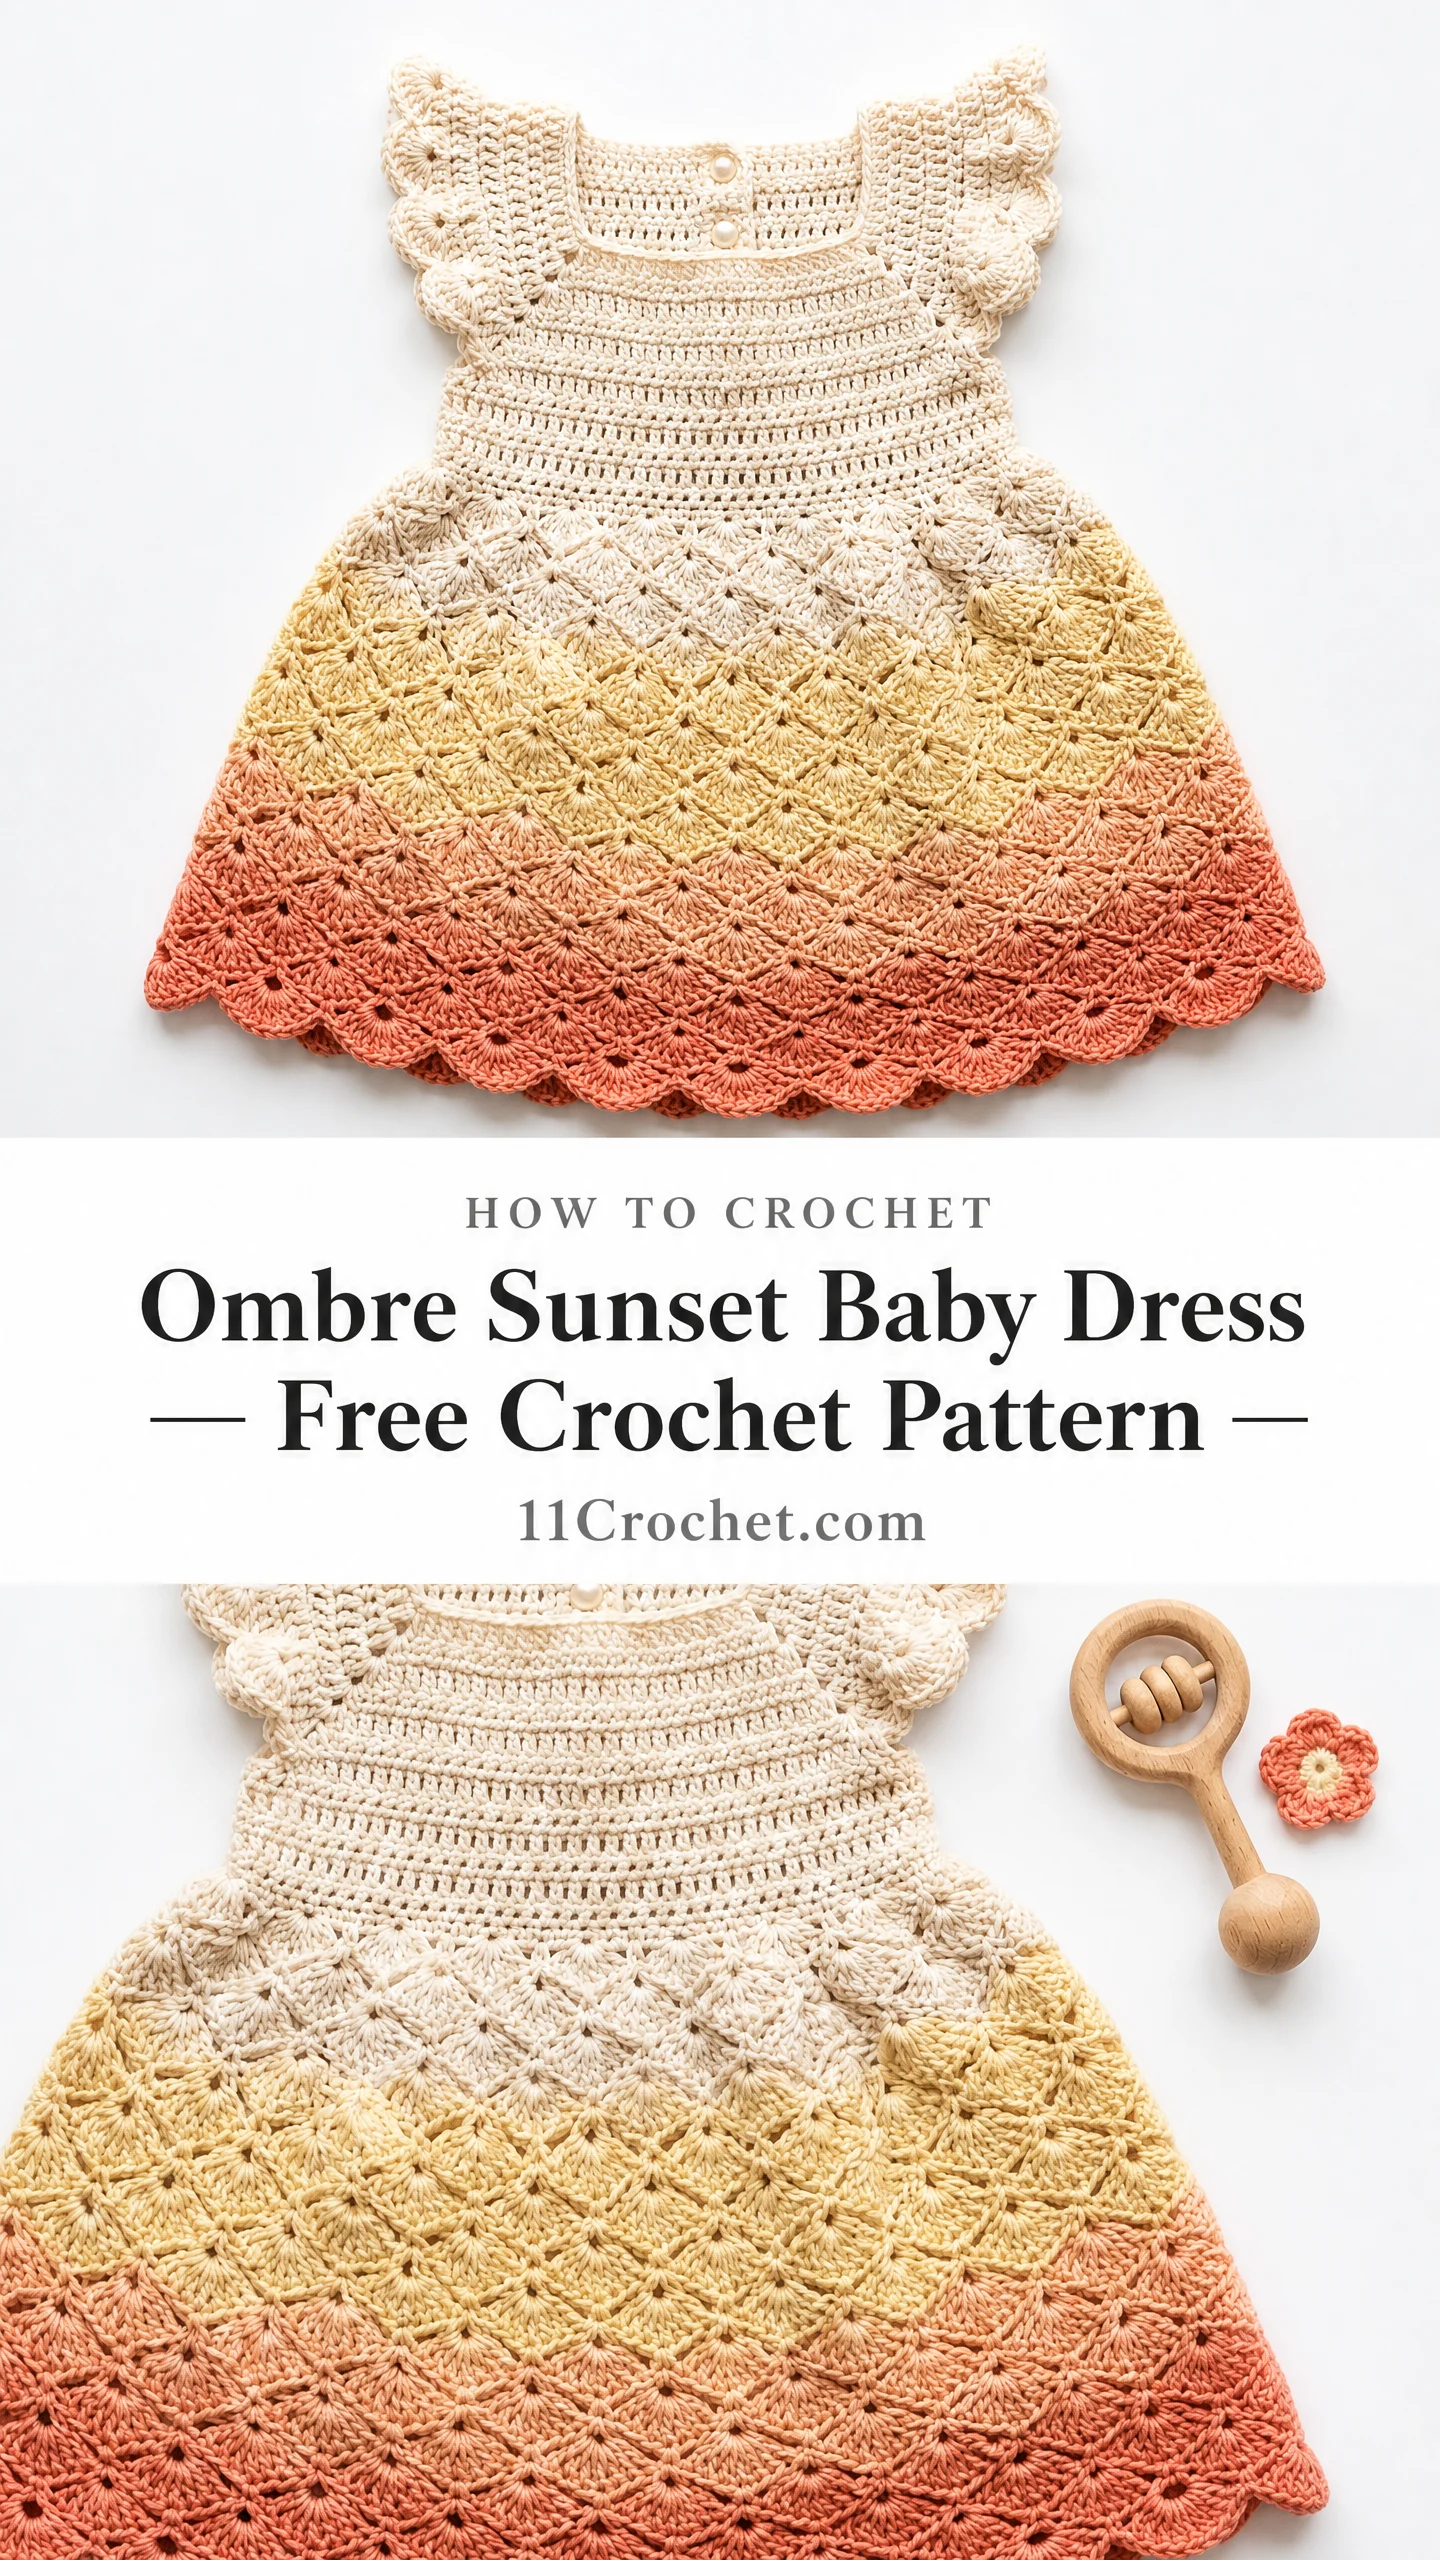
The gradient effect from creamy white through butter yellow to warm terracotta peach at the hem? Absolutely show stopping. Every time I look at this dress, I think of a perfect summer sunset captured in yarn.
Whether you are making this for your own little one, a friend’s baby, or just because you cannot resist tiny adorable things, you are going to love how this project comes together. Let me walk you through everything you need to know.
About This Ombre Sunset Baby Dress Crochet Pattern
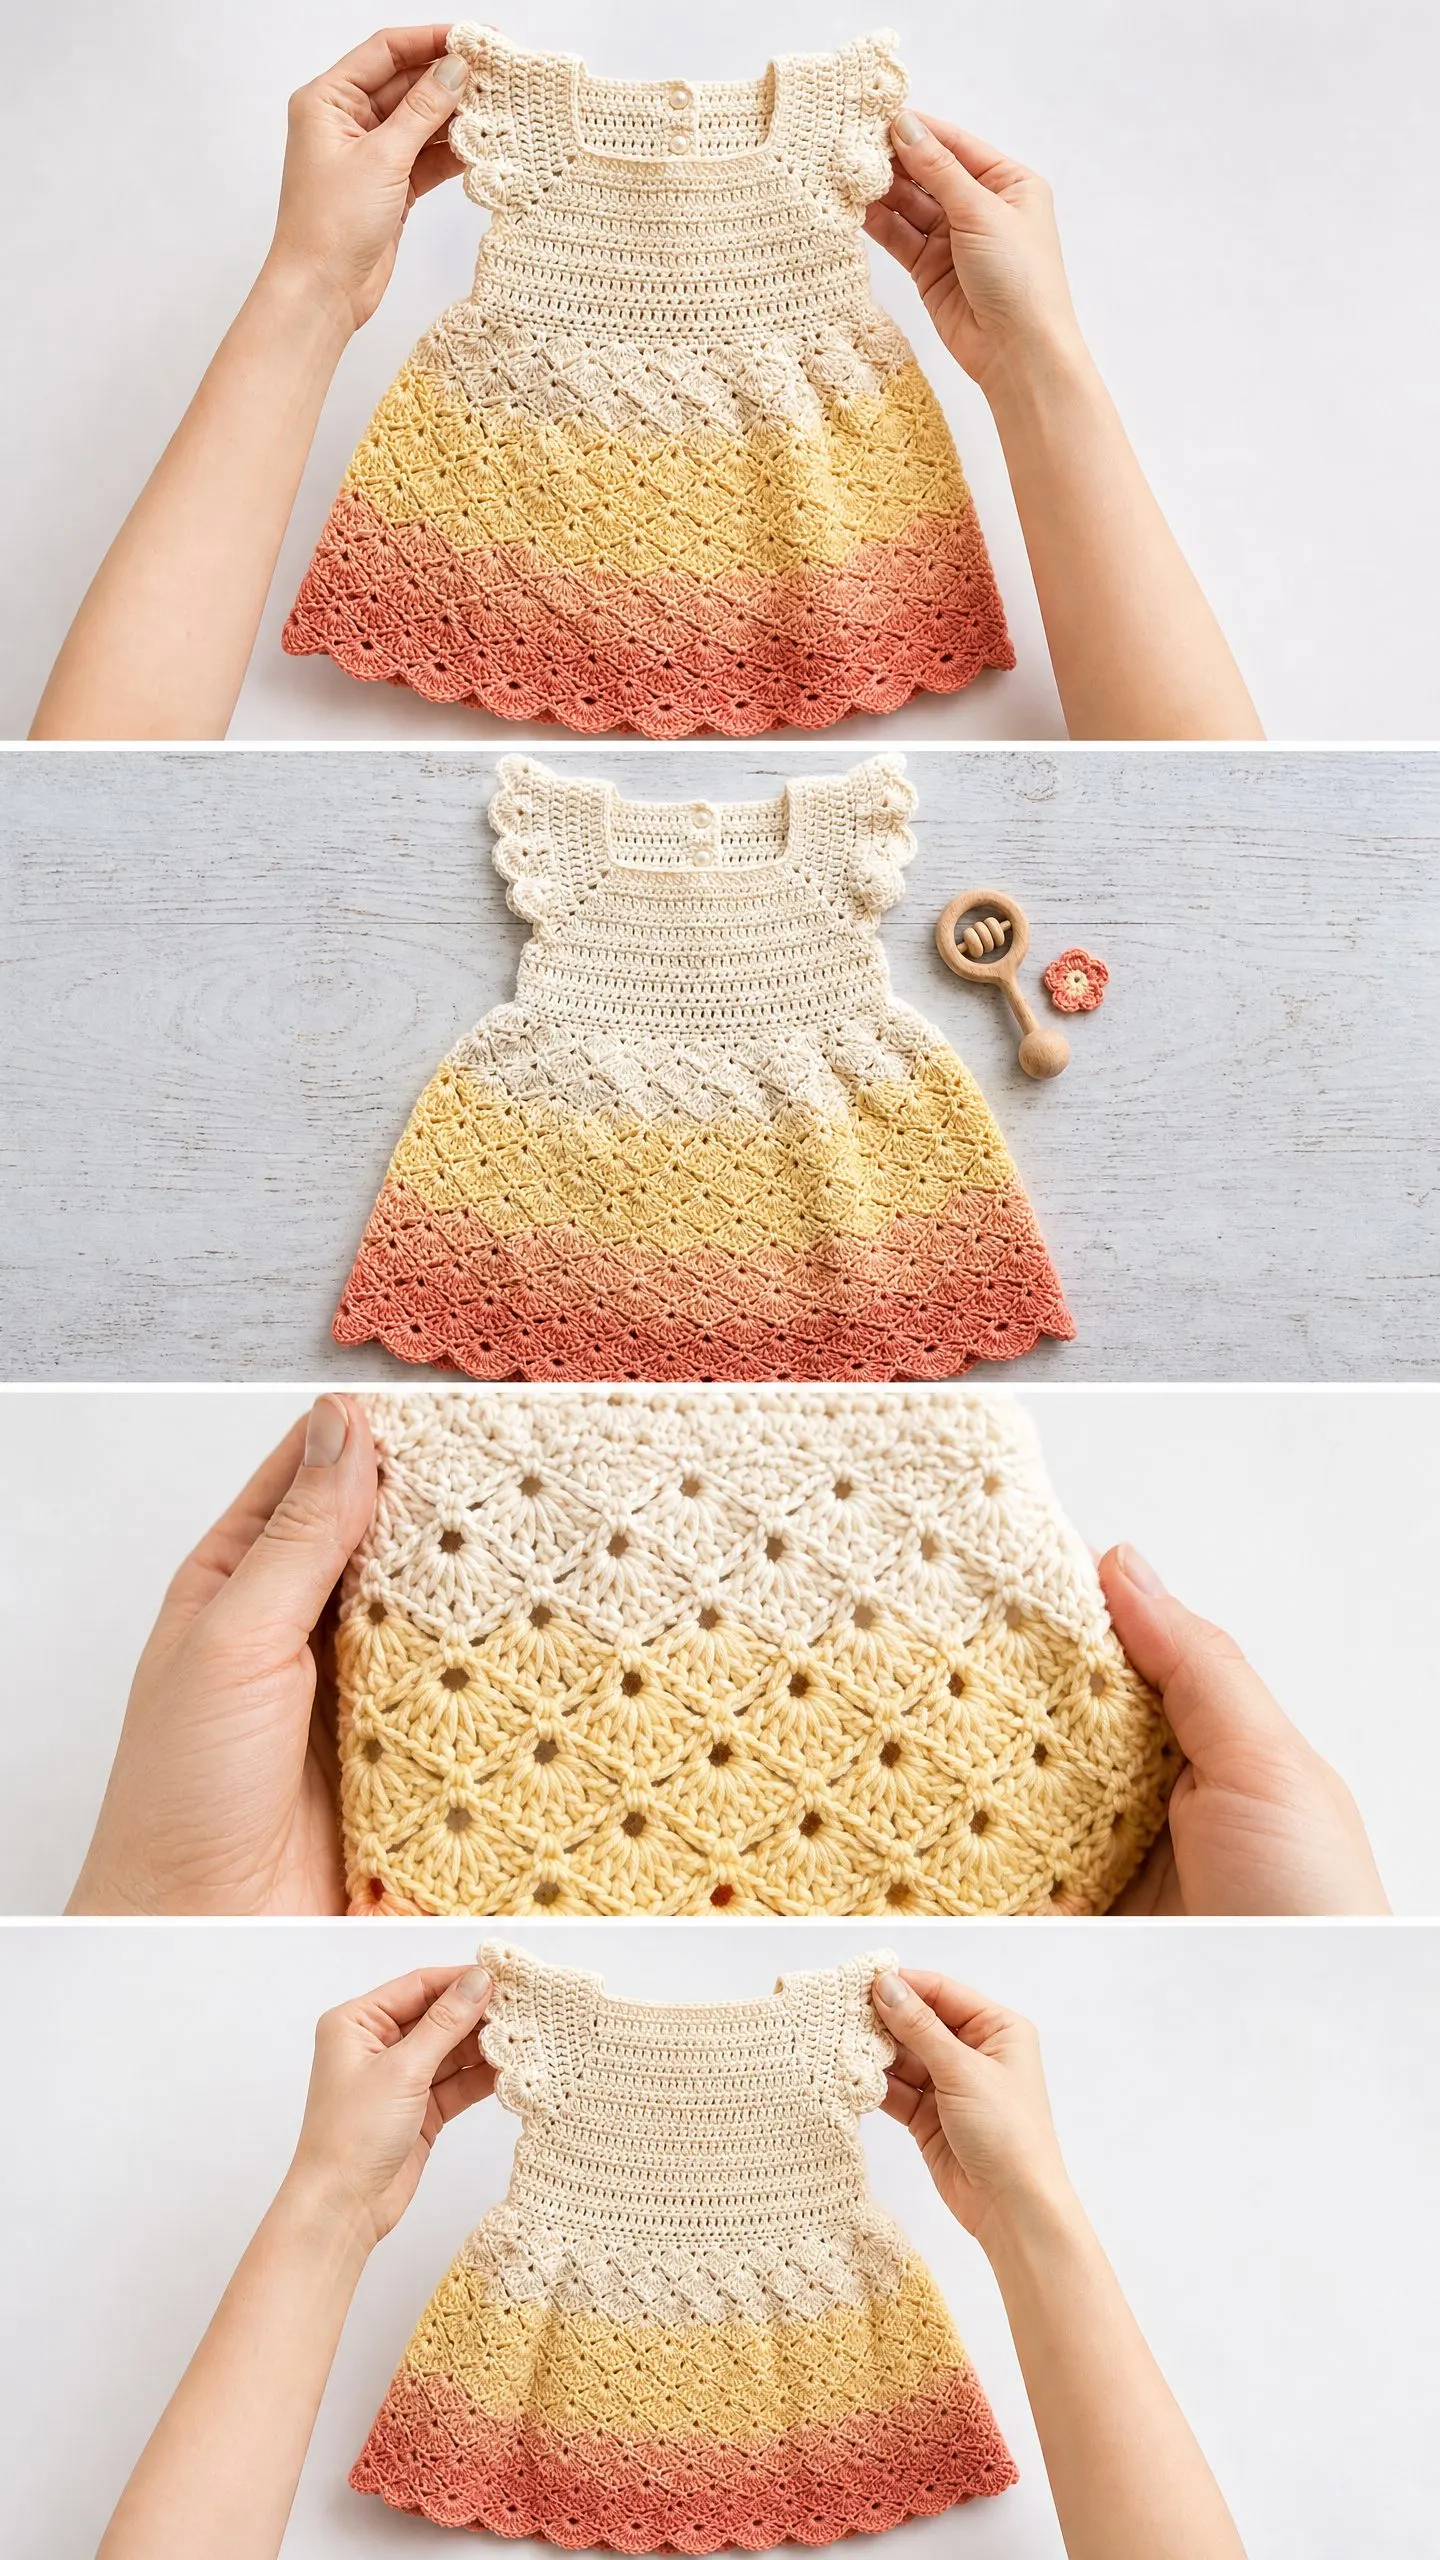
This baby dress is constructed from the top down, which means you start at the shoulders and work your way to the hem. The bodice features a solid single crochet (sc) fabric that gives structure and a clean look, while the skirt blooms into a beautiful fan shell stitch pattern that creates natural flare and movement.
The square neckline is formed by working the bodice flat in two pieces before joining them together. A small button opening at the back makes dressing easy. Those adorable flutter sleeves? They are crocheted separately and attached around the armhole openings, creating that sweet ruffled effect you see in the photos.
The color transition happens gradually through the skirt section. You will use three colors: cream for the bodice and upper skirt, butter yellow for the middle skirt, and terracotta peach for the lower skirt and hem edging. The result is that dreamy ombre sunset effect.
Skill Level
This pattern is rated Intermediate. You should be comfortable with working in both rows and rounds, reading lace stitch repeats, managing color changes, picking up stitches around armholes, and following a shaped yoke with increases.
That said, if you are a confident beginner who has completed several small projects, you can absolutely tackle this with patience. I will break everything down step by step and explain the trickier parts as we go.
Finished Sizes
This pattern includes three sizes:
The instructions below are written for size 3 to 6 months. Size adjustments appear throughout in parentheses marked (0-3m) and (6-12m).
Materials Needed
Yarn
You will need sport weight yarn (CYCA 2), approximately 400 to 450 yards total, divided among three colors:
Recommended Yarns:
1. Paintbox Yarns Cotton Sport (100% cotton, 175 yards per 50g skein) in shades Champagne White, Butter Yellow, and Melon Sorbet. Excellent stitch definition and washes beautifully.
2. Drops Safran (100% combed cotton, 175 yards per 50g skein) in shades Off White, Light Yellow, and Powder Pink. Slightly mercerized finish gives crisp lace definition.
3. Lion Brand 24/7 Cotton in Sport weight (100% mercerized cotton, 186 yards per 50g skein) in shades Linen, Yellow, and Peach. Soft drape and machine washable.
Substitution tip: Any smooth sport weight cotton or cotton blend will work beautifully. Avoid fuzzy or textured yarn because it will obscure the pretty lace fan pattern. Always check your gauge before starting.
Hook
US E-4 / 3.5 mm crochet hook
Notions
Gauge
20 sc x 24 rows = 4 inches (10 cm) worked flat in single crochet with Color A and US E-4 / 3.5 mm hook, blocked.
Lace skirt gauge: One 9-stitch fan repeat = approximately 1.6 inches (4 cm) wide. Four rows of fan pattern = approximately 1.25 inches (3.2 cm) tall, blocked.
Gauge matters for garments! If your gauge is off, your dress will be too big or too small. Take time to make a swatch and adjust your hook size if needed.
Abbreviations and Stitch Definitions
Let me define every stitch abbreviation you will encounter. I will use the full name first, followed by the abbreviation in parentheses, then explain what it means.
Special Stitches Explained
Fan Shell Stitch
This is the beautiful lace pattern that makes up the skirt. Here is how it works:
1. Work to the designated stitch or chain space.
2. Work 5 double crochet stitches all into the same stitch or chain space. This creates one fan shell.
3. Skip the stitches on either side of the fan as directed.
4. Work a single crochet into the center of the next fan or into the chain space between fans.
The result is scalloped fans separated by single crochet anchors. It creates that gorgeous wavy texture.
Scallop Edging
This creates the deep scalloped border at the hem:
1. Join yarn at any point.
2. Work 1 sc into the first stitch.
3. Skip 2 stitches.
4. Work 5 dc into the next stitch.
5. Skip 2 stitches.
6. Work 1 sc into the next stitch.
7. Repeat steps 3 through 6 around.
8. Join with slip stitch to first sc.
Flutter Ruffle (for sleeves)
1. Join yarn at the bottom of the armhole opening with RS facing.
2. Work sc evenly around the full armhole opening, join with sl st.
3. Chain 1, turn. Work 2 dc into every sc around. Join with sl st. (This doubles your stitch count.)
4. Chain 1, turn. Work 2 dc into every dc around. Join with sl st. (This doubles again.)
5. Fasten off and let the ruffle naturally curl outward, forming the flutter sleeve shape.
Diamond Lattice Transition
This open mesh bridges the solid bodice and the fan skirt:
1. Work sc into the first stitch.
2. Chain 2, skip 2 stitches.
3. Work sc into the next stitch.
4. Repeat steps 2 and 3 across.
Important Pattern Notes
Before you begin, read through these notes carefully:
1. The dress is constructed top down, starting with the back bodice panel worked flat, then joining to the front, and finally working the skirt in continuous rounds.
2. Color placement: Color A (Cream) is used for the entire bodice and the first 5 rounds of the skirt. Color B (Butter Yellow) is used for rounds 6 through 14 of the skirt. Color C (Terracotta Peach) is used for rounds 15 through the final hem edging.
3. When changing colors in the skirt, you can either carry the unused color up the wrong side or join fresh yarn each time. Joining fresh and weaving in ends gives the cleanest result.
4. The back opening remains partially open at the top right shoulder seam to form a button band. Two buttons close this gap.
5. All chain 1 turning chains do NOT count as stitches unless explicitly stated.
6. Chain 3 turning chains at the beginning of dc rows DO count as the first dc of that row.
7. All stitch counts given at the end of rows or rounds represent the live working stitches in that row or round.
Pattern Instructions
Section 1: Back Bodice Panel
The back bodice is worked flat in rows. The square neckline is achieved by stopping increases and working straight across.
With Color A, chain 43. (0-3m: chain 37, 6-12m: chain 49)
Row 1 (WS): Sc in 2nd ch from hook and in each ch across. Turn. (42 sc) (0-3m: 36 sc, 6-12m: 48 sc)
Rows 2 through 12: Ch 1, sc in each st across. Turn. (42 sc)
You now have a back bodice panel that is 12 rows tall and 42 stitches wide. Do not fasten off. Set aside.
Section 2: Front Bodice Panel
The front bodice is identical to the back but worked as a separate piece.
With Color A, chain 43. (0-3m: chain 37, 6-12m: chain 49)
Row 1 (WS): Sc in 2nd ch from hook and in each ch across. Turn. (42 sc)
Rows 2 through 12: Ch 1, sc in each st across. Turn. (42 sc)
After Row 12, do not fasten off.
Section 3: Joining Front and Back, Creating Armhole Openings
Place markers at stitch 7 and stitch 36 on both the front and back panels. These mark the armhole positions. Six stitches from each side edge form the armhole width on each side, leaving a 30-stitch shoulder span on each piece.
For size 0-3m: markers at stitches 6 and 31.
For size 6-12m: markers at stitches 8 and 41.
Joining Row (RS of front facing you):
With the front panel RS facing, work across the front panel up to the first armhole marker (first 6 sts), ch 4 (this chains across the armhole underarm), skip 6 sts of front, work sc across the remaining front center panel stitches to the second armhole marker, ch 4 across the second armhole, skip 6 sts of front, work sc across the last 6 sts of front. (42 sc on front, 2 ch-4 underarm spans)
Now hold the back panel behind the front panel with wrong sides together. Work sl st through both layers at each shoulder strap section to join the shoulder seams.
Important: The right back shoulder seam is LEFT OPEN to create the button band. Do not join at this opening. You will add buttons later.
The joined body now has 84 working body stitches plus 8 chain stitches at underarms = 92 total working loops.
Section 4: Bodice in the Round
Join yarn to form a round by connecting the joined piece at the underarm. You will now work in rounds from the underarm downward.
Round 1: Ch 1, sc in each st and each ch around, joining with sl st to first sc. (84 sc) (0-3m: 76 sc, 6-12m: 92 sc)
Rounds 2 through 4: Ch 1, sc in each st around. Join with sl st. (84 sc)
Checkpoint: After Round 4, the total bodice depth from shoulder to current round should measure approximately 3 inches (7.5 cm). The chest circumference should measure 16 inches (40.5 cm).
Section 5: Waist Transition to Skirt (Lattice Rounds)
These rounds add a transitional open lattice that bridges the solid bodice to the fan skirt below. The 84-stitch count must remain divisible by 3 throughout.
Lattice Round 1: Ch 1, sc in first st, (ch 2, skip 2 sts, sc in next st) 27 times, ch 2, skip 2 sts, join with sl st to first sc. (28 sc, 28 ch-2 spaces)
Lattice Round 2: Sl st into first ch-2 sp, ch 1, sc in same ch-2 sp, (ch 2, sc in next ch-2 sp) 27 times, ch 2, join with sl st to first sc. (28 sc, 28 ch-2 spaces)
Lattice Round 3: Repeat Lattice Round 2. (28 sc, 28 ch-2 spaces)
Section 6: Skirt Setup Round
The fan shell stitch requires a multiple of 9 stitches. You need to increase from 84 to 90 stitches, adding 6 stitches evenly across this round.
For size 0-3m: increase from 76 to 81 stitches. Add 5 stitches evenly.
For size 6-12m: increase from 92 to 99 stitches. Add 7 stitches evenly.
Skirt Setup Round: Ch 1, sc in each ch-2 sp and sc of previous round, working 6 increase stitches evenly distributed (approximately every 14th st, work 2 sc instead of 1). Join with sl st to first sc. (90 sc) (0-3m: 81 sc, 6-12m: 99 sc)
Section 7: Skirt in Rounds, Fan Shell Pattern
Color Note: Rounds 1 through 5: Color A (Cream). Rounds 6 through 14: Color B (Butter Yellow). Rounds 15 through 22 plus edging: Color C (Terracotta Peach).
Skirt Round 1 (Color A, RS): Ch 3 (counts as dc), 2 dc in first st, skip 1 st, sc in next st, skip 1 st, (5 dc in next st, skip 1 st, sc in next st, skip 1 st) 9 times, 2 dc in same st as ch-3 base (completes first fan with ch-3). Join with sl st to top of ch-3. (10 fans of 5 dc, 10 sc) = 90 sts (0-3m: 9 fans = 81 sts, 6-12m: 11 fans = 99 sts)
Skirt Round 2 (Color A): Ch 1, sc in first st (top of fan center dc), ch 3, (sc in center dc of next fan, ch 3) 9 times. Join with sl st to first sc. (10 sc, 10 ch-3 spaces)
Skirt Round 3 (Color A): Sl st into first ch-3 sp, ch 3 (counts as dc), 4 more dc in same ch-3 sp (5 dc total, first fan), ch 1, sc into next sc between fans, ch 1, (5 dc in next ch-3 sp, ch 1, sc in next sc, ch 1) 9 times. Join with sl st to top of ch-3. (10 fans, 10 sc, 20 ch-1 sps) = 90 sts
Skirt Round 4 (Color A): Ch 1, sc in same st (center of fan), ch 3, sc in next sc (between fans), ch 3, (sc in center dc of next fan, ch 3, sc in next sc between fans, ch 3) 9 times. Join with sl st to first sc. (20 sc, 20 ch-3 sps)
Skirt Round 5 (Color A): Sl st into first ch-3 sp, ch 3, 4 dc in same sp (fan), ch 1, sc in next sc (single sc anchor), ch 1, 5 dc in next ch-3 sp (fan), ch 1, sc in next sc, ch 1. Repeat around. Join with sl st to top of ch-3. You now have 20 fans total. (20 fans of 5 dc, 20 sc) = 180 working stitches
Checkpoint: After Skirt Round 5, the skirt should measure approximately 2.5 inches (6.5 cm) below the lattice waist transition. The hem should be visibly wider than the waist. The work should lay flat without puckering.
Change to Color B at the start of Round 6.
Skirt Round 6 (Color B): Ch 1, sc in first st (any center fan dc), ch 3, sc in next sc anchor, ch 3, (sc in center dc of next fan, ch 3, sc in next sc, ch 3) 19 times. Join with sl st to first sc. (40 sc, 40 ch-3 sps)
Skirt Round 7 (Color B): Sl st into first ch-3 sp, ch 3, 4 dc in same sp, ch 1, sc in next sc, ch 1, (5 dc in next ch-3 sp, ch 1, sc in next sc, ch 1) 39 times. Join with sl st to top of ch-3. (40 fans of 5 dc, 40 sc, 80 ch-1 sps) = 280 sts
Skirt Round 8 (Color B): Ch 1, sc in center dc of first fan, ch 3, sc in next sc, ch 3, (sc in center dc of next fan, ch 3, sc in next sc, ch 3) 39 times. Join with sl st to first sc. (80 sc, 80 ch-3 sps)
Skirt Round 9 (Color B): Sl st into first ch-3 sp, ch 3, 4 dc in same sp, ch 1, sc in next sc, ch 1, (5 dc in next ch-3 sp, ch 1, sc in next sc, ch 1) 79 times. Join with sl st to top of ch-3. (80 fans, 80 sc, 160 ch-1 sps)
Checkpoint: You now have 80 fans. This is the maximum fan count for this size. The skirt now has significant flare and drape. Do not increase fan count further.
Skirt Rounds 10 through 14 (Color B): Continue alternating network rounds and fan rounds as established.
Change to Color C at the start of Round 15.
Checkpoint: After Round 22, the skirt should measure approximately 8 to 9 inches (20 to 23 cm) from the waist lattice section. Total dress length from shoulder should be approximately 11.5 inches (29 cm). If your dress is too short, add 2 more rounds before the hem edging.
Section 8: Hem Scallop Edging
Hem Edging Round (Color C): Join yarn with sl st into any sc anchor from Round 22. Ch 1, sc in same sc, skip the ch-3 sp entirely, 5 dc into the next sc anchor (fan shell), skip the ch-3 sp entirely, sc in the next sc anchor. Continue (skip ch-3 sp, 5 dc in next sc, skip ch-3 sp, sc in next sc) around. Join with sl st to first sc. (80 fan shells of 5 dc, 80 sc) = 480 sts
This creates a deep, dramatic scalloped border in Color C.
Fasten off Color C. Weave in end securely.
Section 9: Flutter Sleeve Ruffles
Each armhole has approximately 16 working positions around it (6 stitches along front shoulder edge, 4 chains at underarm, 6 stitches along back shoulder edge).
Adjusted Flutter Sleeve (recommended for clean math):
Flutter Sleeve Round 1: Join Color A at the bottom center of one armhole with RS facing. Work 15 sc evenly around armhole (adjust by working 2 sc together at one point if needed to achieve 15). Join with sl st. (15 sc)
Flutter Sleeve Round 2: Ch 1, 2 dc in each st around. Join with sl st. (30 dc)
Flutter Sleeve Round 3: Ch 1, 2 dc in each st around. Join with sl st. (60 dc)
Sleeve Scallop Edging: Ch 1, sc in first dc, (skip 2 dc, 5 dc in next dc, skip 2 dc, sc in next dc) 9 times, skip 2 dc, 5 dc in next dc, skip 2 dc. Join with sl st to first sc. (10 fan shells, 10 sc) = 60 sts
Fasten off and weave in end. Repeat on second armhole.
Section 10: Button Band and Neckline Edging
Neckline Edging Round 1: Join Color A at the right back corner of the open button-side shoulder with RS facing. Ch 1, sc evenly around the entire neckline opening: work 1 sc in each st along the back neck edge, 1 sc in each row-end along the left shoulder seam, 1 sc in each st along the front neck edge, 1 sc in each row-end along the right shoulder opening. Do not join.
Button Band (back overlap): Working on the 6 stitches of the back left shoulder seam area, ch 1, sc in each of 6 sts. Turn. Work 2 more rows of sc flat. Fasten off.
On the opposite side of the opening, work a matching band but add 2 buttonholes on the second row by working (ch 2, skip 2 sts) at evenly spaced positions.
Sew 2 buttons to the button band to align with buttonholes.
Finishing
Weave in all remaining ends using your yarn needle. Block the dress gently by laying it flat on a towel, spritzing with water, and allowing it to dry completely. This opens up the lace pattern and evens out your stitches beautifully.
For best results, hand wash the finished dress in cool water with a gentle detergent and lay flat to dry. Cotton yarns hold up beautifully to repeated washings.
Tips for Success
Color changes: For the smoothest gradient, join new colors at the back of the dress (under one arm) so any slight jog is less visible.
Blocking: This step makes a huge difference with lace patterns. Do not skip it! Blocking opens up the fan shells and gives the dress that professional, polished look.
Buttons: Pearl or cream colored buttons look beautiful against the cream bodice and match the vintage aesthetic of the dress.
Making it longer: Simply add more fan and network round pairs before the hem edging. Each pair adds approximately 1 inch (2.5 cm) to the length.
You Did It!
This crochet tutorial walked you through creating a beautiful Ombre Sunset Baby Dress from start to finish. From the structured bodice to the flowing fan shell skirt, from those precious flutter sleeves to the dramatic scalloped hem, every element comes together to create something truly special.
This beginner friendly step by step pattern breaks down what might look like a complex garment into manageable sections. Take your time, trust the process, and enjoy watching this little dress grow under your hook.
Thank you so much for choosing this pattern for your next project. I really hope you love making it as much as I loved designing it! If you create one, I would absolutely love to see your version. Tag me on Instagram or share a photo in my Facebook group.
Save this Ombre Sunset Baby Dress crochet pattern to your Pinterest boards so you can find it whenever you are ready to start. And please drop a comment below if you make one. I love hearing which colors you chose and seeing your beautiful finished dresses!
