
I’ve been looking for the perfect summer dress pattern for little ones, and this peach high-low girls dress is exactly what I had in mind. The combination of a fitted bodice with that gorgeous flowing fan shell skirt creates such an elegant silhouette.
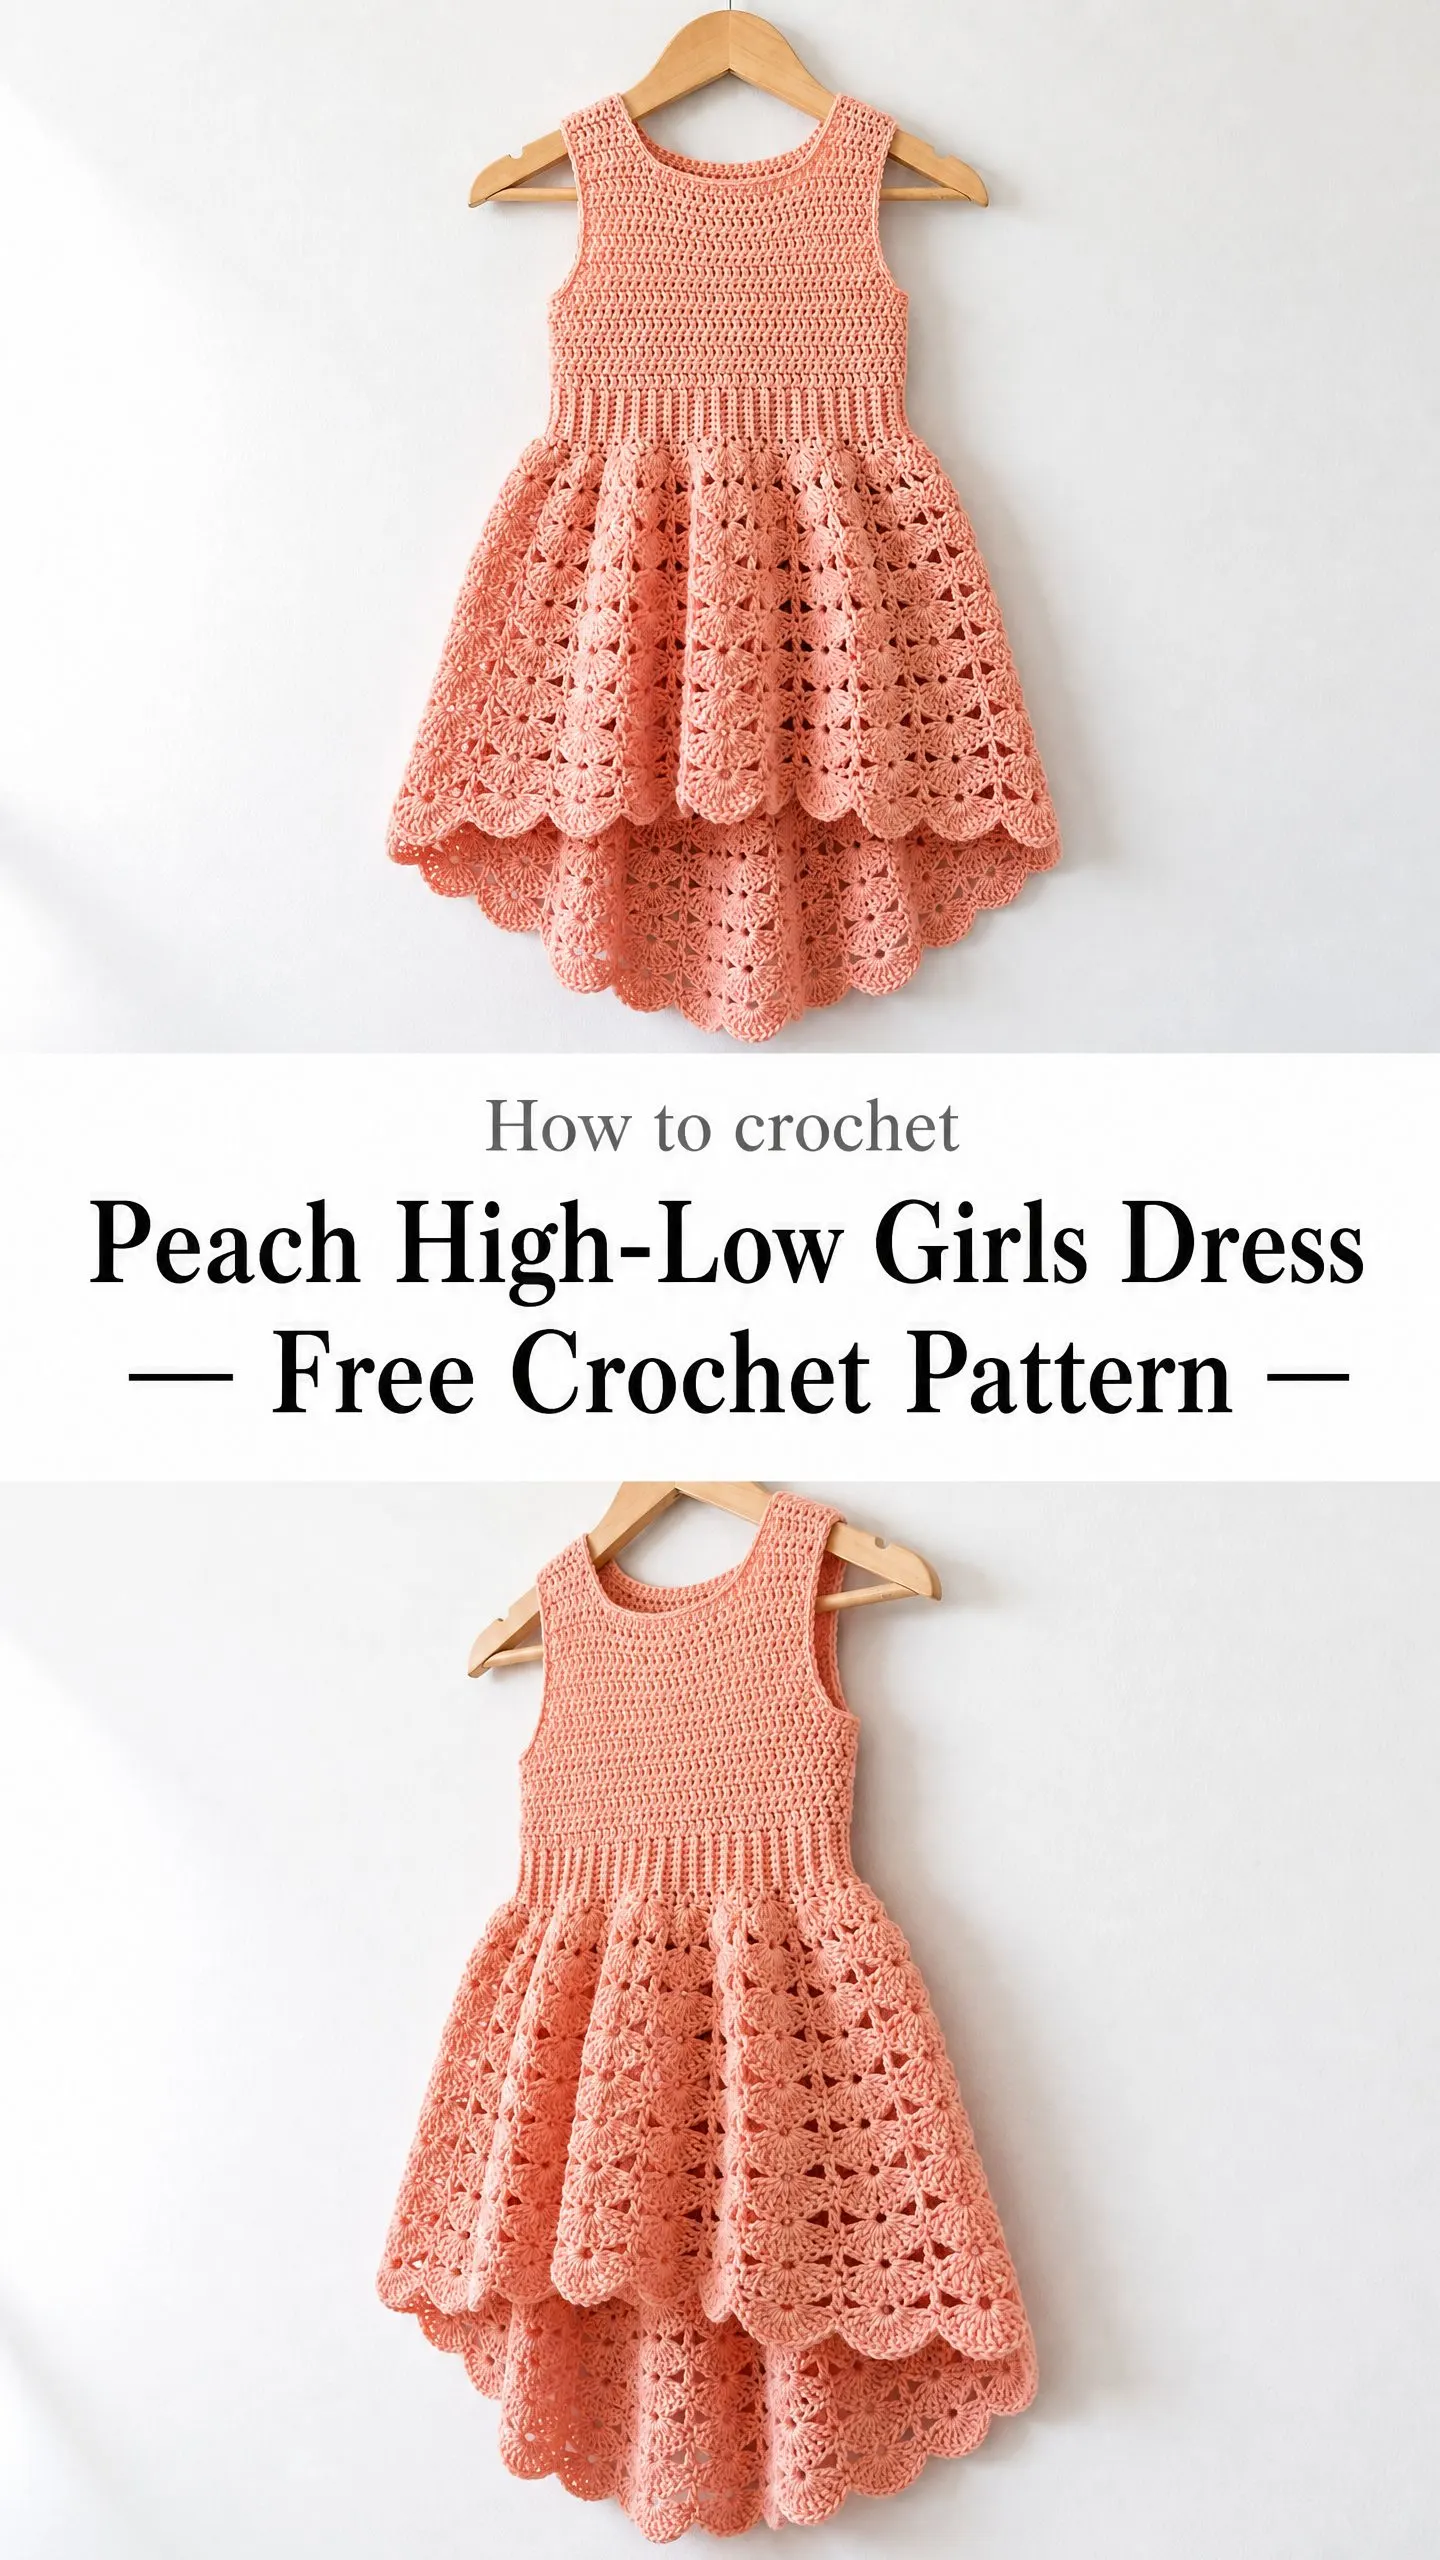
This is hands down my favourite children’s dress design I’ve come across. The high-low hemline adds just the right amount of drama without being over the top, and that scalloped edge along the bottom is absolutely stunning.
I rounded up everything you need to know to make this beautiful dress from start to finish. Whether you’re making it for a special occasion, family photos, or just because every little girl deserves something pretty, this pattern delivers on all fronts.
Why This Crochet Dress Pattern Works So Well
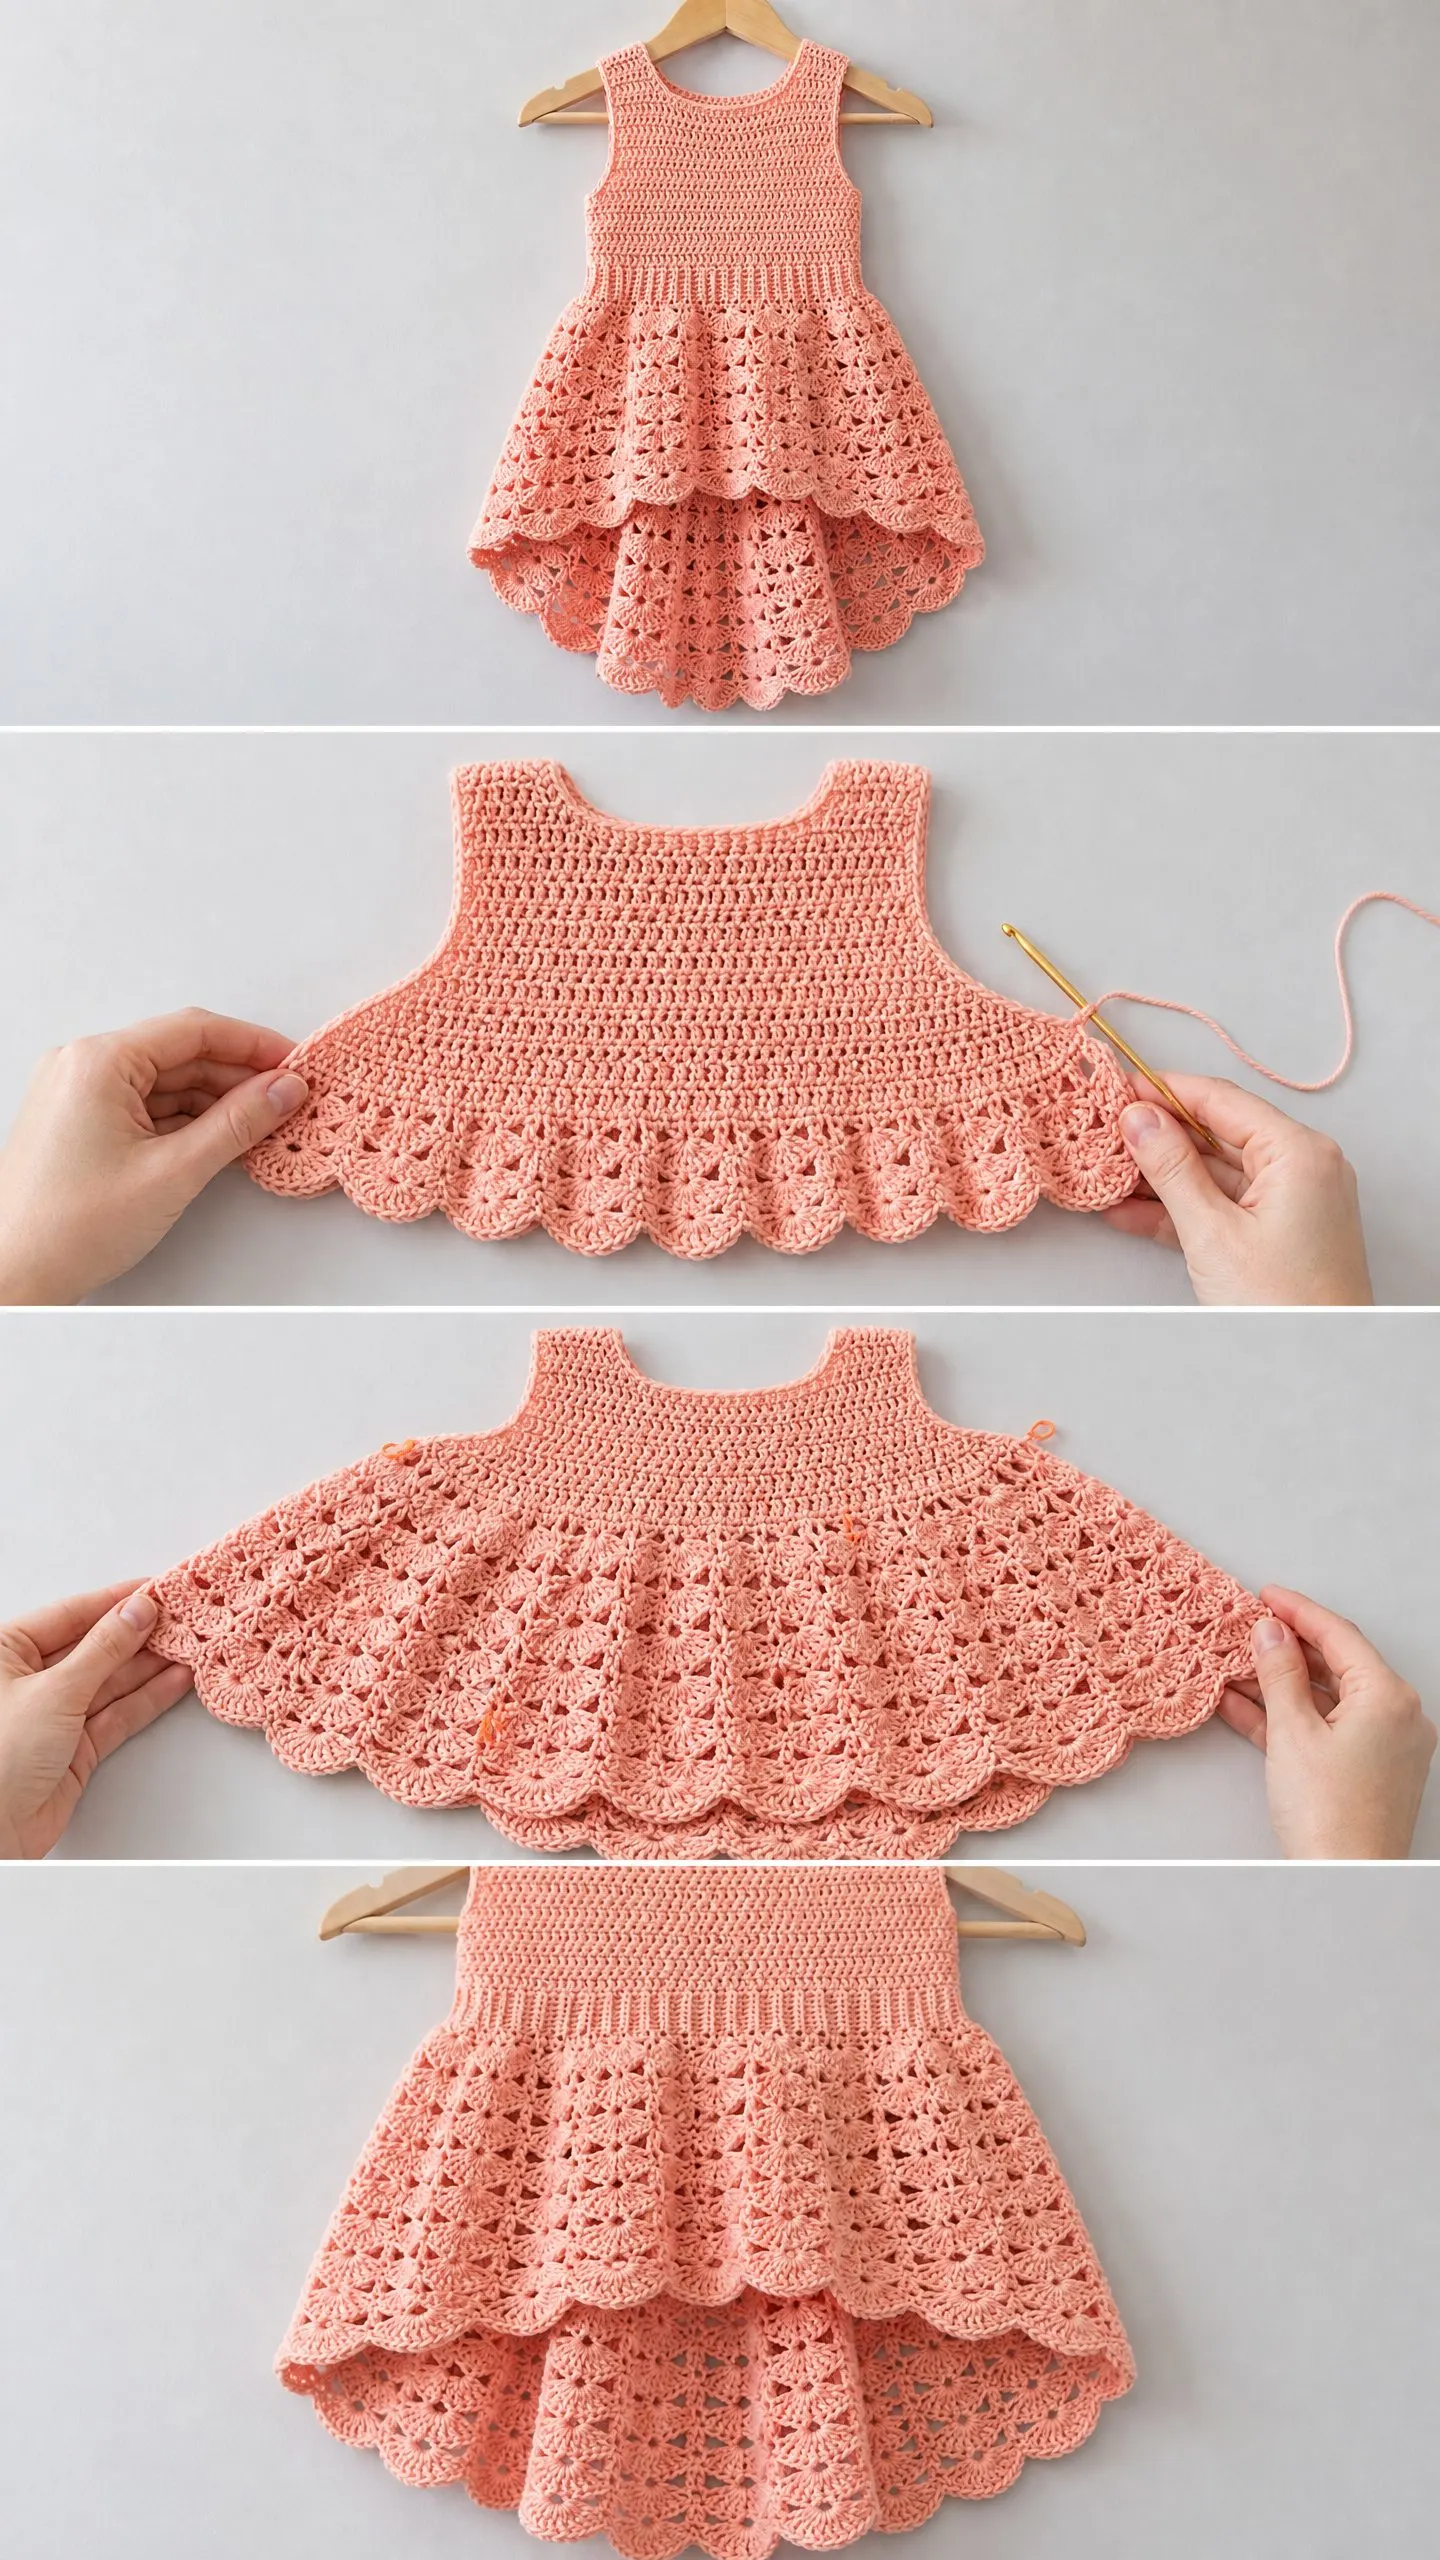
The construction of this dress is really clever. You start at the neckline and work your way down, which means you can try it on as you go and adjust the length if needed. The bodice uses simple single crochet to create a smooth, fitted look. Then a few rows of ribbing at the waist give it that gathered, defined shape you see in the photo.
The real showstopper is the skirt. Those beautiful fan shell stitches create natural tiers that flow and move with every step. And because the back panel gets extra rows of shells compared to the front, you get that gorgeous high-low effect without any complicated shaping.
The dress slips right over the head, so no buttons, zippers, or closures to fuss with. Parents will thank you for that detail.
Skill Level and Time Investment
This is an intermediate level crochet pattern. You’ll need to be comfortable with working in the round, increasing stitches evenly, and counting your stitches carefully. The fan shell sections require attention to multiples, but once you get the rhythm, it flows nicely.
If you’ve made a basic crocheted top or worked with shell stitches before, you’re ready for this project. If the shell stitch section feels intimidating, don’t worry. I’ll walk you through it step by step, and after the first tier, you’ll have it memorized.
Time estimate: Plan for approximately 12 to 18 hours for size 2T. Larger sizes will add 2 to 4 hours. This is a lovely project to work on over a week or two, and it’s satisfying to see the skirt grow row by row.
Finished Measurements
The pattern includes four sizes with built-in ease for comfortable wear:
Size 2T: Chest 21 in / 53 cm, Length front 13 in / 33 cm, Length back 16.5 in / 42 cm
Size 3T: Chest 22 in / 56 cm, Length front 14 in / 35.5 cm, Length back 17.5 in / 44.5 cm
Size 4T: Chest 23 in / 58.5 cm, Length front 15 in / 38 cm, Length back 18.5 in / 47 cm
Size 5T: Chest 24 in / 61 cm, Length front 16 in / 40.5 cm, Length back 19.5 in / 49.5 cm
The measurements allow approximately 1 to 2 inches of ease at the chest, so the dress is comfortable without being baggy.
Materials Needed
Yarn: DK weight (CYCA 3), 100% cotton or cotton-blend
Recommended yarns:
Hook: US size E-4 / 3.5 mm (or size needed to obtain gauge)
Notions:
Substitution note: Any smooth DK weight yarn in a natural fiber will work beautifully. Avoid textured or bouclé yarns because they’ll hide all that gorgeous fan shell stitch definition. Always swatch before starting.
Gauge
Getting gauge right matters here since this is a fitted garment. Take time to make a proper swatch.
18 sc x 22 rows = 4 in / 10 cm in single crochet (sc), blocked
1 fan shell repeat (9 dc) = approximately 1.75 in / 4.5 cm wide, blocked
3 rows of fan shell pattern = approximately 1.5 in / 3.8 cm tall, blocked
Make a swatch at least 5 inches square in single crochet. Wash and block it the same way you plan to care for the finished dress, then measure. If your swatch is too big, go down a hook size. Too small? Go up a hook size.
Abbreviations and Stitch Definitions
Before diving in, let’s cover all the stitches and terms you’ll encounter:
beg = beginning
ch = chain (yarn over, pull through loop on hook)
ch-sp = chain space (the gap created by a chain stitch)
dc = double crochet (yarn over, insert hook, pull up loop, yarn over, pull through 2 loops, yarn over, pull through remaining 2 loops)
inc = increase (work 2 sc in same stitch)
pm = place marker
rnd = round
RS = right side (the pretty side facing outward)
sc = single crochet (insert hook, pull up loop, yarn over, pull through both loops)
sk = skip
sl st = slip stitch (insert hook, yarn over, pull through both loops at once)
sp = space
st(s) = stitch(es)
WS = wrong side
yo = yarn over
Special Stitches for This Crochet Pattern
These are the key techniques that make this dress special:
Fan Shell Stitch
A fan shell in this pattern is 9 double crochet stitches worked into a single stitch or chain space. When the instructions say "work fan shell," you’ll work 9 dc all in the same spot. This creates that beautiful scalloped fan shape.
Fan Shell Row Setup (Row A)
This creates the foundation for the fan pattern. Work sc in first st, skip 4 sts, work fan shell (9 dc) into next st, skip 4 sts, sc into next st. Repeat this sequence across.
Fan Shell Lattice Row (Row B)
Work ch 4, sc into the center dc of the fan below (the 5th dc of the 9-dc fan), ch 4, sc into the sc between fans. Repeat across, ending ch 4, sc into last sc.
Fan Shell Fill Row (Row C)
Work sc in first sc, fan shell (9 dc) into the ch-4 space at center of lattice row, sc into sc between ch-4 spaces. Repeat across.
Rows B and C alternate after the initial Row A. Each complete repeat of Rows B and C makes one tier of shells.
Scallop Edging
Slip stitch into first st, ch 1, work (sl st, ch 2, 4 dc, ch 2, sl st) all into same stitch, skip 2 sts. Repeat around. This creates the pretty rounded border at the hem.
Surface Ribbing
Working in the back loop only (BLO) of each stitch creates visible horizontal ridges that look like ribbing and help the fabric gather slightly at the waist.
Pattern Notes Before You Begin
1. The dress is worked top down starting at the neckline. The bodice is worked in joined rounds, then the skirt is worked in rows to create the high-low shaping.
2. The neckline is sized to slip over a child’s head comfortably. No closures needed.
3. The waist ribbing comes from working 4 rounds of back-loop-only single crochet. This creates that cinched look between bodice and skirt.
4. The high-low effect happens by working more fan tiers on the back panel than the front.
5. Place stitch markers at each underarm, center front, center back, and shoulder seam points. Trust me, they make a huge difference.
6. All rounds are joined with a slip stitch to the first stitch and begun with a starting chain unless noted otherwise.
7. The ch 1 at the beginning of sc rounds counts as 1 sc. The ch 3 at the beginning of dc rounds counts as 1 dc.
8. The fan shells look dense before blocking. After blocking, they open up beautifully. Don’t panic if they look bunched up as you work.
9. Size changes appear as 2T (3T, 4T, 5T). Pick your size at the start and follow only those numbers throughout.
Step by Step Crochet Tutorial
Neckline and Yoke
The yoke is worked from the top down, beginning with the neckline chain.
Foundation chain: Chain 64 (68, 72, 76). Join with sl st to form a ring, being careful not to twist.
Round 1 (RS): Ch 1, sc in each ch around, join with sl st to first sc. (64, 68, 72, 76 sc)
Round 2: Ch 1, sc in each st around, join. (64, 68, 72, 76 sc)
Round 3: Ch 1, sc in each st around, join. (64, 68, 72, 76 sc)
Now place markers to define yoke sections:
Round 4 (Yoke Increase Round): Ch 1, work across as follows: Sc in each of next 20 (21, 22, 23) sts (front panel), pm at last st; inc in first strap st, sc in each strap st to last strap st, inc in last strap st (6, 7, 7, 8 sts become 8, 9, 9, 10 sts); sc in each of next 32 (33, 36, 37) sts (back panel); inc in first strap st, sc in each strap st to last strap st, inc in last strap st (6, 7, 7, 8 sts become 8, 9, 9, 10 sts); join. (68, 72, 76, 80 sc)
Round 5: Ch 1, sc in each st around, join. (68, 72, 76, 80 sc)
Round 6 (Yoke Increase Round): Ch 1, work as follows: Inc in first st, sc across front to last front st, inc in last front st (20 sts become 22, 21 become 23, 22 become 24, 23 become 25); sc across strap sts (8, 9, 9, 10 sts, no change); inc in first back st, sc across back to last back st, inc in last back st (32 sts become 34, 33 become 35, 36 become 38, 37 become 39); sc across strap sts (8, 9, 9, 10 sts, no change); join. (72, 76, 80, 84 sc)
Round 7: Ch 1, sc in each st around, join. (72, 76, 80, 84 sc)
Round 8 (Yoke Increase Round): Repeat the increase pattern of Round 6, adding 1 st each side of front panel and 1 st each side of back panel. Front becomes 24 (25, 26, 27), back becomes 36 (37, 40, 41), straps unchanged. Join. (76, 80, 84, 88 sc)
Round 9: Ch 1, sc in each st around, join. (76, 80, 84, 88 sc)
Round 10 (Yoke Increase Round): Repeat increase pattern. Front becomes 26 (27, 28, 29), back becomes 38 (39, 42, 43), straps unchanged. Join. (80, 84, 88, 92 sc)
Round 11: Ch 1, sc in each st around, join. (80, 84, 88, 92 sc)
Round 12 (Yoke Increase Round): Repeat increase pattern. Front becomes 28 (29, 30, 31), back becomes 40 (41, 44, 45), straps unchanged. Join. (84, 88, 92, 96 sc)
Round 13: Ch 1, sc in each st around, join. (84, 88, 92, 96 sc)
Round 14 (Yoke Increase Round): Repeat increase pattern. Front becomes 30 (31, 32, 33), back becomes 42 (43, 46, 47), straps unchanged. Join. (88, 92, 96, 100 sc)
Round 15: Ch 1, sc in each st around, join. (88, 92, 96, 100 sc)
CHECKPOINT: After Round 15, the yoke should measure approximately 2.75 in / 7 cm from the top edge. The piece should lie flat with gentle flare.
Separating Body and Armholes
Round 16 (Separation Round): Ch 1, sc across front panel (30, 31, 32, 33 sts); chain 4 (4, 5, 5) for underarm; skip all strap sts (8, 9, 9, 10 sts); sc across back panel (42, 43, 46, 47 sts); chain 4 (4, 5, 5) for underarm; skip all strap sts (8, 9, 9, 10 sts); join to first sc.
Working stitch count for body round = front sc + back sc + underarm chains:
Round 17: Ch 1, sc in each sc and in each underarm ch around, join. (80, 82, 88, 90 sc)
Round 18: Ch 1, sc in each st around, join. (80, 82, 88, 90 sc)
Round 19: Ch 1, sc in each st around, join. (80, 82, 88, 90 sc)
Round 20 (Chest Shaping): For sizes 2T and 3T only: sc around without increases. For sizes 4T and 5T only: work 2 evenly spaced increases (inc, sc to center, inc, sc to end) adding 2 sts. All sizes join. (80, 82, 90, 92 sc)
Rounds 21 through 26: Ch 1, sc in each st around, join each round. (80, 82, 90, 92 sc each round)
CHECKPOINT: After Round 26, the bodice should measure approximately 4.5 in / 11.5 cm from the underarm.
Waist Ribbing
Rounds 27 through 30: Ch 1, working in back loops only, sc in each st around, join. (80, 82, 90, 92 sc each round)
These 4 rounds of BLO single crochet create visible horizontal ribbing that cinches slightly at the waist.
CHECKPOINT: After Round 30, the full bodice including waist ribbing should measure approximately 6.5 in / 16.5 cm from the underarm, or 9.5 in / 24 cm from the neckline.
Skirt Preparation
The stitch count must be adjusted to a multiple of 10 plus 3 for the fan shell repeat.
Round 31 (Adjustment Round):
Skirt Tier 1 (Worked in Joined Rounds)
Round 32 (Fan Setup): Ch 1, sc in first st, (sk 4, fan shell of 9 dc in next st, sk 4, sc in next st) repeat to end, join to first sc. Size 2T and 3T: 8 fans. Size 4T and 5T: 9 fans. (83, 83, 93, 93 sts worked into)
Round 33 (Lattice Row): Ch 1, (ch 4, sc in 5th dc of fan below, ch 4, sc in sc between fans) repeat around, ending last repeat with sl st to first ch. (83, 83, 93, 93 positions maintained)
Round 34 (Fill Row): Ch 1, sc in first sc, (fan shell of 9 dc in center ch-4 sp, sc in sc between ch-4 sps) repeat around, join. (83, 83, 93, 93 sts)
CHECKPOINT: After Round 34, you have completed Tier 1 of the fan skirt. The skirt section should measure approximately 1.5 in / 3.8 cm below the waist ribbing.
High-Low Separation
Now divide the skirt into front and back panels. The front receives 2 more tiers (shorter hemline). The back receives 4 more tiers (longer hemline).
Front half stitch count for all sizes: 41 sts (4 fans)
Back half stitch count:
At the end of Round 34, do not join. Continue in rows for the front panel.
Front Panel (Shorter Hem)
Row 35 (Lattice Row for front): Ch 5, turn, sc in 5th dc of first fan, (ch 4, sc in sc, ch 4, sc in 5th dc of next fan) across to end of front panel, ch 4, turn.
Row 36 (Fill Row): Sc in first ch-4 sp (working the first half of the edge fan), fan shell in center ch-4 sp, (sc in next ch-4 sp, fan shell in next center ch-4 sp) across, sc in last ch-4 sp, turn. (41, 41, 41, 41 sts across front)
Row 37 (Lattice Row): Ch 5, sc in 5th dc of first fan, (ch 4, sc in sc, ch 4, sc in 5th dc of next fan) across, ch 4, turn.
Row 38 (Fill Row): Work as Row 36. (41, 41, 41, 41 sts across front)
Fasten off front panel. Front hem is complete with 2 tiers after separation.
CHECKPOINT: The front panel should now measure approximately 6 in / 15.5 cm from the neckline at the shortest front hem point.
Back Panel (Longer Hem)
Reattach yarn to the first stitch of the back panel at the point of separation (immediately following the last front panel stitch at the right side seam).
Row 35 (Lattice Row for back): Ch 5, sc in 5th dc of first back fan, (ch 4, sc in sc, ch 4, sc in 5th dc of next fan) across back, ch 4, turn.
Row 36 (Fill Row): Sc in first ch-4 sp, fan shell in center ch-4 sp, (sc in ch-4 sp, fan shell in center ch-4 sp) across, sc in last ch-4 sp, turn.
Row 37 (Lattice Row): Ch 5, sc in 5th dc of first fan, (ch 4, sc in sc, ch 4, sc in 5th dc of next fan) across, ch 4, turn.
Row 38 (Fill Row): Work as Row 36.
Row 39 (Lattice Row): Work as Row 37.
Row 40 (Fill Row): Work as Row 36.
The back panel now has 4 tiers after separation. Do not fasten off.
CHECKPOINT: The back panel should now measure approximately 9.5 to 10 in / 24 to 25.5 cm from the neckline.
Joining Sides and Hem Edging
Align the front and back panels with right sides facing outward. Work a simple sc join seam along each side from the hem edge upward to the point of separation.
After joining both side seams, reattach yarn to the hem of the front panel at the right side seam to begin the continuous hem edging.
Scallop Hem Edging
Join yarn at right side seam of front hem with RS facing.
Round 1 of edging: Ch 1, sc evenly around the entire hem (front hem, right side transition, back hem, left side transition) placing approximately 1 sc per dc post and 1 sc per row end. Adjust to a multiple of 3 sts for scallop placement. Join with sl st.
Round 2 of edging (Scallop): Ch 1, sl st in first st, (in same st work sl st + ch 2 + 4 dc + ch 2 + sl st, skip 2 sts) repeat around entire hem, joining to first sl st at end.
Fasten off and weave in end.
Armhole Edging
Join yarn at underarm chain of one armhole with RS facing.
Round 1: Ch 1, sc evenly around armhole opening, placing 1 sc per stitch and 1 sc per row end. Aim for 28 (30, 30, 32) sc total. Join. (28, 30, 30, 32 sc)
Round 2: Ch 1, sl st in each sc around, join. Fasten off.
Repeat for second armhole.
Neckline Edging
Join yarn at center back of neckline with RS facing.
Round 1: Ch 1, sc in each st around neckline, join. (64, 68, 72, 76 sc)
Round 2: Ch 1, sl st in each st around, join. Fasten off.
Finishing and Blocking
Weave in all ends securely, running each tail through at least 4 to 5 stitches in multiple directions.
To block, hand wash gently in cool water with mild soap. Squeeze gently to remove water without wringing. Roll in a clean towel to remove excess moisture. Lay flat on blocking mats. Pin the neckline, armholes, and waistline to measurements. Stretch the fan shell skirt tiers open to their full width and pin the scallops individually. Allow to dry completely.
The fan shells will open significantly after blocking. This step makes a huge difference in the final appearance.
Size Customization Tips
To size up or down: Adjust the starting chain in increments of 4 stitches.
For a longer bodice: Add 2 to 4 rounds of plain sc between Rounds 26 and 27 before the waist ribbing.
For a wider skirt: Work an additional increase round before Round 31 to add 10 more stitches (one more fan repeat per tier).
For a longer back hem: Add another tier (Rows B and C pair) to the back panel. Each additional tier adds approximately 1.5 in / 3.8 cm.
For a longer front hem: Add one tier to the front panel, keeping at least 2 fewer tiers than the back to preserve the high-low effect.
Care Instructions
Machine wash on gentle/delicate in cold water if yarn label permits. Otherwise hand wash in cool water. Lay flat to dry. Do not tumble dry. If pressing is needed, use a damp cloth between iron and fabric on lowest heat.
You’ve Got This
This peach high-low girls dress crochet pattern creates such a stunning finished piece. The combination of that structured bodice with the flowing fan shell skirt is truly beautiful, and seeing those scallops take shape along the hem is so satisfying.
Take your time with the fan shell sections. Once you’ve completed Tier 1, the rhythm becomes second nature. And remember, blocking is where the magic happens. Those shells really open up and the whole dress transforms.
Thank you so much for choosing this pattern for your next project. I would absolutely love to see your finished dress! Tag me on Instagram or share in my Facebook group. Seeing your creations genuinely makes my day.
If you found this crochet tutorial helpful, save it to your Pinterest boards so you can find it easily when you’re ready to start. And please leave a comment below if you make this dress. I’d love to hear how it turned out and see photos of your little one twirling in it!
