
I know what you are thinking. A crocheted dress covered in three-dimensional roses? That looks impossibly complicated. Here is the truth: it is not. This stunning halter dress breaks down into simple, repeatable steps. The mesh is just double crochets and chain spaces. The roses are rolled strips. The construction flows from top to bottom in a logical progression that makes sense once you see the whole picture.
If you can crochet a basic double crochet and you have made any garment before, you can absolutely make this dress. The skill level is advanced intermediate, but that just means patience and attention to detail. Nothing in this crochet pattern will stump an experienced crafter. And if you are a confident beginner ready to level up, this project will teach you so much about garment construction, shaping, and appliqué work.
Let me walk you through every single step. By the end of this crochet tutorial, you will have everything you need to create this breathtaking lavender rose halter dress from scratch.
About This Crochet Pattern
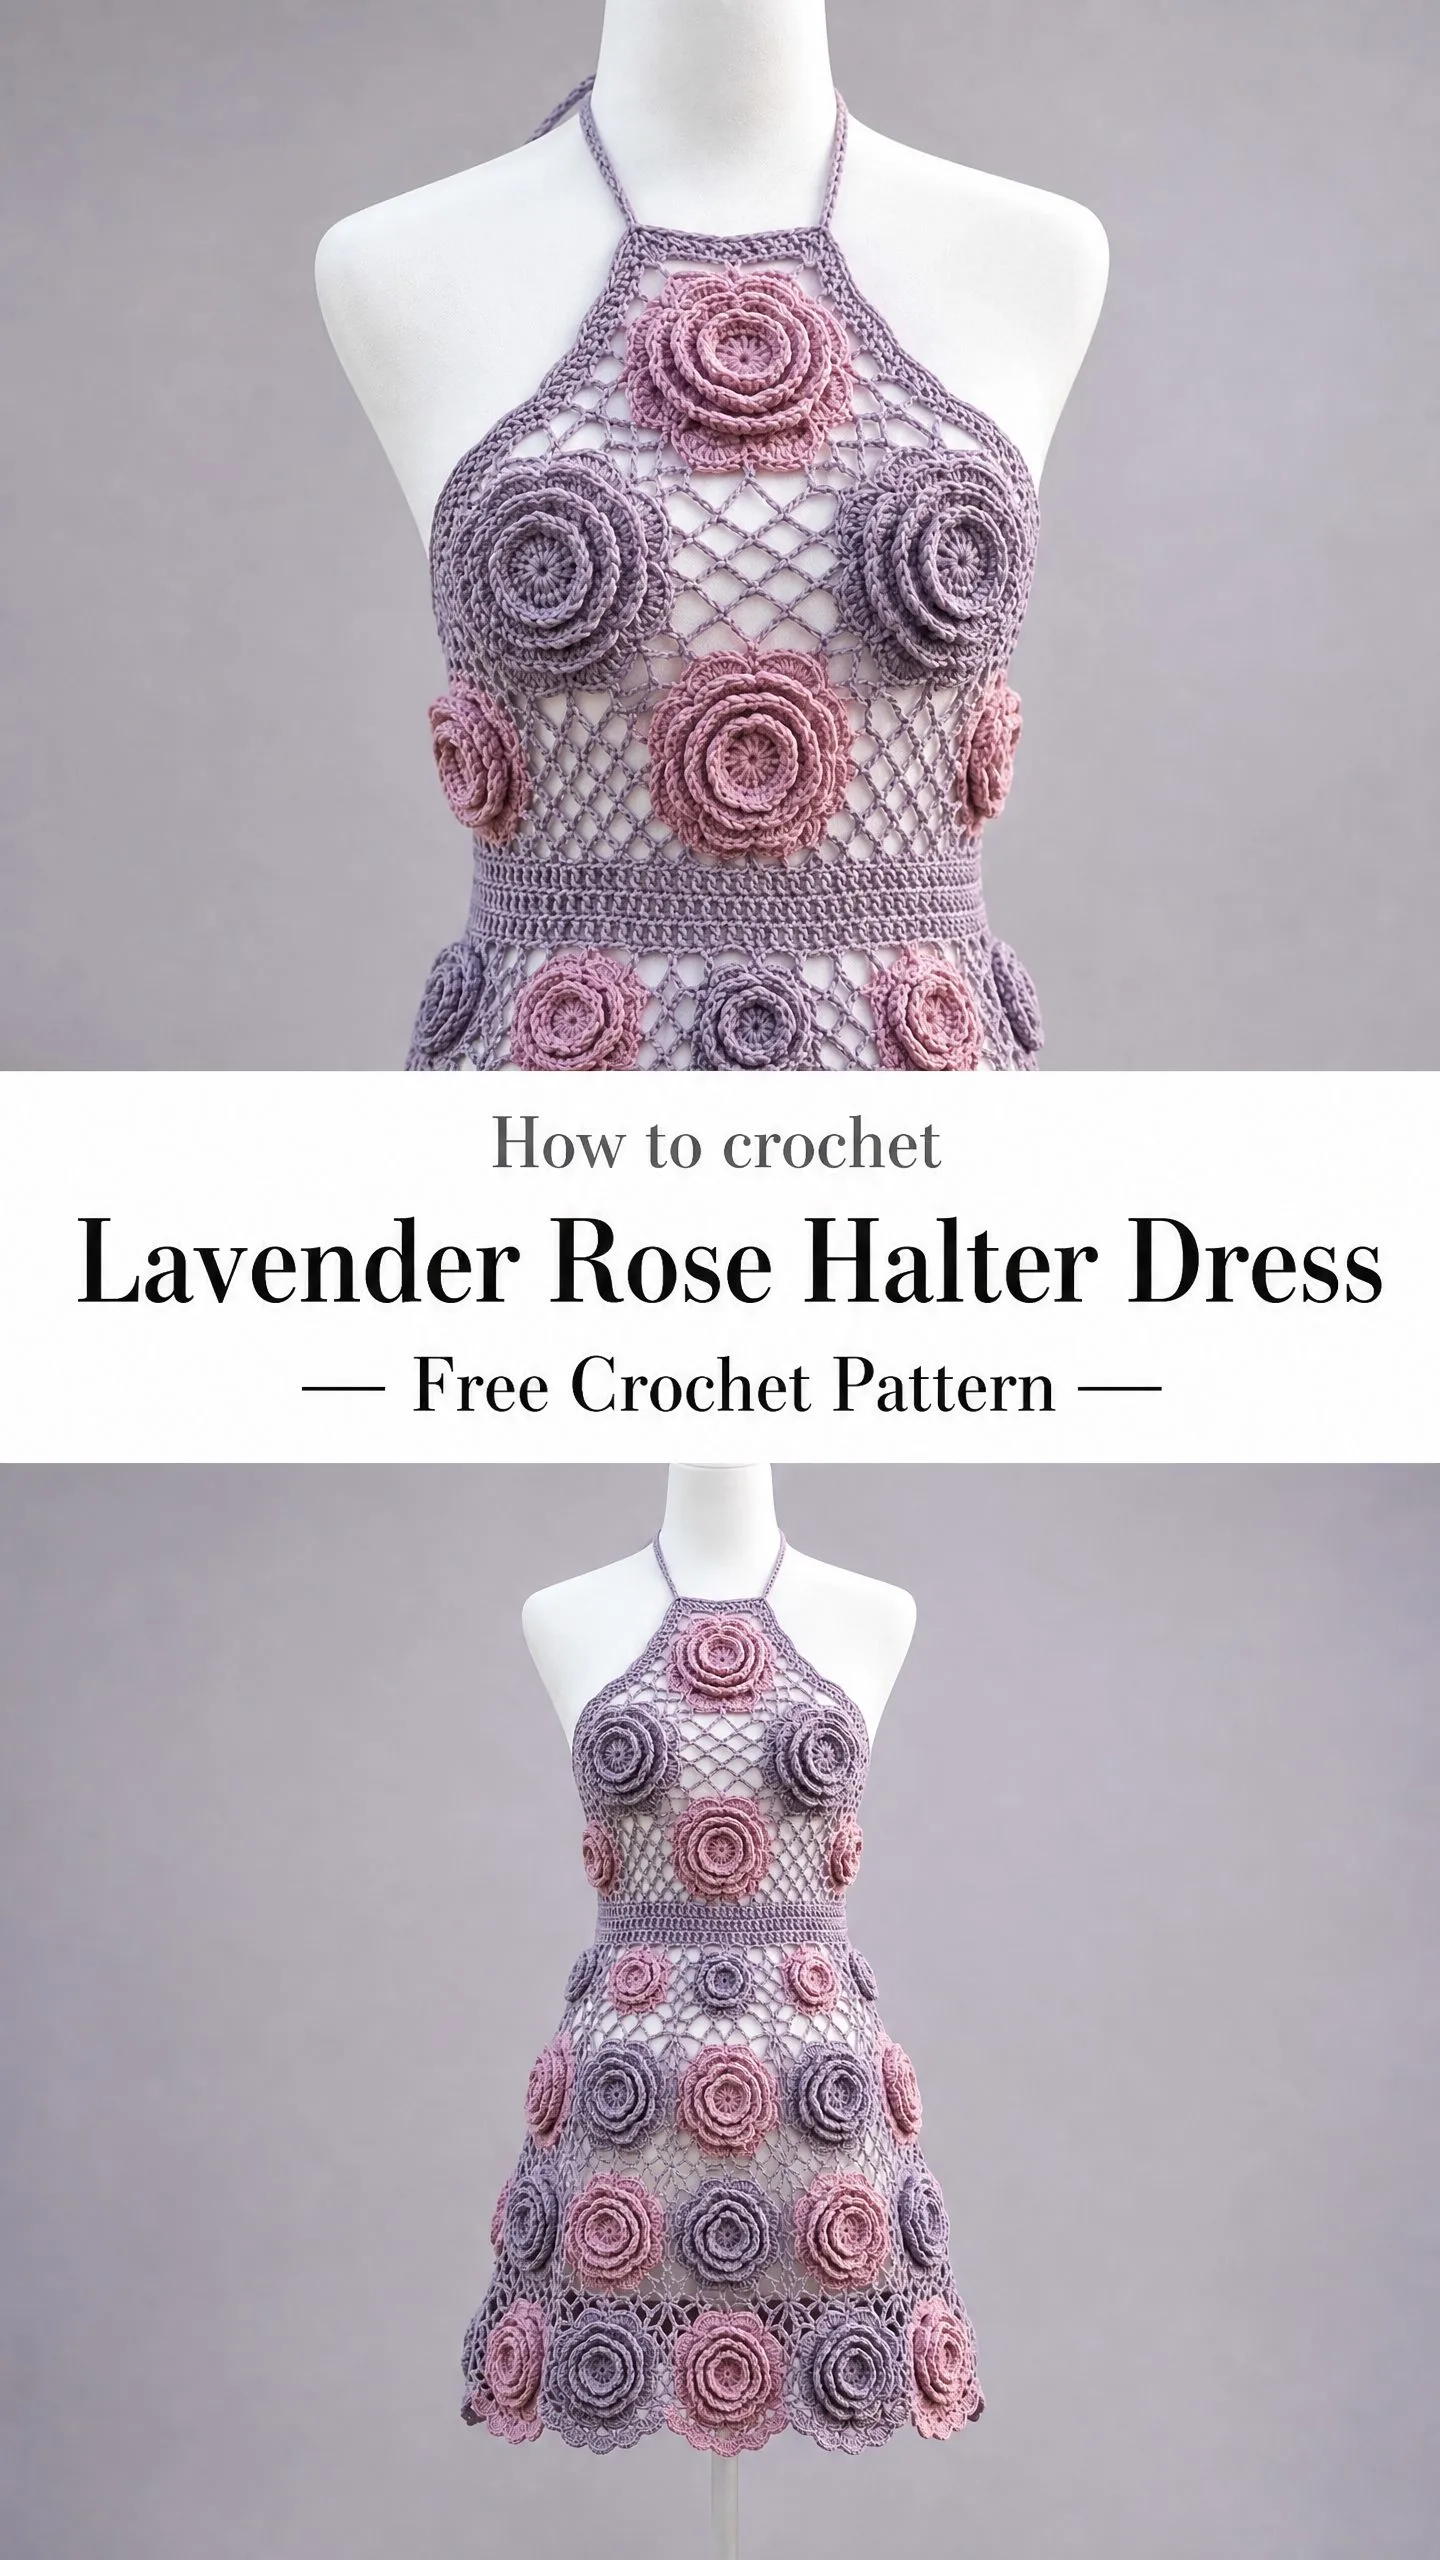
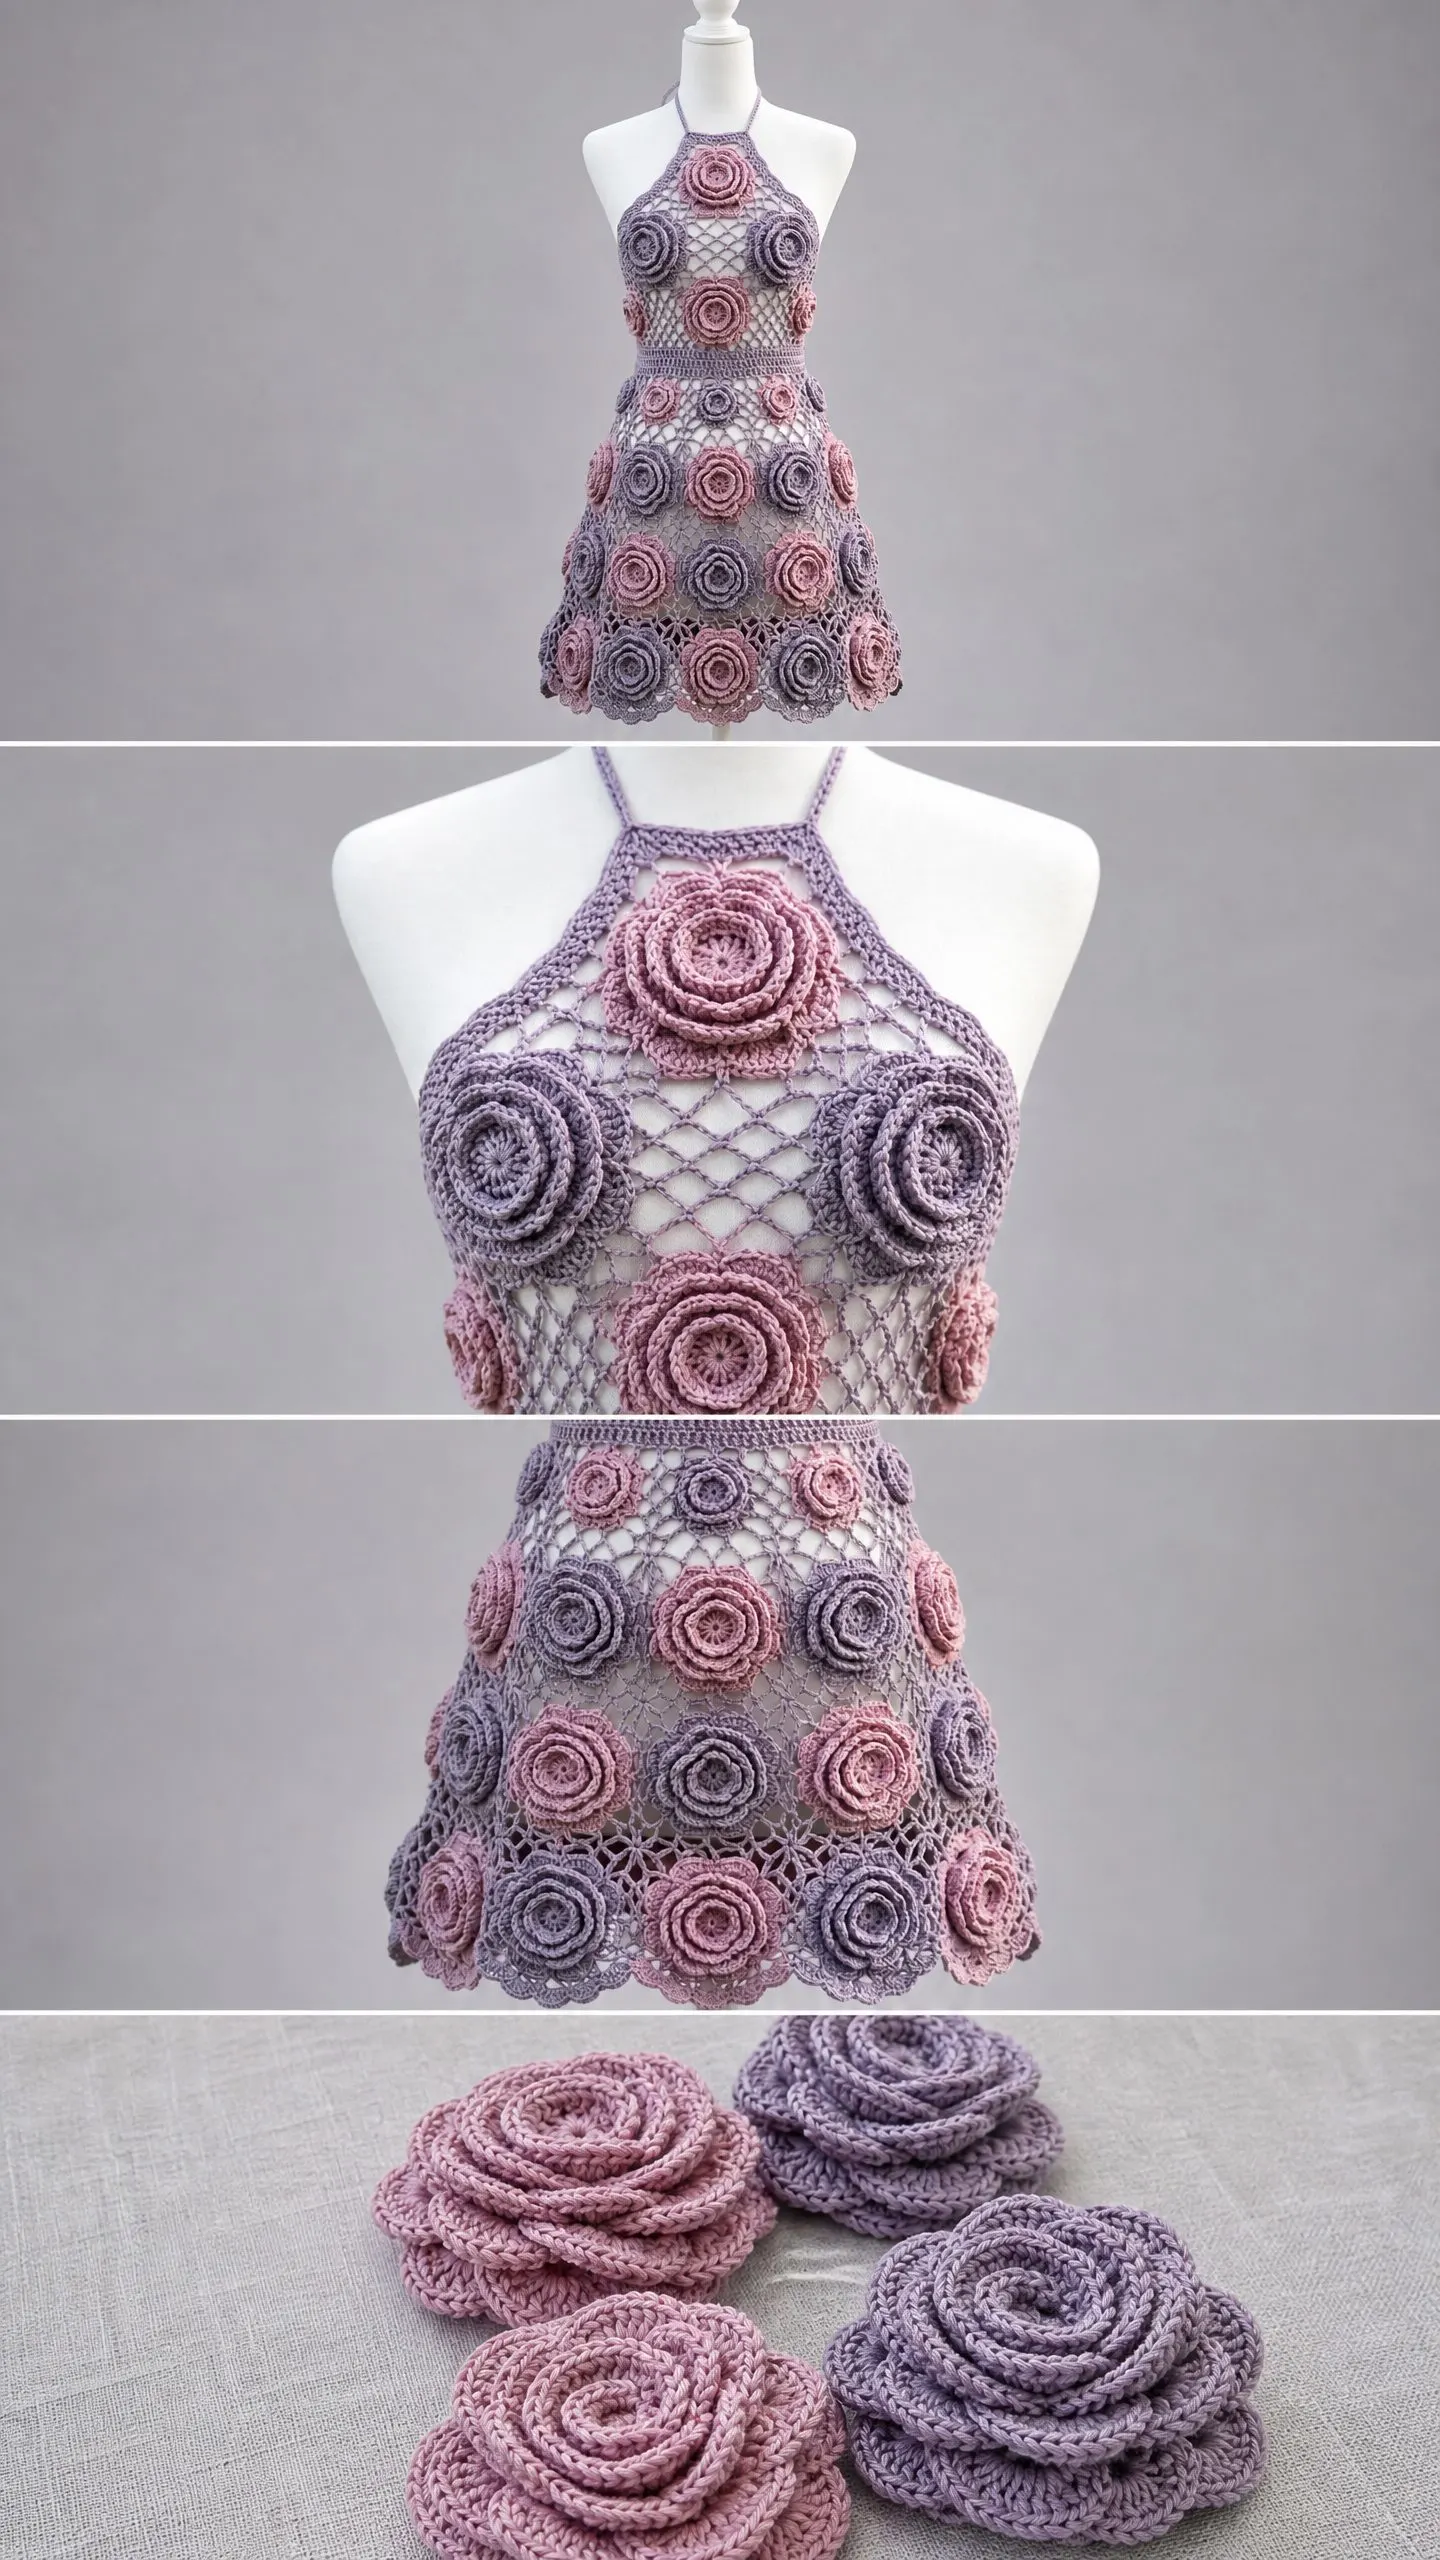
This mini halter dress features a structured mesh bodice and a flared A-line skirt, both worked in a diamond-grid mesh stitch. Three-dimensional crocheted roses in two alternating colors, dusty lavender and soft blush pink, are appliquéd across the entire garment in staggered rows. The roses grow larger toward the hem, creating a gorgeous cascading effect.
The halter neckline ties at the back of the neck with a crocheted cord. A solid-stitch waistband separates the bodice from the skirt and provides structure. The back is open from the waistband up, giving this dress its elegant halter silhouette. The hem is finished with a beautiful scallop-and-flower border.
Construction begins at the halter neckline, works down through the bodice, transitions through the waistband, then fans out into the skirt worked in joined rounds. The roses are made separately and sewn on last. This logical flow means you are never juggling too many techniques at once.
Finished Measurements
This pattern is written for a size Small/Medium.
Bust: 34 inches / 86 cm
Waist: 28 inches / 71 cm
Hip at widest skirt point: 44 inches / 112 cm
Total length from neckline base to hem: approximately 24 inches / 61 cm
Bodice length (neckline base to waistband): 7 inches / 18 cm
Waistband height: 1.5 inches / 4 cm
Skirt length (waistband to hem): 15.5 inches / 39 cm
Size customization tips appear at the end of the instructions.
Materials Needed
Yarn:
Hooks:
Notions:
Yarn Suggestions
Option 1: Paintbox Yarns Simply DK (100% acrylic, 273 yards / 250 meters per 100 g skein). This yarn has excellent stitch definition, holds its shape well after blocking, and comes in colors very close to the dusty lavender and blush pink shown. Purchase 3 skeins Color A and 2 skeins Color B.
Option 2: Scheepjes Stonewashed (78% cotton, 22% acrylic, 142 yards / 130 meters per 50 g ball). The cotton content gives the mesh structure and a slight drape appropriate for a wearable dress. Purchase 5 balls Color A and 3 balls Color B.
Option 3: Lion Brand Comfy Cotton Blend (52% cotton, 48% polyester, 230 yards / 210 meters per 100 g skein). Soft against skin, easy care, and widely available. Purchase 4 skeins Color A and 2 skeins Color B.
Any smooth DK weight yarn with good stitch definition will work. Avoid heavily textured or fuzzy yarns, as they will obscure the mesh and make rose construction difficult.
Gauge
With larger hook (E-4 / 3.5 mm) in Diamond Mesh pattern:
16 stitches and 10 rows = 4 inches / 10 cm, measured over the mesh after light blocking.
With smaller hook (D-3 / 3.25 mm) in single crochet:
20 stitches and 22 rows = 4 inches / 10 cm.
Gauge is mandatory for this garment. Even a half-stitch-per-inch discrepancy will alter the bust measurement by more than an inch. Make a swatch of at least 6 inches square, block it, and measure before proceeding.
Abbreviations (US Terms)
Before we dive in, let me define every abbreviation you will encounter. I will explain each one in plain English so nothing feels mysterious.
Special Stitches
Diamond Mesh
This stitch creates the open diagonal grid visible throughout the bodice and skirt. It is worked over a multiple of 4 stitches plus 2. Do not let the name intimidate you. It is simply double crochets with chain spaces between them.
Row 1 (RS): Ch 3 (counts as first dc here and throughout mesh section), skip first st, dc in next st, (ch 2, skip 2 sts, dc in next 2 sts) across. Turn.
Row 2 (WS): Ch 3, skip first dc, dc in next dc, (ch 2, skip ch-2 sp, dc in next 2 dc) across. Turn.
Repeat Row 2 for pattern.
Shell Stitch (Hem Border)
Work 5 dc into the same stitch or space. This creates one shell.
Picot
Ch 3, sl st into the first ch of the ch-3. This creates a tiny decorative bump.
3D Rose (Small, approximately 2 inches / 5 cm diameter)
Used in top two bodice rows and near the waistband.
Step 1: With smaller hook and desired color, ch 36.
Step 2: Row 1: Sc in 2nd ch from hook, sc in each ch across. (35 sc)
Step 3: Row 2: Ch 3, turn. (Dc, ch 1, dc) in first sc, skip 1 sc, sc in next sc, (skip 1 sc, (dc, ch 1, dc, ch 1, dc) in next sc, skip 1 sc, sc in next sc) across until 2 sts remain, skip 1, sc in last. You will have a ruffly strip.
Step 4: Beginning at one end, roll the strip tightly into a rose shape. The sc edge forms the base. Use the tail to whipstitch through the base several times to secure. Flatten the bottom slightly so the rose sits flush against the dress.
3D Rose (Medium, approximately 2.75 inches / 7 cm diameter)
Used in the middle skirt rows.
Step 1: With smaller hook and desired color, ch 52.
Step 2: Row 1: Sc in 2nd ch from hook and in each ch across. (51 sc)
Step 3: Row 2: Ch 3, turn. Work same ruffle row as Small Rose across all 51 sts.
Step 4: Roll and secure same as Small Rose.
3D Rose (Large, approximately 3.5 inches / 9 cm diameter)
Used in the bottom two skirt rows and hem border.
Step 1: With smaller hook and desired color, ch 68.
Step 2: Row 1: Sc in 2nd ch from hook and in each ch across. (67 sc)
Step 3: Row 2: Ch 3, turn. Work ruffle row same as above across all 67 sts.
Step 4: Roll and secure same as Small Rose.
Scallop (Hem)
Sl st into ch-sp, ch 3, 4 dc into same ch-sp, sl st into next ch-sp. This creates one scallop arc.
Pattern Notes
1. The bodice is worked flat in two panels (front and back are separate above the waistband) beginning from the top of each halter strap and working downward. The front panel is wider than the back.
2. The waistband joins the front and back panels into a single joined round and adds structure.
3. The skirt is worked in joined rounds from the waistband downward, with regular increases to create the A-line flare.
4. All roses are made separately after the dress body is complete and sewn on using a tapestry needle and matching yarn tails.
5. Roses alternate Color A and Color B in a staggered checkerboard pattern.
6. When working mesh rows, the turning chain 3 counts as the first dc throughout. Count it as a stitch in your stitch counts.
7. The mesh is worked with Color A only. The waistband is worked in Color A with single crochet in the smaller hook for density.
8. Halter straps are simple 3-st-wide crocheted cords in sc worked to desired length (approximately 14 inches / 35 cm) and tied at the back of the neck.
9. Pattern is written with the RS of the mesh facing out. Because the bodice panels are worked flat, you will turn at the end of each row.
10. Join all skirt rounds with a sl st to the top of the beg ch-3 unless otherwise noted. Always begin rounds with ch 3.
Step-by-Step Instructions
Halter Front Panel
The front panel is worked top-down, starting at the top neckline edge. The initial width creates the bust shaping.
Foundation: With larger hook and Color A, ch 66.
Row 1 (RS): Dc in 4th ch from hook (beg ch-3 counts as dc), dc in next ch, (ch 2, skip 2 ch, dc in next 2 ch) across. Turn. (32 dc)
Row 2: Ch 3, turn. Sk first dc, dc in next dc, (ch 2, sk ch-2 sp, dc in next 2 dc) across, ending dc in top of t-ch. (32 dc)
Rows 3 through 14: Repeat Row 2 thirteen more times. (32 dc each row)
After Row 14, the front panel should measure approximately 7 inches / 18 cm in length from top edge to bottom edge.
Checkpoint 1: Front bodice panel should be 7 inches / 18 cm tall and approximately 17 inches / 43 cm wide.
Do not fasten off. Leave a long tail and set aside.
Halter Back Panel
The back is open from the waistband up, creating the elegant halter style.
Foundation: With larger hook and Color A, ch 34.
Row 1 (RS): Dc in 4th ch from hook, dc in next ch, (ch 2, skip 2 ch, dc in next 2 ch) across. Turn. (16 dc)
Rows 2 through 14: Repeat the mesh pattern row as established. (16 dc each row)
Checkpoint 2: Back bodice panel should be 7 inches / 18 cm tall and approximately 8.5 inches / 21.5 cm wide.
Seaming: With RS facing, use a tapestry needle and Color A to whipstitch the side edges of the back panel to the side edges of the front panel, leaving the top (neckline) and bottom (waistband attachment) edges open. Join only the last 14 rows of mesh on each side. The seam runs the full 7-inch / 18 cm bodice height on each side. The center back remains fully open.
Waistband
The waistband is worked in joined rounds around the entire lower circumference of the joined bodice. Switch to smaller hook and Color A.
After joining the bodice panels, pick up stitches evenly around the full lower circumference to achieve 140 sc total. Distribute pickups as follows: across the front lower edge, pick up 72 sc; across each side seam, pick up 4 sc; across the back lower edge, pick up 60 sc. Total = 140 sc.
Waistband Round 1: Join Color A with sl st to any st at the lower bodice edge. Ch 1, sc in each st around. Join with sl st to first sc. (140 sc)
Waistband Rounds 2 through 6: Ch 1, sc in each st around. Join. (140 sc each round)
Total waistband height: 6 rounds of sc = approximately 1.25 inches / 3 cm.
Skirt
Switch back to larger hook. The skirt is worked in joined rounds from the waistband down, with increases added every other round to create the A-line flare.
Setup Round (Skirt Round 1): Ch 3 (counts as dc), dc in next st, (ch 2, skip 2 sts, dc in next 2 sts) rep around. Join with sl st to top of beg ch-3. (140 dc total)
Skirt Round 2 (mesh, no increase): Ch 3, dc in next dc, (ch 2, sk ch-2 sp, dc in next 2 dc) around. Join. (140 dc)
Skirt Round 3 (increase round): Work mesh pattern, adding 20 dc evenly distributed by working 2 dc into selected dc stitches. (160 dc)
Skirt Round 4: Mesh round, no increase. (160 dc)
Skirt Round 5 (increase round): Add 20 dc evenly. (180 dc)
Skirt Round 6: Mesh, no increase. (180 dc)
Skirt Round 7 (increase round): Add 20 dc evenly. (200 dc)
Skirt Round 8: Mesh, no increase. (200 dc)
Skirt Round 9 (increase round): Add 20 dc evenly. (220 dc)
Skirt Rounds 10 through 20: Mesh, no increase, 11 rounds total. (220 dc each round)
Checkpoint 4: After Skirt Round 20, the skirt should measure approximately 14 inches / 35.5 cm from the waistband. The circumference should be approximately 44 inches / 112 cm.
Hem Border
Round 21 (Scallop Setup): Ch 1, sl st into same ch-2 sp, (ch 3, 4 dc into same ch-2 sp, sl st into next ch-2 sp) around. Join to first sl st. (55 scallops)
Round 22 (Picot round): Sl st up into center dc of first scallop, ch 1, sc in same st, ch 3, sl st into first ch of ch-3 (picot made), sc in center dc of next scallop, picot, rep around. Join. (55 picots)
Fasten off and weave in ends.
Halter Straps
With smaller hook and Color A, ch 5.
Row 1: Sc in 2nd ch from hook and in each ch across. (4 sc)
Rows 2 onward: Ch 1, turn. Sc in each sc across. (4 sc)
Work until strap measures 14 inches / 35.5 cm, or desired length to reach from front neckline edge over shoulder and tie at back of neck. Make 2 straps.
Attach one end of each strap to the upper corners of the front bodice panel. Leave the other ends for tying.
Roses
Small Roses (2 inches / 5 cm): Make 6 in Color A and 4 in Color B. Total 10 small roses.
Medium Roses (2.75 inches / 7 cm): Make 8 in Color A and 6 in Color B. Total 14 medium roses.
Large Roses (3.5 inches / 9 cm): Make 10 in Color A and 8 in Color B. Total 18 large roses.
Grand total: 42 roses.
Rose Placement
Bodice placement: Position small roses only on the bodice front. Place 1 rose at the center neckline. Place 2 roses in the second row, evenly spaced. Place 2 roses along the sides of the bodice near the lower edge. Total on bodice: approximately 5 small roses, alternating A and B.
Lower bodice and waistband area: 2 to 4 medium roses centered over the waistband.
Skirt placement: Roses are placed in staggered horizontal rows, growing in size toward the hem.
Use a tapestry needle and the tail from each rose to sew each flower securely to the mesh at 3 or 4 points around its perimeter, catching the mesh strands without puckering the dress.
Size Customization Tips
To go up or down a size, adjust the foundation chain for the front bodice panel in increments of 4 stitches (maintaining the repeat of 4 for the mesh). Each 4-stitch addition or subtraction changes the bust by approximately 0.8 inches / 2 cm.
For a longer dress, simply work additional mesh rounds in the skirt before beginning the hem border. Every 2 rounds adds approximately 1 inch / 2.5 cm of length.
For a shorter dress, reduce the skirt rounds. Work only through Skirt Round 15 for a shorter mini length.
To add sizes above Medium, increase the front panel foundation chain to ch 74 (size Large) or ch 82 (size XL), adjusting the waistband pickup count proportionally.
Finishing and Blocking
Weave in all ends securely using a tapestry needle, taking care to run ends through at least 4 different directions to prevent unraveling through movement.
To block: Fill a basin with cool water and a small amount of wool wash or gentle soap. Submerge the finished dress and allow to soak for 15 to 20 minutes. Do not wring. Gently press out excess water by rolling the dress in a clean towel. Lay flat on blocking mats. Shape the skirt so the hem scallops lie flat and even. Use pins to hold scallops in position if needed. Reshape the bodice panels gently. Allow to dry fully, which may take 24 hours or more depending on humidity.
The roses may be lightly steamed (holding the iron 1 to 2 inches above, not touching) to set their shape after attachment.
Care Instructions
Hand wash in cool water with gentle soap. Do not wring or twist. Lay flat to dry away from direct sunlight to preserve the yarn colors. Iron on lowest setting with a pressing cloth if needed, or use steam held above the fabric. For yarns with acrylic content, do not steam directly. Store folded, not hung, to prevent the skirt from stretching under its own weight.
Time Estimate
Plan for approximately 40 to 60 hours total, including rose construction and finishing. The roses alone account for roughly 12 to 18 hours depending on your speed. This is definitely a labor of love, but every hour is worth it when you see the finished piece.
Thank you so much for choosing this lavender rose halter dress crochet pattern for your next project. I truly hope you love making it as much as I loved designing it. This dress is a showstopper, and I cannot wait to see your versions come to life.
If you make this dress, I would absolutely love to see it! Tag me on Instagram or share your finished photos in our Facebook group. Your creativity inspires me and the whole community.
Save this pattern to your Pinterest boards so you can find it whenever you are ready to start. And please drop a comment below if you have any questions or when you finish yours. I read every single one and love hearing from you!
