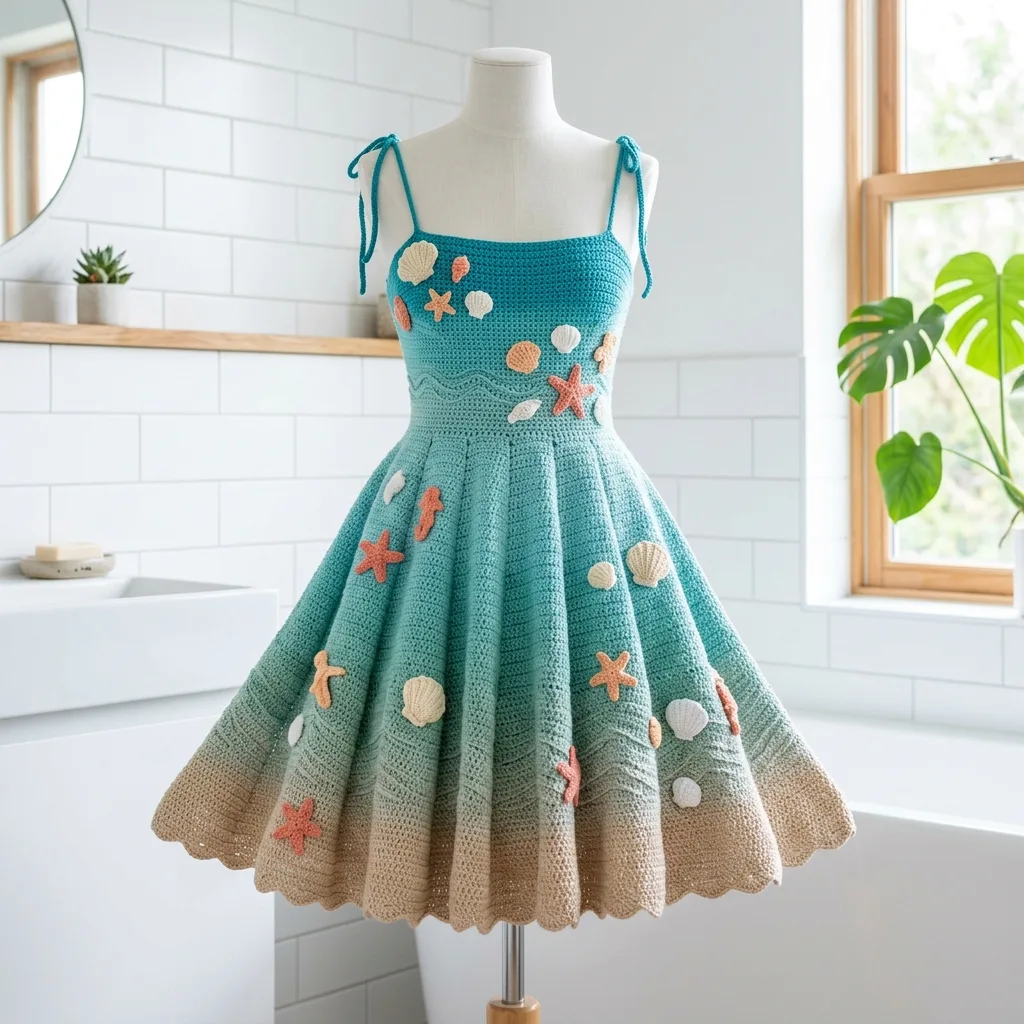
A crocheted dress that actually keeps you cool at the beach while looking like a wearable piece of art? That’s exactly what you’re getting here. The Ocean Wave Seashell Dress combines practical construction with whimsical seaside details, making it perfect for summer gatherings, beach photos, or just feeling like a mermaid on land. The bodice uses half double crochet (hdc) for a smooth fitted look, while the skirt flares out with double crochet (dc) panels and sweet scalloped edges. If you’ve been wanting to try a garment project that goes beyond basic rectangles, this intermediate pattern walks you through every step with clear stitch counts and checkpoints along the way.
Get the Ad-Free PDF Pattern
You can find the free pattern below, or you can purchase the ad-free printable PDF from my shop.
Get the Printable PDF →
About This Pattern
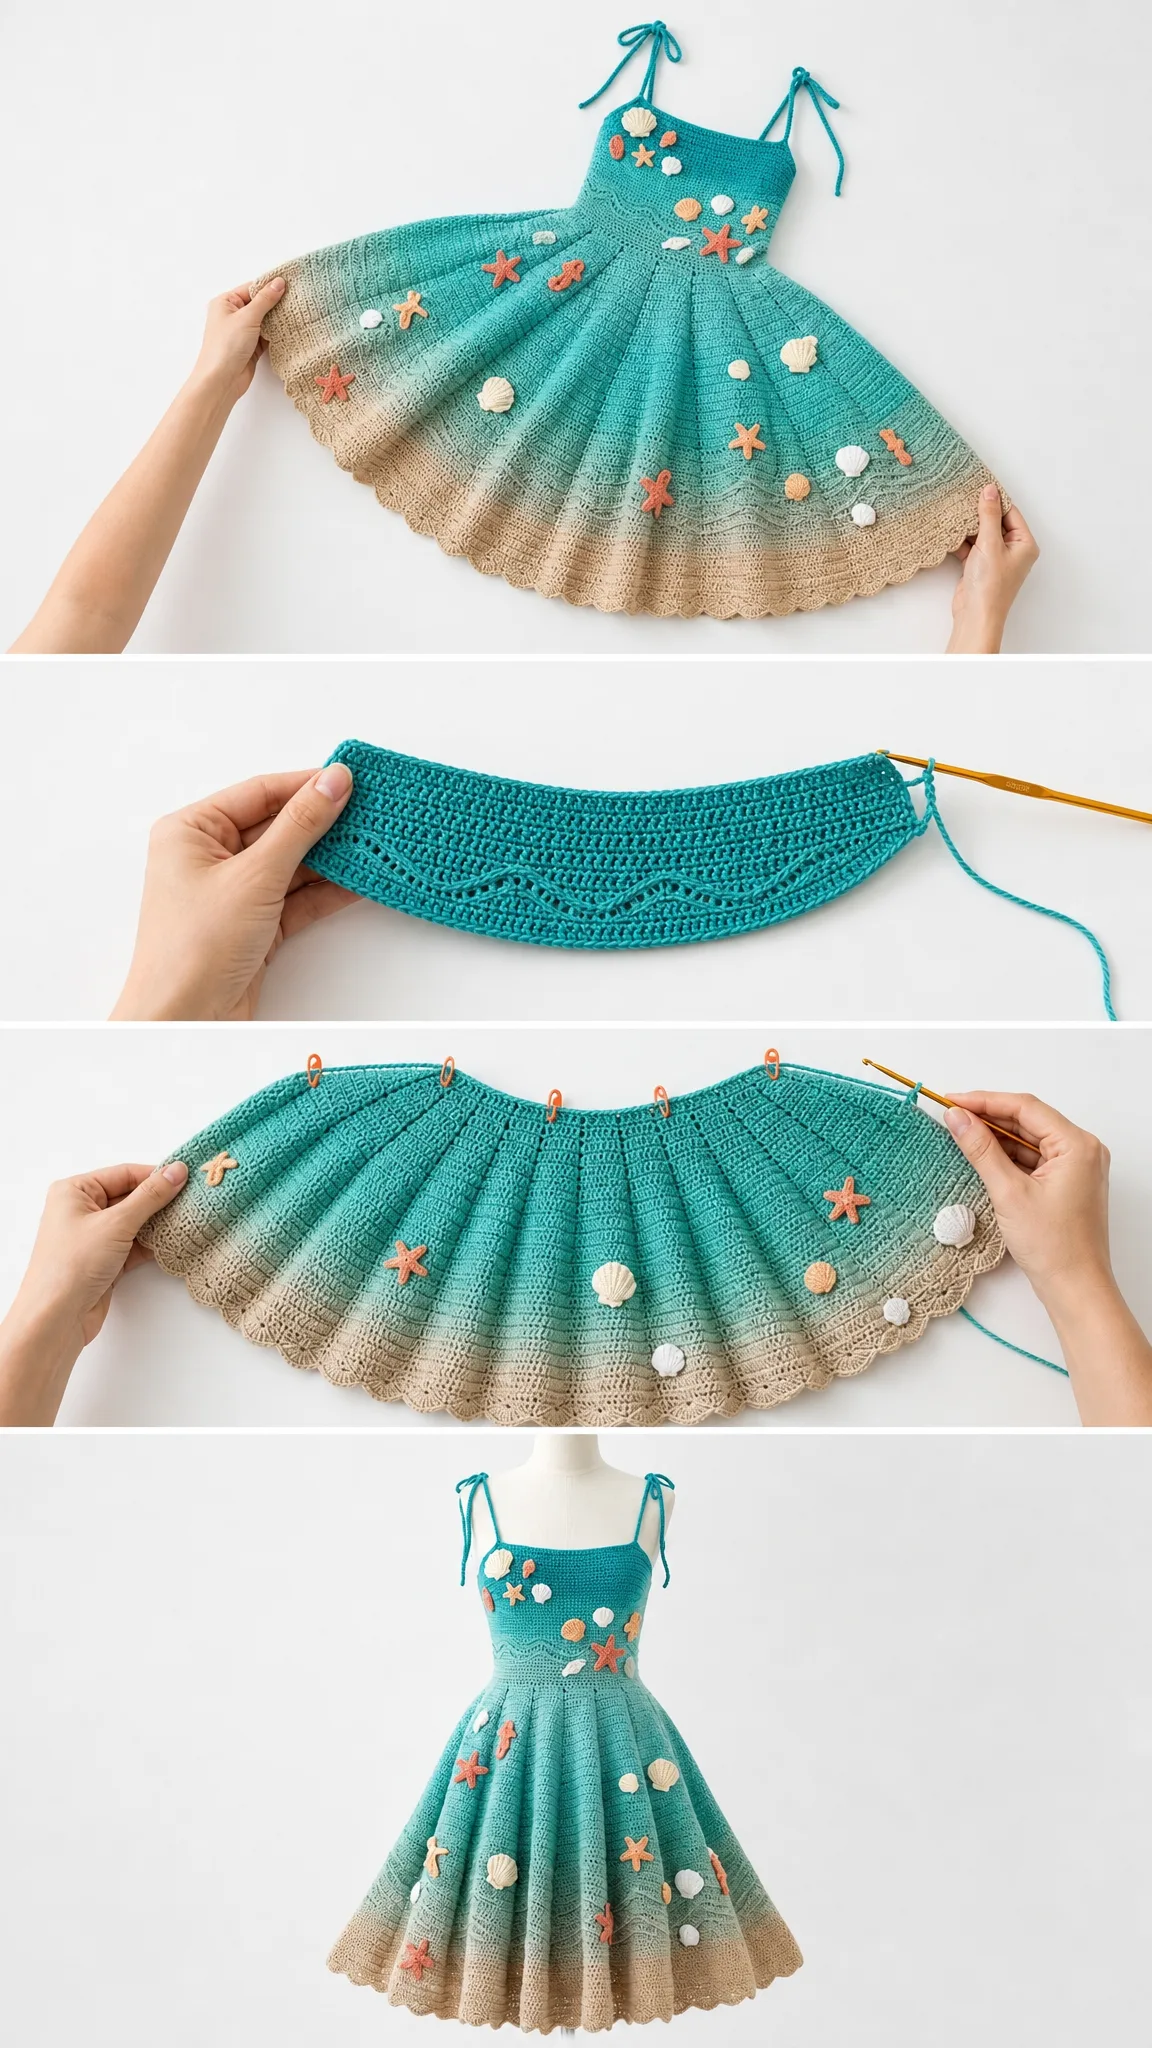
This stunning dress is worked from the top down in joined rounds, which means no seaming the main body. You’ll create a fitted bodice, add a decorative wave band at the waist, then let the skirt flare out into soft pleats with a sandy gradient at the hem. The dimensional appliques, including starfish, shells, coral branches, and sand dollars, are made separately and sewn on after blocking.
Skill Level: Intermediate. You should be comfortable with joined rounds, basic shaping, color changes, front post stitches, and small motif work.
Time Estimate: 18 to 28 hours depending on your finishing pace and how detailed you make the appliques.
Finished Measurements
| Measurement | Size |
|---|---|
| Finished bust | 35.5 in / 90 cm |
| Finished waist | 31 in / 79 cm |
| Bodice depth | 7 in / 18 cm |
| Skirt length from waist | 15.5 in / 39.5 cm |
| Total length from top edge | 22.5 in / 57 cm |
| Intended ease | 0 to 2 in / 0 to 5 cm positive ease at bust |
This pattern is written for adult size S/M. If you need to adjust, see the customization notes near the end of this article.
Materials You’ll Need
Yarn: DK weight or light worsted cotton or cotton bamboo blend in the following colors and estimated yardages:
Recommended Yarns:
Hooks:
Adjust your hook size as needed to match gauge.
Notions:
Gauge
Bodice gauge: 18 hdc x 16 rounds = 4 in / 10 cm in joined hdc, blocked.
Skirt gauge: 14 dc x 10 rounds = 4 in / 10 cm in skirt fabric, blocked.
Please swatch, block, and match gauge before starting. This step truly matters for garments since even a small difference can change your finished measurements significantly.
A note about yarn choice: For the closest silhouette to the photos, use yarn with firm recovery. Softer yarns may lengthen after blocking. If your swatch grows, consider shortening the skirt by 2 to 4 rounds.
Abbreviations (US Terms)
UK crocheters: US sc = UK dc, US hdc = UK htr, US dc = UK tr.
Special Stitches
Invisible join: Cut yarn, pull tail through last st, thread needle, insert under both loops of first st, then back into the last st. Weave in. This creates a seamless finish.
FPdc (Front Post Double Crochet): Yarn over, insert hook from front to back to front around the post of the indicated stitch below, yarn over and pull up loop, complete dc as normal. This creates a raised texture.
Surface wave: With contrast yarn on RS, sl st along the surface between rounds using shallow, loose loops. Do not tighten. The bodice must still stretch.
Scallop: Work 5 dc in one st, sk 2 sts, sl st in next st, sk 2 sts. Each scallop uses 6 sts total.
Pattern Notes
Work joined rounds unless stated otherwise. The ch 1 at the beginning of hdc rounds does not count as a stitch. The ch 2 at the beginning of dc rounds does not count as a stitch. Join to the first stitch of the round, not the beginning chain. Move your side marker up each round to keep track of your place.
For a cleaner bodice, place the join at the left side seam. Appliques are sewn after blocking so they sit smoothly over the flared skirt.
Dress Instructions
Bodice (Turquoise)
Foundation: Ch 160. Without twisting, join with sl st to first ch.
Rnd 1: Ch 1, hdc in each ch around, join. (160 hdc. Top edge measures approximately 35.5 in / 90 cm)
Rnds 2 to 8: Ch 1, hdc in each st around, join. (160 hdc)
Rnd 9: Ch 1, *hdc in next 38 sts, hdc2tog over next 2 sts; rep from * 4 times, join. (156 hdc)
Rnds 10 to 12: Hdc in each st around. (156 hdc)
Rnd 13: *Hdc in next 37 sts, hdc2tog; rep from * 4 times. (152 hdc)
Rnds 14 to 16: Hdc in each st around. (152 hdc)
Rnd 17: *Hdc in next 36 sts, hdc2tog; rep from * 4 times. (148 hdc)
Rnds 18 to 20: Hdc in each st around. (148 hdc)
Rnd 21: *Hdc in next 35 sts, hdc2tog; rep from * 4 times. (144 hdc)
Rnds 22 to 24: Hdc in each st around. (144 hdc)
Rnd 25: *Hdc in next 34 sts, hdc2tog; rep from * 4 times. (140 hdc)
Rnds 26 to 28: Hdc in each st around. (140 hdc)
Checkpoint: Your bodice should measure about 7 in / 18 cm deep. The waist edge should measure about 31 in / 79 cm around after blocking.
Wave Band (Seafoam)
Rnd 29: Join seafoam. Ch 1, sc in each st around, join. (140 sc)
Rnd 30: Ch 1, *FPdc around next st 2 rounds below, sc in next 9 sts; rep from * around, join. (14 raised wave points, 140 sts total)
Rnd 31: Ch 1, sc in each st around, join. (140 sc)
Surface wave: With seafoam or turquoise, make a loose surface sl st wave over Rnds 29 to 31, dipping every 10 sts. Fasten off invisibly. This adds the decorative wave detail at the waist.
Skirt (Full Flare)
Rnd 32: Ch 2, *dc in next st, 2 dc in next st; rep from * around, join. (210 dc) Place 15 panel markers, each 14 sts apart.
Rnds 33 to 43 (Turquoise): Ch 2, dc in each st around. Work FPdc at each marker around the post below to form vertical pleat lines. (210 dc)
Rnd 44 (Seafoam): *Dc in next 13 sts, 2 dc in next st; rep from * around. Move markers so each panel has 15 sts. (225 dc)
Rnds 45 to 55: Dc in each st around, FPdc at each marker. (225 dc)
Rnd 56 (Seafoam): *Dc in next 14 sts, 2 dc in next st; rep from * around. Move markers so each panel has 16 sts. (240 dc)
Rnds 57 to 65: Dc in each st around, FPdc at each marker. (240 dc)
Rnd 66 (Sand): Ch 2, dc in each st around, FPdc at each marker. (240 dc)
Rnds 67 to 71 (Sand): Dc in each st around, FPdc at each marker. (240 dc)
Hem Scallops (Sand)
Rnd 72: Ch 1, sc in first st, *sk 2 sts, 5 dc in next st, sk 2 sts, sc in next st; rep from * around, omitting the final sc because the first sc completes the last repeat. Join and fasten off invisibly. (40 scallops across 240 sts)
Checkpoint: From waist to scallop edge, your skirt should measure about 15.5 in / 39.5 cm and should flare in soft pleats without ruffling at the waist.
Shoulder Ties
Mark front strap points 18 sts in from each side seam. Mark back strap points 14 sts in from each side seam.
For each strap: Join turquoise at marked point, ch 70, sl st in 2nd ch from hook and each ch back to bodice, sl st into same bodice st, fasten off.
Make 4 ties total. Finished tie length is about 13 in / 33 cm each. These ties at the shoulders allow you to adjust the fit and add a pretty bow detail.
Dimensional Appliques
Make all motifs with the smaller hook (US F/5 / 3.75 mm). Sew them on after blocking.
Suggested set: 7 coral starfish, 5 ivory shells, 5 peach shells, 8 ivory sand dollars, 4 small coral branches.
Starfish
Make a magic ring (adjustable loop).
Rnd 1: Ch 1, 10 sc in ring, join.
Rnd 2: *Ch 5, sc in 2nd ch from hook, hdc in next ch, dc in next ch, tr in next ch, sk 1 sc on ring, sl st in next sc; rep from * 5 times.
Shape points with pins while damp to get nice pointed arms.
Ridged Shell
Ch 6.
Row 1: Sc in 2nd ch and next 4 ch. (5 sc)
Row 2: Ch 1, turn, 2 sc in first st, sc in next 3 sts, 2 sc in last st. (7 sc)
Row 3: Ch 1, turn, sc across. (7 sc)
Row 4: Ch 1, turn, sc2tog, sc in next 3, sc2tog. (5 sc)
Surface sl st 3 short ridges from base to outer edge to create the textured shell look.
Sand Dollar
Make a magic ring, 8 sc in ring.
Rnd 2: 2 sc in each st around. (16 sc)
Embroider five short spokes with ivory or pale sand yarn to complete the sand dollar design.
Coral Branch
Ch 13, sl st in 2nd ch and next 4 ch, *ch 5, sl st in 2nd ch and next 3 ch, sl st back into main chain; rep twice along the chain, sl st to end.
Placement Guide
Cluster 6 to 8 motifs across the upper left bodice and 3 to 5 across the upper right. Scatter the remaining pieces down the skirt with heavier placement near the lower sand section. Keep motifs away from the side join and leave the center waist wave visible so that beautiful detail shows.
Finishing and Blocking
Weave in all ends on the wrong side. Steam or wet block gently to finished measurements, pinning the scallops into even waves. Do not stretch the bodice wider than the target bust measurement.
Sew appliques with matching sewing thread or split yarn, catching only the back loops of each motif so the edges stay dimensional and puffy.
Size Customization
For a larger or smaller bodice, adjust the foundation chain in multiples of 20. Each 20 hdc changes the bust by about 4.4 in / 11 cm at gauge. Keep the waist round divisible by 10 for the wave band and use 15 skirt panels if possible.
For length adjustments, add or remove skirt rounds before the sand section. Every 10 dc rounds add about 4 in / 10 cm.
Troubleshooting
Bodice twists after joining: Lay chain flat before joining. Place a marker in the first chain and check that all bumps face inward.
Waist ripples: Your increase round may be too loose. Go down a hook size for Rnd 32 only.
Skirt hangs straight instead of flaring: Block with the hem pinned wider, or add one extra increase round before the sand section.
Motifs curl: Steam from above and pin until cool. Do not press flat with an iron.
Care Instructions
Hand wash in cool water with mild soap. Roll in a towel to remove excess water. Lay flat to dry, reshaping straps, scallops, and motifs. Store folded rather than hanging to protect the skirt shape over time.
You Did It!
Thank you so much for choosing this pattern for your next project. I truly hope you love making this dress as much as I loved designing it. The combination of the ocean gradient colors, the flowy pleated skirt, and those adorable seaside appliques makes this such a special piece to create and wear.
If you make this dress, I would absolutely love to see it! Tag me on Instagram or share a photo in our Facebook group. Seeing your finished projects is honestly the best part of sharing patterns.
Save this pattern to your Pinterest boards so you can find it easily when you’re ready to start, and please drop a comment below if you make one. I’d love to hear how it turned out for you!
Want a Quick & Easy Printable Version?
Get a clean, beautifully formatted PDF of this pattern — easy to follow step by step, ready to print or save on any device. No scrolling, no distractions, just the pattern.
Get the Printable PDF →