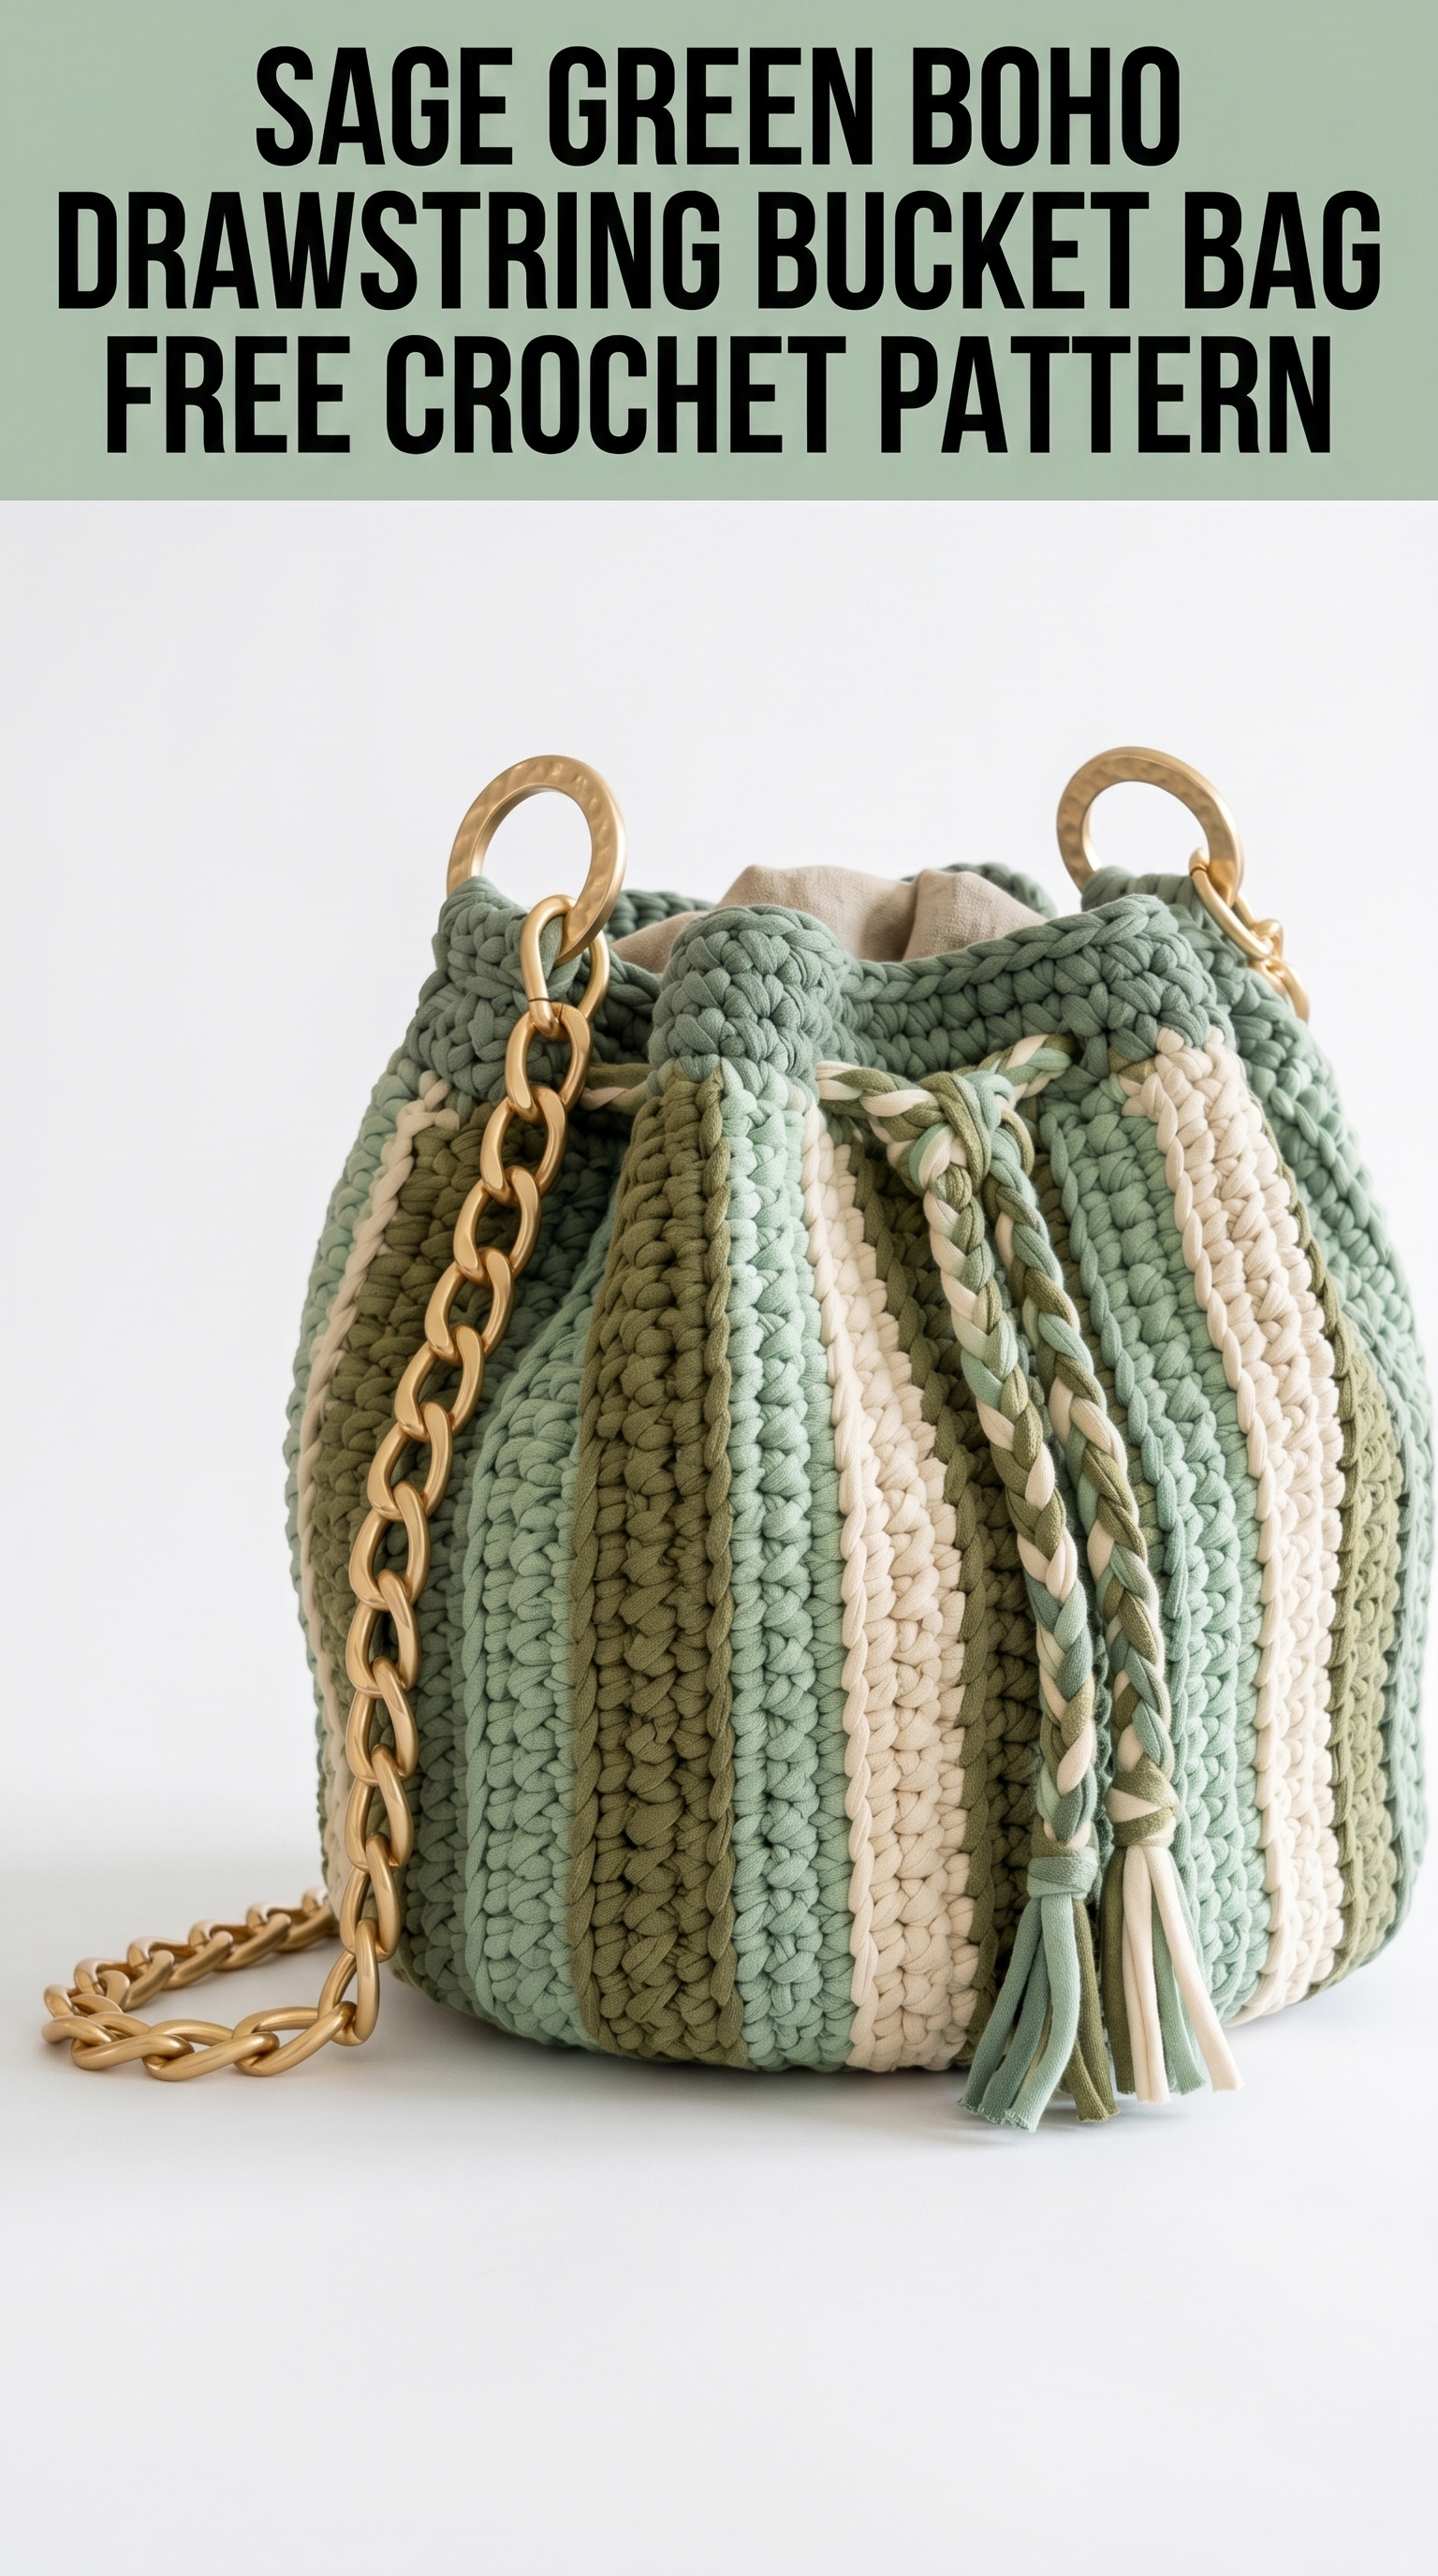
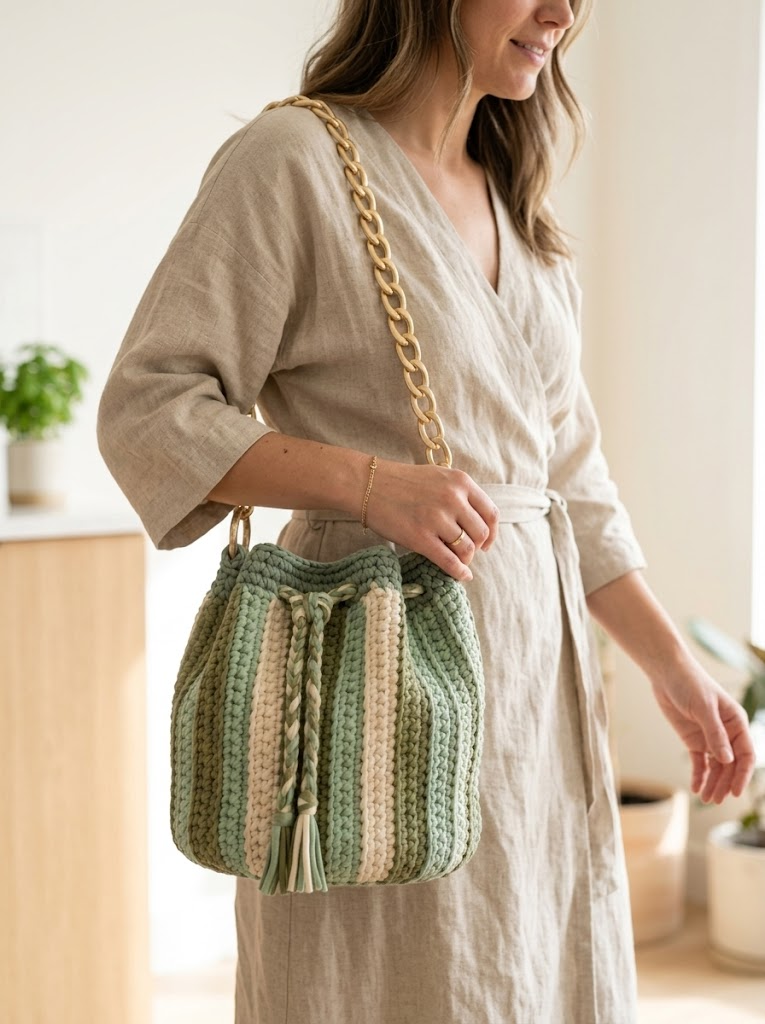
This gorgeous bucket bag is about to become your new favorite project. I designed this sage green boho drawstring bag after falling in love with the vertical stripe trend, and I honestly carry mine everywhere now. The chunky texture, those beautiful earth tones, and the gold chain strap give it such a high-end boutique look. But here is the best part: if you can single crochet, you can absolutely make this bag.
This crochet pattern works up surprisingly fast thanks to the bulky t-shirt yarn. We are talking a weekend project, maybe less if you get into a good rhythm. The construction is beginner friendly with no complicated shaping. You will work in continuous rounds from the bottom up, which means no joining and no counting to find the beginning of each round. I will walk you through every single step.
Why This Boho Bucket Bag Pattern Works So Well
The vertical stripes on this bag create such a stunning visual effect, but they are actually created with a simple technique. You are not doing any complicated colorwork or carrying yarn behind your stitches. Instead, you will work each stripe section separately in rows, then join them together. This approach gives you those crisp, clean color lines that really make the bag pop.
The drawstring closure keeps everything secure while adding that relaxed boho vibe. I added a braided drawstring cord using all three yarn colors, finished with coordinating tassels. These little details take maybe 20 extra minutes but make the finished bag look so polished and intentional.
Materials You Will Need
Yarn:
T-shirt yarn is sometimes called zpagetti yarn or ribbon yarn. It is a super bulky recycled cotton material that creates that thick, structured fabric you see in the photo. If you cannot find t-shirt yarn locally, any super bulky cotton yarn will work. Just make sure to check your gauge.
Hook:
This larger hook paired with the chunky yarn creates that lovely textured fabric with visible stitch definition.
Notions:
The gold hardware against the sage green creates such a beautiful contrast. You can find purse chains and O-rings at most craft stores in the bag-making section, or search for purse hardware online.
Gauge Information
Gauge: 8 stitches and 8 rows = 4 inches in single crochet using 10mm hook and t-shirt yarn
Take time to check your gauge. With bags, gauge matters for the finished size and structural integrity. If your stitches are too loose, your bag will stretch out and lose its shape when you fill it.
Finished Dimensions
Skill Level
Beginner to Intermediate
You should be comfortable with basic crochet stitches and working in the round. The stripe sections require seaming, but I will explain that step thoroughly.
Abbreviations and Stitch Definitions
Ch = Chain: Wrap yarn over hook, pull through loop on hook. This creates the foundation for your work.
Sl st = Slip stitch: Insert hook, yarn over, pull through stitch AND loop on hook in one motion. Used for joining.
Sc = Single crochet: Insert hook into stitch, yarn over and pull up a loop (2 loops on hook), yarn over and pull through both loops. This is your main stitch for the entire bag.
Inc = Increase: Work 2 single crochet stitches into the same stitch. This adds one stitch to your count.
Sc2tog = Single crochet two together: Insert hook into first stitch, pull up a loop, insert hook into next stitch, pull up a loop (3 loops on hook), yarn over and pull through all 3 loops. This decreases by one stitch.
Pattern Instructions

Base of the Bag
You will start at the center bottom and work outward in a spiral. Place a stitch marker at the beginning of each round and move it up as you go. Do not join rounds unless instructed.
Using Color A (dark sage):
Round 1: Create a magic ring. Ch 1, work 6 sc into the ring. Pull tail to close. (6 sts)
Not comfortable with magic rings? No problem. You can chain 2 and work 6 sc into the second chain from hook instead.
Round 2: Inc in each st around. (12 sts)
Round 3: *Sc 1, inc* repeat around. (18 sts)
Round 4: *Sc 2, inc* repeat around. (24 sts)
Round 5: *Sc 3, inc* repeat around. (30 sts)
Round 6: *Sc 4, inc* repeat around. (36 sts)
Round 7: *Sc 5, inc* repeat around. (42 sts)
Round 8: *Sc 6, inc* repeat around. (48 sts)
Your base should measure approximately 6 inches across. If it is significantly smaller or larger, adjust your hook size and try again. A sturdy base is essential for a bag that holds its shape.
Body of the Bag: Creating the Vertical Stripes
Here is where the magic happens. Instead of working continuous rounds up the sides, you will create separate stripe panels and join them. This gives you those beautiful crisp vertical lines.
Stripe Panel A (Dark Sage) – Make 4:
Working into the base, identify where you will place your first panel. Each panel covers 12 stitches of the base circumference.
Row 1: Join Color A with sl st to any stitch on the base edge. Ch 1, sc in same st and next 11 sts, turn. (12 sts)
Rows 2-20: Ch 1, sc in each st across, turn. (12 sts)
Fasten off, leaving a long tail for seaming.
Stripe Panel B (Light Sage) – Make 2:
Row 1: Join Color B to base edge, ch 1, sc across 12 sts, turn. (12 sts)
Rows 2-20: Ch 1, sc in each st across, turn. (12 sts)
Fasten off with long tail.
Stripe Panel C (Cream) – Make 2:
Row 1: Join Color C to base edge, ch 1, sc across 12 sts, turn. (12 sts)
Rows 2-20: Ch 1, sc in each st across, turn. (12 sts)
Fasten off with long tail.
Assembling the Stripe Panels
Arrange your panels in this order around the bag: A, B, A, C, A, B, A, C
Using a yarn needle and matching yarn colors, whip stitch the panel edges together. Work through the outer loops only for a nearly invisible seam. Take your time here. Neat seams make all the difference in the finished look.
Top Band and Drawstring Channel
Once all panels are joined, you will work continuously around the top edge to create the drawstring channel.
Round 1: Using Color A, join with sl st to any seam. Ch 1, sc evenly around the top edge, working approximately 48 sc. Join with sl st to first sc. (48 sts)
Round 2: Ch 1, sc in each st around. Join. (48 sts)
Round 3: Ch 3 (counts as dc), skip next st, *dc in next st, ch 1, skip 1 st* repeat around. Join with sl st to top of ch-3.
This creates the eyelet holes for your drawstring.
Rounds 4-6: Ch 1, sc in each st and ch-1 space around. Join. (48 sts)
Round 7: Sl st in each st around. Fasten off.
Hardware Attachment Points
On opposite sides of the bag top, you will create reinforced attachment points for your O-rings.
Locate two spots directly across from each other. Using Color A, join yarn to the top edge. Work 8 sc tightly around one O-ring, then sl st to secure to the bag edge. Weave through several stitches to anchor firmly. Repeat for second O-ring on opposite side.
Braided Drawstring Cord
Cut 6 strands of yarn, each approximately 60 inches long: 2 strands each of Colors A, B, and C.
Gather all strands and tie a knot at one end. Separate into 3 groups of 2 strands each (one group per color). Braid tightly until you have approximately 36 inches of braid. Knot the other end.
Thread the braided cord through the eyelet holes in Round 3 of the top band. Start and end at the front of the bag so you can tie a decorative bow.
Tassels (Make 2)
For each tassel, cut 12 strands of yarn approximately 8 inches long. Use one color per tassel, or mix colors for variety.
Fold strands in half. Using a separate piece of yarn, tie tightly around the folded top, about 1/2 inch from the fold. This creates the tassel head. Trim the bottom ends evenly.
Attach tassels to each end of the drawstring cord.
Optional Fabric Lining
I highly recommend adding a lining to this bag. It protects the crochet fabric, prevents items from poking through, and gives the bag more structure.
Cut two circles of fabric matching your base diameter plus 1/2 inch seam allowance. Cut a rectangle for the body: the circumference of the bag plus seam allowance by the height plus seam allowance.
Sew the rectangle into a tube, attach to one circle for the bottom. Hem the top edge. Insert into the bag with wrong sides together. Hand stitch the lining to the inside of the top band, hiding your stitches in the crochet texture.
Attaching the Chain Strap
Using lobster clasps or jump rings, attach your chain strap to both O-rings. Test the length before permanently closing any hardware. The bag should hang comfortably at your hip when worn crossbody.
Tips for Success
Tension matters. Keep your stitches firm and consistent throughout. Loose stitches will create a floppy bag that does not hold its shape.
Block your panels. Before seaming, wet block each stripe panel by spritzing with water and pinning flat to dry. This evens out your stitches and makes seaming much easier.
Reinforce the hardware. Those O-rings take a lot of stress when the bag is full. Consider adding a few extra stitches around them or reinforcing with a fabric backing.
Make It Your Own
This crochet tutorial gives you the foundation, but feel free to customize. Try different color combinations like dusty rose and cream, or navy and white for a nautical vibe. Swap the chain for a crocheted strap, a leather handle, or macrame cord.
You could add a pocket inside the lining, embroider initials on one panel, or attach decorative charms to the drawstring. This boho bucket bag crochet pattern is designed to be a starting point for your creativity.
Wrapping Up Your Boho Bucket Bag
I am so excited for you to make this bag. The sage green boho drawstring bucket bag is one of those projects that looks impressive but is actually very achievable. Once you finish, you will have a sturdy, stylish bag that gets compliments everywhere you go.
Thank you so much for choosing this crochet pattern for your next project. I genuinely appreciate you being here and trusting me to guide you through this make. If you create this bag, I would absolutely love to see it! Tag me on Instagram or share a photo in my Facebook group. Seeing your finished projects is honestly the best part of my day.
Happy hooking, and I cannot wait to see what colors you choose!
