
I pulled this pattern from my "someday" folder last month, and I’m so glad I finally did. I originally sketched the concept after seeing vintage butterfly brooches at an estate sale years ago. The idea of combining that dramatic sculptural element with overlapping fan scales sat in my notebook for ages, waiting for the right moment.
Get the Ad-Free PDF Pattern
You can find the free pattern below, or you can purchase the ad-free printable PDF from my shop.
Get the Printable PDF →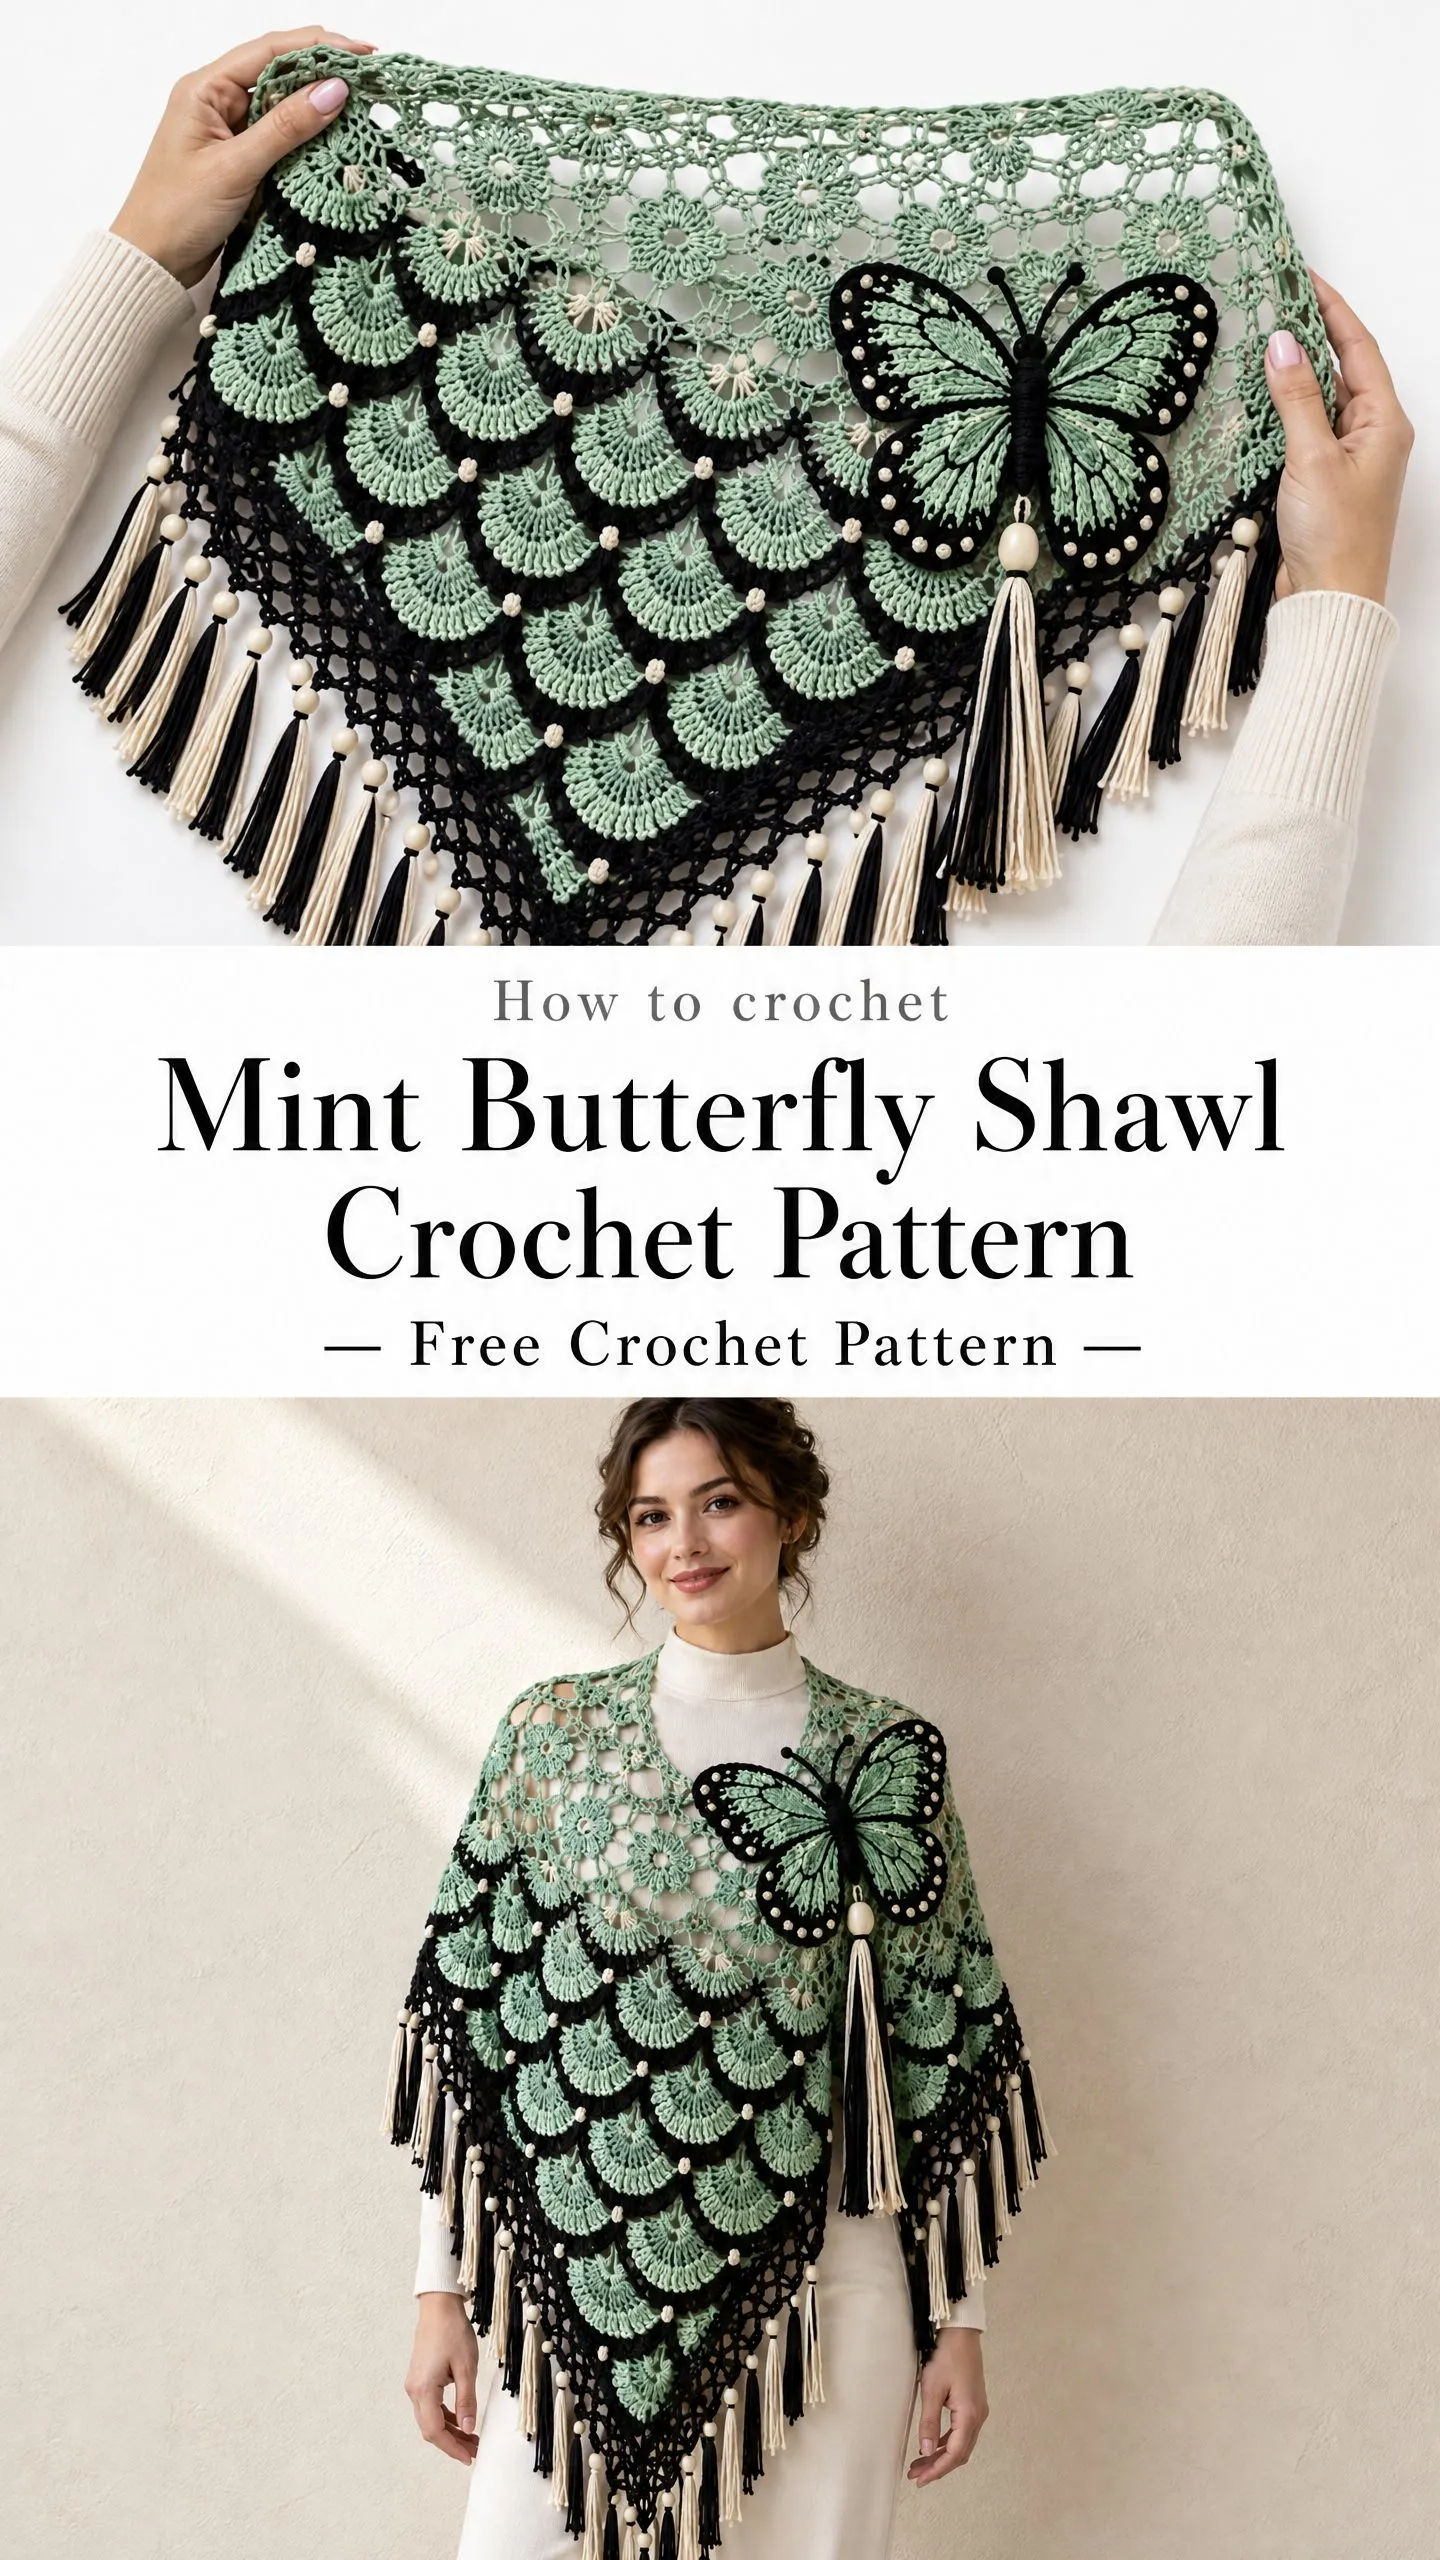
Well, that moment arrived. I named her the Mint Butterfly Shawl because she reminds me of those pale green luna moths that appear on summer evenings. She’s bold without being loud, intricate without being impossible, and absolutely stunning draped across the shoulders.
This pattern taught me that sometimes the projects we put off become our favorites. If you’ve been waiting for a sign to tackle something ambitious and beautiful, consider this your nudge.
About This Pattern
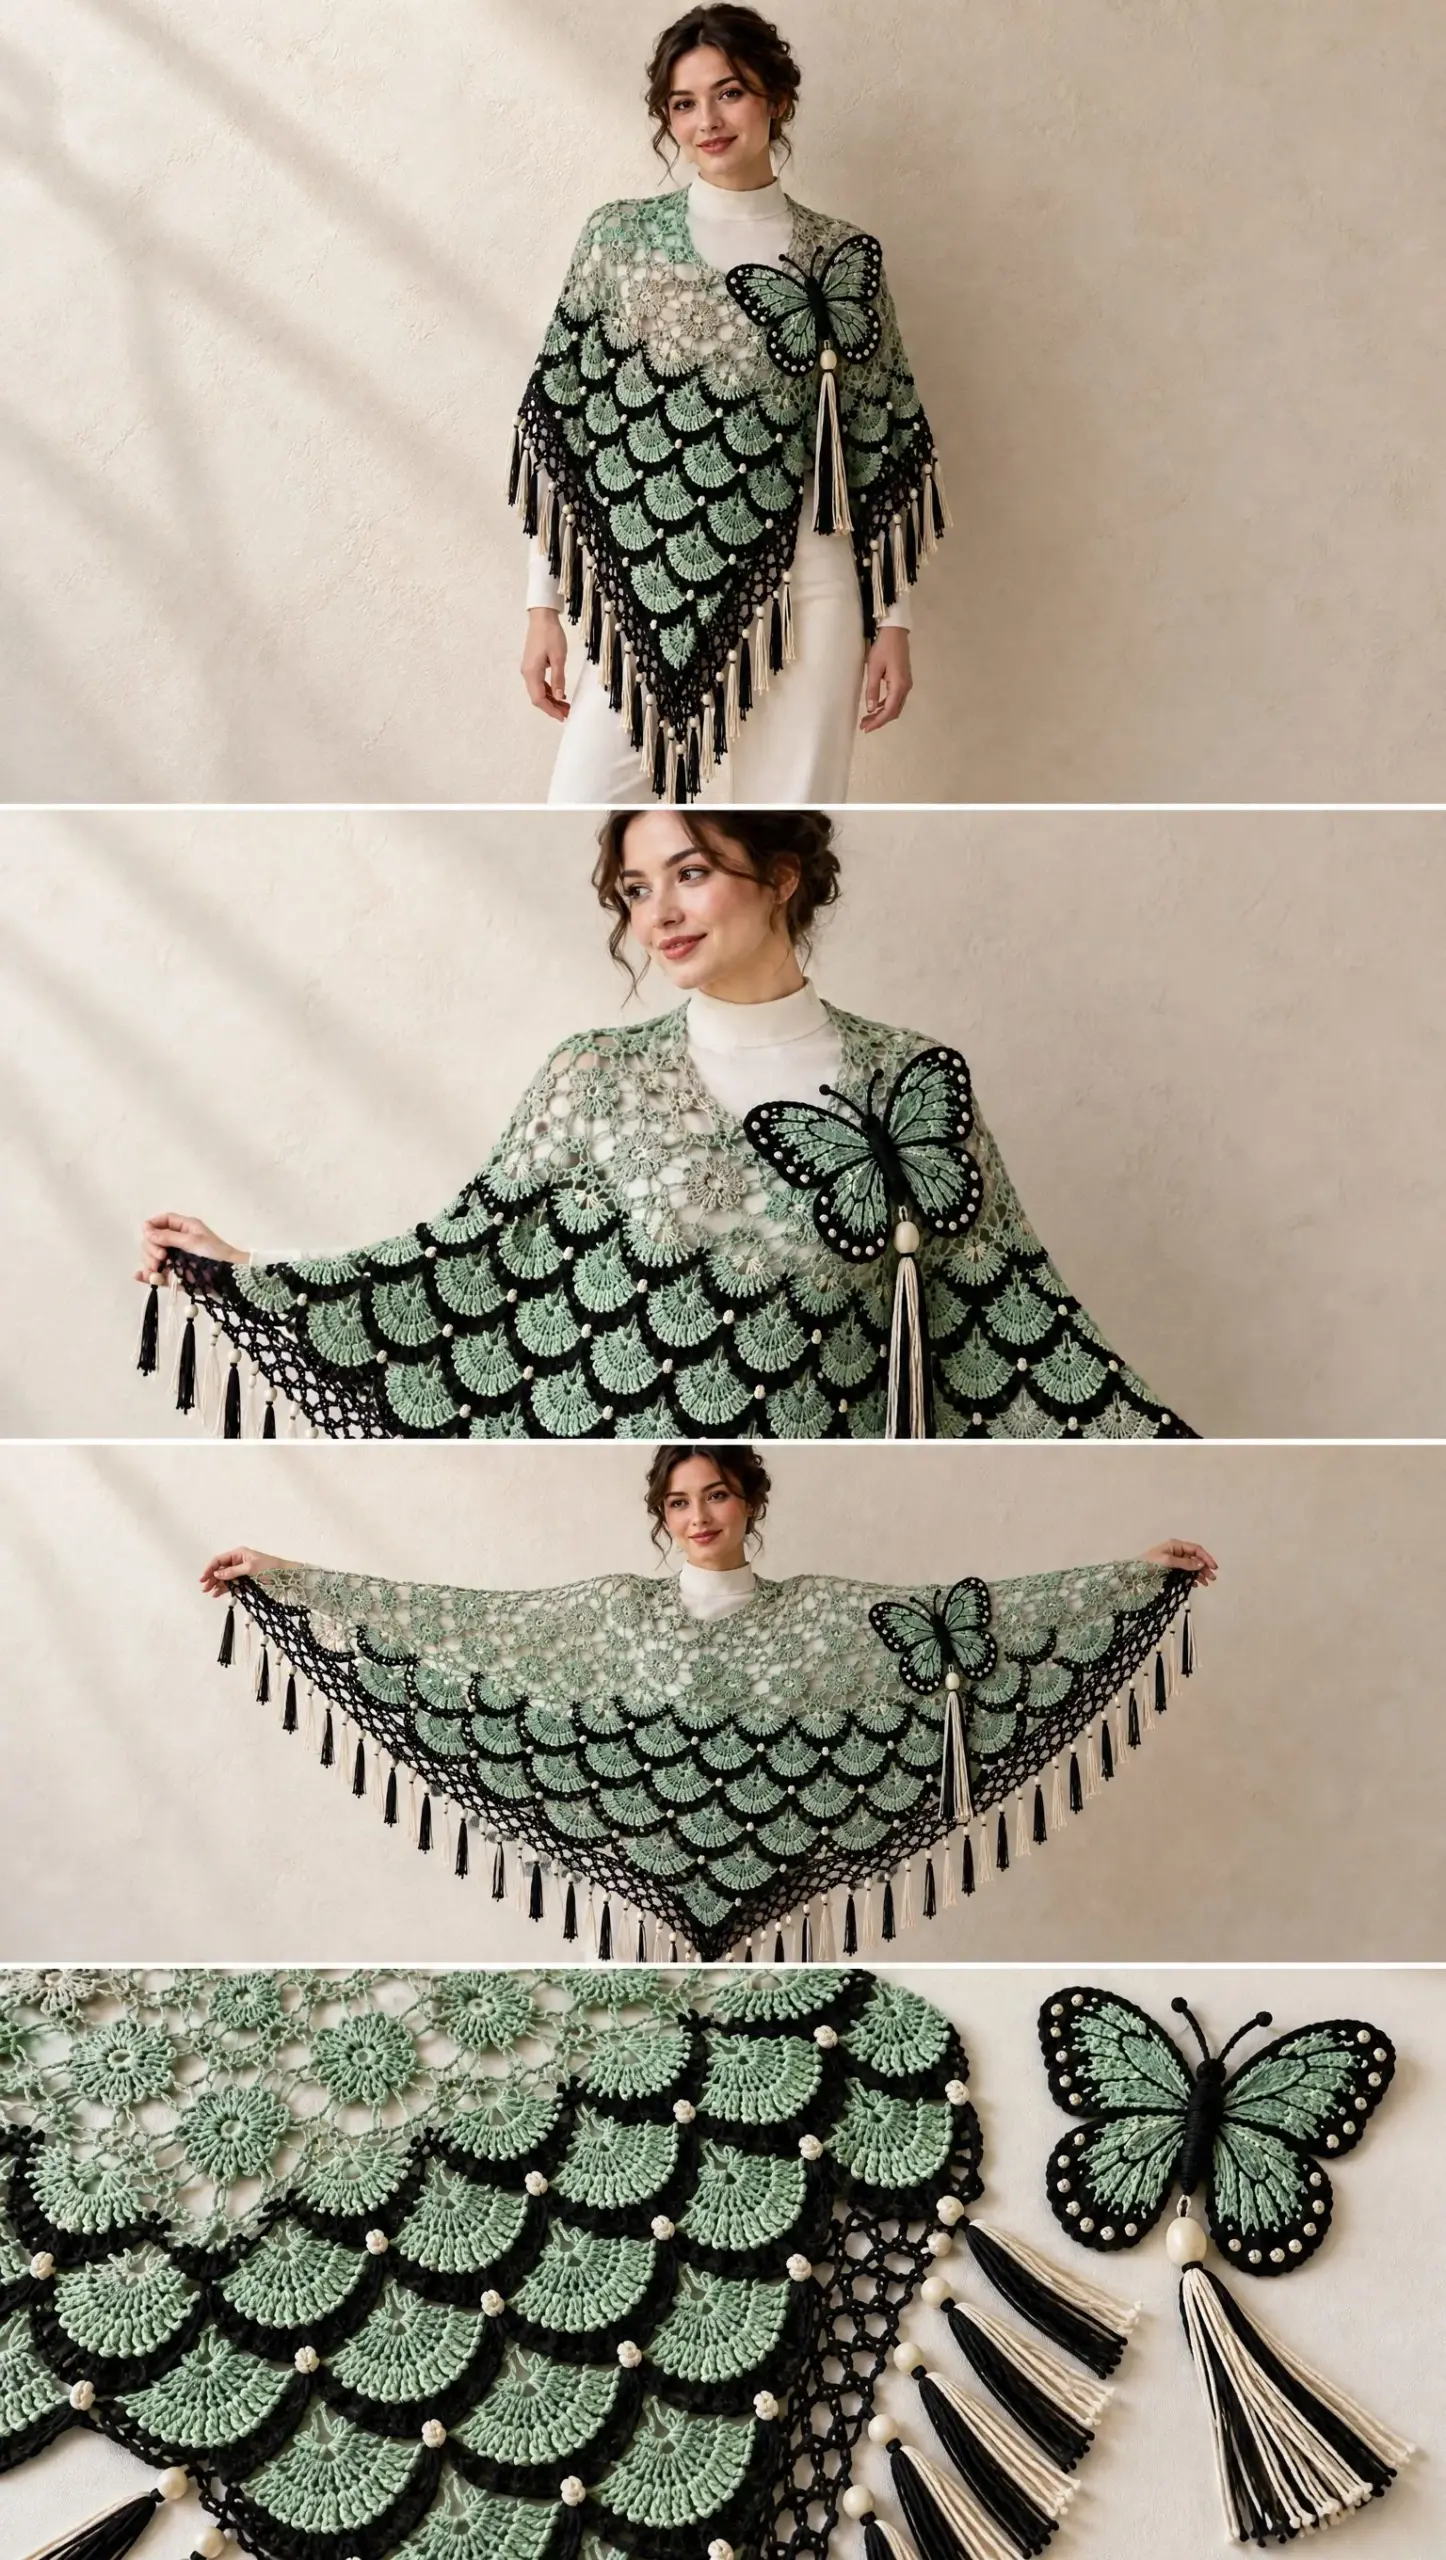
The Mint Butterfly Shawl is a triangular lace shawl built in layers. You’ll start with a mint mesh foundation worked from the top down. The upper section stays open and airy, decorated with small floral motifs. The lower section gets covered with staggered raised fan scales outlined in black. A broad black openwork border frames everything, and an oversized crocheted butterfly serves as the statement fastener.
This is an intermediate to advanced project. You should be comfortable with chain spaces (ch sp), working into row ends, surface crochet, shaping appliques, blocking lace, and sewing motifs securely. Don’t let that scare you though. If you can follow written instructions and take your time, you can absolutely make this.
Finished measurements: Approximately 150 cm / 59 inches wingspan by 78 cm / 31 inches center depth, excluding fringe.
Fit: One size, draped. Easy to scale larger or smaller by changing the number of body rows.
Construction: Top down triangular mesh base, applied overlapping fan scales, black openwork border, separate butterfly applique.
Terms: US crochet terminology throughout.
Materials You’ll Need
Gathering everything before you start makes the whole process smoother. Here’s what the pattern calls for:
Yarn (DK / light worsted weight):
Smooth cotton, cotton bamboo, or cotton acrylic blends give the clearest stitch definition. I recommend avoiding fuzzy or heavily textured yarns for this project since you want those fan scales and butterfly details to really pop.
Hooks:
Adjust hook size to achieve a fluid fabric. You want drape, not stiffness.
Beads: 20 to 30 smooth ivory beads, approximately 10 to 12 mm, with holes large enough for fringe bundles or a crochet thread carrier.
Notions: Tapestry needle, locking stitch markers, scissors, blocking mats and rustproof pins, optional sewing thread for extra butterfly reinforcement.
Gauge
Approximately 15 double crochet (dc) stitches by 8 rows equals 10 cm / 4 inches in lightly blocked fabric.
Exact gauge is not critical as long as your finished measurements are close to the target. The beauty of a shawl is that slight size variations don’t affect wearability the way a fitted garment would.
Abbreviations
Let me walk you through every abbreviation you’ll encounter:
Important: Chain 3 at the beginning of a row counts as 1 dc unless noted otherwise. Place a marker in the center ch 2 space and move it upward each row.
Construction Overview
Understanding how this shawl comes together helps you see the big picture:
| Section | Rows / Quantity | Purpose |
|---|---|---|
| Base triangle | Rows 1 to 42 | Creates full size triangular drape |
| Shoulder flower zone | Rows 5 to 18 | Open mesh with 21 attached mint flowers |
| Scale bands | 10 bands over Rows 21 to 40 | Raised overlapping lower texture |
| Outer border | 4 rounds | Broad black openwork perimeter |
| Butterfly | 4 wings plus body | Approximately 32 to 36 cm wide statement fastener |
| Fringe | Every border arch | Alternating black / ivory strands with optional beads |
Sizing Before You Begin
For the photographed proportion, aim for a center depth of 68 to 72 cm before the black border and 75 to 80 cm after blocking. If your triangle reaches that depth earlier than Row 42, stop early. If it’s smaller, continue the established base row repeat until the measurement is reached. The fan bands are then placed across the final 20 to 22 rows of your actual triangle.
Step 1: Mint Triangular Mesh Base
With mint and 4.5 mm hook, make a magic ring. The center ch 2 space forms the spine of the triangle. Do not turn the work upside down between sections. Keep the same RS facing when adding scales later.
Row 1: Ch 3, 2 dc in ring, ch 2, 3 dc in ring. Pull ring closed. Turn.
Row 2: Ch 3, 2 dc in first st, ch 1, (3 dc, ch 2, 3 dc) in center ch 2 sp, ch 1, 3 dc in top of turning ch. Turn.
Row 3: Ch 3, 2 dc in first st, ch 1, 3 dc in next ch 1 sp, ch 1, (3 dc, ch 2, 3 dc) in center ch 2 sp, ch 1, 3 dc in next ch 1 sp, ch 1, 3 dc in top of turning ch. Turn.
Rows 4 to 42: Continue in the same manner. Begin with ch 3, 2 dc in first st. Work ch 1, 3 dc in every ch 1 sp to the center. Work (3 dc, ch 2, 3 dc) in the marked center space. Mirror the second side. End with ch 1, 3 dc in the top of the turning ch. Each row adds one 3 dc group to each side.
After Row 42, do not fasten off until you confirm the size. Lightly steam or hand stretch the triangle on a flat surface. The center depth should be about 68 to 72 cm. Add or remove repeat rows if needed.
Optional Airier Shoulder Conversion
For a lighter shoulder area closer to the photographed open floral mesh, on Rows 8 to 18 replace every second 3 dc group with ch 5, sc in the next ch 1 sp, ch 5. Keep the center increases and edge groups unchanged. This creates larger windows for the flower motifs.
Step 2: Shoulder Flowers
Make 21 flowers in mint with small ivory centers. Use 4.0 mm hook. These are sewn across Rows 5 to 18, leaving open spaces between motifs.
Five Petal Flower (Make 21)
Center: With ivory, ch 2. Work 10 sc into second ch from hook. Join with sl st. Fasten off ivory.
Petals: Join mint in any sc. Ch 3, 2 tr in same st, ch 3, sl st in next sc; sl st in next sc. Rep from to 5 times total, spacing the petals around the center. Fasten off, leaving a 20 cm sewing tail.
Placement: Pin 7 flowers on each side of the upper triangle and 7 more scattered nearer the center spine. Keep roughly 3 to 5 cm between motifs and avoid creating a solid block.
Sewing: Using the mint tails, tack each petal tip to nearby chain spaces or cluster edges. Sew only enough points to hold the flower flat while preserving the open lace.
Step 3: Raised Fan Scales
The lower texture is formed by 10 staggered scale bands attached onto the mesh base. Work with the RS facing. Each band is anchored approximately two base rows below the previous band so the fans overlap.
Fan Scale Formula
Mint fan: Join mint in a chosen ch 1 space. Ch 3, 8 tr in the same space, ch 3, sl st back into the same space. This forms one rounded 9 post fan. Sl st through the base fabric to the next selected space before starting the next fan.
Black outline: With black and RS facing, join at one lower corner of a fan. Work 1 sc around each of the 9 tall posts along the curved edge, placing (sc, ch 2, sc) around every third post to create the bold scalloped contour. Fasten off at the opposite lower corner.
Scale Band Placement
| Band | Anchor Around Base Row | Fan Placement |
|---|---|---|
| 1 | 21 | Begin 2 spaces from left edge; fan in every 2nd ch 1 space to 2 spaces before right edge |
| 2 | 23 | Offset by 1 space so fans sit between Band 1 fans |
| 3 | 25 | Same alignment as Band 1 |
| 4 | 27 | Same alignment as Band 2 |
| 5 | 29 | Same alignment as Band 1 |
| 6 | 31 | Same alignment as Band 2 |
| 7 | 33 | Same alignment as Band 1 |
| 8 | 35 | Same alignment as Band 2 |
| 9 | 37 | Same alignment as Band 1 |
| 10 | 39 to 40 | Center the final fans closely around the lower point |
The exact number of fans per band depends on your gauge. Prioritize even spacing and symmetry. Each fan should overlap the band below by about one third of its height.
Step 4: Ivory Scale Accents
Use ivory and a tapestry needle or 4.0 mm hook. Add short accent stitches to selected fan tips rather than every fan.
1. Choose approximately every third fan, alternating positions between rows.
2. For a crocheted accent, join ivory around the black edging near the center of the fan, ch 2, sl st around the next black edge stitch, ch 2, sl st around the next stitch. Fasten off.
3. For a stitched accent, make 2 to 3 short vertical satin like stitches over the black edge at the fan center. Keep all ends hidden on the WS.
Step 5: Broad Black Openwork Border
Work the border along both diagonal sides and around the lower point. Leave the top shoulder edge unbordered for a softer drape. Join black at one upper corner with RS facing.
Round 1: Work sc evenly along the side. Approximately 2 sc around each row end dc and 1 sc in each chain space. At the lower point, work 3 sc in the point. Continue up the opposite side. Adjust slightly so the edge lies flat, not ruffled.
Round 2: Ch 1, sc in first st, ch 5, skip 3 sts, sc in next st across. At the lower point, use ch 5 arches with only 2 skipped sts so the curve turns cleanly.
Round 3: Sl st into first ch 5 sp. Ch 1, 5 sc in ch 5 sp, ch 3, skip next sc around. At the center point, work 7 sc into the point arch.
Round 4: Ch 1, sc in next sc, ch 3, skip 1 sc across each 5 sc group. In each ch 3 gap between groups work (sc, ch 5, sc). Fasten off black and weave ends.
Ivory Border Highlights
Join ivory in every fourth large ch 5 loop of Round 4 and work (sc, ch 2, sc) into the loop. Space these accents irregularly enough to look hand placed, but balance the left and right sides.
Step 6: Fringe and Beads
Cutting: Cut black and ivory strands 72 cm / 28 inches long. Each folded bundle becomes roughly 35 cm / 14 inches fringe. Prepare approximately 55 to 70 bundles, depending on border spacing.
Bundles: For most points use 2 strands of one color per bundle. Fold in half, pull the fold through a border loop with the hook, then draw the four loose ends through the fold and tighten.
Alternation: Alternate black and ivory around the perimeter. At the center point, use a slightly fuller bundle of 3 black plus 2 ivory strands for extra weight.
Beads: On every fourth ivory bundle, thread one smooth ivory bead onto two center strands before tightening the final trim. Knot below the bead if needed so it cannot slide off.
Trim: Hang the shawl for several minutes, then trim fringe to an even 33 to 36 cm length. Leave the center point fringe 2 to 4 cm longer for a tapered silhouette.
Step 7: Oversized Mint and Black Butterfly
Finished target width: 32 to 36 cm / 12.5 to 14 inches. Crochet four separate mint wings, outline them in black, add surface crochet veins, then sew them to a thick black body. Use the 4.0 mm hook so the applique is firmer than the shawl.
Upper Wing (Make 2 in Mint)
Round 1: Ch 11. Starting in second ch from hook: sc 2, hdc 2, dc 3, tr 2, 7 tr in last ch. Working down the opposite side of the foundation chain: tr 2, dc 3, hdc 2, sc 2. Join to first sc.
Round 2: Ch 1. Sc in next 3 sts, hdc in next 3, 2 dc in each of next 3 sts, (2 tr in each of next 5 sts), 2 dc in each of next 3 sts, hdc in next 3, sc in remaining sts. Join. The outer end should broaden into an oval wing tip.
Round 3: Ch 1. Work sc evenly around, placing 2 sc in every second stitch around the outermost third of the wing and 1 sc per stitch elsewhere. Fasten off mint.
Black edge: Join black at the narrow inner base. Sc in next 2 sts, (sc, ch 2, sc) in next st around the outer edge, finishing at the opposite side of the base. Leave the inner base plain for sewing.
Lower Wing (Make 2 in Mint)
Round 1: Ch 8. Starting in second ch: sc 2, hdc 2, dc 2, 6 tr in last ch; work back along opposite side with dc 2, hdc 2, sc 2. Join.
Round 2: Ch 1, sc in next 3, hdc in next 2, 2 dc in each of next 2, 2 tr in each of next 4, 2 dc in each of next 2, hdc in next 2, sc around remaining sts. Join.
Round 3 plus edge: Work one mint sc round, increasing around the broad tip as needed to keep flat. Finish with the same black scalloped edging as the upper wings.
Black Branching Veins
With black and RS facing, surface sl st from each wing base toward the outer edge. Make one main curved vein and 3 to 4 shorter branches on each upper wing. Make one main vein and 2 to 3 branches on each lower wing. Keep the surface loops relaxed so the wings remain flat.
Ivory Dots
Add 6 to 10 small ivory French knot like stitches or tiny surface chain accents around each upper black wing edge and 3 to 5 around each lower wing. Do not crowd the outline.
Step 8: Butterfly Body, Antennae, and Hanging Tassel
Body
1. With black, ch 24. Starting in second ch, sc across. Ch 1, turn, sc across for 5 rows total.
2. Fold the strip lengthwise and whipstitch the long edges together to form a narrow padded cord. Lightly stuff with yarn scraps only if needed for shape. Taper both ends by pulling the seam firmly.
3. Lay the two upper wings behind the body and the two lower wings beneath them. Overlap the inner wing bases by 1 to 2 cm. Sew through all layers with black yarn, keeping stitches hidden on the back.
Antennae
Join black at the top of the body. Ch 10, sl st back down the chain, sl st to body. Repeat for second antenna. Curve gently with steam or finger shaping.
Mixed Black and Ivory Tassel
1. Cut 18 strands, each 36 cm long: 10 black and 8 ivory. Bundle evenly.
2. Thread the center of the bundle through a pale oval bead or bead cap if the opening permits. Otherwise wrap the bundle top with ivory yarn for 1.5 cm to imitate a pale cap.
3. Fold the bundle and tie firmly. Wrap the neck 8 to 10 times with black, knot securely, and trim to approximately 16 cm.
4. Sew the tassel directly beneath the butterfly body so it hangs freely without pulling the wing edges.
Step 9: Attach the Butterfly to the Shawl
Place the shawl on a dress form or on the wearer over an opaque top. Arrange the triangle as a broad asymmetric V. Position the butterfly on the upper right chest, about 12 to 18 cm below the shoulder edge and slightly inward from the right side.
1. Pin the butterfly at the body and at the four inner wing bases only. Keep the outer wing edges free for a three dimensional look.
2. With black yarn, stitch the butterfly body firmly through the shawl mesh at 5 to 7 points.
3. With mint yarn, tack each wing base to at least two separate mesh intersections. Avoid attaching across large unsupported chain arches.
4. For a removable fastening, sew two small clear snaps or a brooch back bar to the rear of the butterfly, reinforced with felt or dense crochet patches. If using a brooch mechanism, keep it covered from the skin by the garment beneath.
The butterfly should sit flat enough to be secure but not be stretched. Its visual width should be about one third of the shawl width across the chest.
Step 10: Finishing and Blocking
1. Weave in every end on the WS, changing direction at least once. For fan scale ends, weave through the dense base of the fan rather than the open mesh.
2. Hand wash gently in cool water with a small amount of wool safe or delicate detergent. Do not wring.
3. Roll in a towel to remove excess water. Pin the shawl to finished measurements, opening the upper mesh and shaping every black border arch.
4. Shape the fan scales individually so they overlap smoothly and the black outlines remain visible.
5. Block the butterfly separately if it is removable. If sewn on permanently, support the wings with pins while drying.
6. When completely dry, comb the fringe with fingers and trim only obvious uneven ends.
Adjustment Guide
| Goal | Adjustment |
|---|---|
| Smaller shawl | Stop the base triangle 4 to 6 rows earlier; use 8 scale bands instead of 10; shorten fringe to 28 to 30 cm |
| Larger shawl | Add base rows until desired depth; continue scale bands every 2 rows; maintain 2 to 3 blank spaces at side edges |
| More dramatic scales | Use 11 tr per fan instead of 9; reduce fan frequency slightly to prevent crowding |
| Lighter shawl | Use sport weight yarn and a 4.0 mm hook; make fewer fan bands or alternate scale rows with open mesh |
| More black contrast | Add a second black surface slip stitch line just inside each fan edge and make every third fringe bundle black heavy |
| Fewer beads | Place beads only around the lower 30 cm of each side and at the center point |
Maker Checklist
Before you call this project complete, run through this list:
Care Instructions
Hand wash cool, reshape while damp, dry flat. Store folded rather than hanging long term to prevent the fringe and butterfly from stretching the mesh.
Final Thoughts on This Crochet Pattern
This Mint Butterfly Shawl crochet pattern is one of those projects that looks impossibly complex but breaks down into manageable steps. The layered construction means you’re never tackling too much at once. First the base, then the flowers, then the scales, then the border, then the butterfly. Each piece builds on the last.
Take your time with the butterfly. She’s the star of the show, and those surface crochet veins really bring her to life. If you’ve never done surface crochet before, practice on a swatch first. It’s just slip stitches worked through the fabric from the front, and once you get the rhythm, it goes quickly.
The color combination of mint, black, and ivory creates such a striking contrast. But this pattern would be gorgeous in other colorways too. Imagine dusty rose with charcoal and cream, or golden yellow with navy and white. The design is versatile enough to make your own.
Thank you so much for choosing this pattern. I hope you love making it as much as I loved designing it. If you create your own Mint Butterfly Shawl, I would absolutely love to see it. Tag me on Instagram or share in our Facebook group. Nothing makes my day like seeing your finished projects.
If this pattern caught your eye, go ahead and save it to your Pinterest boards so you can find it when you’re ready to cast on. And please drop a comment below if you make one. I’d love to hear how it turns out for you!
Want a Quick & Easy Printable Version?
Get a clean, beautifully formatted PDF of this pattern — easy to follow step by step, ready to print or save on any device. No scrolling, no distractions, just the pattern.
Get the Printable PDF →