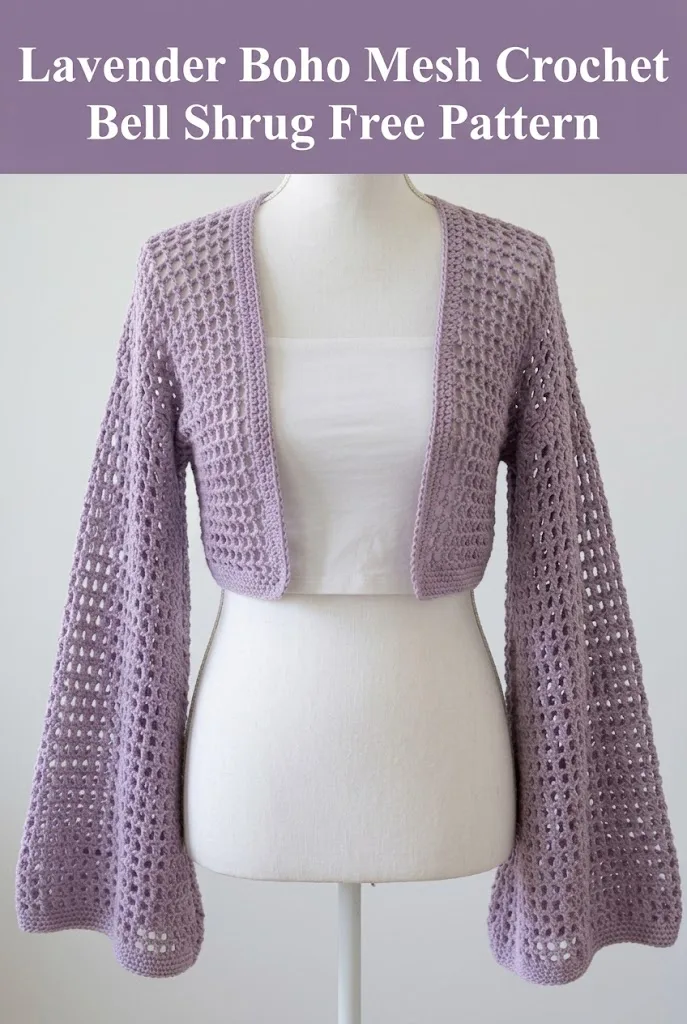
THIS is one of those patterns that looks way more complicated than it actually is, and I am SO excited to share it with you! You can whip up this gorgeous boho bell shrug in a weekend, and trust me when I say the compliments will roll in like you spent weeks on it. The dramatic bell sleeves? Chef’s kiss. The open mesh construction? Absolutely stunning. If you have ever wanted to make a statement piece that works up FAST and impresses everyone, this lavender beauty is your new best friend. This is hands down one of my favorite garment patterns because it delivers maximum impact with minimal stress.
Why You Will Love This Crochet Shrug Pattern
This crochet bell sleeve shrug combines everything I adore about boho fashion. The open mesh stitch creates beautiful drape and breathability, making it perfect for layering over tank tops, dresses, or even swimwear during those transitional weather months. The cropped length hits right at the natural waist, which flatters so many body types.
What really sets this crochet pattern apart is the construction method. You will work the body as two flat panels that join at the back, then pick up stitches to create those show-stopping bell sleeves. No complicated shaping, no fussy seaming of curved pieces. Just straightforward crochet that builds into something truly special.
The lavender colorway feels fresh and modern, but this shrug would be equally stunning in cream, sage, dusty rose, or even a bold black for evening wear. Pick your favorite and make it your own.
Skill Level
Intermediate beginner to intermediate. If you can chain, single crochet, and double crochet with confidence, you are ready for this project. The mesh stitch pattern repeats quickly and becomes almost meditative once you get going.
Materials Needed
Yarn: Approximately 600 to 800 yards of light worsted weight yarn (category 3). I recommend a cotton blend or bamboo blend for beautiful drape. A 100% acrylic would also work well and be easier to care for. Look for a yarn with a soft hand since this garment sits directly against your skin.
Suggested yarn: Lion Brand Truboo, Paintbox Yarns Cotton DK, or Hobbii Rainbow Cotton 8/4 held double.
Crochet Hook: Size H/8 (5.0mm) or size needed to obtain gauge.
Additional Supplies:
Gauge
14 stitches and 8 rows = 4 inches in mesh pattern after light blocking.
Gauge matters for garments! Take time to make a small swatch before diving in. If your swatch is too small, go up a hook size. Too large? Go down a hook size.
Finished Measurements
This pattern is written for size Small/Medium with notes for adjusting.
Abbreviations and Stitch Definitions
Let me walk you through every stitch you will need. No surprises here.
Ch = Chain. Wrap yarn over hook and pull through the loop on your hook. This creates one chain stitch.
Sl st = Slip stitch. Insert hook into stitch, yarn over, pull through both the stitch and the loop on your hook in one motion. Used for joining and moving across stitches without adding height.
Sc = Single crochet. Insert hook into stitch, yarn over and pull up a loop (2 loops on hook), yarn over and pull through both loops.
Dc = Double crochet. Yarn over, insert hook into stitch, yarn over and pull up a loop (3 loops on hook), yarn over and pull through 2 loops (2 loops remain), yarn over and pull through remaining 2 loops.
Ch-sp = Chain space. The gap or hole created by chaining between stitches. You will work into these spaces, not into the chain stitches themselves.
Sk = Skip. Pass over the indicated stitch or space without working into it.
Special Stitch: Mesh Pattern
The mesh pattern creates those beautiful open squares you see throughout this shrug. Here is how it works:
(Dc, ch 1, sk 1) across your row. Each double crochet is separated by one chain and one skipped stitch. When you work the next row, you place your double crochets into the chain spaces from the previous row.
This creates a grid-like fabric that is lightweight, has gorgeous drape, and lets air flow through. Perfect for a layering piece.
Pattern Notes Before You Begin
Do not worry if the body pieces look small before seaming. The mesh opens up beautifully with wear and light blocking.
Crochet Pattern Instructions
Right Front and Back Panel
Foundation Row: Ch 62.
Row 1: Dc in 4th ch from hook (skipped chains count as first dc), *ch 1, sk 1 ch, dc in next ch*, repeat from * to * across. Turn. (30 dc, 29 ch-1 spaces)
Row 2: Ch 3 (counts as dc), *dc in next ch-sp, ch 1*, repeat from * to * across, ending with dc in top of turning chain. Turn. (30 dc, 29 ch-1 spaces)
Rows 3 through 24: Repeat Row 2.
Your panel should measure approximately 17 inches wide and 12 inches tall at this point. If you need more length for your torso, add additional rows here.
Fasten off and weave in ends.
Left Front and Back Panel
Work exactly the same as the Right Front and Back Panel.
Joining the Body
Lay both panels flat with wrong sides facing up. The panels will overlap at center back.
Using your yarn needle and a length of yarn, whip stitch or mattress stitch the back seam. Join approximately 6 inches from the top edge on each side, leaving the center back open and the armholes open.
You should now have:
Try the body on at this point. The front edges should hang open in that beautiful boho shrug style. Adjust your seaming if needed.
Bell Sleeves (Make 2)
Here comes the fun part! Those dramatic bell sleeves are easier than they look.
Round 1: With right side facing, join yarn at the underarm seam. Ch 3 (counts as dc), work 59 dc evenly around the armhole opening, working into the row ends of your mesh panels. Sl st to top of ch-3 to join. (60 dc)
*Tip: To space your stitches evenly, place approximately 2 dc per row end. Adjust as needed to reach 60 stitches total.*
Round 2: Ch 3 (counts as dc), *ch 1, sk 1 st, dc in next st*, repeat from * to * around, ending with ch 1, sl st to top of ch-3 to join. (30 dc, 30 ch-1 spaces)
Rounds 3 through 8: Ch 3, *dc in ch-sp, ch 1*, repeat from * to * around, sl st to join. (30 dc, 30 ch-1 spaces)
Now we begin increasing for the bell shape. This is where the magic happens.
Round 9 (Increase Round): Ch 3, *dc in ch-sp, ch 1, dc in same ch-sp, ch 1*, repeat from * to * around, sl st to join. (60 dc, 60 ch-1 spaces)
Rounds 10 through 16: Ch 3, *dc in ch-sp, ch 1*, repeat from * to * around, sl st to join. (60 dc, 60 ch-1 spaces)
Round 17 (Increase Round): Ch 3, *(dc, ch 1, dc) in ch-sp, ch 1*, repeat from * to * around every other ch-sp (increase in alternating spaces), sl st to join. (90 dc, 90 ch-1 spaces)
Rounds 18 through 24: Ch 3, *dc in ch-sp, ch 1*, repeat from * to * around, sl st to join. (90 dc, 90 ch-1 spaces)
Sleeve Border
Final Round: Ch 1, sc in each dc and each ch-sp around. Sl st to first sc to join. (180 sc)
Fasten off and weave in ends.
Repeat for second sleeve.
Front Edge Border
This simple border gives the front opening a polished, finished look.
Row 1: With right side facing, join yarn at bottom right front corner. Work sc evenly up the right front edge, across the back neckline, and down the left front edge. Work approximately 2 sc per row end and 1 sc in each stitch across the back neck.
Fasten off and weave in all remaining ends.
Finishing Your Crochet Bell Shrug
Blocking: Wet block or steam block your finished shrug to open up the mesh pattern and even out your stitches. Lay flat on a blocking mat, gently stretch to measurements, and allow to dry completely.
Weave in all ends securely. With an open mesh pattern, loose ends are more visible, so take your time here.
Sizing Adjustments
For a larger size: Add multiples of 2 to your foundation chain. For every 2 chains added, you gain approximately half an inch in width. You may also want to add rows to the body length and increase more aggressively in the sleeve rounds.
For a smaller size: Subtract multiples of 2 from your foundation chain. Work fewer rows if needed for a shorter cropped length.
For longer sleeves: Simply add more rounds before the final border round.
Styling Your Boho Mesh Shrug
This versatile layering piece works beautifully over:
The cropped length pairs especially well with high-waisted bottoms. And those bell sleeves? They photograph like a dream.
Care Instructions
For best results, hand wash in cool water with a gentle detergent. Lay flat to dry. If using acrylic yarn, you may machine wash on gentle and tumble dry low, but always check your specific yarn label recommendations.
I really hope you love making this lavender boho mesh crochet bell shrug as much as I loved designing it. It is one of those projects that feels special from the very first row. If you make one, please save this pattern to your Pinterest boards so you can find it again easily, and I would absolutely love to see your finished shrug! Drop a comment below and share your color choices or any modifications you made. Happy crocheting, friend!
