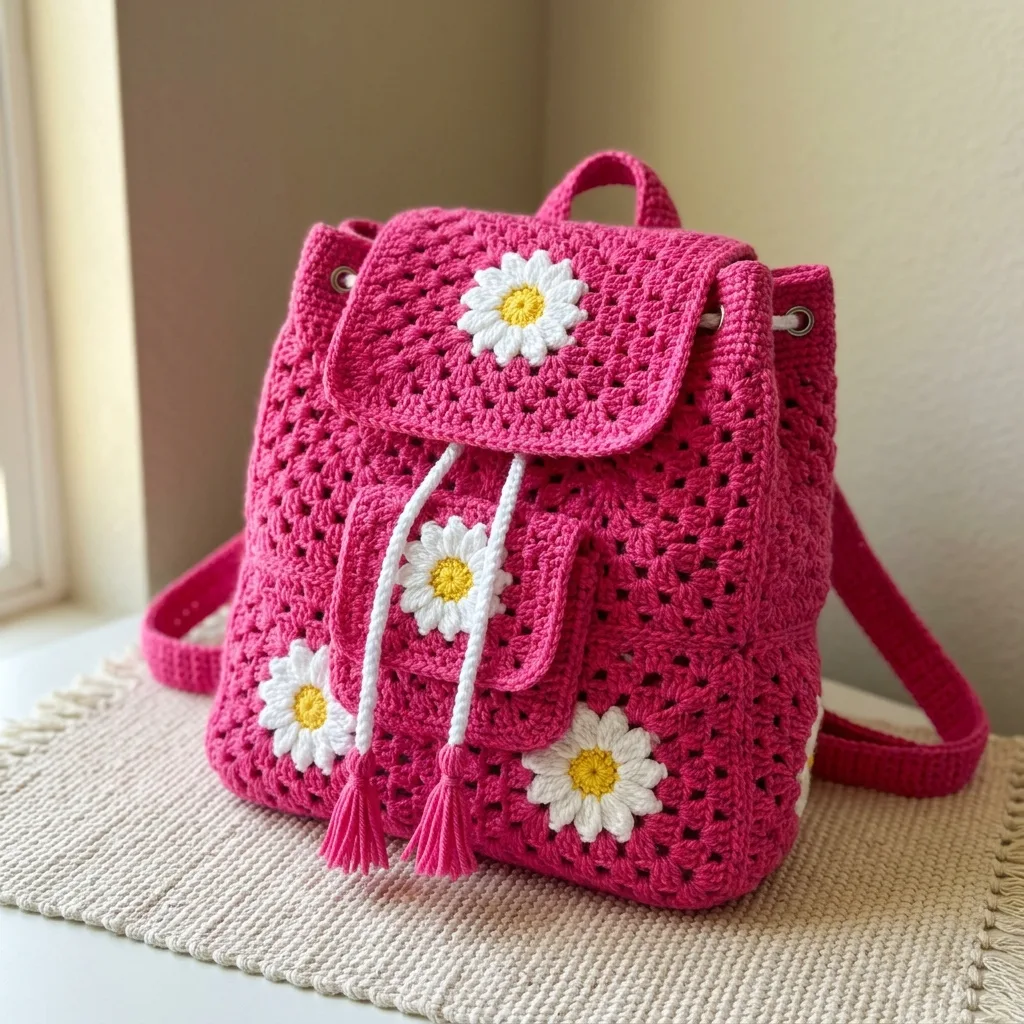
This backpack uses a classic dc shell stitch, simple daisy appliqués, and basic assembly techniques. The pattern is rated intermediate, but if you can work double crochet and follow a repeat, you can absolutely make this. Expect about 8 to 12 hours of work for a finished bag that measures 28 cm tall, 25 cm wide, and 13 cm deep.
Get the Ad-Free PDF Pattern
You can find the free pattern below, or you can purchase the ad-free printable PDF from my shop.
Get the Printable PDF →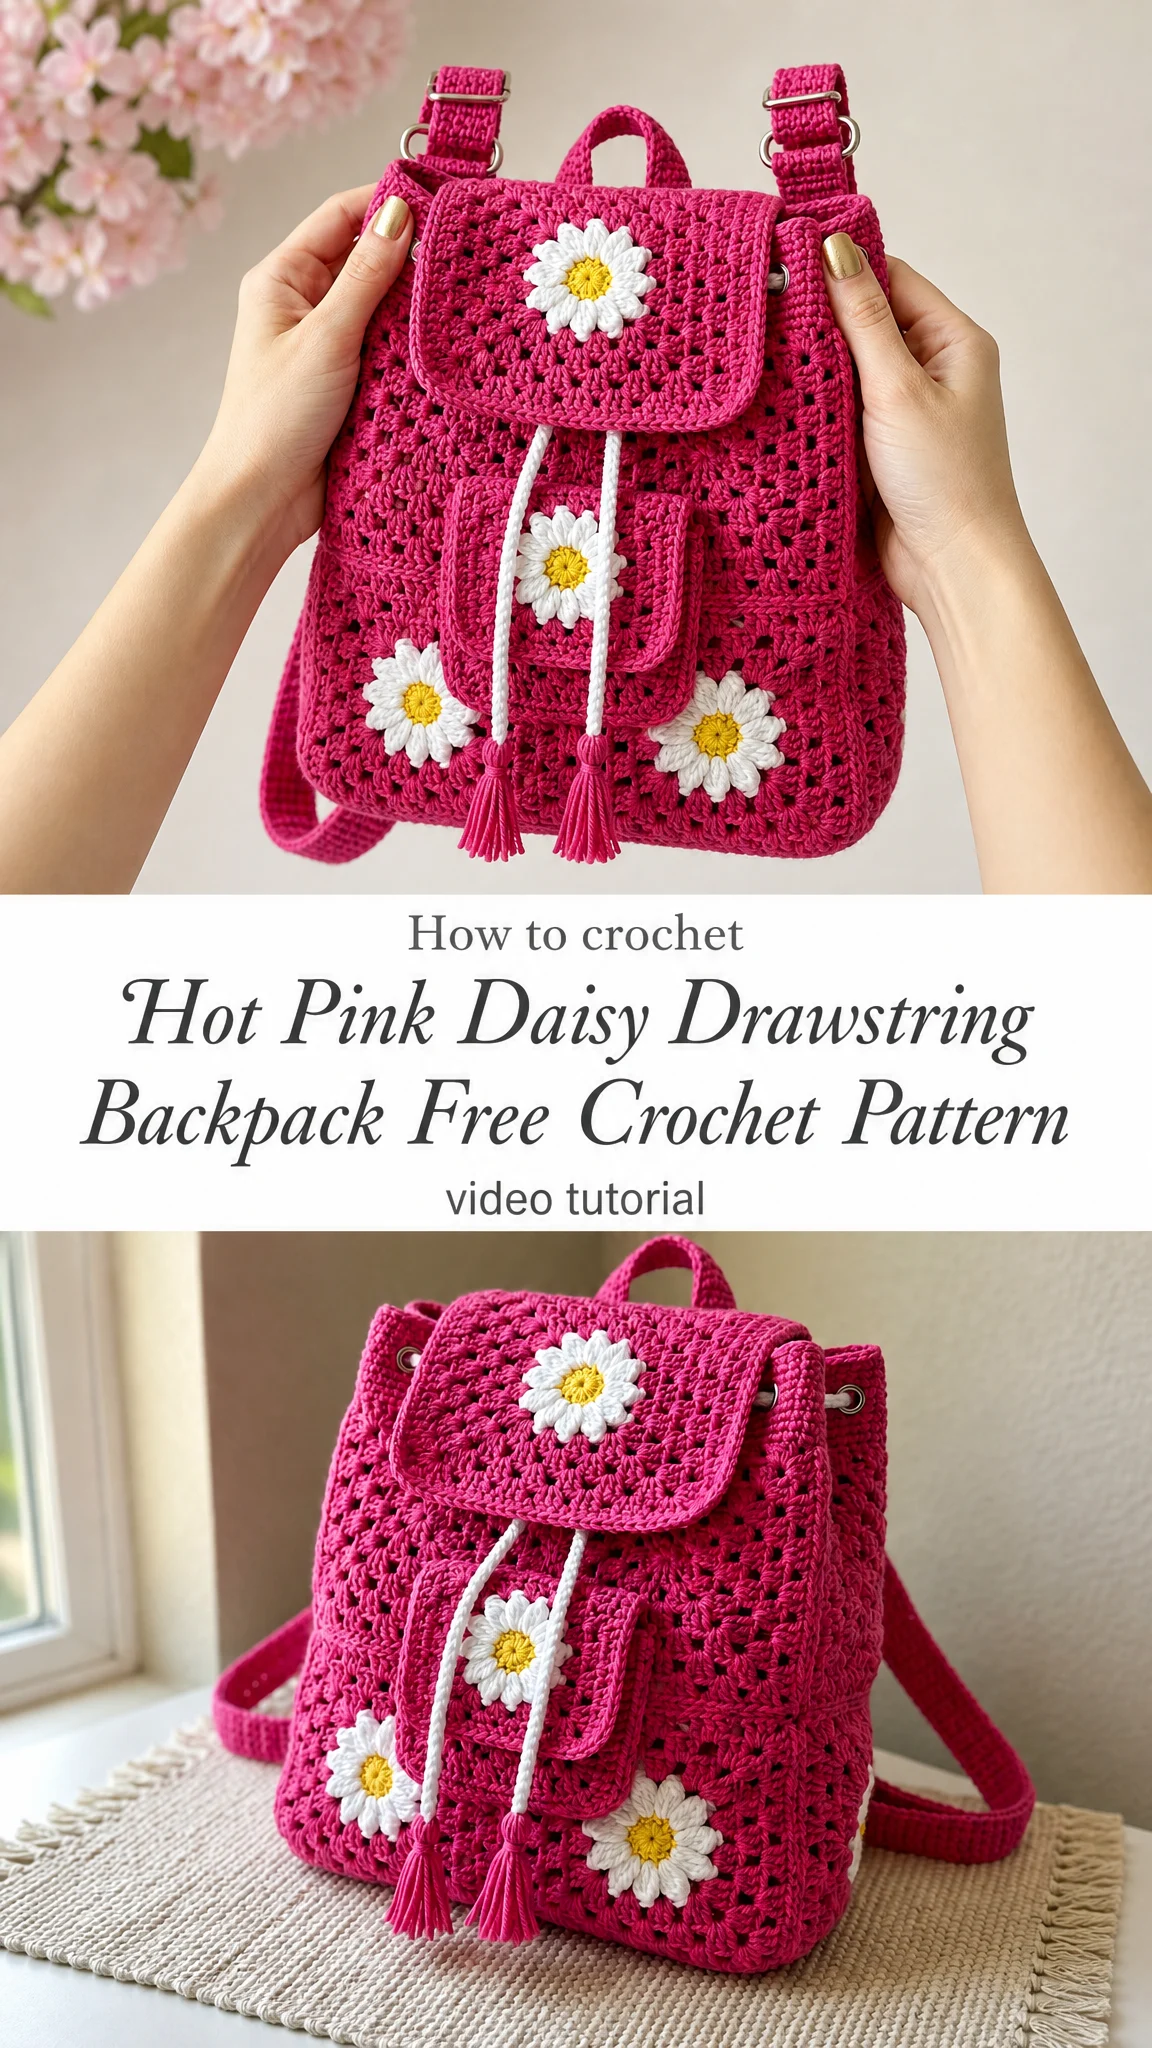
Why You Will Love This Pattern
The hot pink daisy drawstring backpack combines cheerful summer vibes with practical everyday function. The open shell stitch creates a lightweight texture that is perfect for warm weather, while the sturdy single crochet straps provide durability where it counts. Five daisy appliqués add a playful touch without overwhelming the design. This bag works beautifully as a casual day pack, a beach bag, or a fun gift for the flower lover in your life.
Materials You Will Need
Before you start, gather everything so you can work uninterrupted.
Yarn:
Hook:
Additional Supplies:
Any standard worsted weight yarn will work for this project. Just make sure to check your gauge and maintain consistent tension throughout so all your panels line up during assembly.
Gauge
Getting gauge right matters for this project because you are sewing multiple panels together at the end.
Gauge (dc shell stitch): 4 shells x 6 rows = 10 cm x 10 cm (4 in x 4 in)
Take time to make a small swatch before diving in. If your swatch is too big, try going down a hook size. If it is too small, go up a hook size.
Finished Dimensions
Abbreviations
Here are all the abbreviations used in this pattern. If you are new to reading crochet patterns, bookmark this section.
The dc shell is the star of this pattern. You will work 2 double crochets, chain 1, then 2 more double crochets all in one spot. This creates a pretty fan shape with small openings between shells.
Pattern Instructions
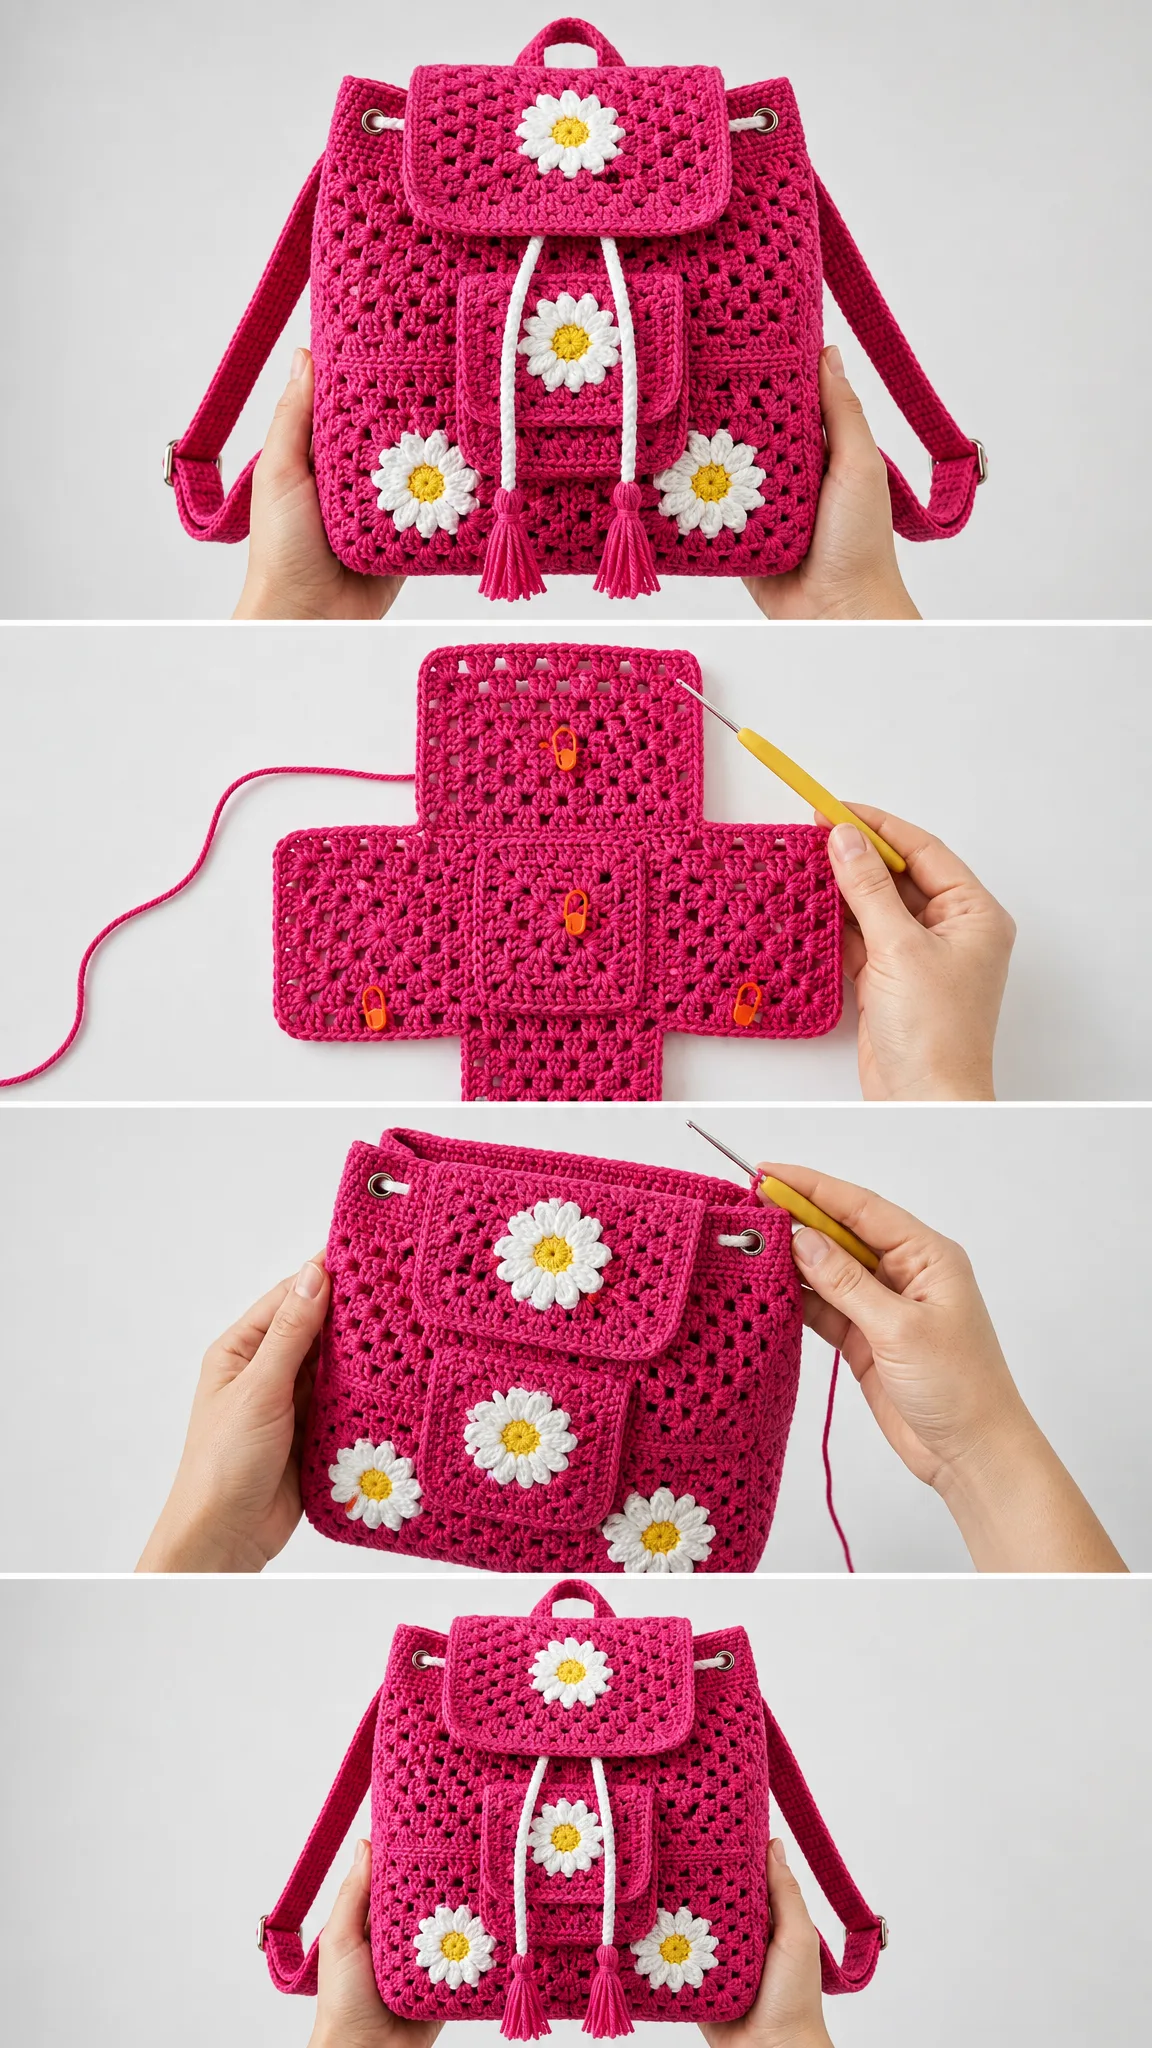
1. Main Body Panel
The body is worked flat in rows using the dc shell stitch. You will make two identical panels (front and back) or one long rectangle that you fold in half.
Base Chain: With pink yarn, chain 38.
Row 1: Dc in 4th ch from hook, ch 1, 2 dc in same ch. This creates your first shell. *Skip 3 chs, dc shell in next ch. Repeat from * across to last 2 chs, skip 1 ch, dc in last ch. Turn.
Rows 2 through 24: Ch 3 (this counts as your first dc). *Work dc shell in the ch-1 space of the previous row’s shell. Repeat from * across to end. Dc in top of turning ch-3. Turn.
Continue until you have completed 24 rows or your panel measures approximately 28 cm (11.0 inches) tall. Fasten off.
Tip: You can either create two separate identical panels, or work 48 continuous rows and fold the rectangle in half. Both methods work well.
2. Flap
The flap covers the top opening and holds one of your daisy appliqués.
Row 1: With pink yarn, chain 22. Work dc shell in 4th ch from hook. *Skip 3 chs, dc shell in next ch. Repeat from * across to last 2 chs, skip 1 ch, dc in last ch. Turn.
Rows 2 through 10: Continue the shell sequence until your flap measures approximately 12 cm in length.
Border: Work 1 row of sc evenly around three exterior edges of the flap (the two sides and the bottom). This creates a clean, finished edge. Fasten off.
3. Front Pocket
The pocket sits on the front panel and features its own daisy appliqué.
Row 1: With pink yarn, chain 18. Work dc shell stitch patterns across.
Continue for 8 rows total.
Border: Finish with a clean sc border around all edges. Fasten off, leaving a long yarn tail for sewing the pocket onto the body later.
4. Shoulder Straps (Make 2)
The straps are worked in dense single crochet rows for maximum strength and durability. These need to hold up to daily use, so keep your tension firm and even.
Row 1: With pink yarn, chain 7. Sc in 2nd ch from hook and in each ch across. Turn. [6 sc]
Rows 2 through 120 (or desired length): Ch 1, sc in each st across. Turn.
Fasten off when your strap reaches your desired length. Thread the ends through metal strap adjusters as shown in the construction overview diagram included in the pattern.
Note: 120 rows creates a standard length, but feel free to adjust based on who will wear the backpack. You can always make them longer and trim later.
5. Daisy Appliqué (Make 5)
These cheerful daisies are worked in two quick rounds. You will need 5 total: one for the flap, one for the pocket, and three for the lower front body.
Round 1 (Center): Using yellow yarn, make a magic ring. Ch 1, work 12 sc into the ring. Sl st to first sc to join. Fasten off yellow. [12 sc]
Round 2 (Petals): Attach white yarn to any sc. *Ch 3, 2 dc in same st, ch 3, sl st into same st. Sl st into next st. Repeat from * around to create 12 distinct daisy petals. Fasten off, leaving a long tail for sewing.
Magic ring tip: If magic rings feel tricky, you can substitute ch 4 and sl st to first ch to form a ring instead. The center will be slightly looser but still looks lovely.
6. I-Cord Drawstring
Using white yarn, create a sturdy cord measuring approximately 85 cm (33.5 inches) long. You can use a traditional i-cord technique with double-pointed needles, or crochet a simple chain and work sl st back through each chain for a denser cord.
Finish the ends with handmade pink yarn tassels. Knot them securely so they do not pull through the eyelets during use.
Assembly and Sewing Notes
Now comes the satisfying part: putting it all together. Take your time with assembly. Neat seams make a big difference in the finished look.
1. Panel Joining: Sew the front and back body sections together along the bottom base and both sides. Use a whip stitch or mattress stitch, keeping your seams hidden on the inside.
2. Pocket and Flap: Center the front pocket on the front body panel. Pin it in place if helpful, then stitch around the sides and bottom, leaving the top open. Sew the top flap securely along the upper back edge of the bag.
3. Daisy Attachment: Sew one daisy appliqué onto the center of the flap. Sew one onto the center of the pocket. Space the remaining three daisies evenly along the lower front body panel. Refer to the turnaround guide image for placement.
4. Hardware: Install 4 metal eyelets (8 mm diameter) evenly spaced along the upper top rim of the bag. Thread the white drawstring through all four eyelets.
5. Straps: Attach the top handle loop to the back upper center. Attach the two shoulder straps firmly to the back upper corners and lower corners.
Tips for Success
Blocking: While acrylic yarn does not need traditional wet blocking, you can steam block your panels lightly to even out the stitches before assembly.
Yarn substitution: Any medium weight (4) yarn will work. Just swatch first and adjust your hook size if needed to match gauge.
Left-handed crocheters: All instructions use standard US right-handed terminology. Simply mirror the placement panels and work stitches in counter-clockwise rows. The layout stays exactly the same.
Eyelet installation: If you have never installed metal eyelets before, watch a quick tutorial video first. You will need eyelet pliers or a setter tool. Practice on scrap fabric before committing to your finished bag.
Care Instructions
Keep your backpack looking beautiful with proper care.
Acrylic yarn is durable and easy to care for, but heat can damage the fibers. Always air dry away from direct sunlight.
Who Is This Pattern For?
This hot pink daisy drawstring backpack pattern works well for intermediate crocheters who are comfortable with basic stitches and ready to try a multi-component project. If you have made granny squares, scarves, or simple bags before, you have the skills for this.
The construction involves flat panels, simple shaping, and seaming. There is nothing complicated here, just multiple pieces that come together at the end. Take it one section at a time and you will do great.
Make It Your Own
While hot pink is stunning, this backpack works in any color combination. Try navy with white daisies for a nautical look, sage green for an earthy vibe, or rainbow straps for extra fun. You could also skip the daisies entirely for a more minimalist design, or add more daisies for maximum flower power.
The shell stitch pattern creates a slightly open fabric, so consider adding a fabric liner if you plan to carry small items that might slip through. A simple drawstring pouch sewn inside works perfectly.
I hope you have so much fun making this hot pink daisy drawstring backpack. It is such a cheerful project, and the finished bag gets compliments everywhere. If you make one, I would absolutely love to see it. Tag me on Instagram or share in my Facebook group.
Save this pattern to your Pinterest boards so you can find it when you are ready to start. And if you make this backpack, please leave a comment below. I love hearing how projects turn out and seeing all the beautiful color combinations you choose.
Want a Quick & Easy Printable Version?
Get a clean, beautifully formatted PDF of this pattern — easy to follow step by step, ready to print or save on any device. No scrolling, no distractions, just the pattern.
Get the Printable PDF →