
This is ONE OF THE MOST STUNNING wearable art pieces you will ever create with a hook and yarn. I am not exaggerating when I say this butterfly wings poncho will stop people in their tracks. Yes, it takes time. Yes, it requires focus. But the finished piece? ABSOLUTELY WORTH every single hour.
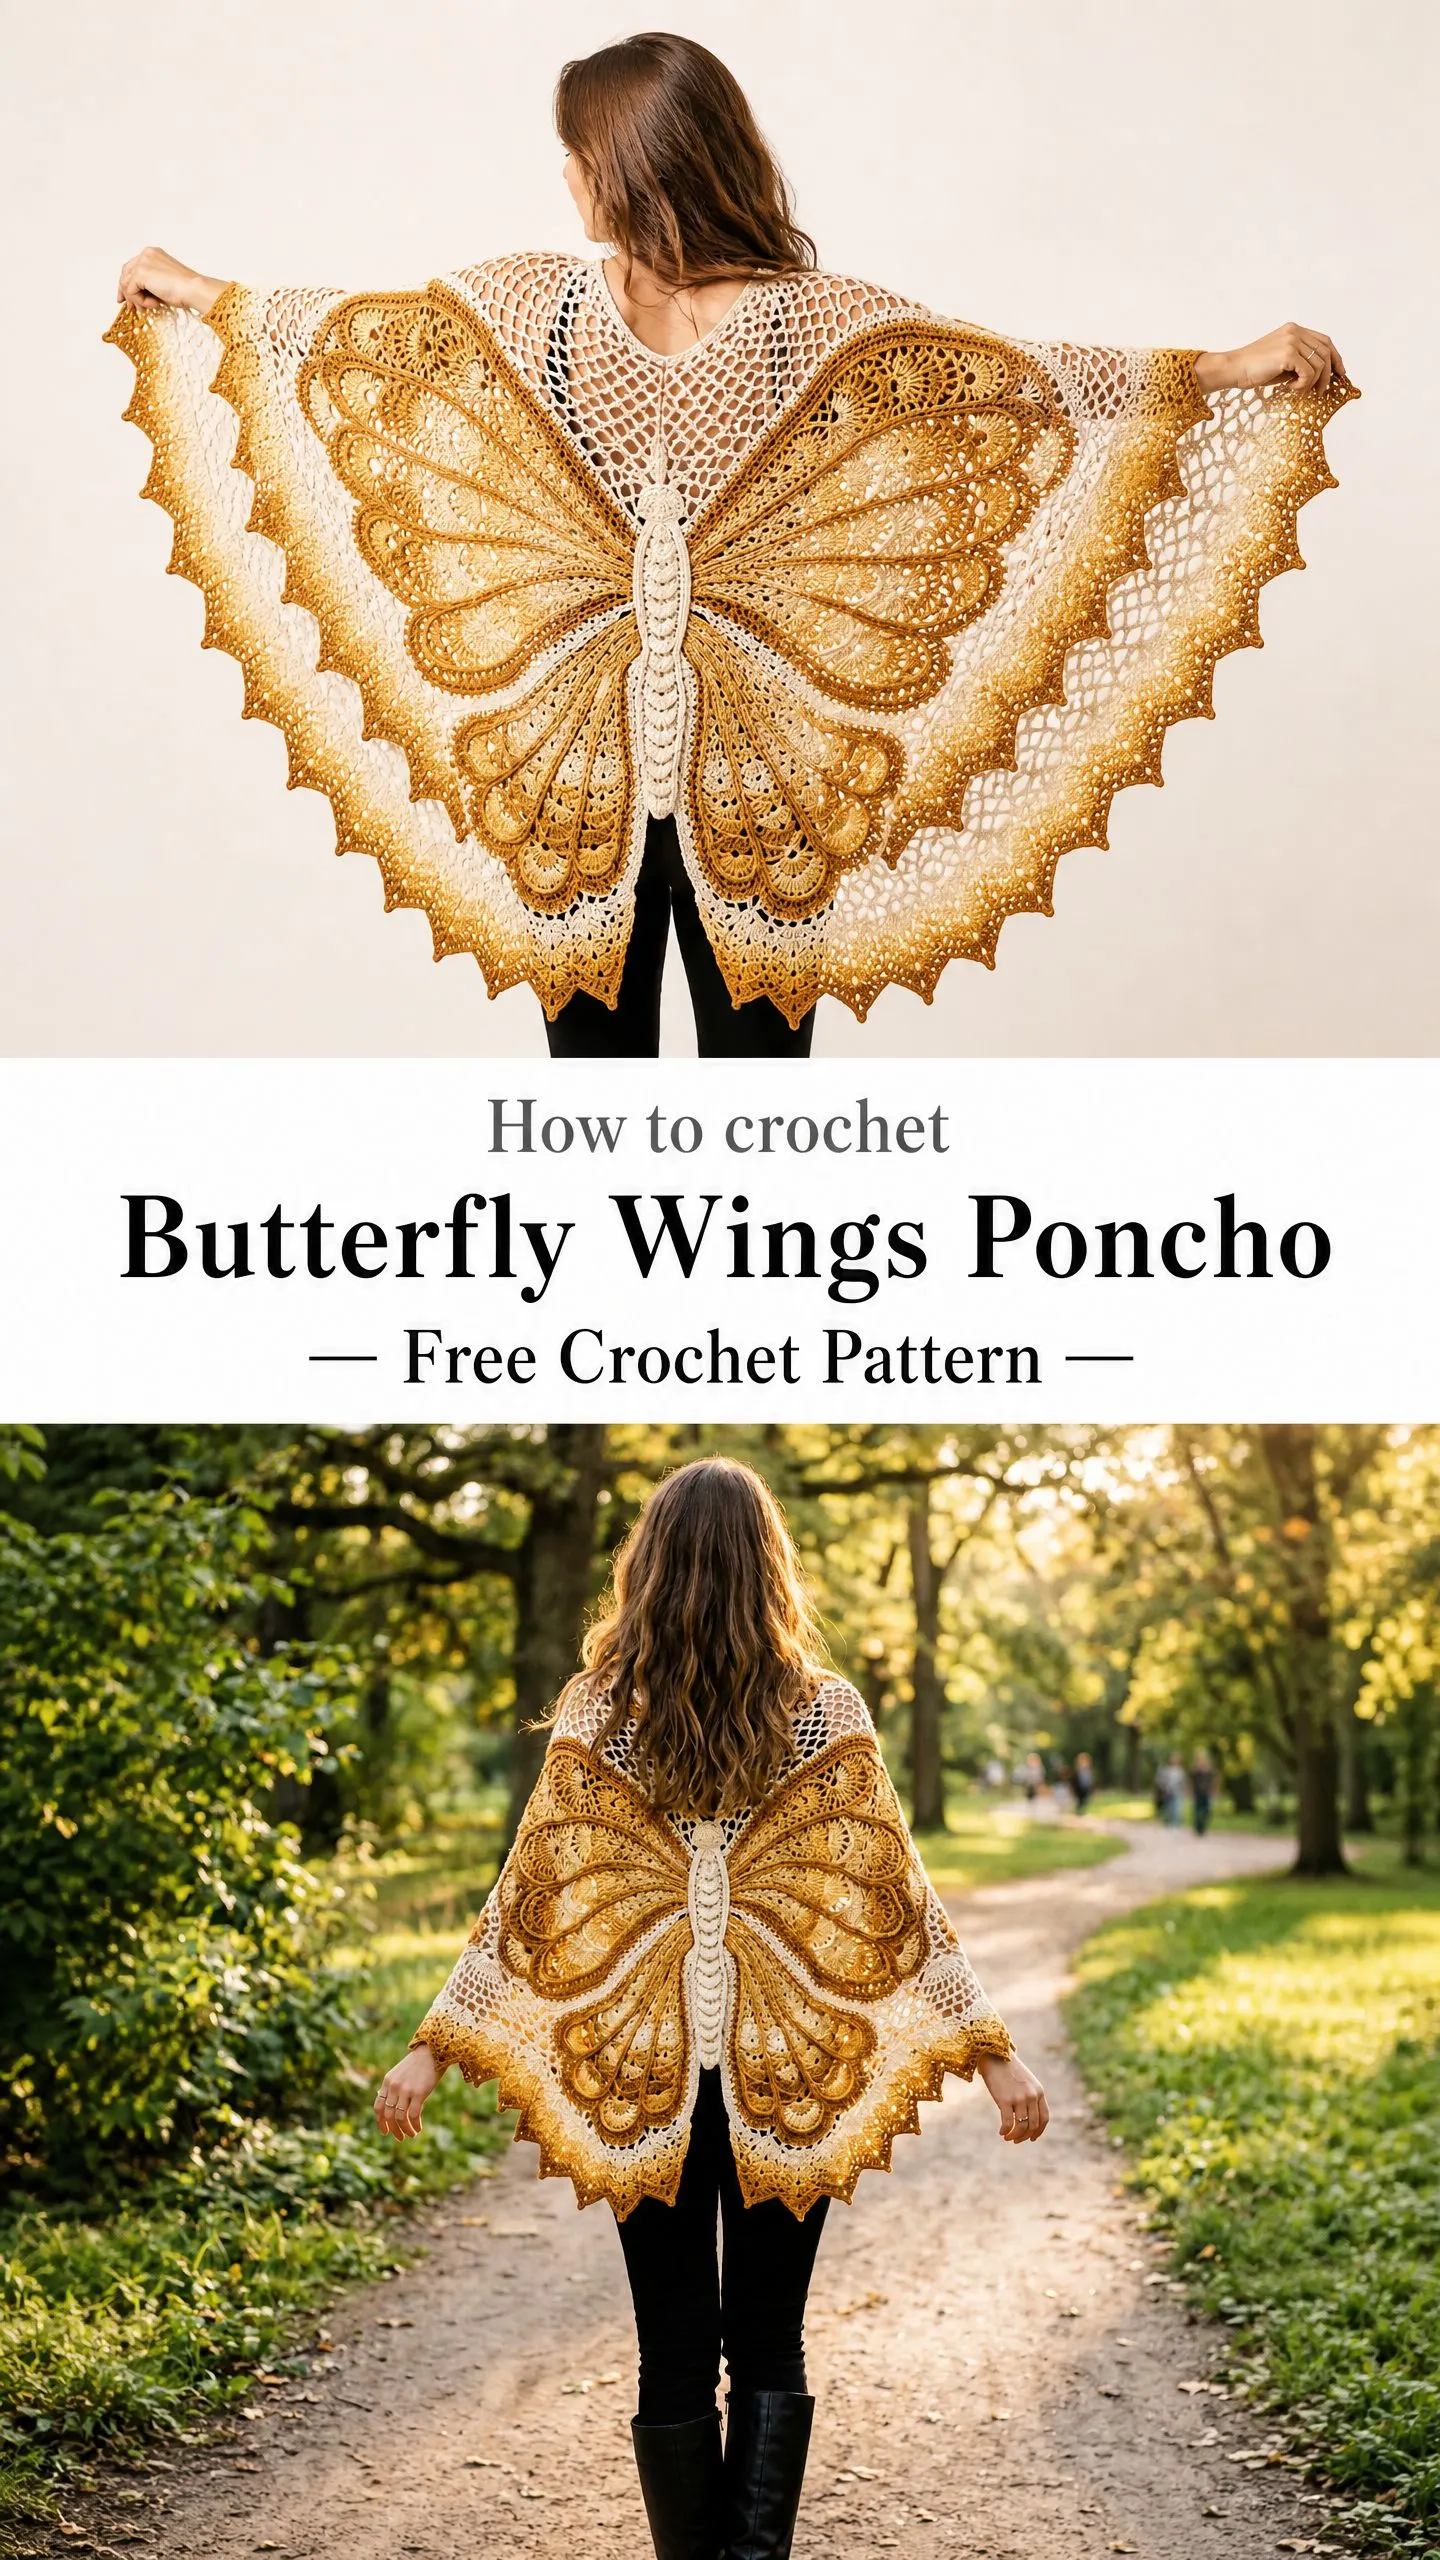
We are talking about a full wingspan of 52 inches across your back. Golden gradient colors that shimmer in sunlight. Raised Irish crochet details that pop off the fabric like actual butterfly wings. This is the project you tackle when you want to challenge yourself and walk away with something museum-worthy.
If you have been crocheting for a while and want to level up, this is your moment. The techniques are advanced but completely achievable. I am going to walk you through every single step, from the lace mesh base to those gorgeous three-dimensional wing motifs. Let’s make something unforgettable together.
Why This Butterfly Wings Poncho Pattern Is Special
This is not your average poncho pattern. The construction method creates a true wearable butterfly effect. When you slip this over your shoulders and spread your arms, the wings unfold behind you in a dramatic display of color and texture.
The design uses Irish crochet techniques to build raised, sculptural wing elements that sit on top of a delicate lace mesh background. The color gradient flows from soft cream at your shoulders through warm golden honey to deep burnt amber at the wing tips. The effect mimics the natural coloring of a monarch butterfly.
You will work this poncho in stages. First comes the base mesh panel, which creates the flowing silhouette. Then you construct the butterfly motif components separately. Finally, you join everything together and add a finished collar and edging. Breaking it into stages makes this ambitious project completely manageable.
Skill Level and Time Investment
I want to be honest with you. This is an advanced crochet pattern. You should feel comfortable with lace work, motif construction, raised stitches worked over previous rows, and color management before starting.
Ideally, you have completed at least two lace shawls and one motif-based project. If that sounds like you, you are ready. If not, consider practicing those skills first so you can fully enjoy this project.
Time estimate: Plan for 80 to 120 hours of work. The butterfly motif sections account for roughly 40 percent of your total working time. This is a marathon, not a sprint. Break it into sessions and enjoy the process.
Finished Measurements
Here are the dimensions you will achieve:
The poncho fits most adults with gentle negative ease at the shoulders. It drapes loosely and beautifully.
Materials You Will Need
Yarn
You need three colors to achieve the gradient effect. All yarns should be fingering to sport weight with a smooth, plied texture.
Total yardage needed: approximately 1900 yards (1738 m) across all three colors.
Recommended Yarn Brands
Option 1: Malabrigo Sock in Natural, Sunset, and Terracotta. This fingering weight superwash merino has excellent stitch definition and blocks beautifully.
Option 2: Cascade Heritage Silk in Cream, Honey Gold, and Amber. The silk content adds subtle sheen that mimics the luminosity visible in the finished piece.
Option 3: Paintbox Yarns Simply DK for an affordable, washable alternative. Note that using DK weight requires adjusting your hook size and will result in a piece approximately 10 percent larger.
Important: Choose smooth, non-fuzzy yarn with good stitch definition. Avoid bouclé, mohair blends, or highly textured yarns. The raised wing stitches require clearly visible stitch legs. A slight sheen is desirable.
Hooks
The smaller hook keeps your 3D elements firm and defined.
Additional Tools
Gauge
Getting gauge right is critical for this project. Block your swatches before measuring.
Base lace mesh panel (US E/4 hook, Color A):
5 mesh loops across = 4 inches (10 cm)
5 mesh rows tall = 4 inches (10 cm)
Butterfly wing motif (US D/3 hook):
One completed small wing segment (the fan unit) measures approximately 3.5 inches (9 cm) wide by 2.5 inches (6.5 cm) tall after blocking.
Swatch both the mesh and one wing segment, block them, and measure before beginning the full project.
Abbreviations and Stitch Definitions
Here is every abbreviation you will encounter, with plain-English definitions:
Special Stitches
These specialized stitches create the dimensional wing texture and decorative elements.
Puff Stitch (puff)
Yarn over, insert hook into indicated stitch or space, yarn over and pull up a loop to the height of a double crochet. You now have three loops on your hook. Repeat this yarn over, insert, pull up sequence four more times into the same stitch. You should have eleven loops on your hook. Yarn over and draw through all eleven loops. Chain 1 to close and lock the puff. The completed puff counts as one stitch unit.
Picot (picot)
Chain 4, slip stitch into the first chain made. This creates a small decorative loop. For the edging, use chain 5 instead for a larger picot.
Shell (shell)
Work 5 double crochets into the same stitch or space. The shell counts as a group occupying one stitch position.
Large Shell (large shell)
Work 7 double crochets into the same stitch or space.
Fan Unit (fan)
This is the repeating decorative element used in the butterfly wing construction. Into one chain-5 space, work: (dc, ch 1) six times, then work 1 dc. This creates 7 double crochets separated by 6 chain-1 spaces, all fanning from a single point. The fan unit spans approximately 1.5 inches (3.8 cm) at gauge.
Front Post Treble Crochet (FPtr)
Yarn over twice, insert hook from front to back to front around the post of the indicated stitch in the previous row. Do not go into the top of the stitch. Yarn over and pull up a loop, then yarn over and draw through 2 loops three times. The raised stitch sits on the front face of the fabric.
Front Post Double Treble Crochet (FPdtr)
Yarn over three times, insert hook from front to back to front around the post of the indicated stitch, yarn over and pull up a loop, then yarn over and draw through 2 loops four times. This creates a taller raised stitch used for central wing arcs.
Back Post Treble Crochet (BPtr)
Yarn over twice, insert hook from back to front to back around the post of the indicated stitch, yarn over and pull up a loop, then yarn over and draw through 2 loops three times. Used on wrong-side rows to maintain raised texture.
Arch Mesh Stitch (arch mesh)
The base fabric repeat. Skip 2 stitches, chain 5, skip 2 stitches, slip stitch or single crochet into next stitch to anchor. When working into arch mesh on subsequent rows, work stitches into the chain-5 arch space, not into individual chains.
Raised Arc (raised arc)
A curved line of FPtr worked over a chain space from a lower row. With right side facing, reach your hook down two rows to the indicated chain-5 space below. Yarn over twice, pull up a loop through that space to the height of the current row, then complete the treble crochet as normal. Multiple raised arcs worked side by side into the same lower space create the curved, swooping wing lines visible in the finished piece.
Pattern Notes Before You Begin
Construction order: The base lace mesh panel is crocheted first in its entirety, blocked, and set aside. The butterfly motif components are crocheted as separate flat pieces, blocked, and then joined to the base panel using slip stitches and surface crochet from the right side.
Color gradient: The gradient from cream to gold to amber is achieved by working sections of the base mesh in Color A, then introducing Color B by holding it alongside Color A (double strand creates a blend), then transitioning to Color B alone, then blending Color B with Color C, and finally working in Color C alone at the hem and wing tip areas.
Right side orientation: The RS is the side that faces away from the wearer when worn. The butterfly image faces the public when you wear the poncho. All RS rows are worked with the butterfly image facing you.
Neck opening: The poncho is constructed as two identical rectangular panels (front and back). After blocking, both panels are joined at the shoulder edge with slip stitches for approximately 12 inches on each side of center, leaving a 24-inch central gap as the neck opening. No side seams. The butterfly motif is applied to the back panel only.
Stitch count maintenance: In the arch mesh section, each "stitch" counts as one anchor single crochet plus one chain-5 arch. When counts are given for mesh rows, the number refers to the number of complete chain-5 arch units in the row.
Edging: The edging is worked in the round after both panels are joined and the collar is attached.
Section 1: Base Mesh Panel (Make 2)
You will create two identical panels, one for the front and one for the back. Each panel measures approximately 52 inches wide by 28 inches long before edging.
With Color A and US E/4 hook, chain 264.
Row 1 (WS): Working into the foundation chain, sc into the 2nd chain from hook, (ch 5, skip 4 chains, sc into next chain) across. Turn. (52 ch-5 arches, 53 sc anchor points)
Verify your count of 52 complete arch units before proceeding.
Row 2 (RS): Chain 3, sc into first ch-5 arch space, (ch 5, sc into next arch space) across, sc into turning ch-3 space. Turn. (52 ch-5 arches)
Rows 3 through 14: Repeat Row 2 twelve more times. Keep Color A throughout. (52 ch-5 arches each row)
Gradient Transition (Rows 15 through 42)
Row 15: Begin holding one strand of Color B alongside Color A (double strand). Continue mesh pattern as established. (52 ch-5 arches)
Row 16: Drop one strand of Color A. Continue with one strand Color A and one strand Color B held together. (52 ch-5 arches)
Row 17: Drop remaining Color A strand. Continue with Color B only (single strand). (52 ch-5 arches)
Rows 18 through 28: Work in Color B only. (52 ch-5 arches each row)
Row 29: Begin holding one strand of Color C alongside Color B. (52 ch-5 arches)
Row 30: Drop one strand Color B. Continue with one strand Color B and one strand Color C held together. (52 ch-5 arches)
Row 31: Drop remaining Color B. Continue with Color C only. (52 ch-5 arches)
Rows 32 through 42: Work in Color C only. (52 ch-5 arches each row)
Row 42 is your final mesh row. Total rows worked: 42.
Fasten off Color C. Weave in all ends on this panel.
Checkpoint
Your panel should measure approximately 52 inches wide and 27.5 to 28 inches tall before blocking. If your measurement is off by more than 1.5 inches in either direction, check gauge and adjust hook size.
Blocking Section 1
Wet block each panel by submerging in cool water for 20 minutes. Gently press out excess water without wringing. Pin to blocking mats at exact dimensions of 52 inches wide by 28 inches tall. Allow to dry fully, which takes 12 to 24 hours.
Section 2: Butterfly Motif Components
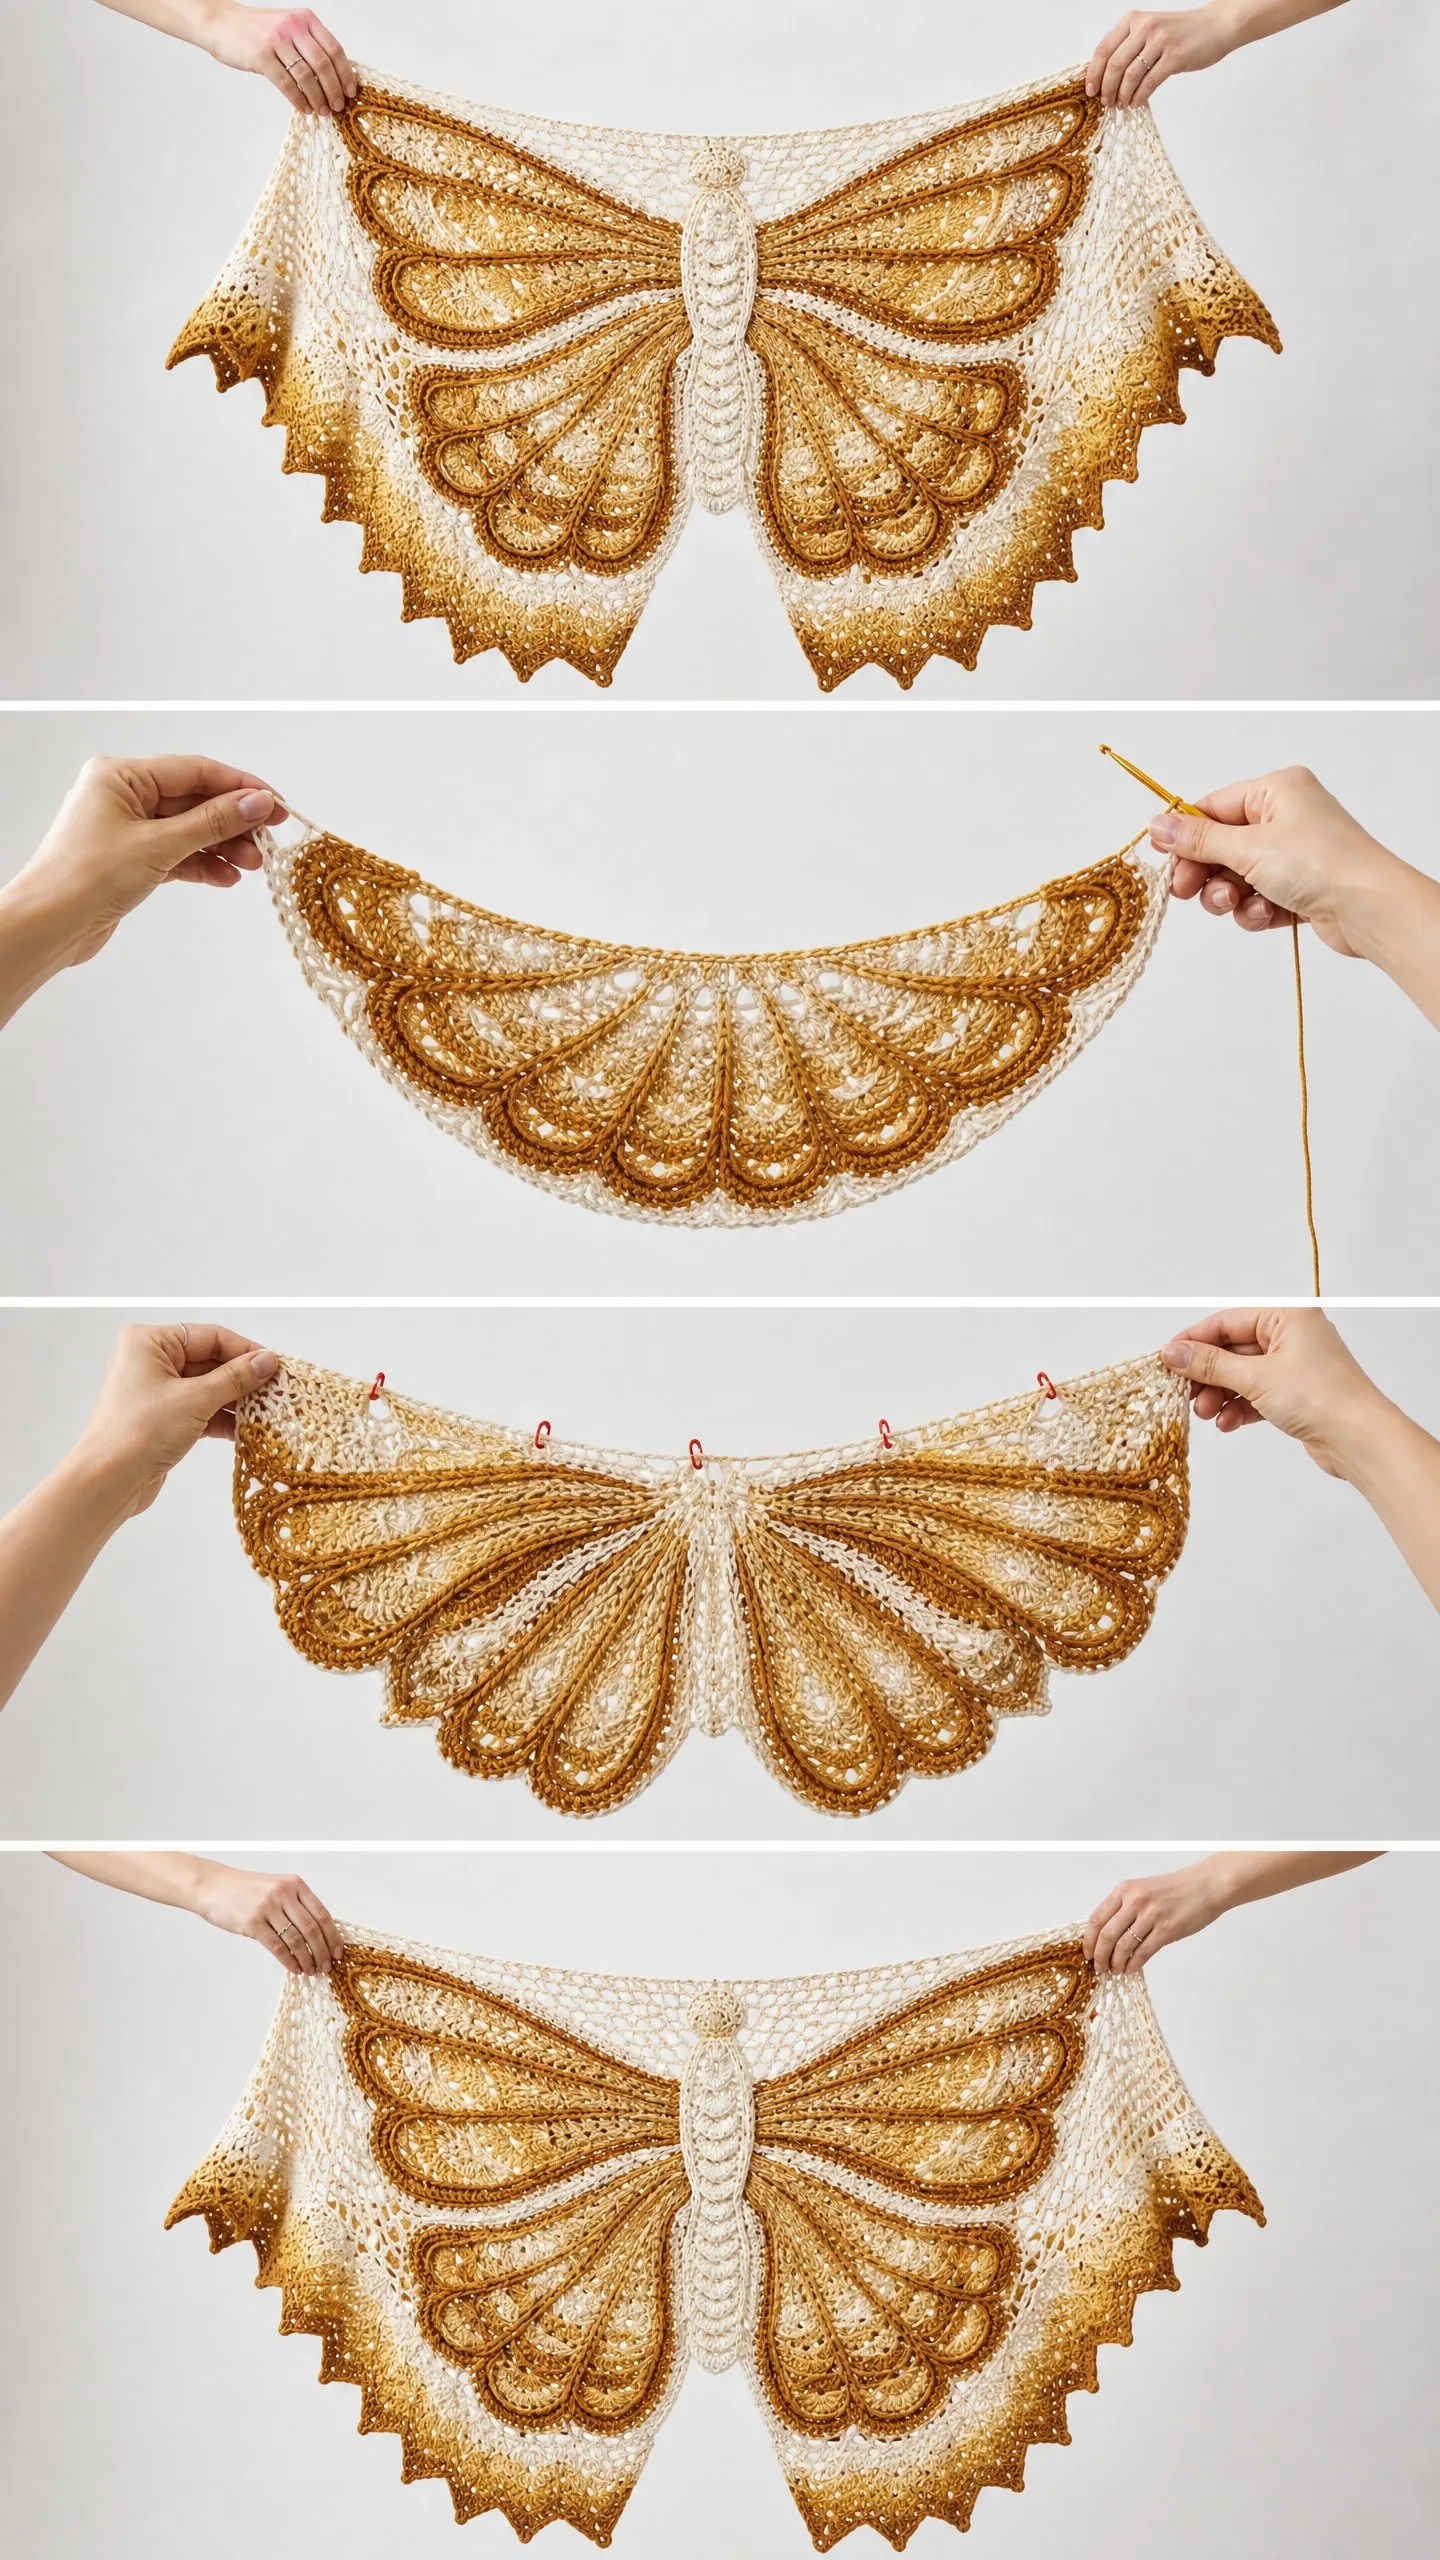
The butterfly motif is constructed as five separate sub-components: Right Upper Wing, Left Upper Wing, Right Lower Wing, Left Lower Wing, and Central Body. Each component is crocheted separately, blocked, and then placed onto the back base panel for joining.
Orientation note: When the motif is placed on the back panel and the poncho is worn, the butterfly body runs from approximately 4 inches below the neck opening to approximately 4 inches above the hem. The wings spread horizontally across the full panel width.
Sub-component 2A: Right Upper Wing
The right upper wing occupies the upper right quadrant of the back panel. It measures approximately 23 inches wide by 14 inches tall.
With Color B and US D/3 hook, chain 6, join with sl st to form a ring.
Rnd 1 (RS): Chain 3 (counts as dc), work 19 dc into the ring, join with sl st to top of beginning ch-3. (20 dc)
Rnd 2: Chain 5 (counts as dc plus ch-2), (dc in next dc, ch 2) 19 times, join with sl st to 3rd ch of beginning ch-5. (20 dc, 20 ch-2 sps)
Rnd 3: Sl st into first ch-2 sp, ch 3 (counts as dc), work 4 more dc in same sp (shell made), ch 2, (shell in next ch-2 sp, ch 2) 19 times, join with sl st to top of beginning ch-3. (20 shells of 5 dc each, 20 ch-2 sps)
Now transition from rounds to flat rows to create the curved wing shape.
Row 4 (RS): Working across only the top 10 shells (right half of the ring, which becomes the curved leading edge of the wing), sl st across first shell to ch-2 sp, ch 5, (shell in next ch-2 sp, ch 2) 9 times, shell in next ch-2 sp, turn. (10 shells, 9 ch-2 sps between them)
Row 5 (WS): Ch 3, dc in first ch-2 sp, (ch 2, shell in next ch-2 sp) 8 times, ch 2, 2 dc in last ch-2 sp, dc in top of tch, turn. (8 complete shells, 2 partial dc groups at edges, 8 ch-2 sps)
Row 6 (RS): Ch 5, (shell in next ch-2 sp, ch 2) 8 times, shell in last ch-2 sp, turn. (9 shells, 8 ch-2 sps)
Rows 7 through 10: Continue alternating WS and RS rows, following the established shell-and-chain mesh, increasing by 1 shell every RS row by working an extra shell into the ch-sp at the outer edge.
Rows 11 through 16: Now begin adding raised arc details to create the layered wing texture.
Rows 17 through 22: Continue building the wing body, adding fan units every other RS row.
Rows 23 through 28: Work entirely in Color C. Continue adding 1 fan unit per RS row until 6 fan units total are placed in the lower-outer section of the wing.
The completed right upper wing before joining measures approximately 23 inches at widest by 14 inches tall.
Sub-component 2B: Left Upper Wing
Work as Right Upper Wing, mirroring all shaping. Increases happen at the left outer edge instead of right. The piece is a true mirror image. All stitch counts are identical.
Sub-component 2C: Right Lower Wing
The right lower wing is wider at the base and shorter in height. It measures approximately 22 inches wide by 10 inches tall.
With Color B and US D/3 hook, chain 6, join with sl st to form a ring.
Rnd 1: Ch 3 (counts as dc), 15 dc in ring, join. (16 dc)
Rnd 2: Ch 5 (counts as dc plus ch-2), (dc in next dc, ch 2) 15 times, join. (16 dc, 16 ch-2 sps)
Rnd 3: Sl st to ch-2 sp, ch 3, 4 dc in same sp (shell), ch 2, (shell, ch 2) in each remaining ch-2 sp, join. (16 shells, 16 ch-2 sps)
Transition to flat rows over lower 8 shells:
Row 4 (RS): Across 8 shells only. Sl st to ch-2 sp, ch 5, (shell in next ch-2 sp, ch 2) 7 times, shell in last ch-2 sp, turn. (8 shells)
Rows 5 through 12: Work in shell mesh with increasing fan units. Add 1 fan unit every 2 rows, beginning at Row 6.
Begin shaping the rounded lower wing bottom:
Row 13 (WS): Sl st across first large shell, ch 1, sc in next sp, (ch 3, sc in next sp) across to last large shell, sl st across. Fasten off.
This creates a natural scalloped lower tip.
Sub-component 2D: Left Lower Wing
Work as Right Lower Wing, mirroring all shaping. All stitch counts are identical.
Sub-component 2E: Central Body Column
The butterfly body is a narrow vertical oval measuring approximately 2.5 inches wide by 20 inches long.
With Color A and US D/3 hook, chain 82.
Row 1: Sc in 2nd chain from hook and in each chain across, turn. (81 sc)
Row 2: Ch 1, sc in first sc, (FPtr around sc 1 row below, sc in next sc) across, ending sc, turn. (81 sts: alternating sc and FPtr posts)
Row 3: Ch 1, sc across, turn. (81 sc)
Row 4: Ch 1, sc in first sc, (BPtr around FPtr post 2 rows below, sc in next sc) across, turn. (81 sts)
Rows 5 through 8: Repeat Rows 3 and 4 twice more. (81 sts each row)
Row 9: Dc2tog at each end to begin shaping. (79 sts)
Rows 10 through 12: Work textured rows as established. (79 sts each)
Row 13: Dc2tog at each end. (77 sts)
Rows 14 through 16: Work as established. (77 sts)
Row 17: Dc2tog at each end. (75 sts)
Continue decreasing 2 sts every 4th row until 65 sts remain.
Row 33: (65 sts)
For the upper head portion of the butterfly body:
Row 34: Dc2tog at each end. (63 sts)
Row 35: Work puff stitches every 4th st across for texture on the head segment. (63 sts with puff details)
Rows 36 through 38: Decrease 2 sts every row. End with 57 sts.
Fasten off.
Fold the body column lengthwise (with RS out) into a narrow strip approximately 1.25 inches wide. Slip stitch along the long edge to form the tubular body. You may lightly stuff with scrap yarn or fiberfill before closing if you want a more dimensional effect.
Section 3: Joining Butterfly Motif to Back Panel
Before joining, lay the back base panel (blocked) right side up on a flat surface. Position the five butterfly components as follows:
Central body: Center vertically and horizontally on the panel. The top of the body should sit approximately 4 inches below the center top edge (where the neck opening will be). Pin in place.
Upper wings: Position the ring-base (inner curved edge) of each upper wing against the sides of the central body, at the upper two-thirds of the body length. The inner ring edge of each wing should overlap the body edge by approximately 0.5 inch. Pin in place.
Lower wings: Position below and slightly overlapping the upper wings. The inner base of each lower wing connects at the lower third of the body. The scalloped hem of the lower wings should align approximately 4 inches above the bottom edge of the base panel. Pin in place.
When satisfied with placement, join each component using Color C and US E/4 hook. Work from the RS, slip stitching through both layers (motif plus base panel) around the full outer perimeter of each wing. Work approximately 1 sl st per chain space or dc. At the inner curved edges where wings meet the body, work a surface crochet slip stitch seam.
For the body column, sl st the body to the base panel along both long edges using Color A and D/3 hook.
Checkpoint
The butterfly should be clearly visible and all components should lie flat against the base panel without puckering. If puckering occurs, re-block the motif sections before joining. The total joined piece should still measure 52 inches wide and 28 inches long.
Section 4: Joining Front and Back Panels
Place front panel and back panel with wrong sides together (right sides facing out on both sides). Align top edges precisely.
With Color A and US E/4 hook, working through both layers, sl st along the top edge for 12 inches from the right outer edge. Fasten off.
Skip the center 28 inches of the top edge. This creates your neck opening.
Rejoin Color A at the point 12 inches from the left outer edge. Slip stitch the remaining 12 inches along the left top edge. Fasten off.
Your neck opening is now 28 inches wide. The finished circumference will be approximately 24 inches after the collar is attached.
Section 5: Collar
With Color A and US D/3 hook, join yarn at right neck edge with sl st.
Rnd 1: Ch 1, work 120 sc evenly around the neck opening. Distribute as follows: approximately 60 sc along the front neck edge and 60 sc along the back neck edge. Join with sl st to first sc. (120 sc)
Rnd 2: Ch 2 (counts as hdc), hdc in each sc around, join. (120 hdc)
Rnd 3: Ch 2, (FPhdc around next post, BPhdc around next post) around, creating ribbed texture. Join and continue for 6 more rounds in ribbing pattern for a finished collar height of approximately 2 inches.
Fasten off and weave in ends.
Finishing and Final Blocking
Weave in all remaining ends carefully. Give your completed poncho a final light blocking, paying special attention to the wing tips and scalloped edges. Pin out each point to maximize the dramatic wing shape.
Care Instructions
Hand wash in cool water with gentle detergent. Press out excess water without wringing. Block flat to dry. Store folded or hanging to preserve the dimensional motif.
Tips for Success with This Butterfly Wings Crochet Pattern
Take your time with the motifs. The wing components are intricate. Work in good lighting and do not rush the raised stitch sections.
Block aggressively. This design relies on blocking to open up the lace mesh and define the wing shapes. Do not skip this step.
Use stitch markers generously. Mark your row beginnings, color transitions, and motif placement points.
Practice the special stitches first. If you have never worked front post trebles or puff stitches, make a small swatch to get comfortable before tackling the full motif.
Photograph your placement before joining. Once you have the motif pieces pinned to the base panel, snap a photo. This helps you remember exact positioning if pieces shift during the joining process.
Thank you so much for choosing this pattern for your next crochet adventure. I truly cannot wait to see your finished butterfly wings poncho. If you make this project, please share your photos with me on Instagram or in my Facebook group. Seeing your creations brings me so much joy.
Save this butterfly wings poncho pattern to your Pinterest boards so you can find it when you are ready to start. And please drop a comment below if you make it or have any questions along the way. Happy crocheting!
