I have been wanting to design a backpack pattern for ages. Something structured enough to actually use every day, but still unmistakably handmade. When I finally sat down to work out the construction, I had a few non-negotiables: it needed an oval base that would hold its shape, adjustable shoulder straps with real hardware, and a front zip pocket because I am always digging around for my keys. I am SO pleased with how this turned out! The dense single crochet fabric gives it that boutique bag look while keeping all the cozy handmade charm visible.
Get the Ad-Free PDF Pattern
You can find the free pattern below, or you can purchase the ad-free printable PDF from my shop.
Get the Printable PDF →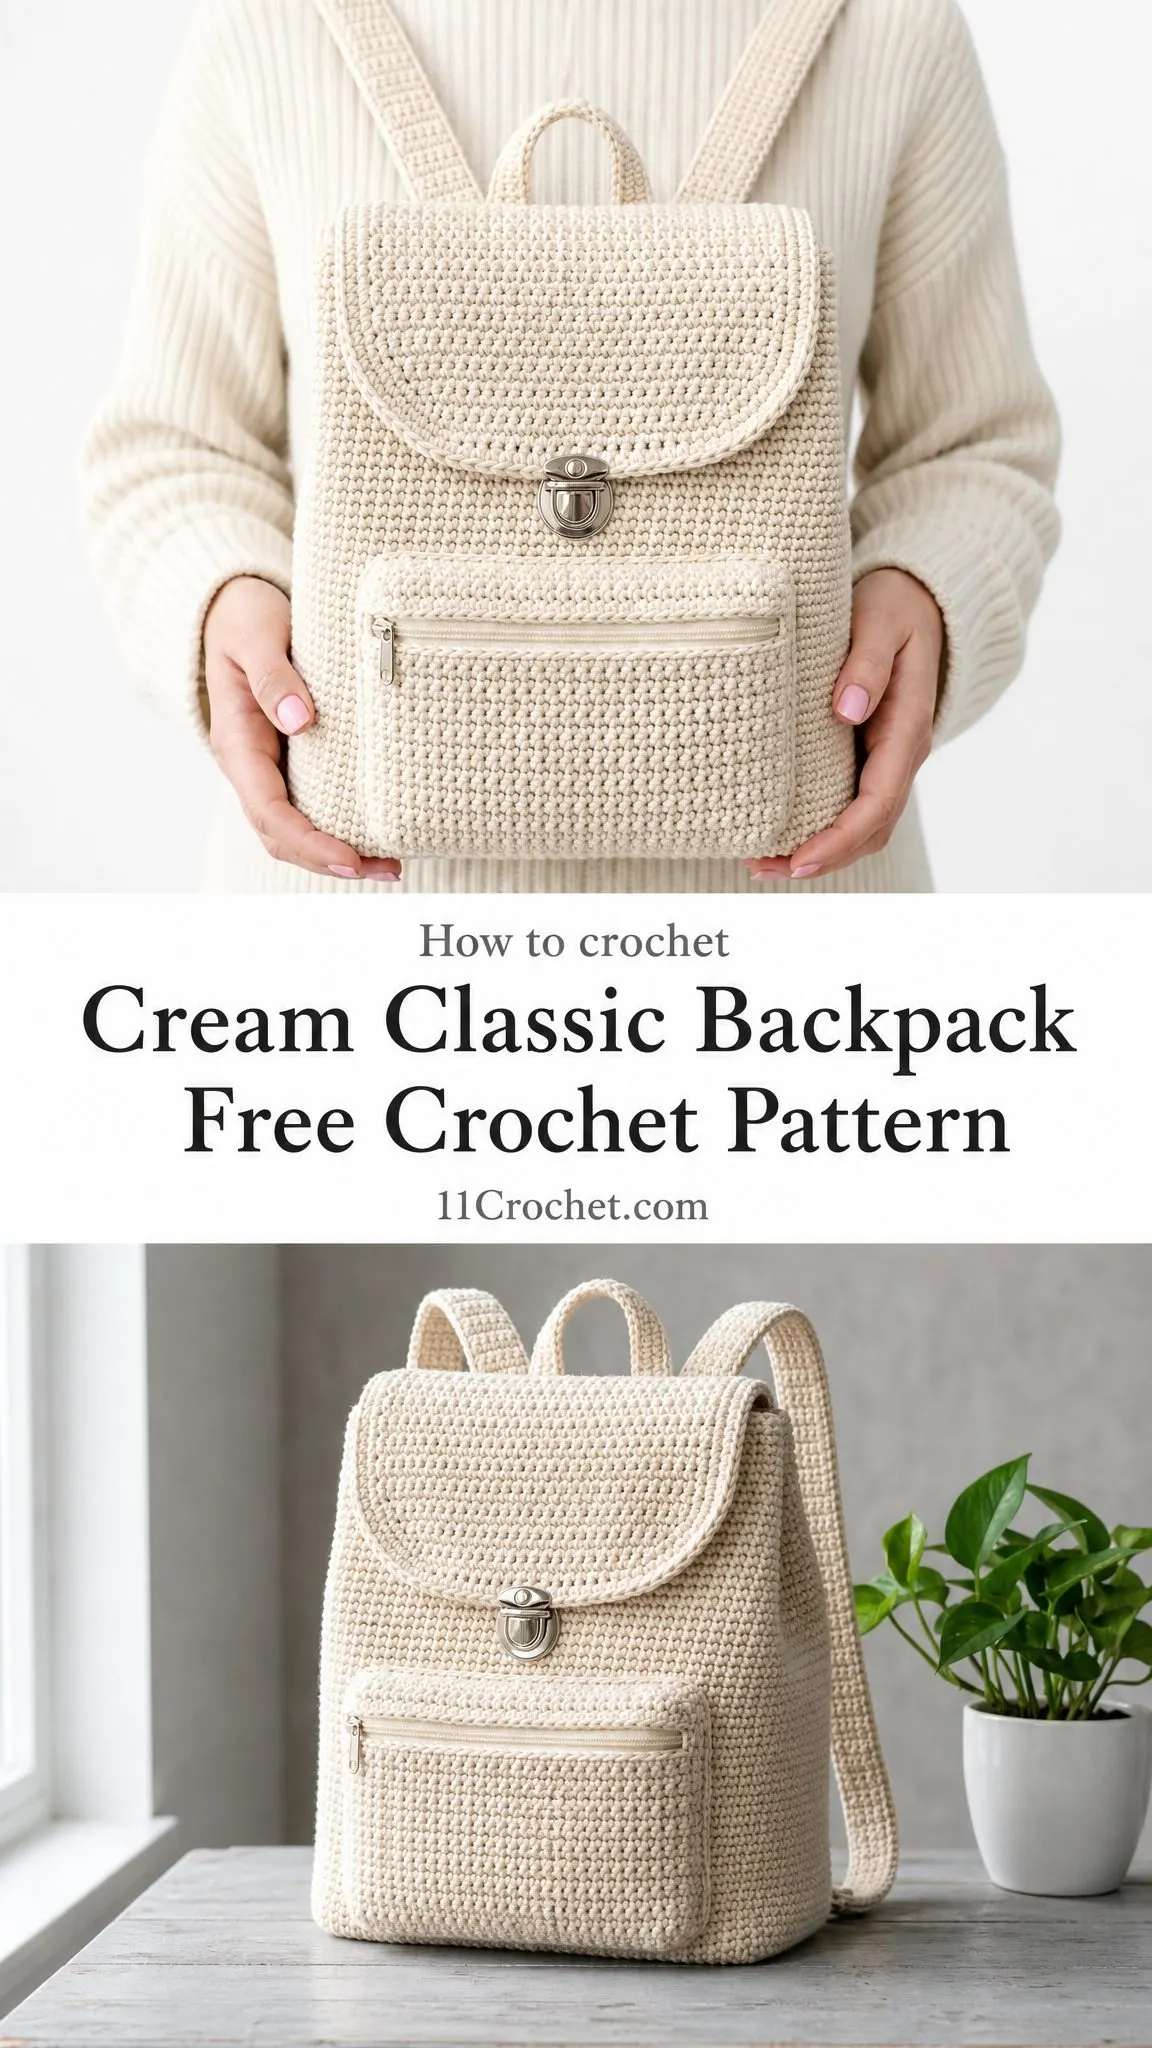
This Cream Classic Backpack crochet pattern walks you through every single step, from building a firm oval base to attaching the turn lock hardware. If you have ever wanted to make a bag that looks like it came from a fancy shop, this is your project.
About This Crochet Backpack Pattern
This compact backpack is worked from the bottom up as one continuous piece. You will start with an oval base, then work upward in dense single crochet (sc) to create the structured body. The project finishes with a rounded flap, a zip pocket, shoulder straps, a top handle, and metal hardware.
The finished size is approximately 9 inches wide x 11 inches tall x 3.5 inches deep (23 x 28 x 9 cm). Plan for about 10 to 14 hours of crochet time, plus extra for blocking and attaching hardware.
Skill level: Confident beginner. If you can work single crochet in the round and are comfortable sewing pieces together, you can absolutely make this bag.
Materials You Will Need
Gather everything before you start. There is nothing worse than getting halfway through a project and realizing you need to order hardware.
Yarn:
Hook:
Notions:
A note on yarn substitution: Choose a smooth yarn with low stretch. If your yarn is soft or has a lot of drape, consider adding a lining or inserting a plastic canvas base to help the bag hold its shape.
Gauge
Getting gauge right matters a lot for this project. Your bag size and hardware placement depend on it.
12 sc x 14 rounds = 4 inches (10 cm) in firm single crochet, worked in the round and lightly blocked.
Make a gauge swatch before you begin. Match both stitch gauge and row gauge.
Checkpoint: After Round 12 of the body, your piece should stand about 2 inches (5 cm) above the base. After Round 44, the body should measure about 11 inches (28 cm) from base edge to top.
Stitch Guide and Abbreviations
US terms are used throughout this pattern. If you typically work from UK patterns, remember that US sc equals UK dc.
Special Stitches:
Reverse sc edge: Work single crochet from left to right around the edge instead of right to left. This creates the corded border you see on the flap and pocket. It looks fancy but is easier than it sounds.
Surface slip stitch zipper line: Hold yarn behind the fabric, insert hook from front to back, pull up a loop and slip it through the loop on hook. Continue along your marked line.
Left-handed note: Work the same instructions in your natural direction. When placing the pocket zipper pull, put it on whichever side opens most comfortably for you.
Backpack Body Instructions
The base and body are worked as one continuous piece. Use a stitch marker for the first stitch of each round. Only join where the pattern specifically tells you to.
Oval Base
Ch 22.
Rnd 1: 2 sc in 2nd ch from hook, sc in next 19 ch, 4 sc in last ch; working along opposite side, sc in next 19 ch, 2 sc in first ch. (46 sc)
Rnd 2: Inc in each of next 2 sts, sc 19, inc in each of next 4 sts, sc 19, inc in each of next 2 sts. (54 sc)
Rnd 3: [sc, inc] twice, sc 19, [sc, inc] 4 times, sc 19, [sc, inc] twice. (62 sc)
Rnd 4: [sc 2, inc] twice, sc 19, [sc 2, inc] 4 times, sc 19, [sc 2, inc] twice. (70 sc)
Checkpoint: Your base should measure about 9 x 3.5 inches (23 x 9 cm) after blocking.
Body
Rnd 5: BLO sc in each st around to turn the base upward. (70 sc)
Working in the back loop only for this round creates a crisp edge where the base meets the walls. This is what makes the bag stand up properly.
Rnds 6-43: Sc in each st around. (70 sc each rnd)
Rnd 44: Sc in each st around; sl st to first sc, fasten off. (70 sc)
Top edging: Join yarn at back top edge, reverse sc around, join and fasten off. (70 reverse sc)
Place side markers 17 stitches from each side of center front. These guide strap tabs and flap placement later.
Rounded Flap
The flap starts wide and gradually decreases to create that gently curved bottom edge.
Ch 55.
Row 1: Sc in 2nd ch from hook and each ch across. Turn. (54 sc)
Rows 2-12: Ch 1, sc across. Turn. (54 sc)
Row 13: Ch 1, sc2tog, sc 50, sc2tog. Turn. (52 sc)
Row 14: Ch 1, sc across. Turn. (52 sc)
Row 15: Ch 1, sc2tog, sc 48, sc2tog. Turn. (50 sc)
Row 16: Ch 1, sc across. Turn. (50 sc)
Row 17: Ch 1, sc2tog, sc 46, sc2tog. Turn. (48 sc)
Row 18: Ch 1, sc across. Turn. (48 sc)
Border: Work sc evenly around, placing 2 sc in each lower corner; finish with 1 round reverse sc. Fasten off.
Front Zip Pocket
This little pocket is perfect for keys, lip balm, or anything you need quick access to.
Ch 25.
Row 1: Sc in 2nd ch from hook and each ch across. Turn. (24 sc)
Rows 2-12: Ch 1, sc across. Turn. (24 sc)
Border: Sc around the pocket, placing 3 sc in each corner. Work one reverse sc round if desired.
Sew the zipper along the top edge, then sew the pocket centered on the front of the bag, about 1.25 inches (3 cm) above the base.
Shoulder Straps (Make 2)
Ch 7.
Row 1: Sc in 2nd ch from hook and each ch across. Turn. (6 sc)
Rows 2-86: Ch 1, sc across. Turn. (6 sc)
Border: Sc evenly around strap; fasten off.
Each strap should measure about 24.5 inches (62 cm) before hardware.
For longer straps: Add rows in pairs. For shorter straps: Remove rows in pairs.
Top Handle
Ch 9.
Row 1: Sc in 2nd ch from hook and each ch across. Turn. (8 sc)
Rows 2-24: Ch 1, sc across. Turn. (8 sc)
Fold lengthwise if you want extra structure and seam the long edge closed, or leave flat for a softer handle.
Tabs (Make 4)
These small pieces attach your hardware to the bag.
Ch 7.
Row 1: Sc in 2nd ch from hook and each ch across. Turn. (6 sc)
Rows 2-8: Ch 1, sc across. Turn. (6 sc)
Fold each tab through a D-ring or slider and sew firmly to the bag. Attach 2 tabs at lower back corners and 2 tabs near the upper back edge.
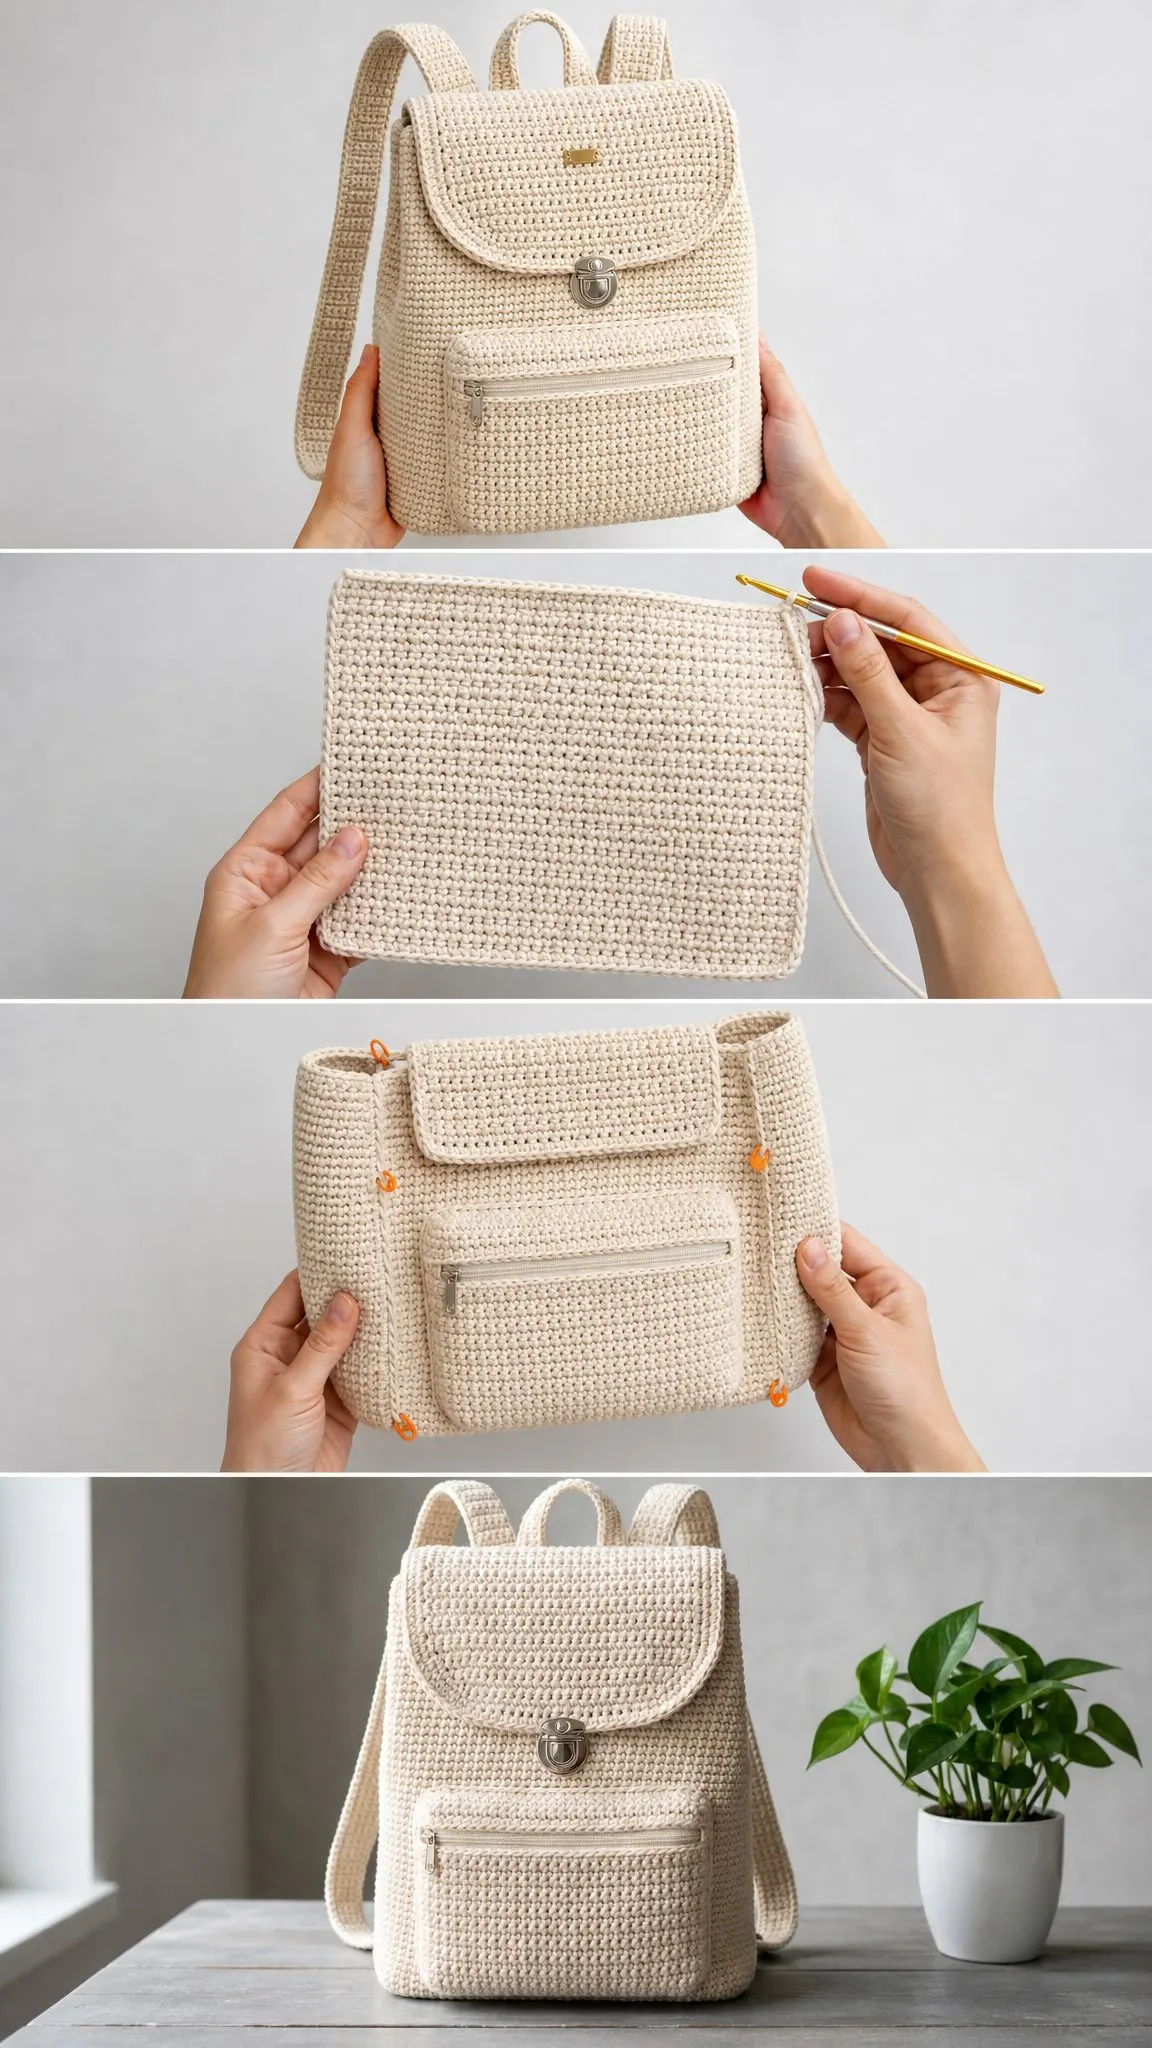
Assembly
Take your time with assembly. This is where all your hard work comes together.
1. Block pieces lightly. Steam gently through a cloth if needed. Do not flatten the texture.
2. Sew pocket to front using matching yarn or strong thread. Keep the zipper opening smooth and level.
3. Sew flap to back top edge over 54 centered stitches. The shaped edge should fall over the front.
4. Install the turn lock or snap. Place the flap half first, close the flap naturally, then mark the front body placement before attaching the second half.
5. Attach handle between the back strap tabs. Reinforce each end with several passes of yarn or thread.
6. Attach lower tabs at back lower corners. Thread straps through hardware and stitch strap ends securely.
7. Optional lining: Cut lining slightly smaller than the bag, add an inner pocket if desired, and hand-stitch under the top edge.
Finishing checkpoint: The backpack should stand upright with a flat oval base, a gently rounded flap, and a centered front pocket. Strap tabs should sit symmetrically on the back so the bag hangs level.
Size Customization
To make the bag wider: Add chains to the foundation in multiples of 2. Each added chain increases the long sides by 1 stitch. Keep the end increases the same and continue the body with the new stitch count.
To make the bag taller: Add or remove body rounds before the top edging. At gauge, 3 to 4 rounds add about 1 inch (2.5 cm).
To change flap width: Start with any even stitch count between 50 and 60 and decrease 2 stitches on every other shaping row until the curve looks balanced.
Troubleshooting Tips
Base ruffles: Your increases may be too loose. Go down a hook size for the base or block flatter.
Body leans: Use a running marker and occasionally shift the join by 1 stitch to keep the start line at the back.
Bag collapses: Choose a firmer yarn, add lining, or insert plastic canvas in the base and back panel.
Flap does not meet lock: Block the flap first, then attach the front lock half only after the flap hangs naturally.
Maker tip: Use stitch markers to divide the 70-stitch body into front 18, side 17, back 18, side 17. This helps center the pocket, flap, handle, and straps perfectly.
Care Instructions
Spot clean when possible. For a full wash, remove detachable hardware if you can, hand wash in cool water, press out moisture in a towel, reshape, and dry flat. Do not hang while wet or the bag may stretch out of shape.
Thank you so much for choosing this pattern! I really hope you love making your Cream Classic Backpack as much as I loved designing it. If you make one, I would absolutely love to see it. Tag me on Instagram or share a photo in my Facebook group.
If this pattern is calling your name, go ahead and save it to your Pinterest boards so you can find it when you are ready to start. And please drop a comment below if you give it a try. I love hearing how your projects turn out!
Want a Quick & Easy Printable Version?
Get a clean, beautifully formatted PDF of this pattern — easy to follow step by step, ready to print or save on any device. No scrolling, no distractions, just the pattern.
Get the Printable PDF →