I don’t know about you, but I’ve been searching for the perfect everyday bag that looks polished enough for brunch but practical enough for running errands. Something that keeps my hands free, holds more than just my phone, and doesn’t scream "I made this in my grandma’s craft room." This minimalist drawstring backpack checks every single box. All the style with none of the fuss.
Get the Ad-Free PDF Pattern
You can find the free pattern below, or you can purchase the ad-free printable PDF from my shop.
Get the Printable PDF →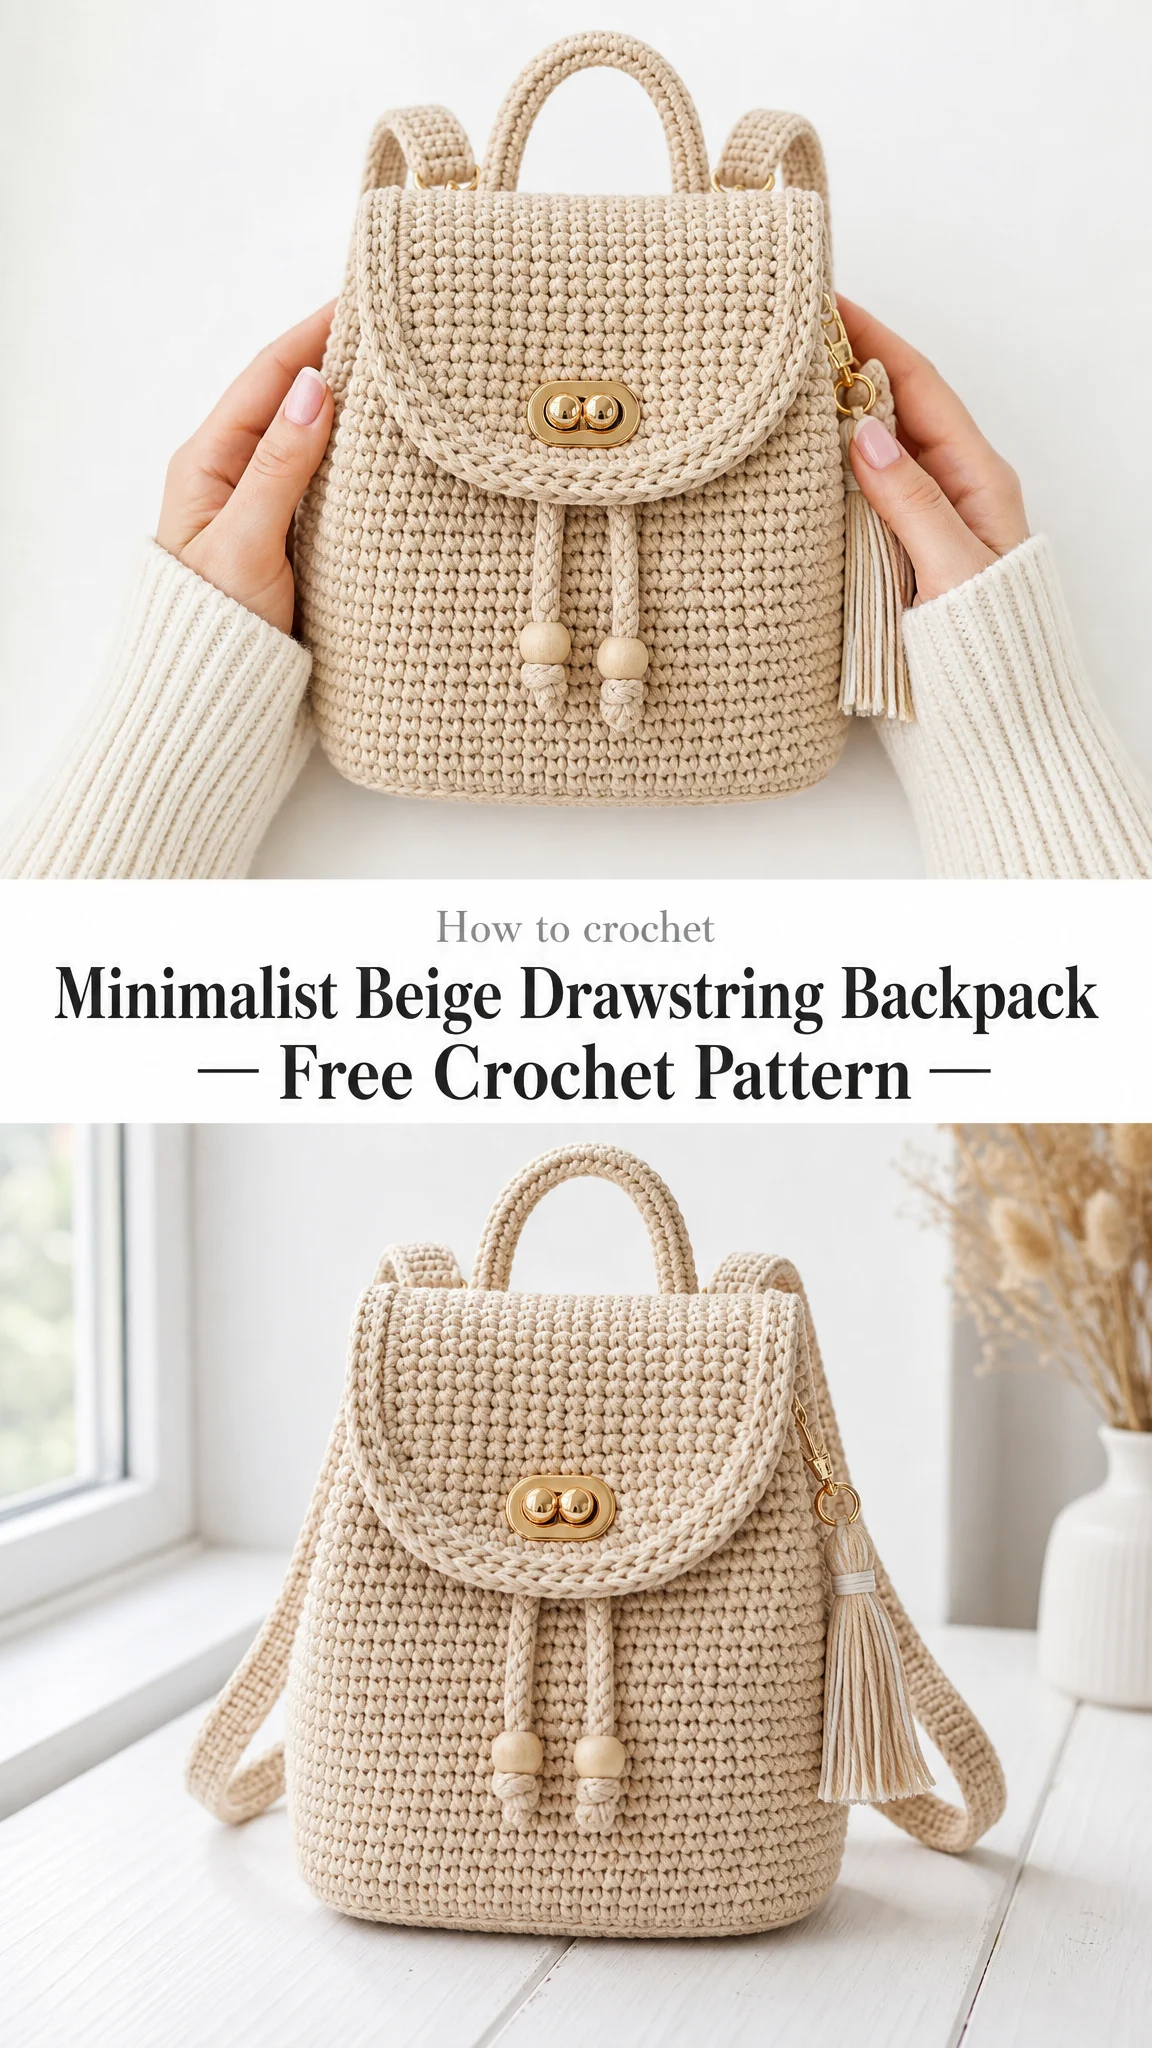
This pattern creates a softly structured mini backpack featuring a gorgeous pebble texture, a rounded flap with surface braid edging, a drawstring closure, a sturdy top handle, adjustable shoulder straps, gold-tone hardware accents, and an adorable side tassel. The finished piece measures 8.5 inches wide by 9.5 inches tall by 3 inches deep, making it the ideal size for your daily essentials.
Why You’ll Love This Crochet Backpack Pattern
This isn’t your typical slouchy crochet bag. The construction method creates a firm fabric that holds its shape beautifully without requiring a lining, though you can certainly add one if you prefer. The oval base provides structure and stability, while the alternating mini puff stitches and single crochet rows create that lovely raised pebble texture you see in the photos.
The skill level is intermediate, and I want to be honest about that upfront. You’ll be working an oval base with shaping, managing texture placement across joined rounds, attaching hardware, and handling several finishing details. If you’ve made a few basic bags or amigurumi, you’re ready for this. The techniques aren’t difficult individually. They just require attention and patience.
Time estimate: Plan for 10 to 14 hours of work. I know that sounds like a lot, but spread it across a week or two of evening crocheting, and you’ll have a stunning handmade accessory that would easily cost $80 or more in a boutique.
Materials You’ll Need
Before diving into the stitches, let’s gather everything. Having all your supplies ready makes the process so much smoother.
Yarn:
Yarn Suggestions:
Important substitution note: Choose a low-stretch cotton or cotton-blend yarn that creates a firm fabric at gauge. A soft acrylic may stretch under weight, and you definitely don’t want your backpack sagging after the first use.
Hook:
Hardware and Notions:
Gauge
Getting gauge right matters more for bags than you might think. Too loose, and your backpack won’t hold its shape. Too tight, and it’ll be stiff and difficult to work.
14 stitches and 16 rounds = 4 inches (10 cm) in alternating single crochet and pebble texture, blocked lightly.
Swatch at least 5 inches (13 cm) square and match gauge before starting. Trust me on this one.
Finished-size checkpoint: Your base should measure about 8.5 x 3 inches (21.5 x 7.5 cm) after Round 6.
Abbreviations and Stitch Definitions
Let me walk you through every abbreviation you’ll encounter. Even if you’re familiar with these, a quick refresher never hurts.
UK crocheters note: US sc = UK dc; US dc = UK tr.
Special Stitches
Mini Puff Stitch
This creates that beautiful pebble texture throughout the body. Here’s how to work it:
Yarn over, insert hook in indicated stitch, yarn over and pull up a loop. Yarn over again, insert hook in the same stitch, yarn over and pull up a loop. You now have 5 loops on your hook. Yarn over and pull through all 5 loops on hook. Chain 1 tightly to close.
The closing chain does not count as a separate stitch. This is important for keeping your stitch counts accurate.
Surface Braid Edging
This gives the flap that polished, finished look. With right side facing, slip stitch into the edge. Insert hook from front to back around the next edge post, pull up a loop, and slip stitch through the loop on hook. Continue evenly around the edge to form a raised rope-like border.
Pattern Notes Before You Begin
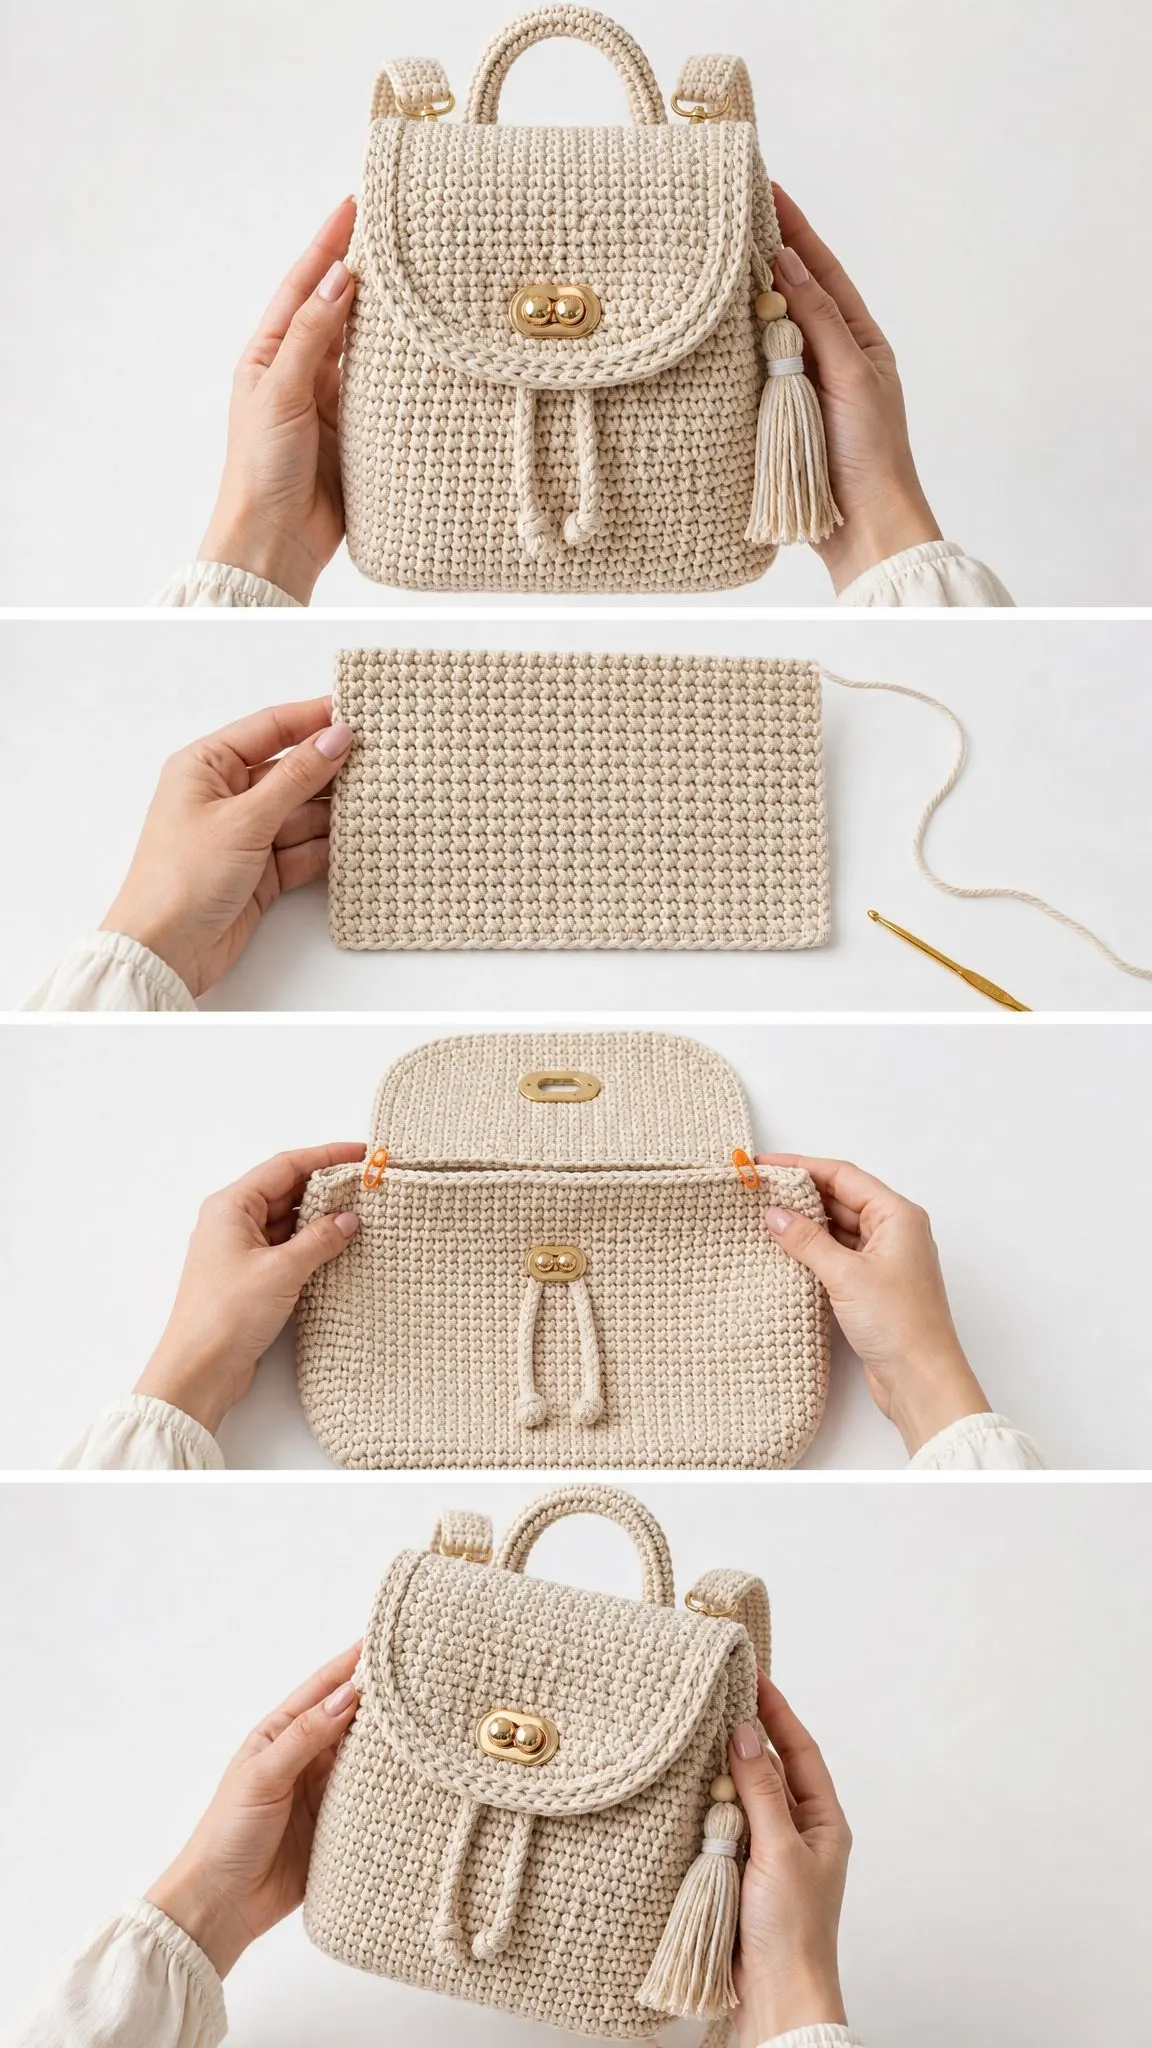
Backpack Base Instructions
We’re starting with an oval shape that forms the bottom of your backpack. Take your time here because a good base sets you up for success.
Chain 25.
Rnd 1: Sc in 2nd ch from hook, sc in next 22 ch, 3 sc in last ch; working along opposite side of chain, sc in next 22 ch, 2 sc in first ch. Join. (50 sc)
Rnd 2: Ch 1, 2 sc in next st, sc 22, 2 sc in each of next 3 sts, sc 22, 2 sc in each of last 2 sts. Join. (56 sc)
Rnd 3: Ch 1, [2 sc in next st, sc 1] once, sc 22, [2 sc in next st, sc 1] 3 times, sc 22, [2 sc in next st, sc 1] twice. Join. (62 sc)
Rnd 4: Ch 1, [2 sc in next st, sc 2] once, sc 22, [2 sc in next st, sc 2] 3 times, sc 22, [2 sc in next st, sc 2] twice. Join. (68 sc)
Rnd 5: Ch 1, [2 sc in next st, sc 3] once, sc 22, [2 sc in next st, sc 3] 3 times, sc 22, [2 sc in next st, sc 3] twice. Join. (74 sc)
Rnd 6: Ch 1, [2 sc in next st, sc 4] once, sc 22, [2 sc in next st, sc 4] 3 times, sc 22, [2 sc in next st, sc 4] twice. Join. (80 sc)
Body Instructions
Now we’re building upward. This is where the magic happens with that gorgeous pebble texture.
Rnd 7: Ch 1, working in back loops only, sc in each st around. Join. (80 sc)
Working in the back loops only creates a sharp angle that makes your base sit flat and your sides stand up straight.
Rnd 8: Ch 1, [mini puff in next st, sc in next st] 40 times. Join. (40 puffs, 40 sc)
Rnd 9: Ch 1, sc in each st around. Join. (80 sc)
Rnds 10-29: Rep Rnds 8-9 ten times. End with a sc round. (80 sts each rnd)
Rnd 30: Rep Rnd 8. (40 puffs, 40 sc)
Rnd 31 (eyelet round): Ch 1, [sc in next 3 sts, ch 1, sk next st] 20 times. Join. (60 sc, 20 ch-1 sps)
These eyelets are where your drawstrings will thread through. Make sure your chain-1 spaces are consistent in size.
Rnd 32: Ch 1, [sc in next 3 sc, sc in next ch-1 sp] 20 times. Join. (80 sc)
Rnd 33: Rep Rnd 8. (40 puffs, 40 sc)
Rnd 34: Ch 1, sc in each st around. Join. (80 sc)
Rnd 35: Ch 1, reverse sc or firm sl st in each st around. Join and fasten off. (80 sts)
Checkpoint: Your body should measure about 9.5 inches (24 cm) tall from base underside to top edge.
Rounded Flap Instructions
The flap gives this backpack its sophisticated look. We’ll work it flat and then add that beautiful surface braid edging.
With RS facing, mark the center back 30 sts across the top edge. Join yarn at the right marker.
Row 1: Ch 1, sc in each marked st across. Turn. (30 sc)
Rows 2-9: Ch 1, sc in each st across. Turn. (30 sc)
Now we begin the shaping that creates that lovely rounded bottom edge.
Row 10: Ch 1, sc2tog, sc 26, sc2tog. Turn. (28 sc)
Row 11: Ch 1, sc2tog, sc 24, sc2tog. Turn. (26 sc)
Row 12: Ch 1, sc2tog, sc 22, sc2tog. Turn. (24 sc)
Row 13: Ch 1, sc2tog, sc 20, sc2tog. Turn. (22 sc)
Row 14: Ch 1, sc2tog, sc 18, sc2tog. Turn. (20 sc)
Row 15: Ch 1, sc2tog, sc 16, sc2tog. Turn. (18 sc)
Row 16: Ch 1, sc2tog, sc 14, sc2tog. Turn. (16 sc)
Row 17: Ch 1, sc2tog, sc 12, sc2tog. Turn. (14 sc)
Row 18: Ch 1, sc2tog, sc 10, sc2tog. Do not turn. (12 sc)
Edging: Work surface braid evenly around flap sides and lower curve, placing 2 braid sts at each lower corner. Fasten off.
Drawstrings Instructions
Make two cords: Chain 105 for each cord, then sl st in the back bump of each chain for a firm cord. Each cord should be about 26 inches (66 cm).
Thread Cord A from front center to back and around to front. Thread Cord B in the opposite direction. Knot ends and add small yarn beads if desired.
Sew the turn-lock or magnetic clasp to the flap and front panel, centered about 2.5 inches (6.5 cm) below the top edge.
Top Handle Instructions
Chain 29.
Row 1: Sc in 2nd ch from hook and each ch across. Turn. (28 sc)
Rows 2-5: Ch 1, sc across. Turn. (28 sc)
Fold lengthwise around a short piece of cord or leave flat. Sew short ends to the top back, 2.25 inches (5.5 cm) apart. Stitch securely through the body fabric.
Back Straps Instructions (Make 2)
Chain 6.
Row 1: Sc in 2nd ch from hook and each ch across. Turn. (5 sc)
Rows 2-92: Ch 1, sc across. Turn. (5 sc)
Each strap should measure about 23 inches (58.5 cm) before hardware. Add or remove rows in pairs for length adjustments. Sew one end to a top D-ring tab and thread the lower end through a strap slider and lower D-ring.
Hardware Tabs Instructions (Make 4)
Chain 6.
Row 1: Sc in 2nd ch from hook and each ch across. Turn. (5 sc)
Rows 2-8: Ch 1, sc across. Fasten off, leaving a long tail. (5 sc)
Fold each tab around a ring and sew: two at the upper back corners and two near the lower back corners.
Side Tassel Instructions
Wrap yarn 22 times around a 5 inch (12.5 cm) card. Tie at top, slide on a wooden bead, wrap the neck 8-10 times, knot securely, and trim ends even. Attach to the right side ring.
Assembly and Finishing
Follow this order for the smoothest assembly:
1. Weave in all ends before attaching hardware
2. Sew flap attachment row firmly across the back top edge
3. Add handle first, then upper tabs, then lower tabs, checking that straps hang evenly
4. Install clasp after the flap is blocked so the front closure sits centered
5. Optional lining: sew a simple fabric pouch 0.25 inches (6 mm) smaller than the bag, then hand stitch it below the top rim
Blocking: Steam lightly without flattening the pebble texture. Shape the base flat, square the front and back, and let the bag dry stuffed with a towel.
Care Instructions
Troubleshooting Common Issues
Base cups: Your increases are too tight or gauge is too small. Go up a hook size for the base only.
Body leans: Join rounds consistently and place a marker at the start of every round.
Pebble texture looks flat: Close each mini puff firmly and work the next sc snugly.
Flap curls: Block lightly and avoid pulling the surface braid too tight.
Straps stretch: Use cotton cord, add fabric backing, or crochet an extra row of slip stitch along each edge.
Customization Options
Want to make this backpack your own? Here are some easy modifications:
Wider bag: Increase the foundation chain by multiples of 2. Each added 2 chains adds 4 stitches to the base circumference after Round 6.
Deeper bag: Add one more oval increase round before the body, keeping the final stitch count even for the pebble repeat.
Taller bag: Add any even number of body rounds before the eyelet round so the texture sequence stays balanced.
Longer or shorter straps: Add or remove rows in pairs to both straps.
Designer Tip
For a crisp boutique finish, sew a hidden row of firm stitches along the lower edge of the flap before adding the surface braid. This helps the curved flap sit neatly over the drawstring opening.
Thank you so much for choosing this pattern! I really hope you love making this backpack as much as I loved designing it. If you give it a try, I’d absolutely love to see your finished project. Tag me on Instagram or share a photo on Facebook so I can admire your work!
If this pattern is calling your name, go ahead and save it to your Pinterest boards so you can find it when you’re ready to start. And if you do make one, drop a comment below. I love hearing which colors you choose and seeing how you make these patterns your own!
Want a Quick & Easy Printable Version?
Get a clean, beautifully formatted PDF of this pattern — easy to follow step by step, ready to print or save on any device. No scrolling, no distractions, just the pattern.
Get the Printable PDF →