I call this one "The Daisy Bag" because it reminds me of lazy summer afternoons picking wildflowers. This pattern has been sitting in my design notebook for almost two years now, scribbled between coffee stains and random yarn swatches. I originally made it for my niece who wanted something "cute but not too girly" for carrying her sketchbooks around. She wore it until the straps nearly gave out, which told me everything I needed to know. Now I am finally sharing it with you, complete with all the little tweaks I made along the way to get the raised braid motif just right.
Get the Ad-Free PDF Pattern
You can find the free pattern below, or you can purchase the ad-free printable PDF from my shop.
Get the Printable PDF →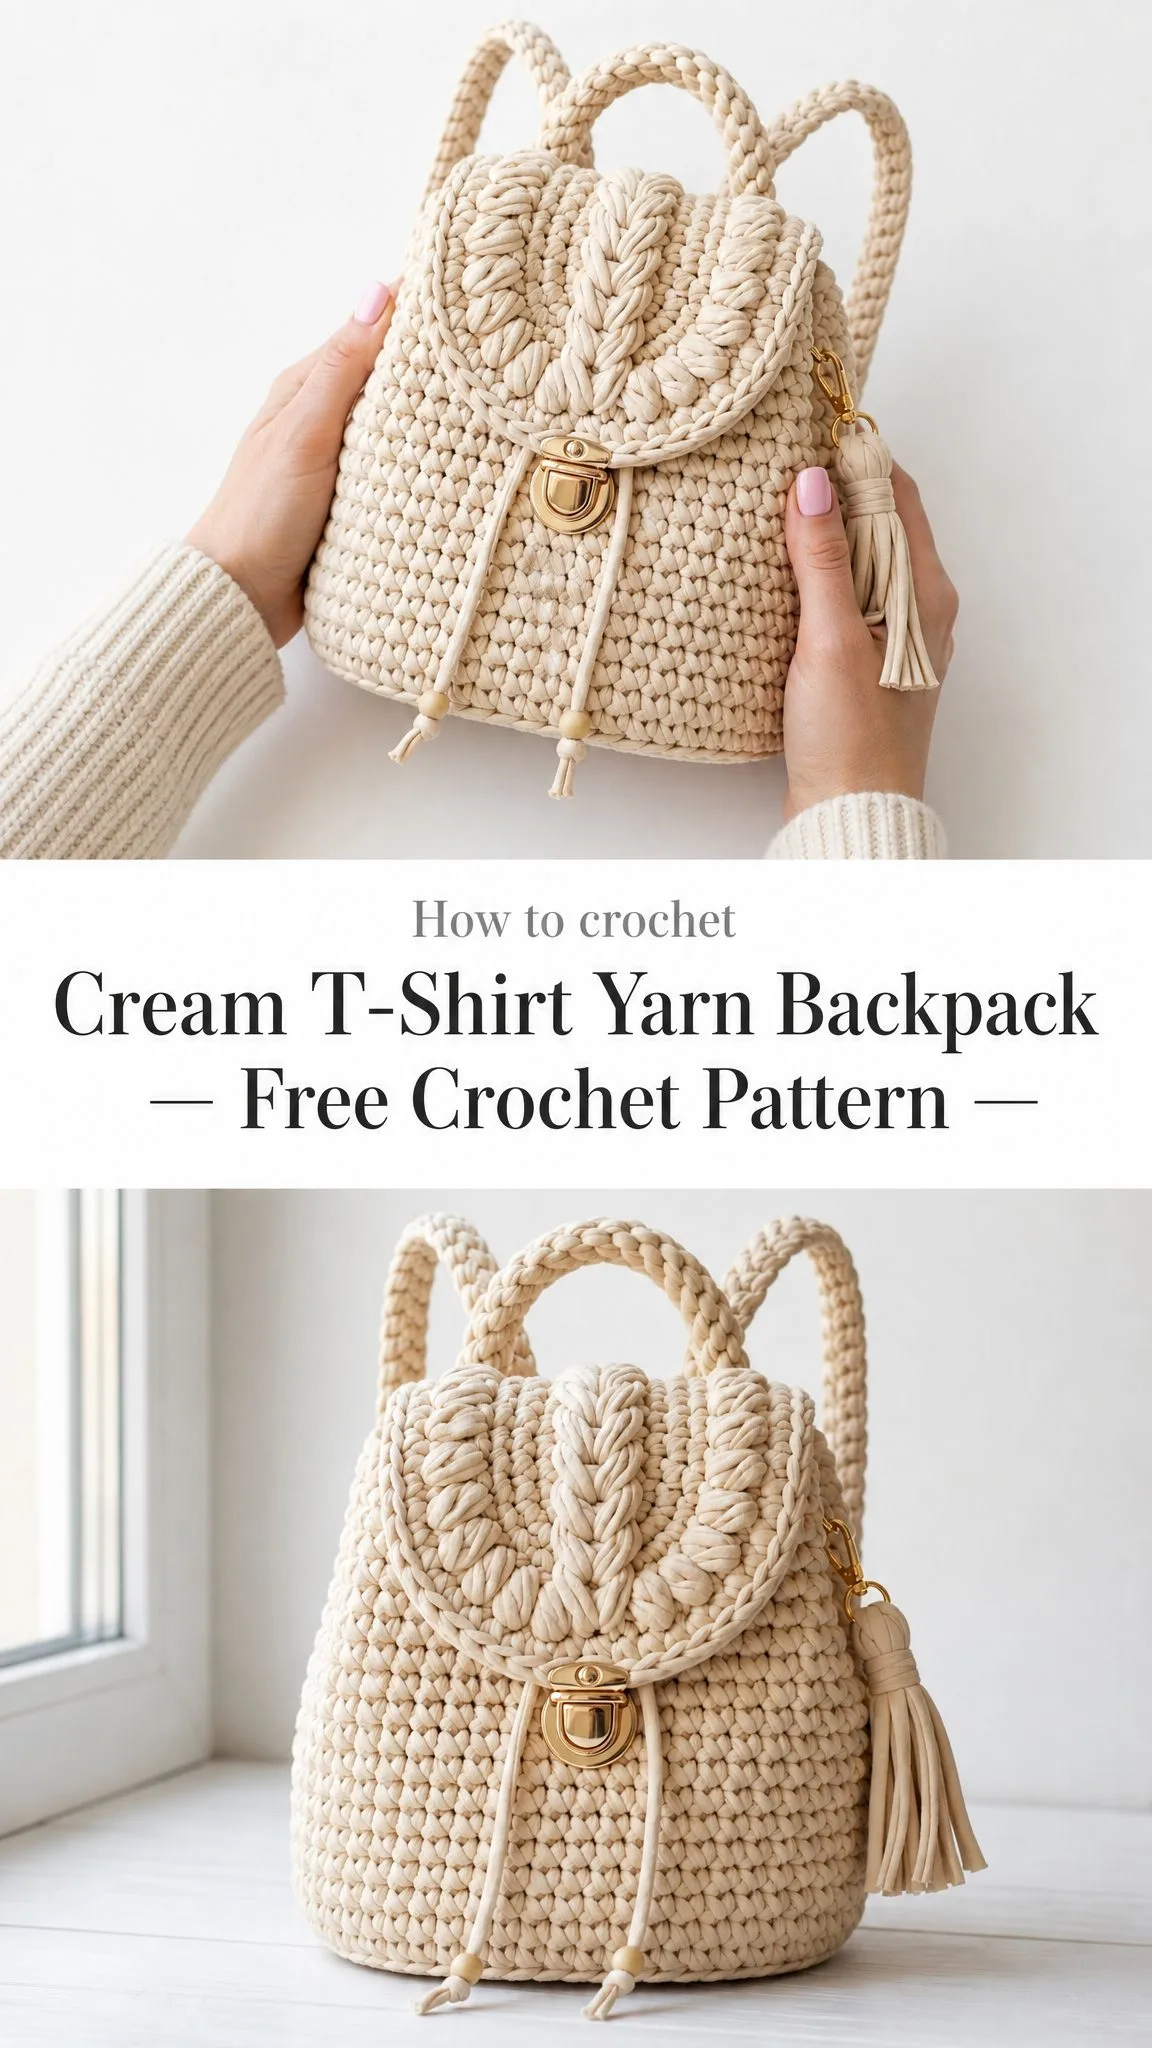
About This Cream T-Shirt Yarn Backpack Pattern
This plush drawstring mini backpack is the perfect blend of style and function. Made entirely from chunky t-shirt yarn, it creates a dense, structured fabric that holds its shape beautifully without any lining needed. The standout feature is that gorgeous raised braided flap, which looks incredibly impressive but is actually created using surface crochet techniques you can master in an afternoon.
The body uses waistcoat stitch throughout, giving the bag that distinctive knit-like V pattern you can see in the photos. Combined with polished gold hardware including a tuck lock closure, D-rings, and swivel hooks, this backpack looks like something you would find in a boutique.
Skill level: Confident intermediate. You will be working continuous oval shaping for the base, maintaining even tension in waistcoat stitch, adding surface crochet details, and attaching hardware.
Time estimate: 7 to 10 focused hours from start to finish.
Finished size: Approximately 9 inches wide x 10.5 inches tall x 4.5 inches deep (23 x 27 x 11.5 cm), not including the straps and tassel.
Materials You Will Need
Gathering your supplies before you start makes the whole process smoother. Here is everything you need:
Yarn:
Recommended yarn brands:
Hooks:
Hardware:
Notions:
Substitution tip: Choose a bulky t-shirt yarn that gives you a dense fabric without causing wrist strain. If your yarn runs thinner, try holding two strands together or add extra rounds to maintain the finished measurements.
Gauge
Getting your gauge right is essential for this project since you want a sturdy bag that holds its shape.
8 single crochet stitches and 8 rounds = 4 inches (10 cm) in waistcoat stitch worked in the round, gently blocked.
Swatch in the round and match both stitch and row gauge before beginning. I know swatching feels tedious, but trust me on this one.
Checkpoint gauge: After completing Base Round 7, your base should measure about 8.75 x 4.25 inches (22 x 11 cm).
Abbreviations and Special Stitches
Let me walk you through all the terms you will encounter in this pattern.
Standard Abbreviations:
Special Stitches:
Waistcoat stitch: This is the star of the show. Instead of inserting your hook under the top two loops like a normal single crochet, you insert your hook through the center V of the next stitch. Draw up a loop, yarn over, and pull through 2 loops. Keep your loops loose enough for the hook to pass through easily. This creates that beautiful knit-like texture.
Surface slip stitch braid: With the right side facing you, hold your yarn under the fabric. Insert your hook into the next marked space, pull a loop to the front and through the loop on your hook. Continue along the marked line without pulling tight. This technique creates the raised braid effect on the flap.
4-loop puff: Yarn over, insert hook in the marked stitch, draw up a loop. Repeat this 4 times total. Yarn over and pull through all loops on your hook, then chain 1 to lock it in place. You will only use this on the flap motif.
Left-handed note: Work the same instructions in the opposite direction. Place the tassel and hardware on your preferred wearing side after trying on the finished shell.
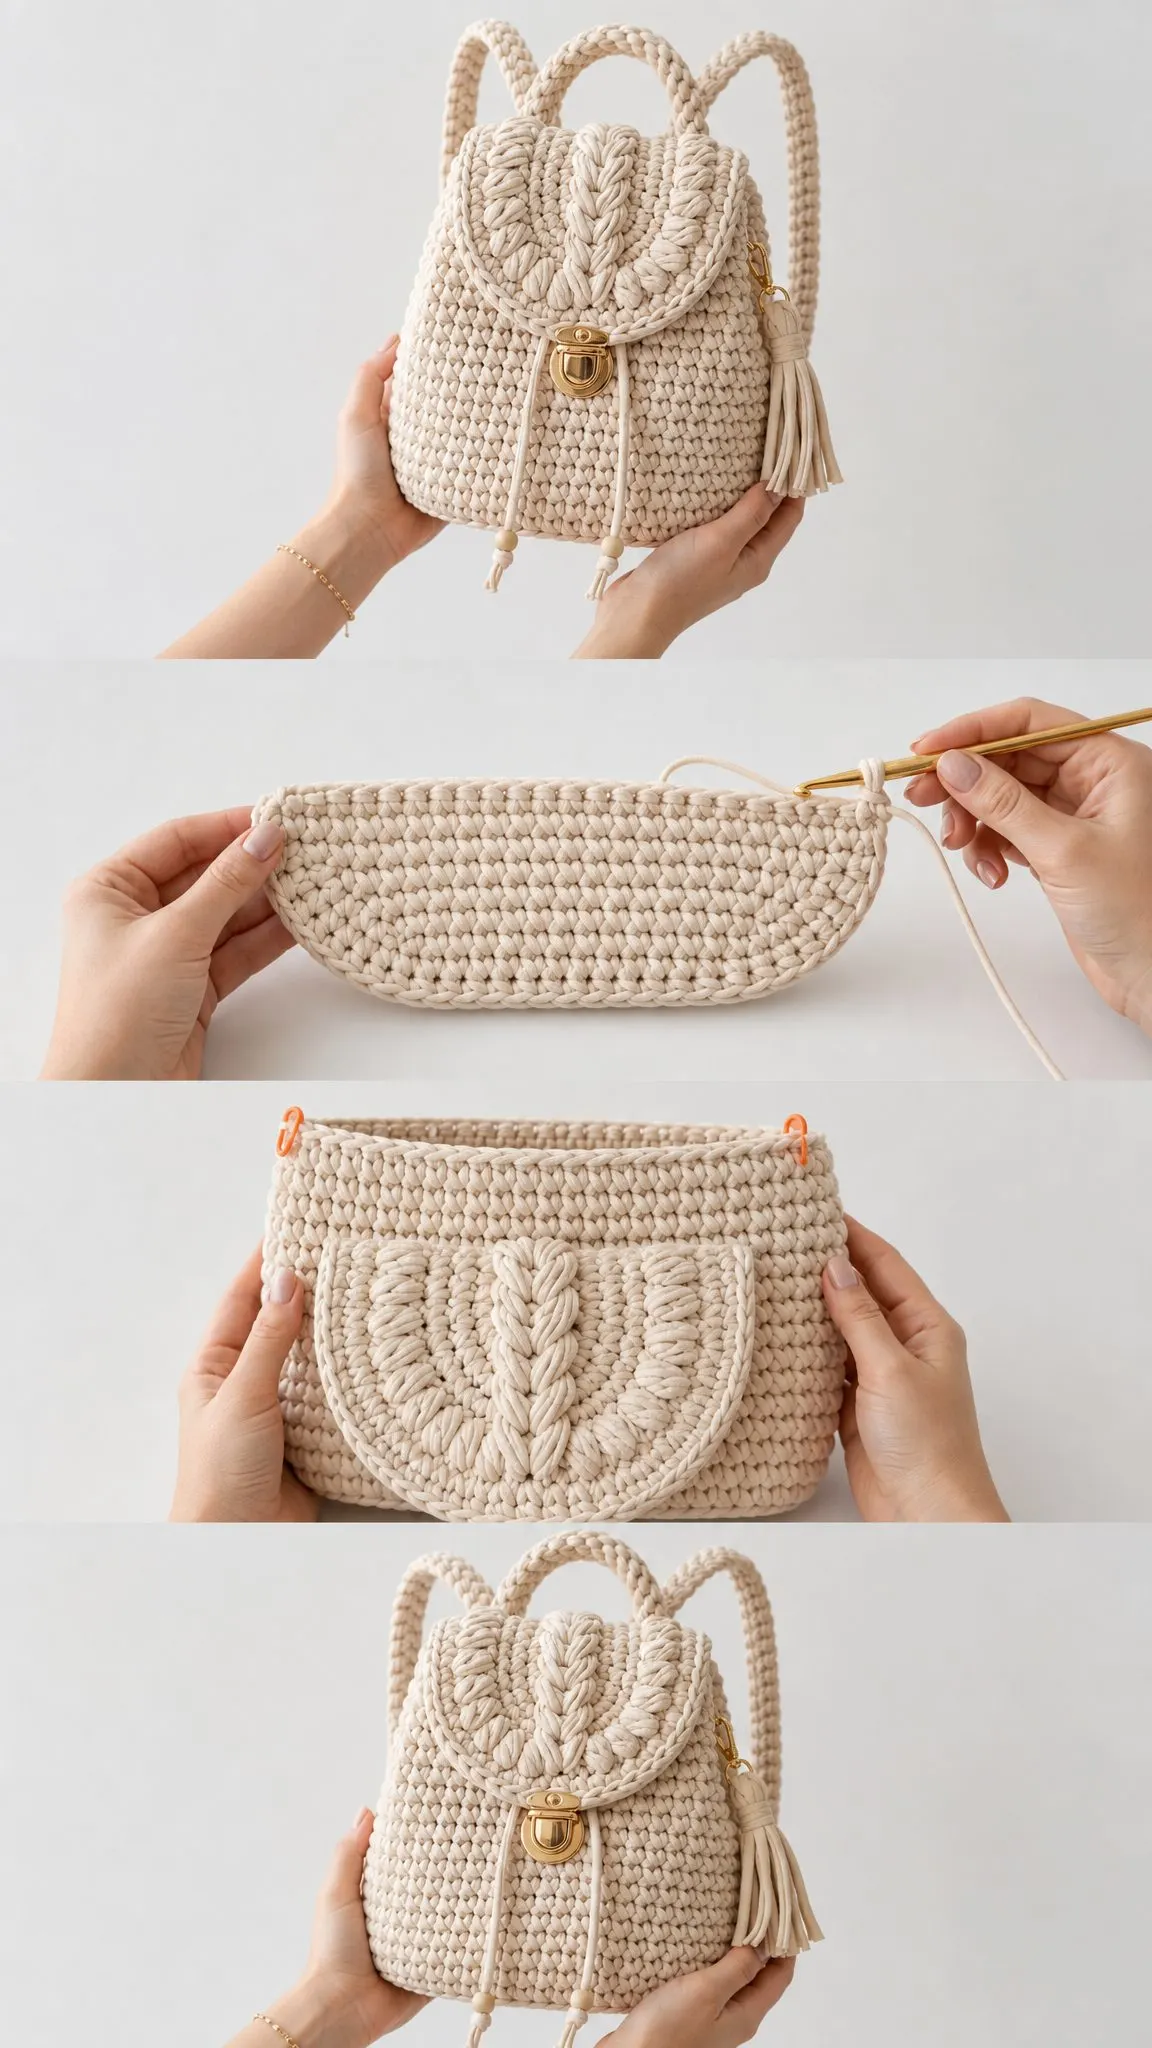
The Base
The base creates an oval shape that gives your backpack its structure. Work in continuous rounds, placing a marker in the first stitch of each round and moving it up as you go.
Round 1: Chain 12. Single crochet in 2nd chain from hook, single crochet in the next 9 chains, work 3 single crochet in the last chain. Working along the opposite side of your foundation chain, single crochet 9, work 2 single crochet in the first chain. (24 sc)
Round 2: Increase, single crochet 9, increase in each of the next 3 stitches, single crochet 9, increase in each of the next 2 stitches. (30 sc)
Round 3: Single crochet around, placing 6 increases evenly on the curved ends only, with 3 increases on each end. (36 sc)
Round 4: Single crochet around, placing 6 increases evenly on the curved ends only, with 3 increases on each end. (42 sc)
Round 5: Single crochet around, placing 6 increases evenly on the curved ends only, with 3 increases on each end. (48 sc)
Round 6: Single crochet around, placing 6 increases evenly on the curved ends only, with 3 increases on each end. (54 sc)
Round 7: Single crochet around, placing 6 increases evenly on the curved ends only, with 3 increases on each end. (60 sc)
The Body
Now you will build the walls of your backpack upward from the base.
Round 8: Working in back loop only, single crochet evenly around with no increases. (60 sc)
This BLO round creates a crisp edge where the base meets the body.
Rounds 9 through 25: Work waistcoat stitch in each stitch around. (60 sc each round)
This is the main body of your bag. Take your time with these rounds and focus on keeping your tension consistent. The waistcoat stitch can feel a bit fiddly at first, but you will find your rhythm.
Round 26: Single crochet around, placing markers at center front, center back, and side edges. (60 sc)
Checkpoint: Your piece should measure about 9 inches (23 cm) tall from the bottom center. The top opening should measure about 26 to 30 inches (66 to 76 cm) around depending on stuffing and yarn spring.
Top Edge and Drawstring
The eyelet round creates holes for threading your drawstring cord.
Round 27 (eyelets): Single crochet 3, chain 1, skip 1; repeat from 15 times. (45 sc, 15 ch-1 spaces)
Round 28: Single crochet in each single crochet and each chain-1 space around. (60 sc)
Round 29: Slip stitch loosely in each stitch around. Fasten off invisibly. (60 sl sts)
Drawstring Cord
With your 8 mm hook, chain 70, then slip stitch in the back bump of each chain back to the start. Fasten off, leaving 5 inch (13 cm) tails. Make 2 small stopper knots or add wooden beads to the ends. Weave the cord through the eyelet round starting from center front, going around the back, and coming out at center front.
Checkpoint: Your cord should cinch the opening neatly with two hanging tails about 5 to 6 inches (13 to 15 cm) long.
Size Customization Tips
Want to adjust the size? Here is how:
The Rounded Flap
The flap is worked separately, starting from the straight top edge and decreasing down to the rounded lower edge. Chain 1 to turn on every row. Your turning chain does not count as a stitch.
Row 1: Chain 32. Single crochet in 2nd chain from hook and each chain across. (31 sc)
Rows 2 through 4: Single crochet across. (31 sc)
Row 5: Sc2tog, single crochet 27, sc2tog. (29 sc)
Row 6: Single crochet across. (29 sc)
Row 7: Sc2tog, single crochet 25, sc2tog. (27 sc)
Row 8: Single crochet across. (27 sc)
Row 9: Sc2tog, single crochet 23, sc2tog. (25 sc)
Row 10: Single crochet across. (25 sc)
Row 11: Sc2tog, single crochet 21, sc2tog. (23 sc)
Row 12: Single crochet across. (23 sc)
Row 13: Sc2tog, single crochet 19, sc2tog. (21 sc)
Row 14: Sc2tog, single crochet 17, sc2tog. (19 sc)
Row 15: Sc2tog, single crochet 15, sc2tog. (17 sc)
Flap Edging and Raised Braid Motif
Edge your flap with 1 round of single crochet: work 31 single crochet across the top, 14 single crochet down the first side, 17 single crochet across the rounded lower edge, and 14 single crochet up the second side. Join with a slip stitch. (76 sc)
Now for the beautiful raised detail. Surface crochet a raised oval border 1 row inside the edge. Add three raised vertical braids: the center braid over Rows 4 through 13, and side braids over Rows 5 through 12, each spaced 6 stitches from center. Work 4-loop puffs on every other row along each line, then surface slip stitch between puffs to create the braided look.
Sew the straight top edge to the back top of the backpack, centered over 31 body stitches.
Straps, Tassel, and Assembly
Back Straps (make 2)
With your 6.5 mm hook, chain 78. Slip stitch in the back bump of each chain. Work a second slip-stitch pass along the opposite side if you want a rounder cord. Finished strap length: about 27 to 29 inches (69 to 74 cm) before attachment.
Top Handle
Chain 28, slip stitch in back bumps, then sew both ends firmly to the top back edge 3 inches (7.5 cm) apart.
Tassel
Wrap yarn around a 5 inch (13 cm) piece of cardboard 10 times. Tie at the top, wrap the neck 6 to 8 times, trim ends evenly, and attach to a swivel hook.
Hardware Placement
1. Sew or crochet two lower D-ring tabs to the back base corners. Each tab should be 4 single crochet wide by 4 rows tall.
2. Attach each strap top to the upper back edge, just inside the handle base. Clip strap ends to the lower D-rings.
3. Center the lock plate on the lower flap edge. Sew the matching receiver to the body front, aligned with the drawstring tails.
4. Attach the tassel to the right side ring or to the flap hinge ring.
Finishing and Blocking
Weave in all your ends with a large tapestry needle, splitting the yarn only when needed for security. Steam lightly from a distance. Do not press directly. Shape the bag over a towel or small box while it cools. Add the optional base insert after blocking.
Quick Progress Checkpoints
Use these measurements to make sure you are on track:
| Stage | Expected Measurement |
|---|---|
| After base | About 8.75 x 4.25 inches (22 x 11 cm), 60 stitches around |
| After body | About 9 inches (23 cm) tall before top edging |
| After flap | About 7.5 inches (19 cm) wide and 5 inches (13 cm) deep before edging |
Care and Troubleshooting
Care: Spot clean with cool water and mild soap. Lay flat to dry, stuffed lightly with a towel to preserve shape. Avoid machine washing unless your yarn label specifically allows it.
If the body leans: Your waistcoat stitches may be pulling right or left. Rotate the starting point every few rounds or block the shell after finishing.
If the base ruffles: Your base rounds are too loose. Go down a hook size for the base only.
If the flap curls: Add one more single crochet edging round or steam lightly while pinned flat.
If hardware feels heavy: Reinforce the inside with a small square of felt or plastic canvas before sewing on the lock.
UK Terms Note
This pattern uses US crochet terminology. If you work in UK terms, remember that US single crochet equals UK double crochet, and US slip stitch equals UK slip stitch. All stitch counts and construction steps stay the same.
I hope you love making this cream t-shirt yarn backpack as much as I loved designing it. There is something so satisfying about creating a functional accessory you will actually use every day. Thank you for trusting me with your crafting time.
If you found this crochet pattern helpful, I would love for you to pin it to your Pinterest boards so you can find it later and share it with other crafters. And please leave a comment below if you make your own version. I genuinely love seeing your finished projects and hearing about any color swaps or modifications you try!
Want a Quick & Easy Printable Version?
Get a clean, beautifully formatted PDF of this pattern — easy to follow step by step, ready to print or save on any device. No scrolling, no distractions, just the pattern.
Get the Printable PDF →