
Alright, yarn lovers. This is your sign to finally use that gorgeous cotton you have been saving for something special. The Blush Floral Lace Dress combines raised floral squares, openwork lace, and a dreamy A-line silhouette into one stunning wearable project.
Get the Ad-Free PDF Pattern
You can find the free pattern below, or you can purchase the ad-free printable PDF from my shop.
Get the Printable PDF →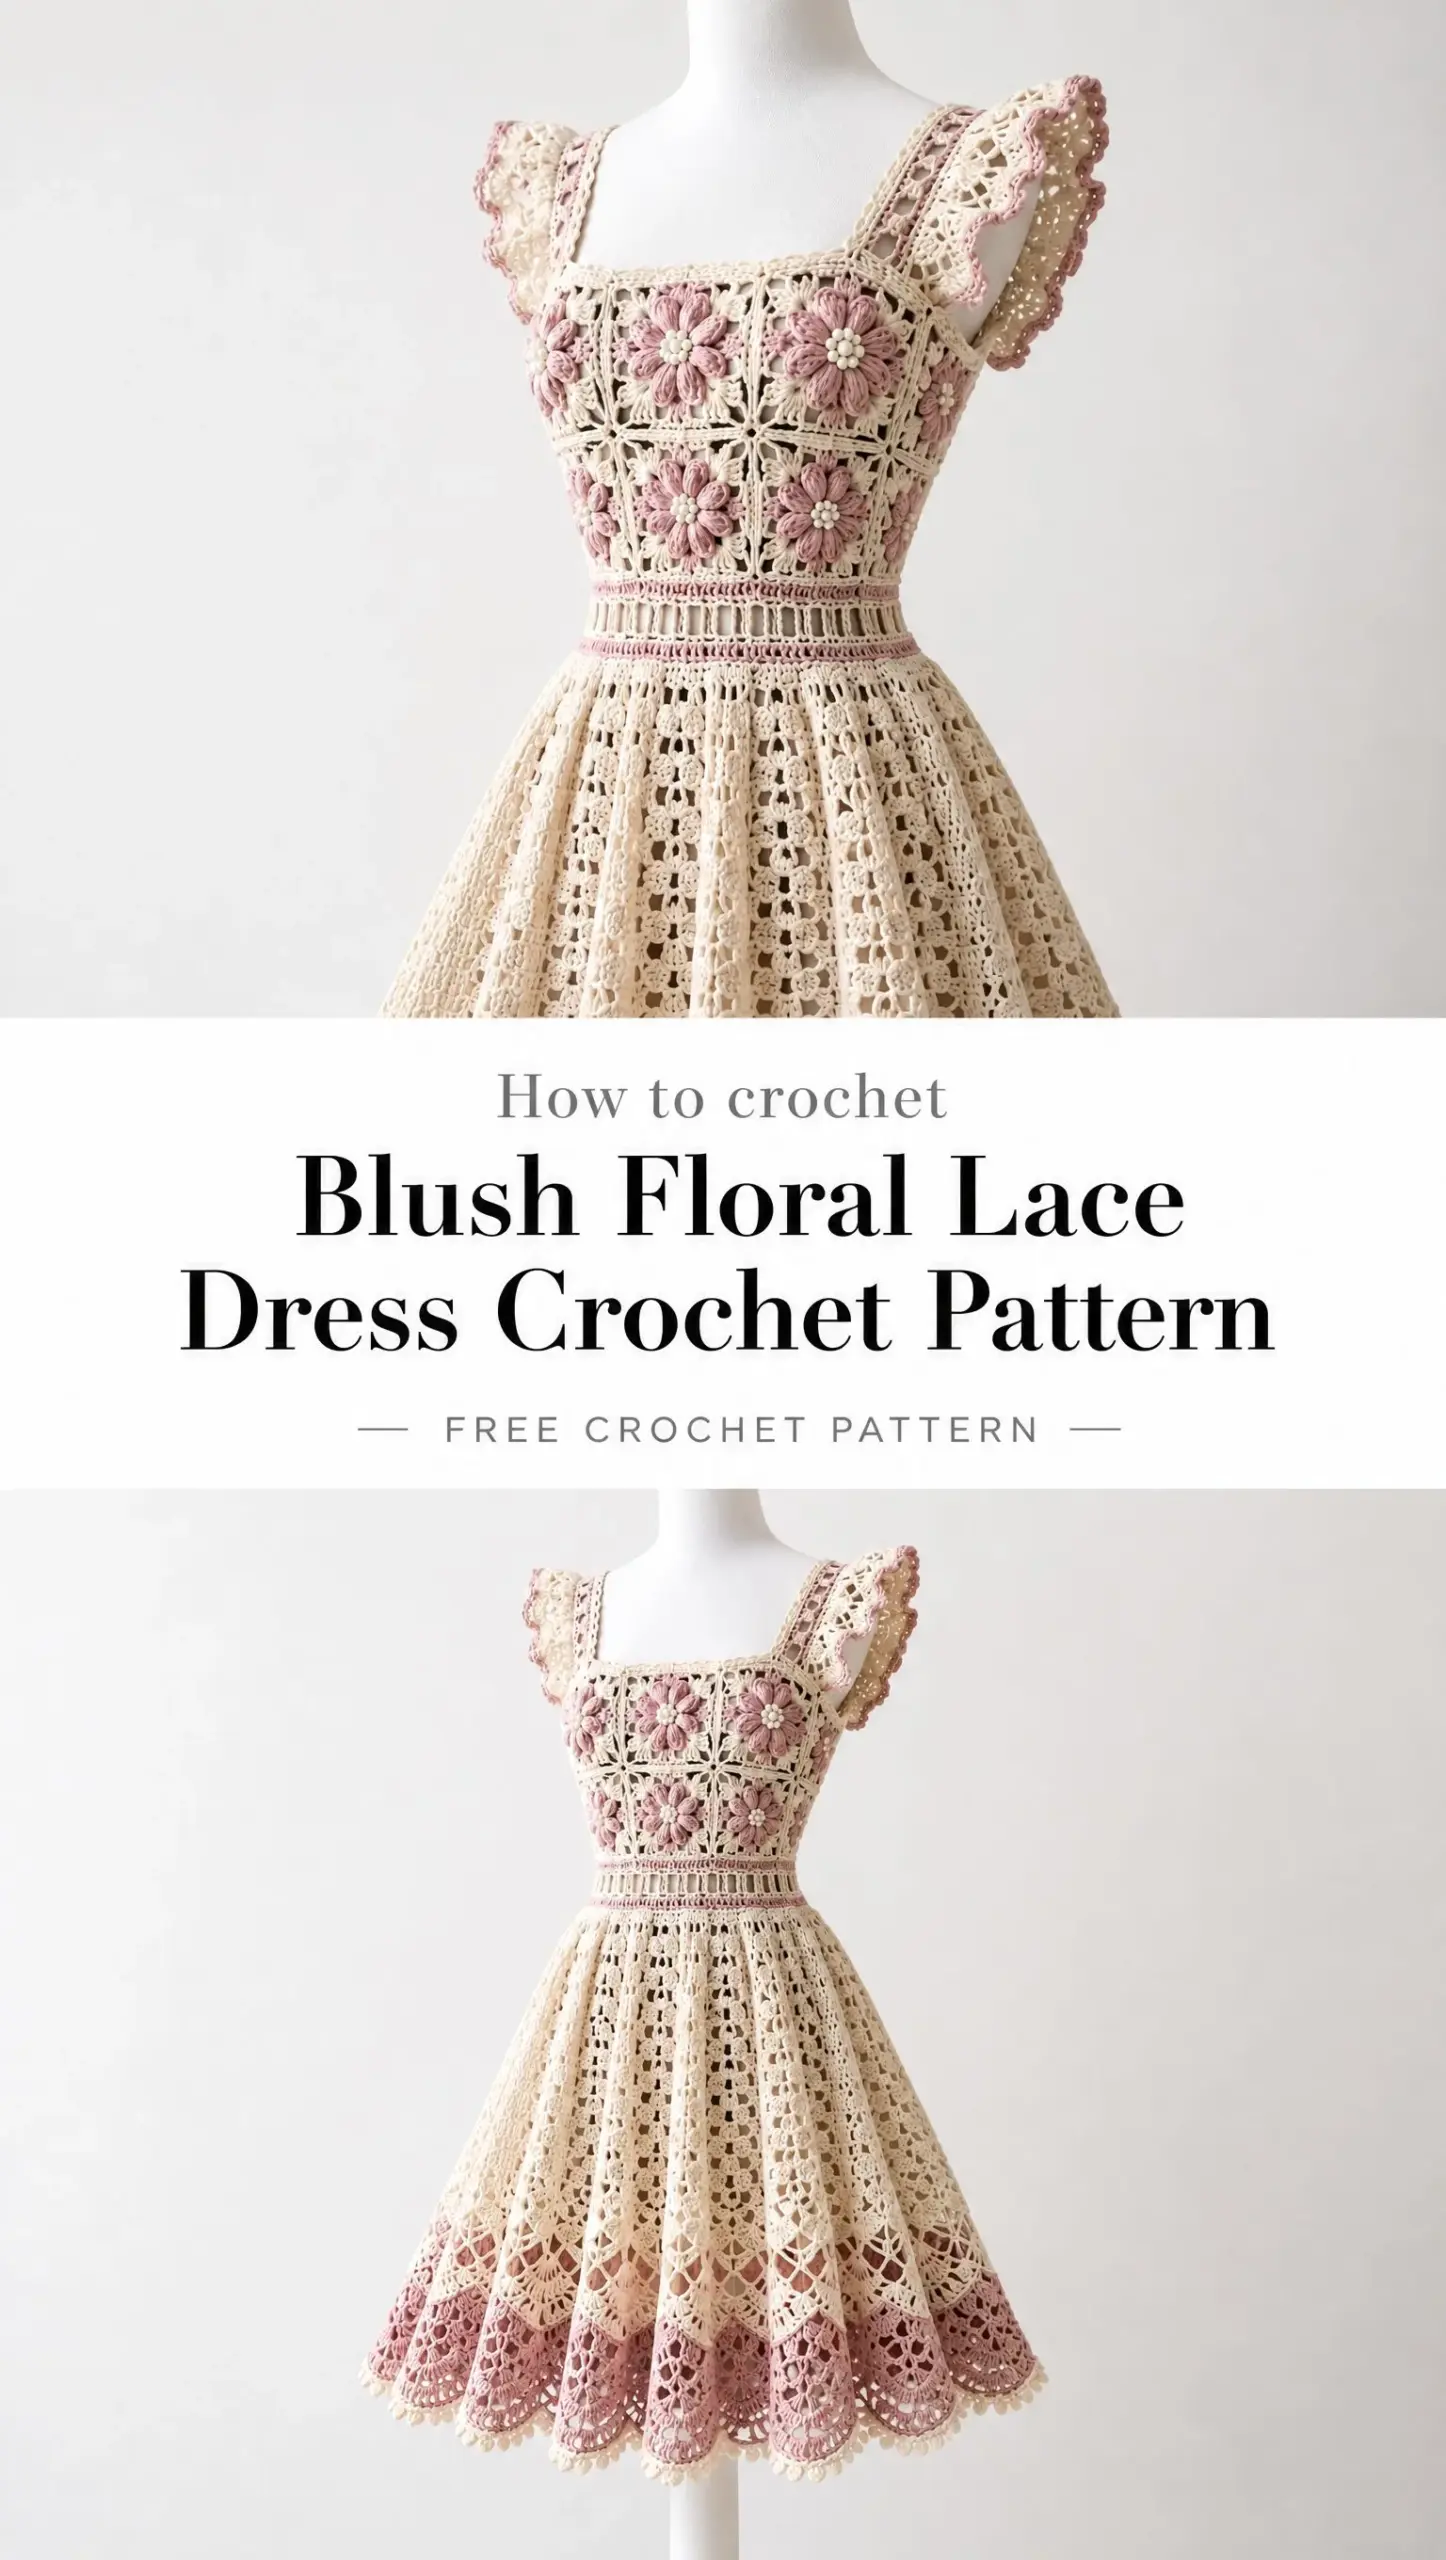
Fair warning: this is an intermediate to advanced pattern. You will be working motifs, joining them into a bodice, adding shaped waistband construction, and building an expanding lace skirt. But if you have tackled granny squares and basic garment construction before, you are absolutely ready for this.
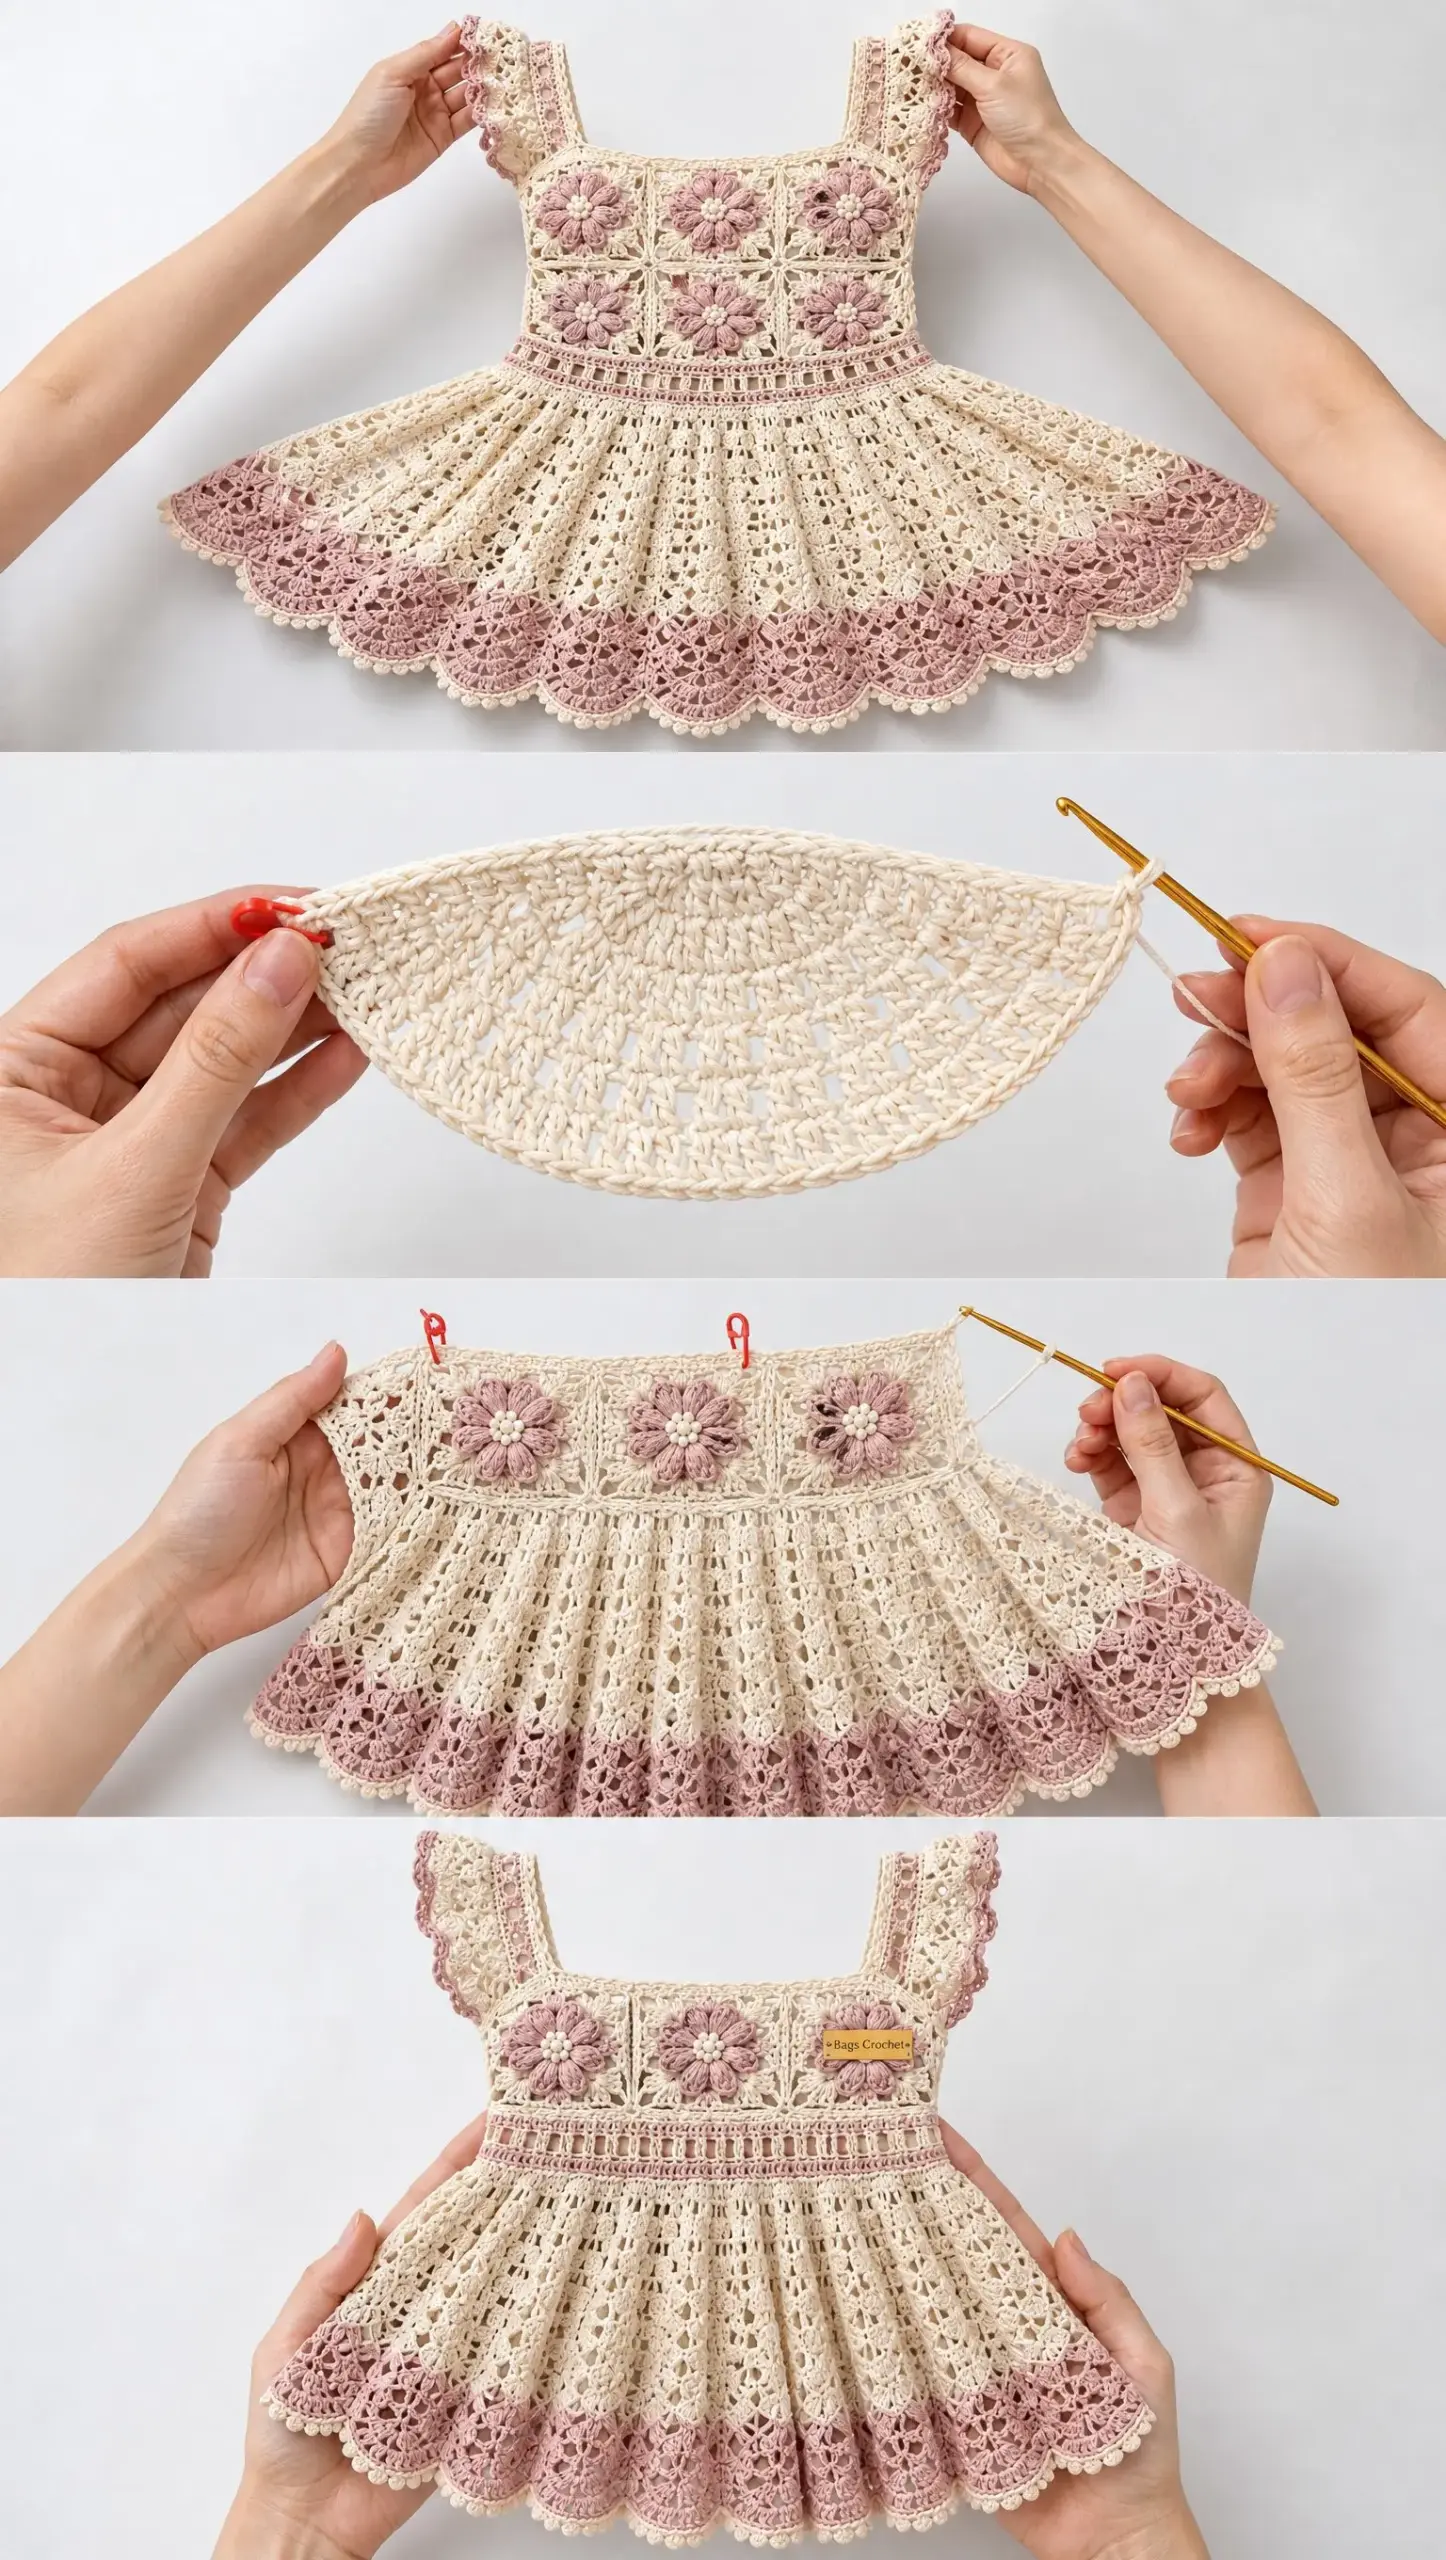
The finished dress features a two-row floral square bodice, wide shoulder straps with flutter ruffles, a fitted openwork waistband, and a full lace skirt with a gorgeous blush scalloped hem. It is size-inclusive from XS to 3XL, and the modular construction means you can customize fit as you go.
About This Pattern
This crochet dress pattern creates an airy, romantic sundress perfect for warm weather occasions. The design uses a clever four-system construction: floral squares for the bodice, a structured waistband that cinches at the natural waist, vertical lace panels that flare into an A-line skirt, and beautiful wide straps finished with delicate ruffles.
The color palette combines cream cotton for all structural elements with dusty pink for the raised flower petals and pale blush for accents like the strap ruffles and broad hem band. The result is soft, feminine, and absolutely eye-catching.
Skill Level: Intermediate to Advanced
This pattern assumes you are comfortable with working in the round, joining motifs, basic increases and decreases, and following multi-section construction. If terms like "puff stitch" or "shell" are new to you, practice them on a small swatch first.
Materials Needed
Yarn:
Hook:
Notions:
Optional:
Gauge
Gauge is essential for this pattern. The modular bodice depends entirely on square size. Wash and block one complete motif before making the full set.
Motif gauge: 1 finished floral square equals 4 inches by 4 inches (10 cm by 10 cm) blocked.
Skirt lace gauge: approximately 6 double crochet (dc) equals 1 inch (2.5 cm) and 4 lace rows equals 1.5 inches (3.8 cm) after blocking.
If your square is larger or smaller than 4 inches, change your hook size before continuing. The exact skirt gauge is less critical than achieving good drape and the correct finished circumference.
Size Chart
| Size | To Fit Bust | Bodice Squares Per Row | Total Bodice Squares | Approx. Bodice Circumference | Target Waist | Approx. Finished Length |
|---|---|---|---|---|---|---|
| XS | 30-32 in | 8 | 16 | 32 in | 24-26 in | 31 in |
| S | 34-36 in | 9 | 18 | 36 in | 27-29 in | 32 in |
| M | 38-40 in | 10 | 20 | 40 in | 30-33 in | 33 in |
| L | 42-44 in | 11 | 22 | 44 in | 34-37 in | 34 in |
| XL | 46-48 in | 12 | 24 | 48 in | 38-41 in | 35 in |
| 2XL | 50-52 in | 13 | 26 | 52 in | 42-45 in | 36 in |
| 3XL | 54-56 in | 14 | 28 | 56 in | 46-49 in | 37 in |
Choose the square count that gives 0 to 2 inches of positive ease at the bust. For a closer fit, use a slightly smaller hook for the final cream framing round.
Abbreviations
Before we dive into the pattern, here are all the abbreviations you will need:
Pattern Instructions
Part 1: Raised Eight-Petal Floral Square
Make 16 (18, 20, 22, 24, 26, 28) squares total. Finished blocked size: 4 inches (10 cm) square.
Center and Petals:
Step 1: With cream, make a magic ring. Round 1: Ch 1, work 8 sc into ring. Join with sl st to first sc. Pull ring closed. Fasten off cream. (8 sc)
Step 2: Join dusty pink in any sc. Round 2: Ch 3, work 3 dc in same st, ch 3, sl st in same st. Repeat in each of 8 sc. You now have 8 narrow petals. Fasten off. (8 petals)
Step 3 (Optional fuller petal): On each petal, join blush at base, sl st up first ch-3 side, work (sc, hdc, 2 dc, hdc, sc) across the top loops of the petal, then sl st down opposite side. Repeat around. This creates the softly raised two-tone petals shown in the photos.
Cream Bead-Like Center:
Step 4: Join cream through the center ring. Ch 1, make one 5-loop puff stitch: yarn over, insert into center, pull up a loop to about 1/2 inch (1.2 cm), repeat 4 more times, yarn over and pull through all loops, ch 1 to close. Fasten securely on WS.
Tip: For a clustered center, make 3 small 3-loop puffs into the ring instead of one large puff.
Square Frame:
Round 3 (behind petals): With cream, join around the post or base between any two petals. Ch 5, sl st around the next petal base from the back. Repeat 8 times. You have 8 chain loops behind the flower. (8 ch-5 loops)
Round 4: Sl st into first ch-5 loop. Ch 3 (counts as dc), 2 dc, ch 2, 3 dc in same loop (corner made). Ch 2, 3 dc in next loop, ch 2, (3 dc, ch 2, 3 dc) in next loop. Repeat from * around, positioning a corner in every second loop. Join to top of ch-3.
Round 5: Sl st to corner ch-2 sp. Ch 3, (dc, ch 2, 2 dc) in corner. Ch 1, 3 dc in next ch-2 sp, ch 1, 3 dc in next ch-2 sp, ch 1, (2 dc, ch 2, 2 dc) in corner. Repeat around. Join.
Round 6: Ch 1, sc in each dc and ch-1 sp around, working (sc, ch 1, sc) in each corner ch-2 sp. Join. Fasten off, leaving a 12 inch (30 cm) tail if using sewn joins.
Important: Block before joining. Pin each square to exactly 4 inches (10 cm). Steam lightly or wet-block according to your yarn label. Uniform square size is more important than tiny stitch-count differences.
Part 2: Joining the Bodice
Join squares into two separate rings, then join the two rings vertically. The front and back are identical at this stage.
Step 9: Lay out the first row of 8 (9, 10, 11, 12, 13, 14) squares. Alternate flowers very slightly in orientation so the petals look organic, but keep all square edges aligned.
Step 10: Join side edges with mattress stitch through the outer loops of the cream sc edging, or use a flat sl st join on the WS. Keep the seam narrow and textured, not bulky.
Step 11: Close the row into a ring. Repeat for the second row.
Step 12: Place the two rings with RS facing. Join the upper edge of the lower ring to the lower edge of the upper ring, matching corners and seam lines.
Step 13: Try on. The upper edge should sit at or just above the fullest bust line. If the tube feels loose, weave 1/4 inch (6 mm) clear elastic through the top cream edging, lightly tensioned.
Top-Edge Stabilizing Round:
Join cream at a side seam along the top of the upper motif ring. Work 1 sc in each sc and 1 sc into each joining seam, skipping occasional stitches only if needed to prevent rippling.
Next round: Sc 3, ch 1, sk 1. Repeat around, adjusting at seams. This creates tiny open spaces while stabilizing the neckline level.
Part 3: Wide Shoulder Straps and Square Neckline
Make 2 straps. Finished width: about 2.75 inches (7 cm) before ruffle.
Suggested finished strap length from front bodice edge over shoulder to back edge: 12 to 16 inches (30 to 41 cm) depending on torso and size. Measure on the wearer before final attachment.
Strap Base:
Step 14: With cream, ch 15. Row 1: Dc in 4th ch from hook and in next 2 ch, ch 2, sk 2 ch, dc in next 3 ch. Repeat twice. Turn. You should have three 3-dc groups separated by two chain windows.
Step 15: Row 2: Ch 3, dc in next 2 dc, ch 2, 3 dc over next 3 dc. Repeat across. Turn.
Step 16: Repeat Row 2 until strap measures the required length. End after a WS row. Fasten off.
Flutter Ruffle Along Outer Strap Edge:
Step 17: With blush, join at one lower corner along one long edge. Work 2 sc into each row-end space.
Next pass: Ch 1, sc in next st, (hdc, 3 dc, hdc) in next st. Repeat across.
If the ruffle is too full, work the shell in every third stitch instead of every second.
Fasten off. Repeat along the outer edge of the second strap, mirroring placement.
Attach Straps:
Step 18: Mark the front bodice so the inner edges of the straps create the desired square neckline. For sizes XS to S, begin about one square-width apart at center front. For M to 3XL, begin 1 to 1.5 square-widths apart.
Pin straps to front and back while the dress is on the wearer or mannequin. Sew securely through the cream edging only. The ruffled edge faces outward toward the shoulder.
Fit check: Before weaving in strap ends, raise both arms and sit down. The bodice should stay close to the body without the straps digging in. Shorten or lengthen the straps now.
Part 4: Fitted Openwork Waistband
Work downward from the bottom edge of the bodice with cream. The waistband is about 2.25 to 3 inches (5.5 to 7.5 cm) deep.
Round 1: Join cream at a side seam. Ch 3, dc evenly around. To reduce circumference, work dc2tog every 8 to 12 sts until the round measures approximately 1 to 2 inches (2.5 to 5 cm) larger than the target waist when relaxed. Join.
Round 2: Ch 3, dc in next 2 sts, ch 2, sk 2 sts. Repeat around. Join. Adjust the final repeat by skipping 1 or 3 sts if needed.
Round 3: Ch 3, dc in each dc and work 2 dc in each ch-2 sp around. Join.
Round 4 (blush accent): Join blush. Ch 1, sc in each st around. Join.
Round 5 (cream): Ch 3, dc in next 3 sts, ch 2, sk 2 sts. Repeat around. Join.
Round 6: Ch 1, sc around, working 2 sc in each ch-2 sp. Join. Fasten off.
If you need more waist depth, repeat Rounds 3 to 5 once more. If the band gaps at the back, thread a narrow elastic or crochet drawcord through the chain-window round.
Part 5: A-Line Lace Skirt
The skirt is worked in the round from the waistband downward. It begins with narrow vertical cream panels and opens gradually into larger shell-and-diamond lace.
Set-up rule: Count waistband stitches after Round 6. Adjust by increasing or decreasing a few stitches so the count is divisible by 12. One 12-stitch repeat forms one vertical lace panel.
Section A: Narrow Vertical Panels
Round A1: Ch 3, dc in next 2 sts, ch 2, sk 2, dc in next 3 sts, ch 1, sk 1, dc in next 3 sts, ch 2, sk 2, dc in next 1 st. Repeat the 12-st pattern as established around. Join.
Round A2: Ch 3. Work dc in each dc, ch 2 over each ch-2 sp and ch 1 over each ch-1 sp. Join.
Round A3: Repeat A2, but in every third ch-2 sp work (dc, ch 2, dc) instead of ch 2. This adds controlled fullness.
Rounds A4 to A8: Continue the established vertical columns. Every second round, add one extra dc at the outer edge of each main panel. Keep chain spaces aligned vertically.
Section B: Expanding Diamond Lace
Round B1: In each repeat, work 3 dc in the first solid column, ch 3, sc in the center chain space, ch 3, 3 dc in the next solid column. Then ch 2 to move to the next repeat.
Round B2: Work 3 dc over each 3-dc group. Over each ch-3/sc/ch-3 arch, work ch 4, sc in sc, ch 4. Between repeats, work (dc, ch 2, dc) in the ch-2 space.
Round B3: Work 3 dc over each group. Ch 5, sc around the paired ch-4 arches, ch 5. In each between-repeat V-space work (2 dc, ch 2, 2 dc).
Rounds B4 to B7: Continue enlarging the arches by 1 chain per round until they reach ch 7. Increase the between-repeat V-group from 2 dc per side to 3 dc per side. The skirt should begin to flare noticeably.
Section C: Large Shell Lace
Round C1: In each between-repeat ch-2 V-space work a large shell: (3 dc, ch 2, 3 dc). Ch 3, sc into the center of the nearest diamond arch, ch 3. Repeat around.
Round C2: In each shell ch-2 sp work (4 dc, ch 2, 4 dc). Ch 4, sc in previous sc, ch 4. Repeat around.
Round C3: In each shell ch-2 sp work (5 dc, ch 2, 5 dc). Ch 5, sc in previous sc, ch 5. Repeat around.
Step 36: Repeat C2 and C3 until skirt from waist measures 15 (16, 17, 18, 19, 20, 21) inches, or desired length minus 3.5 inches (9 cm) for the hem band.
Tip: If the skirt begins to cup inward, increase the chain arches or add one dc to each side of every shell. If it ruffles excessively, remove one dc from each shell for a round. The visual goal is soft vertical folds, not a rigid circle skirt.
Part 6: Broad Blush Lace Hem Band
Hem Round 1 (blush): Join blush in any shell ch-2 sp. Ch 3, 6 dc in same sp. Ch 3, sc in the center arch between shells, ch 3, 7 dc in next shell ch-2 sp. Repeat around.
Hem Round 2: Ch 3, dc in each of next 6 dc. Ch 3, skip the center sc area, dc in each dc of next fan. Repeat around. Join.
Hem Round 3: In the center dc of each 7-dc fan work (3 dc, ch 3, 3 dc). Ch 5 to the next fan center. Repeat. This starts the large rounded scallops.
Hem Round 4: In each ch-3 shell center work 9 dc. Sc around the ch-5 arch between shells. Repeat around.
Hem Round 5 (cream): Join cream. Sc in first 3 dc of shell, picot, sc in next 3 dc, picot, sc in remaining 3 dc. Sl st into the sc between shells. Repeat around. Fasten off.
Part 7: Neckline and Bodice Finishing
Step 42: With cream, work one neat sc round around the entire square neckline, including the inner edges of both straps. Place 2 sc in each strap row-end corner so the edge lies flat.
Step 43: Next round: Sc 2, picot, sc 2. Repeat around, spacing picots approximately every 1/2 to 3/4 inch (1.2 to 2 cm). Keep this edging delicate. Omit picots across the underarm if they feel bulky.
Step 44: With blush, work a narrow surface sl st line along the lower edge of the waistband or along one bodice seam if you want a stronger blush accent.
Step 45: Weave in all ends on the WS, splitting the yarn tail through nearby stitches so open lace does not reveal loose ends.
Blocking and Final Assembly
Step 46: Soak the dress in cool water with a small amount of wool or cotton wash for 10 to 15 minutes. Do not wring.
Step 47: Roll in towels to remove excess water. Lay flat on blocking mats.
Step 48: Pin the floral squares so their seams are straight and the neckline is square. Smooth the waistband to the target waist measurement.
Step 49: Spread the skirt evenly into soft folds. Pin only enough to open the lace. Over-stretching will make the skirt too long and narrow.
Step 50: Shape strap ruffles with fingertips and pin scallops lightly. Allow to dry completely before unpinning.
Custom Fit Adjustments
| Fit Issue | Adjustment |
|---|---|
| Fuller bust | Use the size matching full bust, then decrease more aggressively in Waist Round 1. Or add 1 to 2 short dc rows across only the lower front bodice before working the waistband. |
| Smaller bust or narrow ribcage | Use fewer bodice squares if possible. Otherwise seam 1/8 to 1/4 inch inside each side join and stabilize the top edge with clear elastic. |
| Long torso | Add 1 to 2 extra waistband repeats or add a narrow dc/chain lattice between the motif bodice and waistband. |
| Short torso | Work only Rounds 1 to 4 of the waistband before beginning the skirt. |
| Wider shoulders | Attach straps farther apart and add 1 to 2 rows to strap length. |
| Narrow shoulders | Attach straps closer to center and shorten them. Stabilize back neckline with elastic if needed. |
| Longer skirt | Repeat Section C as many times as desired before the blush hem band. |
| More coverage | Line bodice only, or wear over a simple slip. A stretch knit lining works best because the crochet bodice has modest give. |
Yarn Substitution Tips
Choose a smooth cotton or cotton-bamboo yarn with strong stitch definition. Highly fuzzy yarns will hide the beautiful floral texture. Very stiff mercerized thread can make the skirt stand away from the body unnaturally.
If using bamboo-rich yarn, shorten the skirt slightly before blocking because the fabric may lengthen with wear.
Best choices: Fine cotton, cotton-bamboo, or cotton-linen blends with 2 to 3 ply structure.
Avoid: Heavy worsted yarn, elastic boucle, chenille, or very haloed fibers.
Always swatch both a flower square and 3 to 4 inches (8 to 10 cm) of shell lace before committing to the full dress.
Estimated Total Yardage by Size
| Size | Cream | Blush | Dusty Pink | Total Approx. |
|---|---|---|---|---|
| XS | 850 yd | 300 yd | 90 yd | 1,240 yd |
| S | 950 yd | 325 yd | 100 yd | 1,375 yd |
| M | 1,050 yd | 350 yd | 110 yd | 1,510 yd |
| L | 1,150 yd | 375 yd | 120 yd | 1,645 yd |
| XL | 1,275 yd | 425 yd | 135 yd | 1,835 yd |
| 2XL | 1,400 yd | 475 yd | 145 yd | 2,020 yd |
| 3XL | 1,550 yd | 525 yd | 160 yd | 2,235 yd |
These estimates include roughly 10% allowance for joining, swatching, and finishing.
Care Instructions
Hand wash or machine wash on a gentle cycle in a mesh garment bag if your yarn label allows. Reshape flat to dry. Store folded rather than on a hanger so the open lace does not stretch over time.
Steam only from a distance and never press the raised petals flat.
Wear note: Because this dress uses large openwork areas, check that all joins are secure before wearing. If worn without a lining, choose undergarments appropriate for the amount of transparency. Put on delicate necklaces after dressing to avoid snagging the lace.
Final Thoughts on the Blush Floral Lace Dress Crochet Pattern
This dress is truly a labor of love, but the finished result is absolutely worth every stitch. Take your time with the floral squares, block them carefully, and trust the process. The modular construction means you can try on as you go and make adjustments for a perfect custom fit.
Thank you so much for choosing this pattern. I hope it brings you hours of happy crocheting and results in a dress you will treasure for years.
If you make this Blush Floral Lace Dress, I would absolutely love to see it! Tag me on Instagram or share your photos in my Facebook group. There is nothing better than seeing your beautiful creations come to life.
If you loved this pattern, save it to your Pinterest boards so you can find it when you are ready to start. And please leave a comment below if you make one. I always love hearing how your projects turn out and seeing your color choices!
Want a Quick & Easy Printable Version?
Get a clean, beautifully formatted PDF of this pattern — easy to follow step by step, ready to print or save on any device. No scrolling, no distractions, just the pattern.
Get the Printable PDF →