
Colorwork crochet scares a lot of people. I get it. You look at those intricate monarch wing patterns with the veins and the cells and the perfectly placed dots, and your brain immediately says "nope, too hard." But here’s the truth: this Cream Monarch Butterfly Cape is built almost entirely with single crochet. That’s it. If you can work a single crochet, you can make this cape.
Get the Ad-Free PDF Pattern
You can find the free pattern below, or you can purchase the ad-free printable PDF from my shop.
Get the Printable PDF →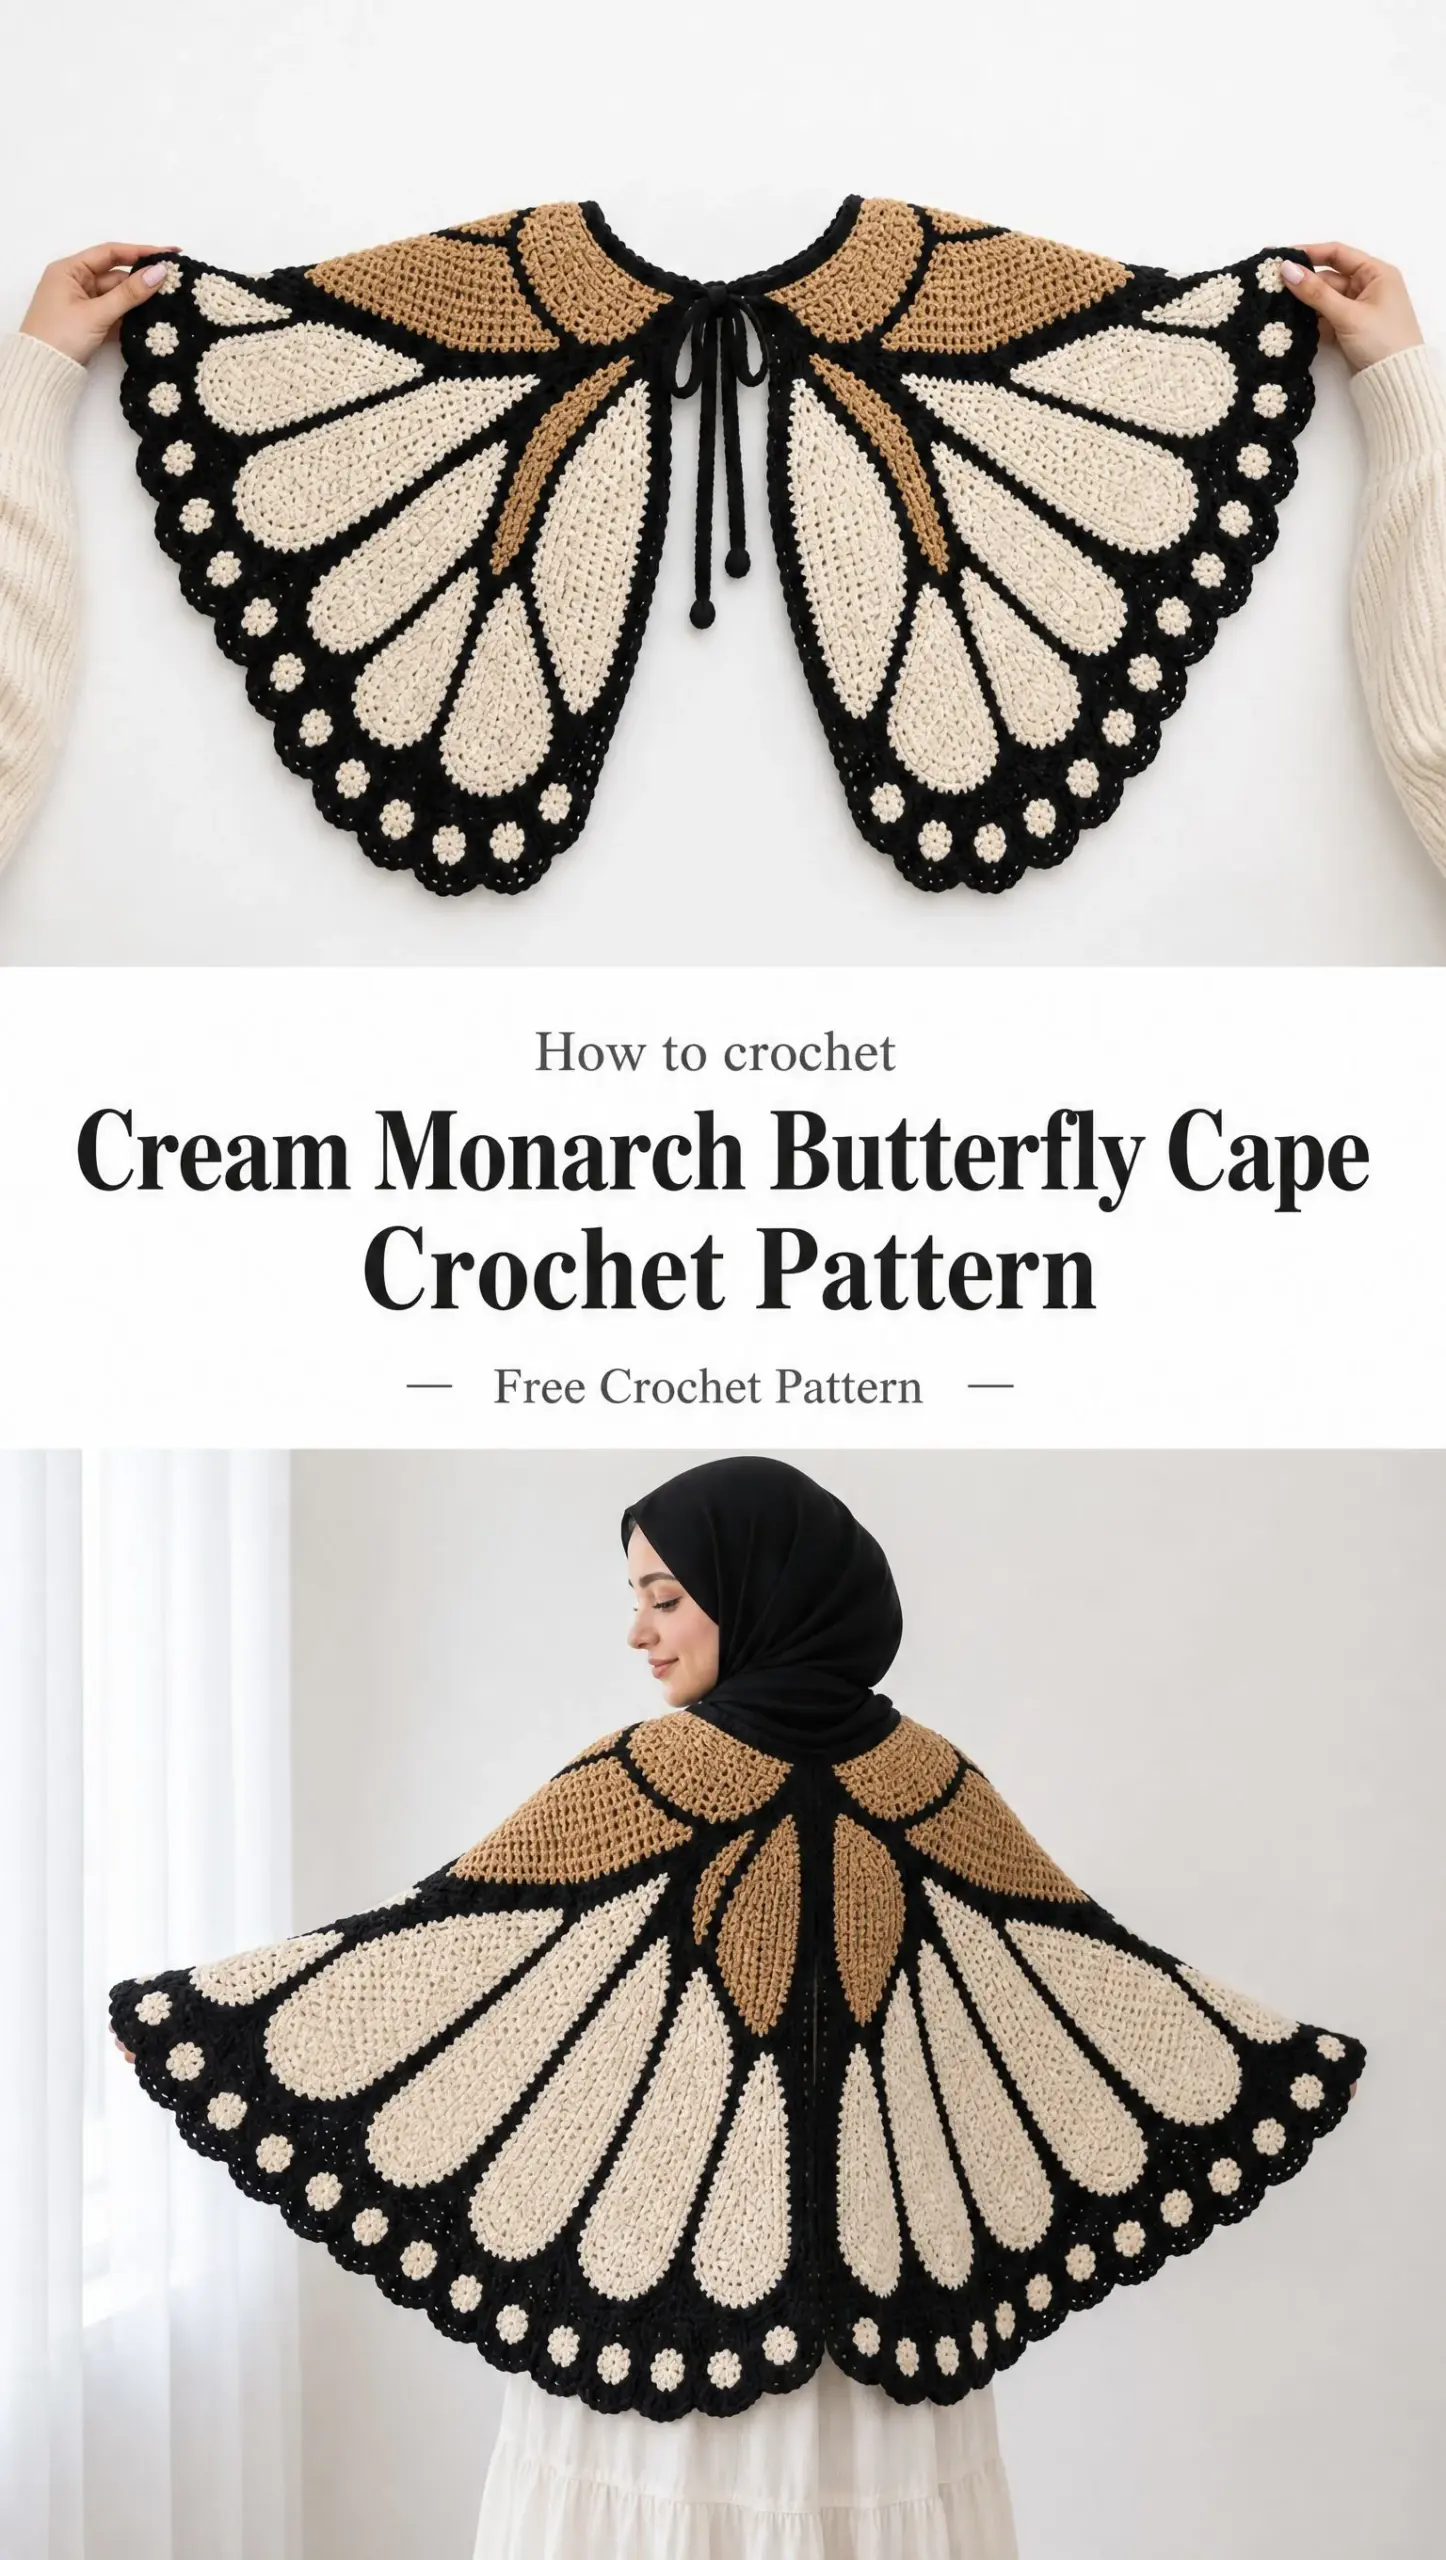
The magic isn’t in complicated stitches. It’s in smart color placement and patient shaping. The pattern breaks everything down into manageable sections. You work two mirrored wings from a center back spine, add some appliqué dots, and suddenly you’re wearing butterfly wings that look like they belong in a museum.
Whether you’ve never tried colorwork before or you’re an experienced crocheter looking for a statement piece, this pattern meets you where you are. The instructions give you flexibility to adjust as you go. Symmetry matters more than hitting exact stitch counts, and that takes so much pressure off. Let’s walk through everything you need to bring these wings to life.
About This Stunning Butterfly Wing Cape
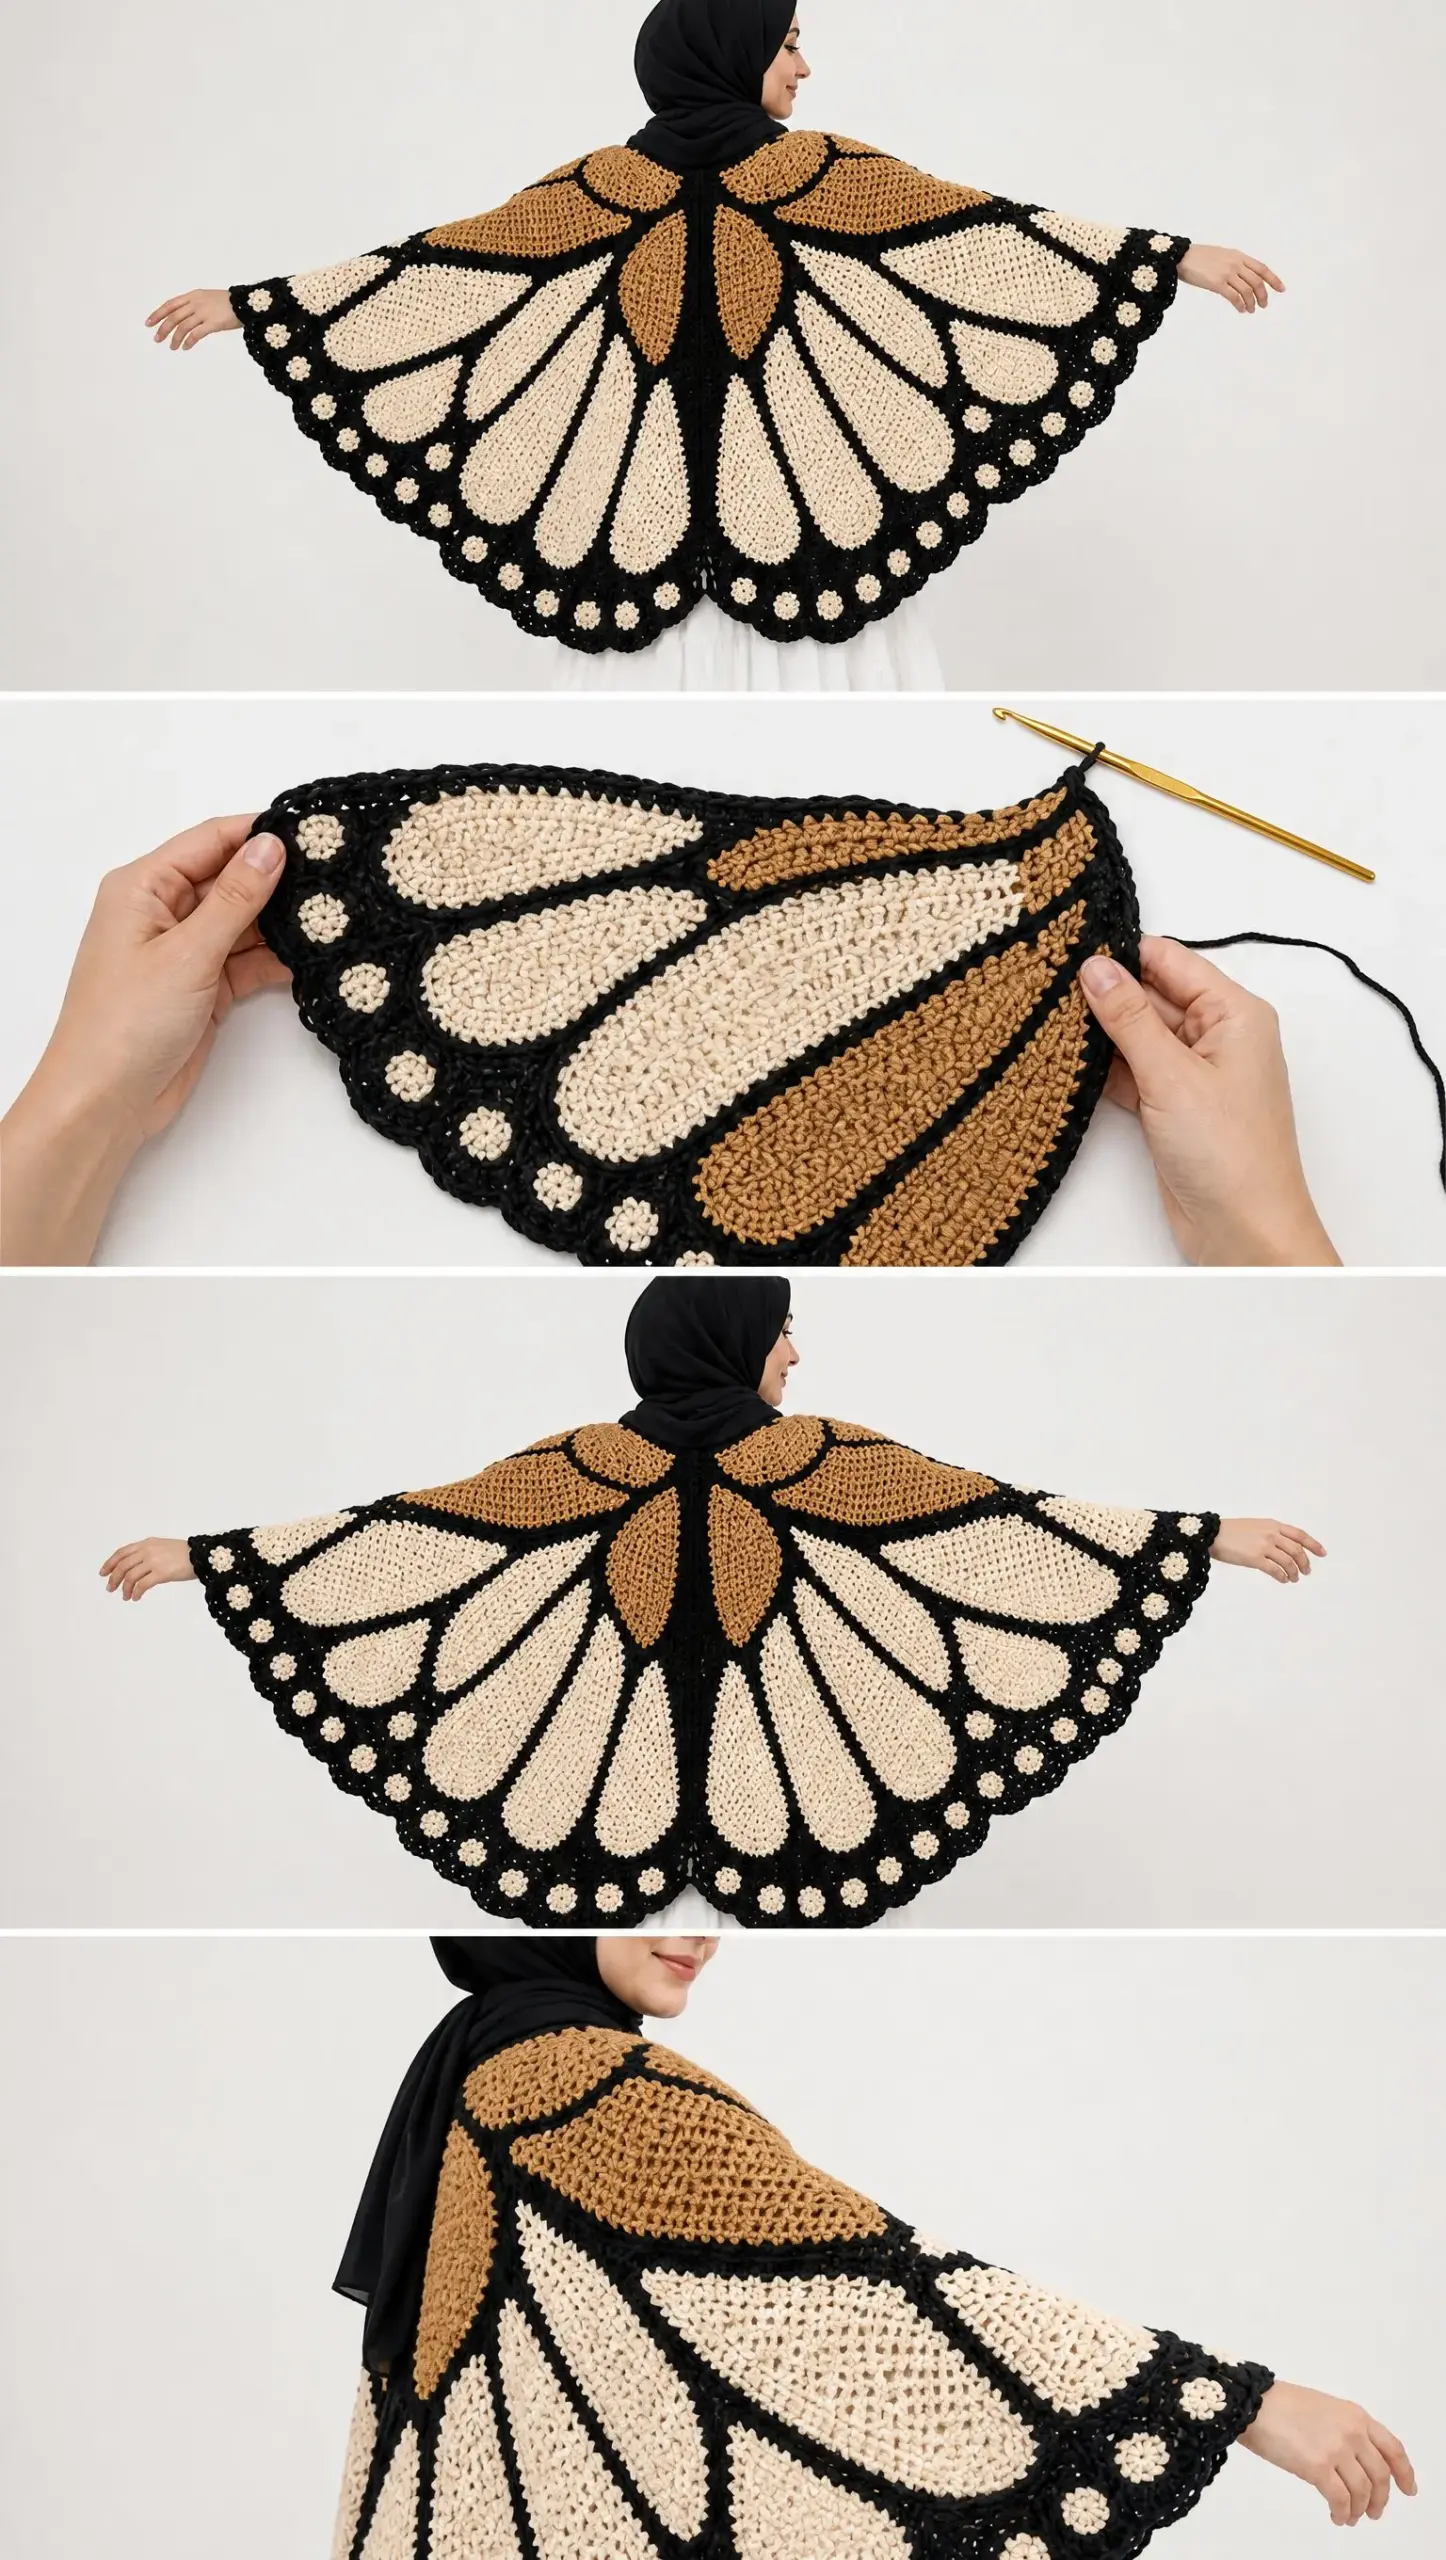
This hip-length, open-front cape transforms you into a walking work of art. The design mimics the iconic monarch butterfly wing pattern using three colors: cream for the main wing cells, black for the veins and border, and warm camel tan for the shoulder patches. When you spread your arms, the full wingspan stretches approximately 58 to 62 inches from fingertip to fingertip.
The construction is clever but straightforward. You start with a narrow center back spine that runs from neck to hem. Then you build each wing outward from that spine using tapestry and intarsia color changes. The lower edges get shaped with stepped decreases to create those beautiful scalloped wing lobes. Finally, you add a black border with cream appliqué dots and teardrop spots.
Skill level: Intermediate. You should be comfortable with single crochet, basic increases and decreases, color changes, and following a shaping pattern. The colorwork is intuitive rather than chart-based, which makes it more forgiving than pixel-perfect patterns.
Materials You’ll Need
Gather these supplies before you begin. Having everything ready makes the process so much smoother.
Yarn: Medium-weight cotton or cotton-blend yarn, category 4 worsted weight, with a firm matte hand and good stitch definition.
| Color | Yardage Needed |
|---|---|
| Cream | 900 to 1050 yards (825 to 960 meters) |
| Black | 650 to 800 yards (595 to 730 meters) |
| Warm camel tan | 350 to 450 yards (320 to 410 meters) |
Hooks: 5.0 mm (H-8) crochet hook, or size needed to obtain gauge. Optional: 4.5 mm hook for firmer edging and ties.
Notions: Locking stitch markers, tapestry needle, scissors, flexible tape measure, blocking mats and rustproof pins. Optional: small amounts of black sewing thread to tack the appliqué dots invisibly from the wrong side.
Gauge and Fabric Notes
16 single crochet stitches x 17 rows = 4 inches (10 cm) in blocked single crochet using the main hook.
Your fabric should be dense, smooth, and opaque but still drape enough to fall nicely from the shoulders. If your swatch comes out wider than gauge, go down a hook size. If it’s narrower, go up a hook size.
For the cleanest colorwork, carry yarn only across short black vein sections. For large cream or camel areas, use separate bobbins or small yarn butterflies so the reverse side stays neat and doesn’t become bulky.
Finished Measurements
| Measurement | Target Size |
|---|---|
| Wingspan, fingertip to fingertip | Approx. 58 to 62 inches (147 to 157 cm) |
| Center back neck to lower edge | Approx. 31 to 33 inches (79 to 84 cm) |
| Front opening | Fully open; edges fall from neckline to hip |
| Upper wing depth | Approx. 15 to 17 inches (38 to 43 cm) |
| Lower lobe depth | Approx. 12 to 14 inches (30 to 36 cm) |
| Neck opening | Approx. 20 to 22 inches (51 to 56 cm) circumference |
Abbreviations and Special Techniques
Let me define every abbreviation you’ll encounter so there’s no confusion.
ch = chain (wrap yarn over hook, pull through loop on hook)
sc = single crochet (insert hook, yarn over, pull up a loop, yarn over, pull through both loops)
sl st = slip stitch (insert hook, yarn over, pull through stitch and loop on hook in one motion)
st(s) = stitch(es)
RS / WS = right side / wrong side
inc = increase (work 2 single crochet in the same stitch)
dec = decrease (single crochet 2 stitches together)
BLO = back loop only (insert hook under just the back loop of the stitch)
FO = fasten off
Invisible Color Change
Work the final yarn over of the stitch before a color change with the new color. This keeps your color transitions crisp. Keep floats under 4 stitches whenever possible. For longer spans, drop the old color and pick it up on the next row or use a separate bobbin.
Stepped Shaping
At the beginning of a row, slip stitch across the stated number of stitches, then begin the row normally. At the end of a row, leave the stated stitches unworked. This technique creates the curved, scalloped wing profile.
Important pattern note: All wing rows are written from the center back edge outward. Make the left wing first. For the right wing, mirror all shaping and color placement so both outer edges match.
Color Placement Key
Understanding where each color goes helps you visualize the finished cape before you start.
| Zone | Color | Placement |
|---|---|---|
| CB spine + vein lattice | Black | Center back, shoulder vein branches, cell outlines |
| Upper shoulder patch | Camel | Top 8 to 12 inches (20 to 30 cm) of each wing |
| Main elongated cells | Cream | Large inner and lower wing cells |
| Outer border | Black | 2 to 3 inches (5 to 7.5 cm) wide around wing perimeter |
| Border dots | Cream | Evenly spaced round motifs on lower black band |
| Side-tip spots | Cream | Irregular teardrops near the outer upper side tips |
Step 1: Center Back Spine and Neck Foundation
The center back strip stabilizes the cape and gives you a clean line from neck to hem. Work it first, then attach each wing along one long edge.
Row 1: With black, ch 13. Sc in 2nd ch from hook and across. (12 sc)
Rows 2 through 124: Ch 1, turn, sc across. (12 sc) Aim for a strip about 29 inches (74 cm) long before edging.
Neck shaping: At the top 10 rows only, work the first and last 2 stitches in BLO. This softens the strip and helps the neckline curve after blocking.
Finish: FO, leaving a 24 inch (60 cm) tail for seaming. Mark the top edge and both long sides.
If your row gauge differs, work enough rows to reach 29 inches (74 cm). The finished lower wing lobes and border will add about 2 to 4 inches (5 to 10 cm) of visual depth below the spine.
Step 2: Left Wing Base
Join camel to the top left side of the spine. Work into row ends along the long edge. The first section creates the rounded shoulder and upper wing.
Row 1 (RS): Join camel in the side of spine Row 2. Ch 1, place 1 sc in each of the next 44 row ends. (44 sc) Ch 34 loosely; turn.
Row 2: Sc in 2nd ch from hook and in next 32 ch, then sc across 44 sts. (77 sc)
Row 3: Ch 1, turn, sc across. Inc in sts 15, 31, 48, and 64. (81 sc)
Row 4: Sc across 81.
Row 5: Inc in first st, sc 19, inc, sc 39, inc, sc to last st, inc in last. (85 sc)
Rows 6 through 10: Sc across, working 4 evenly spaced incs on Rows 7 and 9 only. End Row 10 with 93 sc.
Rows 11 through 18: Maintain 93 sts. Begin black vein branches as follows: work a 2-st black stripe at approximately sts 22-23, 46-47, and 69-70. Shift each stripe 1 st outward every other row to create branching diagonals. Keep remaining stitches camel.
Rows 19 through 22: Change large lower portions to cream while keeping a camel shoulder patch over roughly the first 26 sts nearest the spine and black vein stripes 2-3 sts wide. The outer 8 sts are black to begin the perimeter band.
Rows 23 through 26: Continue color pattern. On each RS row, add 1 cream st to the main cell area and reduce camel by 1 st, allowing the camel patch to taper toward the center vein.
Step 3: Build the Upper Wing Curve
The next rows create the broad fingertip-to-shoulder arc. Work in single crochet throughout while continuing the wing cell pattern. Exact color transitions may be shifted by 1 to 2 stitches to keep the black veins visually smooth.
Rows 27 through 30: At outer edge, inc 1 st each row. At spine edge, keep stitch count stable. End with 97 sts. Outer 10 sts black.
Rows 31 through 34: Work even. Keep 3 major cream cells separated by 2-3 st black diagonal veins. The topmost cell remains camel for the shoulder patch; the lower cells are cream.
Rows 35 through 38: Begin outer rounding: leave 2 outer-edge sts unworked at the end of each row. Also dec once near the end of the camel patch on Rows 36 and 38.
Rows 39 through 42: Leave 3 outer-edge sts unworked on each row. Extend black perimeter to 12 sts measured perpendicular to the edge.
Rows 43 through 46: Leave 4 outer-edge sts unworked on each row. Keep cream cell tips rounded by changing 1-2 cream sts to black at each cell tip on every row.
Row 47: Work to final 8 sts; leave them unworked. Do not fasten off.
Step 4: Lower Wing Lobes
Turn the work so you can build downward from the lower edge of the upper wing. The lower section is shorter and more scalloped. Work cream cells framed by thick black veins.
Lower Row 1 (RS): With cream, join at the lower side of the spine approximately 44 rows below the neck. Ch 1 and work 1 sc in each of the next 50 row ends. Ch 22; turn. (71 sc total after working back across the chain and foundation on Lower Row 2)
Lower Row 2: Sc in 2nd ch from hook and across chain, then across foundation. (71 sc)
Rows 3 through 6: Work even. Add black 2-st vein lines at about sts 20-21 and 44-45. Keep last 8 outer-edge sts black.
Rows 7 through 10: Inc 1 st at outer edge every row. (75 sts) Shift black veins outward by 1 st on alternating rows.
Rows 11 through 14: Work even. Widen the outer black band to 10 sts.
Rows 15 through 18: Leave 2 outer-edge sts unworked each row. At the same time dec once beside each black vein on Rows 16 and 18 to round the cream cells.
Rows 19 through 22: Leave 3 outer-edge sts unworked each row. Change the final 2 cream sts of each cell tip to black to create a smooth teardrop ending.
Rows 23 through 26: Leave 4 outer-edge sts unworked each row. The final row should end in a rounded lower lobe roughly 12 to 14 inches (30 to 36 cm) deep.
Finish: FO and weave in only those tails that will not be hidden by the border. Block the left wing lightly before making the second wing so you can verify the shape.
Step 5: Right Wing
Repeat Steps 2 through 4 on the opposite long edge of the center back spine. Mirror all shaping: increases and stepped outer-edge decreases should occur on the opposite side, and the vein diagonals should angle outward from the center back. Compare both wings every 5 to 8 rows by laying them flat. Adjust a color change by 1 stitch if necessary to keep the design symmetrical.
Important: Symmetry matters more than exact individual row counts once gauge is established. If one wing edge is 1/2 inch (1.3 cm) longer after blocking, correct it in the final black edging by using a slightly tighter or looser stitch placement.
Step 6: Black Perimeter Band
The black band unifies the wing silhouette and creates the monarch-style spotted edge.
Round 1: With RS facing and black, join at one front neck edge. Ch 1. Sc evenly down the open front edge, around the entire lower and outer wing perimeter, up the opposite front edge, and around the back neckline. Work 3 sc in sharp outer corners and 2 sc in each concave valley. Join with sl st.
Round 2: Ch 1. Sc around. At each outer lobe tip work inc, sc, inc across 3 consecutive stitches. At each valley work one dec on either side of the deepest stitch.
Round 3: Repeat Round 2, but work inc only where the edge needs to lie flat. Keep neckline and center-front edges firm and smooth.
Round 4: Sc around in black. On lower wing edges, create subtle scallops by working [sc in 5 sts, 2 sc in next] repeated as needed; in valleys use one dec. Join and FO.
Blocking check: Lay flat. The band should be 2 to 3 inches (5 to 7.5 cm) wide at the widest outer sections and narrower along the neckline and front opening.
Step 7: Cream Border Dots
Make approximately 28 to 36 small dots, enough to space them evenly around the lower black perimeter of both wings.
Dot Round 1: With cream, make a magic ring. Ch 1, work 6 sc in ring. Join.
Dot Round 2: Ch 1, 2 sc in each st around. (12 sc) Join, FO, leaving a sewing tail.
Optional larger dot: Add Round 3: [sc, inc] around. (18 sc) Use larger dots near the broadest lower wing lobes and smaller dots near the tips.
Placement: Pin dots about 1.5 to 2 inches (4 to 5 cm) apart along the lower black band, centered between the edge and the nearest cream cell. Sew with small whipstitches through the back loops so the appliqué edges remain crisp.
Step 8: Cream Teardrop Side Spots
Make 4 to 8 teardrops total, placing 2 to 4 on each outer side-tip area.
Row 1: With cream, ch 3. Sc in 2nd ch and next ch. (2 sc)
Row 2: Ch 1, turn, inc in first st, sc in next. (3 sc)
Row 3: Ch 1, turn, inc, sc 1, inc. (5 sc)
Rows 4 through 6: Ch 1, turn, sc across.
Row 7: Ch 1, turn, dec, sc 1, dec. (3 sc)
Row 8: Ch 1, turn, sc3tog or work dec across first 2 sts then sl st in final st. (1 point) FO.
Edging: With cream or black, sl st evenly around the teardrop if you want a firmer appliqué edge.
Placement: Sew teardrops to the upper outer black band with points aimed toward the outer wing tip. Stagger sizes and angles slightly for an organic monarch look.
Step 9: Rounded Neckline
If the neckline still looks square after the perimeter rounds, soften it with short-row edging.
Neck Row 1: With black, join 4 inches (10 cm) below one front neck edge. Sc evenly up to neckline center and down 4 inches (10 cm) on the opposite side.
Neck Row 2: Ch 1, turn. Sl st 4 sts, sc to final 4 sts, leave them unworked.
Neck Row 3: Repeat Row 2 once more.
Finish: FO and steam-block very lightly through a pressing cloth, shaping the neck into a smooth shallow curve.
Step 10: Black Throat Ties
Tie 1: With black and 4.5 mm hook, ch 62 (about 16 to 18 inches or 41 to 46 cm). Sl st back through each chain for a firm cord. FO leaving a sewing tail.
Tie 2: Repeat.
Attach: Sew one cord to each front neck corner with several secure passes. Knot or tack the cord ends neatly. Optional: add a tiny cream 6-sc ring at each cord end for a decorative finish.
Vein Layout Guide for Consistent Colorwork
The pattern is intentionally written as a shaping recipe rather than a pixel chart because body size and row gauge change the exact stitch count. Use this proportional guide to place the black veins consistently.
| Vein | Starts Near | Ends Near | Width |
|---|---|---|---|
| V1 – shoulder separator | 15-20% of wing width | Upper outer edge at 55-60% depth | 2-3 sts |
| V2 – upper cell divider | 35-40% of wing width | Outer edge around mid-height | 2-3 sts |
| V3 – main lower divider | 55-60% of wing width | Lower lobe outer third | 2-3 sts |
| V4 – lower branch | Branches from V3 | Lower black band above dot row | 2 sts |
| Perimeter band | Whole outer edge | Continuous | 8-12 sts or 2-3 in |
For each vein, shift the black stripe by one stitch every 1 to 2 rows. This produces the organic diagonal line visible in real monarch wings. Avoid perfectly straight vertical stripes; monarch veins should radiate outward from the center back and shoulder.
Assembly and Finishing
Now comes the satisfying part: bringing everything together.
Weave in all ends on the wrong side, splitting yarn plies where necessary so tails do not show through cream areas.
Pin the cape to final measurements on blocking mats with the center back spine perfectly straight. Curve the upper wings into broad rounded arcs and shape the lower edges into soft scalloped lobes.
Steam lightly for cotton blends or wet-block pure cotton according to the yarn label. Do not flatten the yarn texture excessively. Allow to dry completely before removing pins.
Try on over a dress or top. The cape should sit at the base of the neck, open at center front, reach roughly to the hips, and spread close to fingertip-to-fingertip when the arms are extended.
If the shoulders slip, add two hidden 1 inch (2.5 cm) crocheted loops on the inside near each shoulder so a dress strap or small safety pin can discreetly anchor the cape.
Customization Options
More wingspan: Add 4 to 8 foundation chains in Step 2 and the same number in Step 4. Maintain the same proportion of cream cells and widen the outer black band only after shaping.
Less wingspan: Subtract 4 to 8 chains from the wing extensions and begin stepped decreases 2 to 4 rows earlier.
Longer cape: Add 8 to 16 rows to the center back spine and corresponding lower-wing foundation. Extend the cream cells before starting the lower-lobe decreases.
Shorter cape: Remove 8 to 12 center back rows and begin lower-wing decreases earlier.
Different yarn weight: Keep the finished measurements and proportions rather than the written stitch counts. Recalculate each wing from your gauge.
Sharper monarch contrast: Use warm ivory for the cells, true matte black for veins and border, and a saturated caramel or camel for the shoulder patch.
Quality Checklist Before Wearing
Run through this list to make sure your cape is photo-ready:
Care Instructions
For cotton or cotton-blend yarn, hand wash or machine wash on a gentle cycle in cool water if permitted by the yarn label. Reshape while damp and dry flat. Store folded rather than hung for long periods so the wing points do not stretch.
Final Thoughts on This Monarch Butterfly Cape Crochet Pattern
The strongest visual effect comes from proportion: broad camel shoulders, long cream inner cells, bold black veins, and a generous spotted border. During colorwork, step back every few rows and look at the cape from several feet away. If a cream cell feels too narrow or a vein too heavy, adjust on the next row rather than trying to force exact symmetry stitch by stitch.
For a polished photographed finish, block the wings flat first, then let the cape hang overnight before the final fitting. If the lower lobes curl inward, lightly re-block only the outer black band while leaving the cream cells untouched.
This cape is a showstopper. You’ll get stopped for photos. You’ll get asked where you bought it. And you’ll get to say, "I made it myself."
Thank you so much for choosing this pattern. I truly hope you love making it as much as I loved designing it. If you create your own Cream Monarch Butterfly Cape, I would absolutely love to see it! Tag me on Instagram or share a photo in my Facebook group.
And hey, if you’re not quite ready to start this project today, go ahead and pin this pattern to your Pinterest boards so you can find it when inspiration strikes. I’d also love to hear from you in the comments below, especially if you make this cape. Your photos and stories make my day!
Want a Quick & Easy Printable Version?
Get a clean, beautifully formatted PDF of this pattern — easy to follow step by step, ready to print or save on any device. No scrolling, no distractions, just the pattern.
Get the Printable PDF →