Let me guess. You’ve been eyeing granny square bags on Pinterest for months, convinced they’re too complicated. All those pieces to join, the flowers to attach, the straps to figure out. It looks like something only advanced crocheters can pull off, right?
Get the Ad-Free PDF Pattern
You can find the free pattern below, or you can purchase the ad-free printable PDF from my shop.
Get the Printable PDF →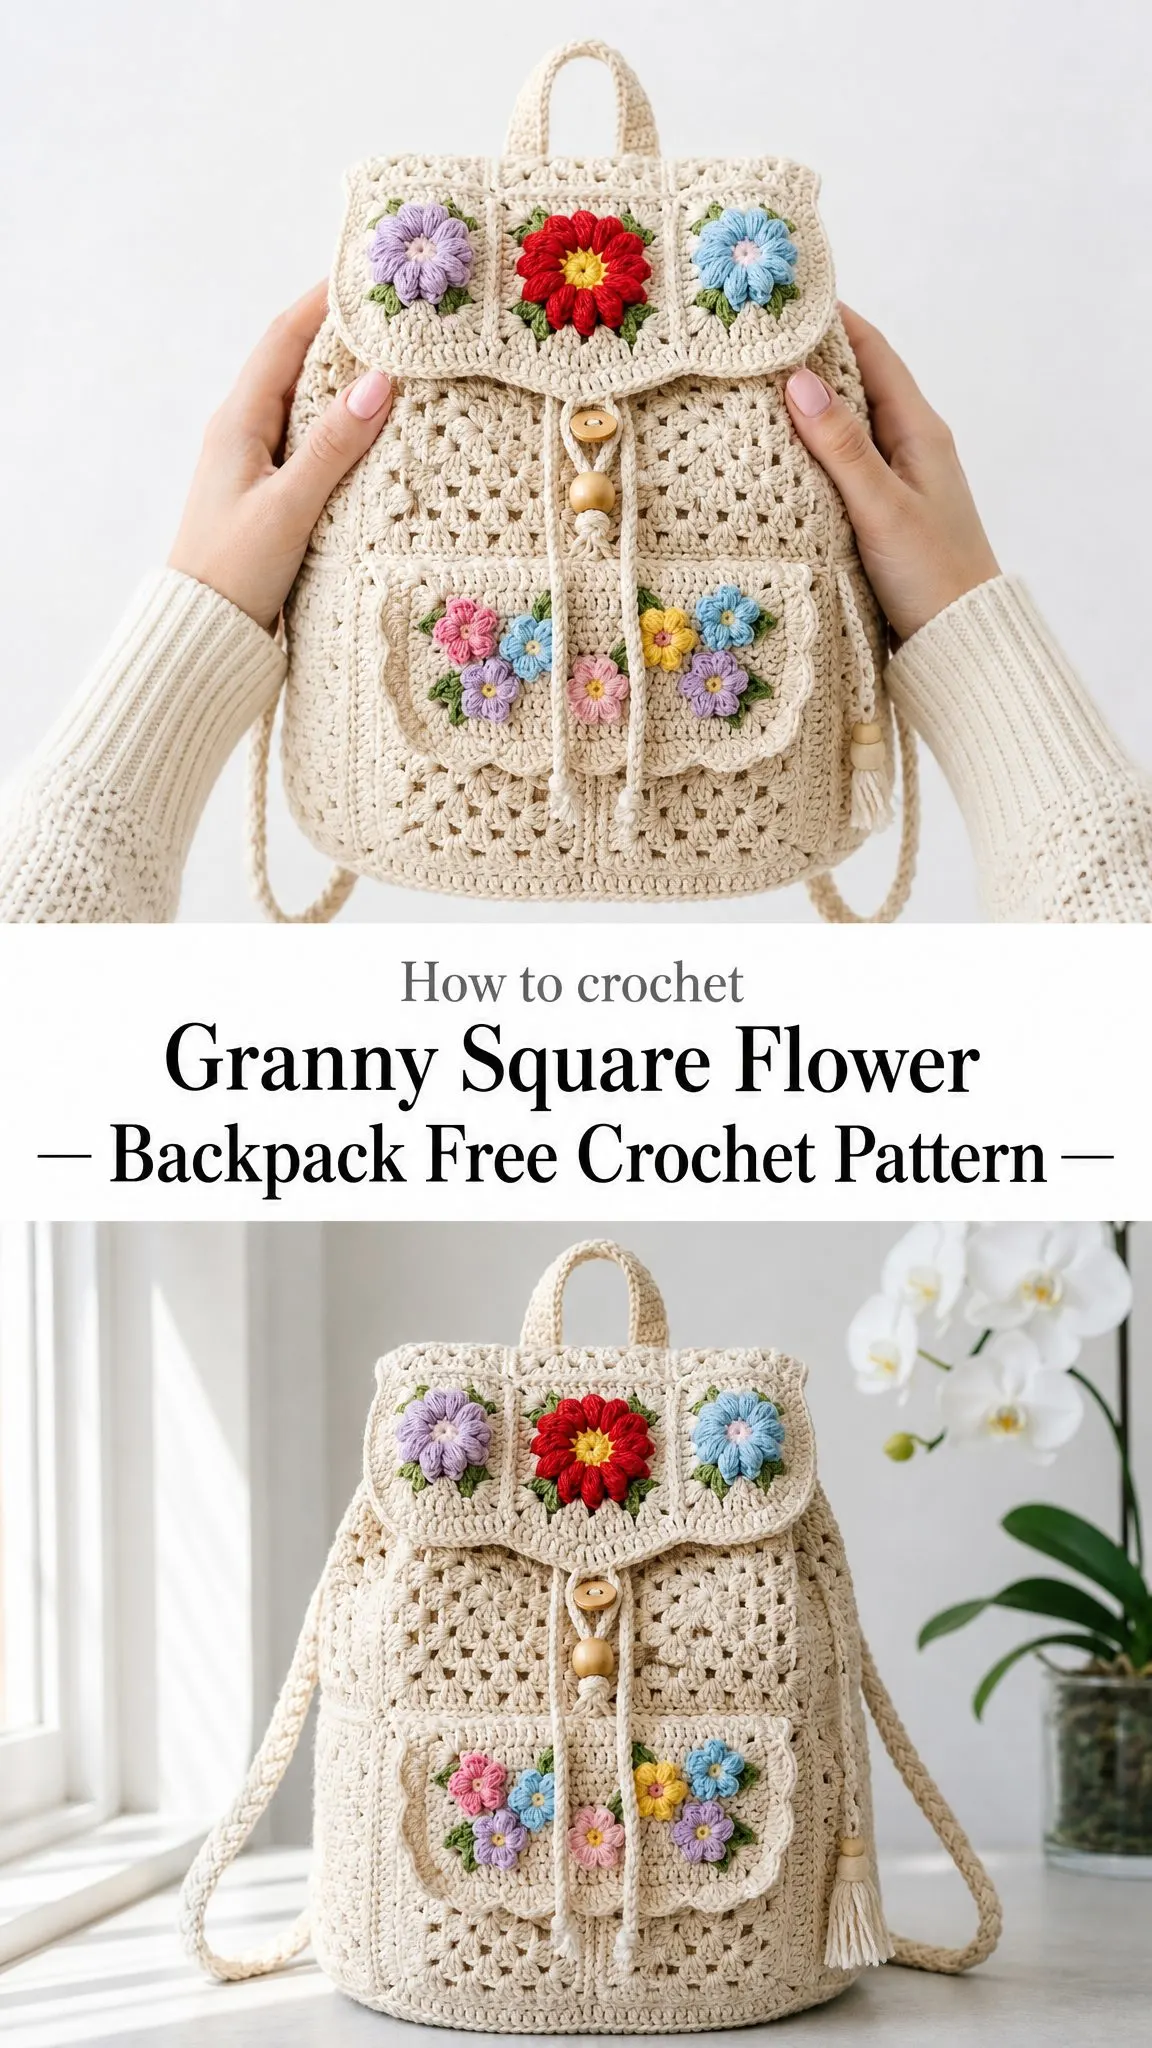
Here’s the truth: if you can make a basic granny square and single crochet in rows, you can absolutely make this backpack. I promise. The construction is more straightforward than it appears because you’re essentially making 14 identical squares, seaming them into a box shape, and adding simple accessories on top.
This pattern breaks everything down into manageable chunks. You’ll tackle one element at a time, from the squares to the body assembly to those cheerful flower appliques. By the end, you’ll have a stunning handmade backpack that looks far more impressive than the skill level required to create it.
About This Granny Square Backpack Pattern
This cream granny square backpack features blooming floral appliques, a shaped front flap, a drawstring closure, braided shoulder straps, and two petite front pockets. The finished size measures approximately 9.5 inches wide by 10.5 inches tall by 4.5 inches deep (24 x 26.5 x 11.5 cm).
The body is built from firm cream granny squares arranged in a boxy shape with a hidden bottom panel. The top is finished with a drawstring channel, and the whole piece comes together with beautiful three-dimensional flowers in red, yellow, blue, lavender, and pink.
Skill Level: Confident Intermediate
Time Estimate: 10 to 14 hours
Materials You’ll Need
Gathering your supplies before you start makes the process so much smoother. Here’s everything you’ll need for this crochet backpack pattern:
Yarn:
Hooks:
Notions:
Recommended Yarns:
You can substitute with any worsted or aran weight cotton that blocks to the correct gauge. If you prefer a softer yarn, consider adding a fabric lining so the backpack holds its shape.
Gauge
Getting gauge right matters here because the entire bag size depends on your square measurements.
One 4-round granny square plus the single crochet (sc) border should measure 4.5 inches / 11.5 cm square after blocking.
In single crochet fabric: 16 sc by 18 rows equals 4 inches / 10 cm with the 4.0 mm hook.
Make a test square before diving in. If yours is too small, go up a hook size. If it’s too large, go down. This extra step saves frustration later.
Abbreviations and Stitch Guide
Let me walk you through every stitch and technique you’ll use in this pattern. If you’re newer to crochet, read through this section before starting.
Abbreviations:
UK Crocheters: US sc equals UK dc, and US dc equals UK tr.
Special Techniques
Granny Cluster: Work 3 double crochet (dc) stitches into the indicated chain space. For corners, work 3 dc, chain 2, 3 dc all into the same corner space.
Standing SC Join: Place a slip knot on your hook, insert the hook in the indicated stitch, yarn over and pull up a loop, yarn over and pull through both loops. This gives you a clean start without a chain.
sc2tog (Single Crochet Decrease): Insert hook in the next stitch, yarn over and pull up a loop. Insert hook in the next stitch, yarn over and pull up a loop. Yarn over and pull through all 3 loops on your hook.
Flat Slip Stitch Seam: Hold your pieces with wrong sides together. Insert your hook through the back loop only of the front piece AND the back loop only of the back piece. Yarn over, pull through both loops and the loop on your hook. Keep your tension loose to prevent puckering.
Braided Crochet Cord: Make 3 long chains, knot them together at one end, braid firmly, then knot the other end. Steam lightly to relax any twist.
Construction Notes
Before you begin, here are some important things to keep in mind:
How to Make the Granny Squares
Make 14 cream squares total. Each square finishes with 16 granny clusters before the sc border, then 72 sc around the outside edge.
Round 1: Magic ring, ch 3, 2 dc in ring, ch 2, (3 dc in ring, ch 2) 3 times, sl st to top of beginning ch-3. (4 clusters, 4 corner ch-2 spaces; 12 dc)
Round 2: Sl st into corner space, ch 3, 2 dc, ch 2, 3 dc in same space, ch 1, (3 dc, ch 2, 3 dc) in next corner space, ch 1; repeat from around, sl st. (8 clusters)
Round 3: Sl st into corner space, work corner (3 dc, ch 2, 3 dc), ch 1, 3 dc in next ch-1 space, ch 1; work corner, ch 1, 3 dc in next ch-1 space, ch 1; repeat from around, sl st. (12 clusters)
Round 4: Sl st into corner space, work corner, ch 1, (3 dc in next ch-1 space, ch 1) across to next corner; repeat around, sl st. (16 clusters; 4 clusters per side)
Round 5 (Border): Ch 1. In each corner, work 3 sc. Along each side, work 1 sc in each dc and 1 sc in each ch-1 space: 12 sc in dc plus 3 sc in chain spaces per side. Sl st to first sc. (72 sc total)
Checkpoint: Each side of the border should have 18 sc including its corner group. Block every square to 4.5 inches / 11.5 cm before assembly. The full body width spans two squares across.
Body Assembly
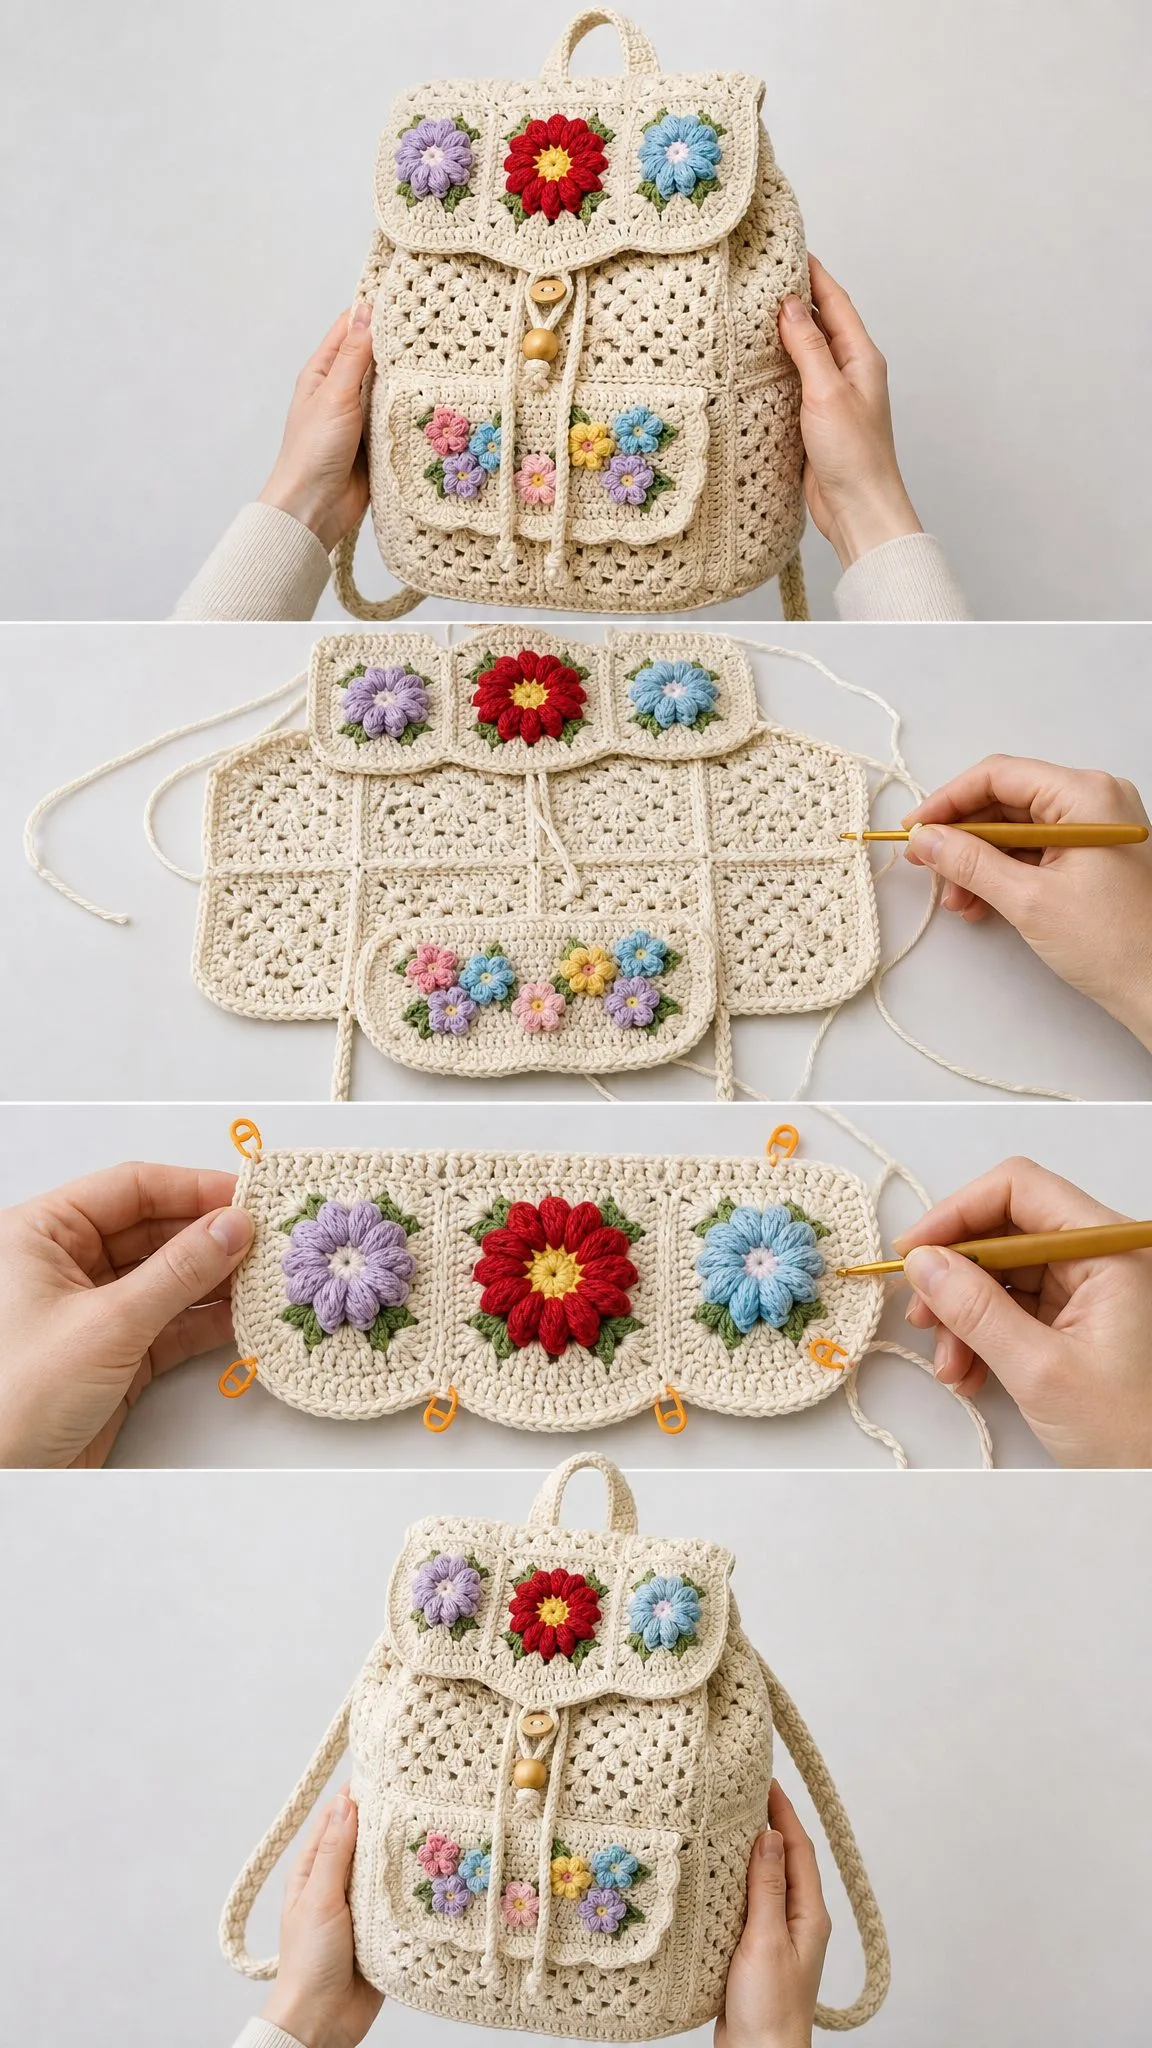
Now comes the fun part: turning your flat squares into a three-dimensional bag. Arrange your cream squares with the right side facing out. Seam through the back loops only so those raised ridges show as vertical and horizontal panel lines.
Layout:
| Section | Layout | Count |
|---|---|---|
| Back | 2 wide x 2 tall | 4 squares |
| Front | 2 wide x 2 tall | 4 squares |
| Left side | 1 wide x 2 tall | 2 squares |
| Right side | 1 wide x 2 tall | 2 squares |
| Bottom | 2 wide x 1 deep | 2 squares |
Assembly Steps:
1. Seam 4 front squares into a 2 x 2 panel. Repeat for the back panel. Each panel measures about 9 inches / 23 cm square.
2. Seam 2 squares vertically for each side panel. Each side measures about 4.5 inches x 9 inches / 11.5 x 23 cm.
3. Join the front panel to the left side, left side to back, back to right side, and right side to front to create an open tube. The top circumference should be about 27 inches / 68.5 cm.
4. Join 2 bottom squares side by side, then seam the bottom panel to the lower edge of the tube. Ease corners neatly and don’t pull your seams too tight.
Top Edging
Round A: With cream, sc evenly around the top edge, placing 18 sc across each square edge. (108 sc)
Round B: Ch 3, dc in each sc around, sl st. (108 dc)
Round C (Drawstring Eyelet): Ch 4 (counts as dc, ch 1), skip next stitch, dc in next stitch, ch 1, skip next stitch; repeat from around, sl st to 3rd ch. (54 dc, 54 ch-1 spaces)
Round D: Ch 1, sc in each dc and ch-space around, sl st. (108 sc)
Checkpoint: After the top edging, your bag should measure about 10.25 to 10.5 inches / 26 to 26.5 cm high before adding straps. The open top should draw in softly.
Front Flap
The shaped flap gives this backpack its distinctive look. Don’t let the pointed bottom intimidate you. It’s just decreasing!
Row 1: Ch 49. Sc in 2nd ch from hook and each ch across. Turn. (48 sc)
Rows 2-7: Ch 1, sc in each st across. Turn. (48 sc)
Creating the Point
Point Row 1: Mark the center 16 stitches. With RS facing, join yarn in the first marked stitch, ch 1, sc in the 16 marked stitches. Turn. (16 sc)
Point Rows 2-7: Ch 1, sc2tog, sc across to last 2 stitches, sc2tog. Turn.
Point Row 8: Ch 1, sc2tog twice. Fasten off. (2 sc)
Edging: Join at the upper right corner. Sc evenly around the flap, placing 3 sc in each lower point and corner. Across the top edge, work 48 sc. Sl st to join.
Sew the straight top edge of the flap to the back top edge, centered over the front. Sew only through the back of the top edging so the flap folds forward cleanly.
Pockets (Make 2)
These sweet little pockets are perfect for showcasing your small flower appliques.
Row 1: Ch 25. Sc in 2nd ch from hook and across. Turn. (24 sc)
Rows 2-10: Ch 1, sc in each st across. Turn. (24 sc)
Lower Curve: Ch 1, sc in first 6 stitches, hdc in next 12 stitches, sc in last 6 stitches. Fasten off. (24 sts)
Edging: Sc evenly around sides and lower edge, placing 2 sc in lower corners. Leave the top edge unworked for sewing.
Place pockets side by side on the lower front panel. Sew the sides and lower edge only, leaving the top open for storage.
Flower Appliques
The flowers bring this backpack to life. You’ll make two sizes: large daisies for the flap and small flowers for the pockets.
Large Daisy (Make 3)
With yellow, magic ring, ch 1, 12 sc in ring, sl st. Change to your petal color.
(Sl st in next sc, ch 3, 3 tr in same stitch, ch 3, sl st in same stitch); repeat from in each sc. (12 petals)
For leaves, add 2 small green leaves behind each flower: ch 6, sc in 2nd ch, hdc, dc, hdc, sc; fasten off.
Small Flower (Make 8-10)
Magic ring, ch 1, 8 sc in ring, sl st.
(Ch 2, 2 dc in same stitch, ch 2, sl st in same stitch); repeat from in each sc. (8 petals)
Use pink, blue, yellow, and lavender for variety. Add tiny green leaves as desired.
Flower Placement
Sew 3 large flowers across the flap with the largest red and yellow flower in the center and blue and lavender flowers at the sides. Sew small flowers across both pockets, clustering colors evenly and tucking leaves underneath.
Straps, Handle, and Drawstring
Drawstring
Ch 155 with cream, then sl st in the back bump of each chain for a firm cord. Thread through the Round C eyelets from center front around to center front. Add wooden beads and knot the ends. The finished cord measures about 38 inches / 96.5 cm.
Shoulder Straps (Make 2)
For each strap, make three chains 38 inches / 96.5 cm long. Knot one end, braid firmly, then knot the other end. After braiding, each strap should be about 32 inches / 81 cm. Sew the upper ends to the back top corners and lower ends to the bottom side corners. Reinforce with several passes of yarn.
Top Handle
Make three chains 12 inches / 30.5 cm long, braid to 7 inches / 18 cm, and sew both ends to the back top edge, centered. Stitch through several layers for strength.
Finishing Your Backpack
You’re almost there! These final steps polish your project beautifully.
Care Instructions
Hand wash your backpack gently in cool water. Press it in a towel, reshape, and dry flat. Do not hang while wet because cotton can stretch. Spot clean straps and appliques between washes.
Troubleshooting Common Issues
Squares curl: Go up 0.25 to 0.5 mm in hook size or block more firmly.
Bag feels floppy: Use firmer cotton, work at a tighter gauge, or add a fabric lining.
Top edge ruffles: Confirm you have 18 sc per square edge for 108 sc total. Don’t add extra stitches at the seams.
Flap pulls inward: Add a few extra edging sc along the side edges only, then block flat.
Straps stretch: Braid tightly, steam lightly, and reinforce your attachment points.
Customization Ideas
Want to make this backpack your own? Here are some easy modifications:
Thank you so much for choosing this pattern! I really hope you love making this granny square flower backpack as much as I loved designing it. If you create one, I’d absolutely love to see it. Tag me on Instagram or share a photo on Facebook. Your finished projects always make my day!
Don’t forget to save this pattern to your Pinterest boards so you can find it easily when you’re ready to start. And if you make this backpack, please drop a comment below. I’d love to hear how it turned out for you!
Want a Quick & Easy Printable Version?
Get a clean, beautifully formatted PDF of this pattern — easy to follow step by step, ready to print or save on any device. No scrolling, no distractions, just the pattern.
Get the Printable PDF →