
I don’t know about you, but I’ve always dreamed of making a showstopper dress that looks like it belongs in a garden party scene from a romantic movie. All the elegance with none of the intimidation once you break it down into manageable pieces.
Get the Ad-Free PDF Pattern
You can find the free pattern below, or you can purchase the ad-free printable PDF from my shop.
Get the Printable PDF →
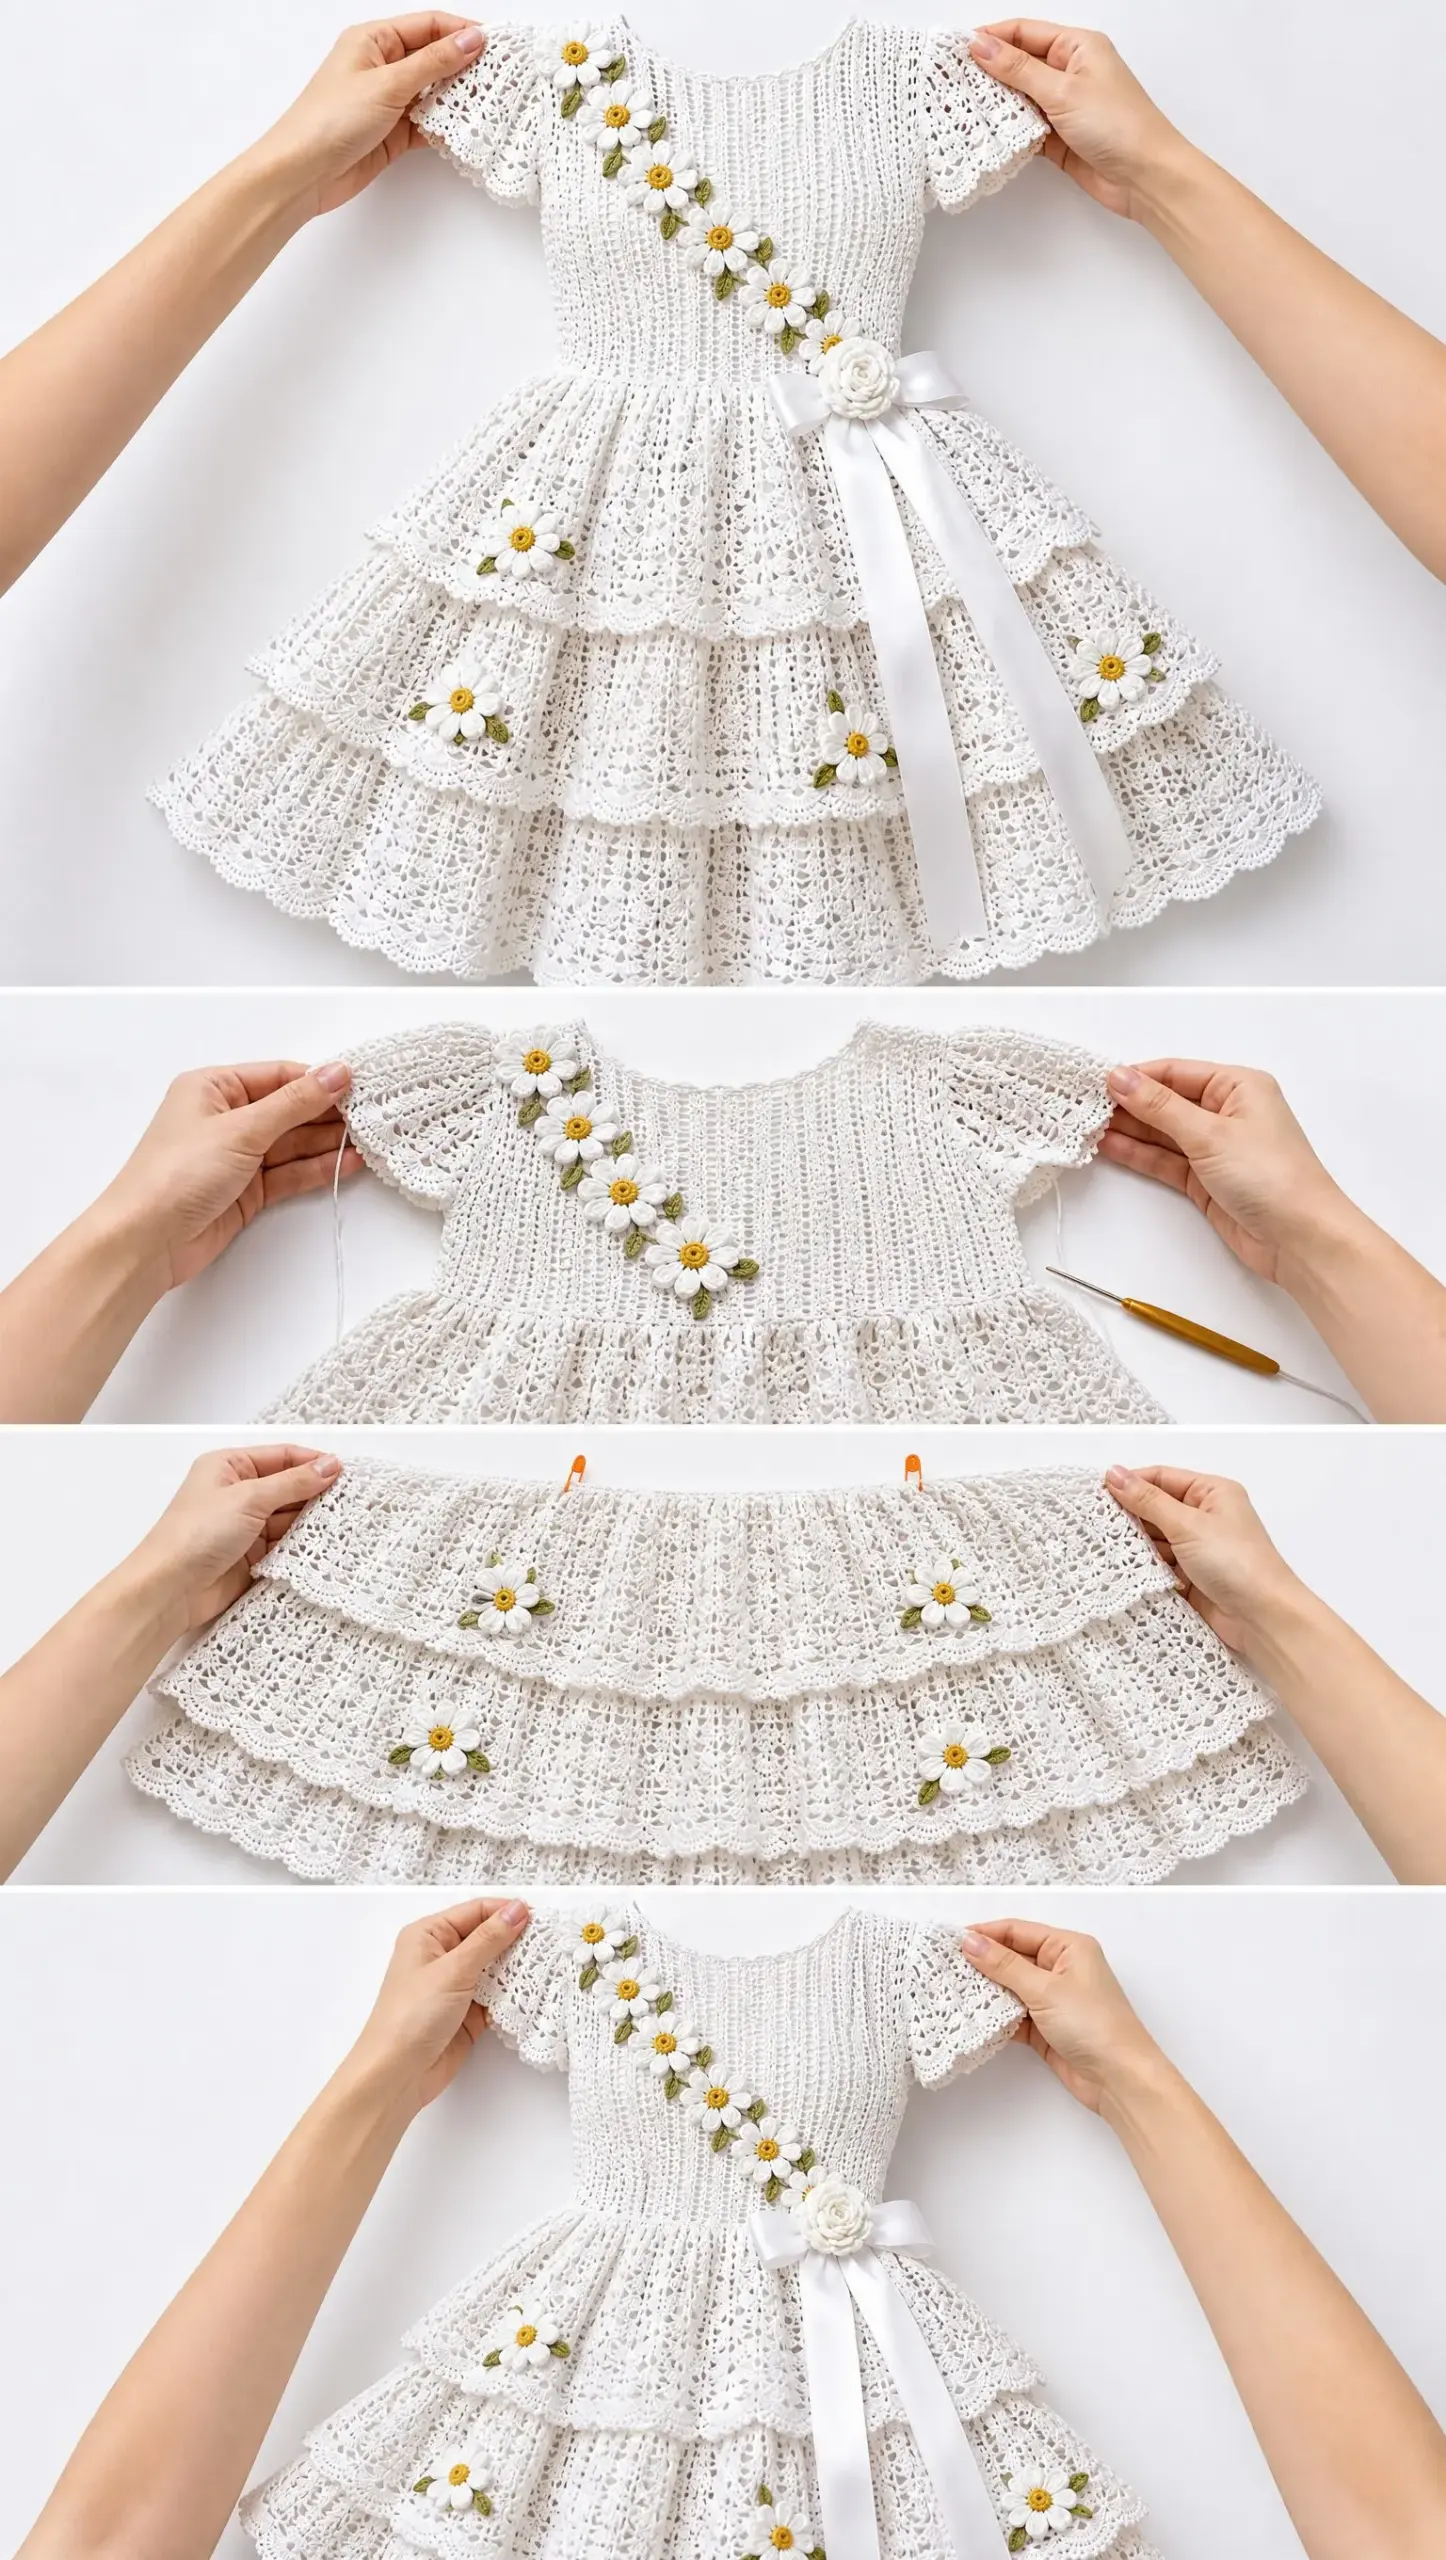
This White Daisy Tiered Dress is exactly that dream realized. The fitted bodice, fluttery sleeves, and cascading lace tiers come together in a way that looks incredibly intricate but is actually built from repeating sections you’ll master quickly. Add those sweet raised daisies trailing from shoulder to waist, and you’ve got a garment that will turn heads wherever you go.
Whether you’re making this for a summer wedding, a special anniversary, or simply because you deserve something beautiful, this pattern walks you through every single step. Let’s dive in and create something extraordinary together.
About This Pattern
This intermediate to advanced crochet pattern creates a stunning fitted dress with a lightly openwork bodice, short scalloped flutter sleeves, and three gathered lace tiers. The diagonal floral garland of raised daisies and olive leaves adds dimensional beauty, while a crocheted rosette sits prettily over a wide satin bow at the side waist.
The construction is modular, which means you’ll work each section separately before bringing everything together. You’ll crochet the bodice from the waist upward in joined rounds, shape the armholes and neckline, add the sleeves, create three skirt tiers that attach at specific points, and finally make and sew on all the floral embellishments. A sewn lining goes inside the finished crochet shell for coverage since the lace is intentionally open.
Written size: Adult M with a finished bust of approximately 36 inches (91.5 cm)
Grading notes included for sizes XS through 2XL
Finished Measurements
Before you begin, check these measurements against the wearer to choose the right size. The pattern recommends selecting a finished bust measurement 0 to 2 inches larger than the actual body measurement for a close but comfortable fit.
| Size | Bust | Waist | Bodice Length | Skirt Length | Approx. Finished Length |
|---|---|---|---|---|---|
| XS | 32-34 in | 25-27 in | 14.5 in | 21 in | 35.5 in |
| S | 34-36 in | 27-29 in | 15 in | 21.5 in | 36.5 in |
| M | 36-38 in | 29-31 in | 15.5 in | 22 in | 37.5 in |
| L | 40-42 in | 33-35 in | 16 in | 22.5 in | 38.5 in |
| XL | 44-46 in | 37-39 in | 16.5 in | 23 in | 39.5 in |
| 2XL | 48-50 in | 41-43 in | 17 in | 23.5 in | 40.5 in |
All stitch counts in the instructions below are written for size M. The grading section at the end explains where to add or remove pattern repeats for other sizes.
Materials and Tools
Gathering your supplies before you start will make this project flow smoothly. Here’s everything you’ll need:
Yarn:
Hook:
Lining:
Notions:
Gauge
Getting gauge right is essential for this fitted garment. Please don’t skip the swatch!
Main bodice pattern: 22 stitches x 12 rows = 4 inches (10 cm) after wet blocking, measured over the vertical eyelet column pattern.
Skirt lace: One 8-stitch shell repeat = about 1.45 inches (3.7 cm) wide. 8 rows = about 4 inches (10 cm).
If your swatch is too big, try a smaller hook. If it’s too small, go up a hook size. Match gauge before beginning because the bodice fit depends on it.
Abbreviations and Special Stitches
Let me walk you through every abbreviation and special stitch you’ll encounter. If you’re new to any of these, practice them before starting the dress.
Standard Abbreviations:
Special Stitches:
V-eyelet: Work (dc, ch 1, dc) all in the same stitch or space. This creates a small V-shaped opening in your fabric.
Small shell: Work 5 dc in the indicated space. These cluster together to form a fan shape.
Large fan: Work (3 dc, ch 2, 3 dc) in the indicated space. This creates a wider decorative fan.
Picot: Ch 3, then sl st in the first chain. This makes a tiny decorative bump along edges.
Standing dc: Begin with a slip knot on your hook, yarn over, insert hook into the designated stitch, draw up a loop, and complete a regular dc. Use this technique when joining a new round invisibly without a starting chain.
The Bodice (Size M)
The bodice is worked from the waist upward. You’ll start with joined rounds to the underarm, then separate the front and back to shape the armholes and neckline individually. The seam line sits at one side and gets hidden by the floral garland and bow later.
Waist Foundation
Step 1: With white yarn and your 3.0 mm hook, ch 168 loosely. Join with a sl st to the first ch, taking care not to twist. The foundation should measure about 30.5 to 31 inches (77.5 to 79 cm) after a light stretch.
Round 1: Ch 1, sc in each ch around; join. (168 sc)
Round 2: Ch 3 (counts as dc), dc in next 2 sts, ch 1, sk 1, dc in next 3 sts around; join. You should have 42 vertical eyelets.
Round 3: Ch 3, dc in next 2 dc, ch 1, sk ch-1 sp, dc in next 3 dc around; join.
Rounds 4 and onward: Repeat Round 3 until the bodice measures 7.5 inches (19 cm) from the waist, ending after an even, relaxed round. This is approximately 22 to 23 rounds depending on your row gauge.
Fit check: Try the tube on the wearer or a dress form. It should sit close to the torso without pulling the eyelets open dramatically. If more room is needed at the bust, increase 4 to 8 stitches evenly over the final 4 rounds before dividing for the armholes.
Divide for Front and Back
Lay the tube flat with the side seam at the wearer’s left. Mark 84 stitches for the Front and 84 stitches for the Back. Each panel is now worked back and forth in rows.
Front Armhole Shaping
Row F1 (RS): Join yarn 6 stitches in from the side marker, ch 3, continue the established eyelet pattern across 72 sts, turn. The 6 unworked stitches at each side create the first armhole step.
Rows F2-F3: Sl st across the first 3 sts, continue in pattern to the last 3 sts, leaving them unworked, turn. You now have about 60 working stitches.
Rows F4-F7: Decrease 1 stitch at each edge on every row by working the first two dc together and the last two dc together while maintaining eyelets where possible. Finish with about 52 stitches.
Continue even in the eyelet pattern until the armhole depth measures 5.25 inches (13.5 cm).
Front Neckline
Mark the center 20 stitches. Work the right shoulder across 16 stitches, turn, leaving the center 20 stitches and left shoulder unworked.
At the neck edge, decrease 2 stitches on the next 2 rows, then 1 stitch on the following 2 rows. Continue even on 10 stitches until the armhole depth reaches 7.5 inches (19 cm). Fasten off.
Rejoin at the opposite side of the center neck and mirror the shaping for the left shoulder.
Back Armholes and Neckline
Shape Back armholes exactly as Front through an armhole depth of 6.5 inches (16.5 cm).
For the back neck, mark the center 28 stitches. Work each shoulder separately. At each neck edge, decrease 2 stitches once and 1 stitch once, leaving approximately 10 stitches per shoulder. Continue to the same total armhole depth as Front.
With RS together, slip stitch or mattress stitch the shoulder seams. Block the upper bodice to measurements before adding sleeves.
Neckline Edging and Flutter Sleeves
Round Neckline Edging
With RS facing, join white at one shoulder seam. Work sc evenly around the entire neckline, aiming for an even, flat edge. Join.
Next round: Sc in next 2 sts, picot, sc in next 2 sts around, adjusting the final repeat as needed. Join and fasten off.
Flutter Sleeve (Make 2)
The sleeve is worked directly into each armhole. It’s intentionally fuller than the opening, so you’ll increase in the first round to create that soft scalloped flutter effect.
Round S1: With RS facing, join yarn at underarm. Work 96 sc evenly around the armhole, placing approximately 3 sc for every 2 row ends and 1 sc in each underarm stitch. Adjust by a few stitches if necessary, but keep the count a multiple of 8.
Round S2: Ch 3, dc in same st, 2 dc in next st, dc in next 2 sts around. Join. This increases fullness by roughly 25%.
Round S3: Ch 4 (dc + ch 1), dc in same st, sk 2 sts, V-eyelet in next st around; join.
Round S4: Sl st into first ch-1 sp, ch 3, 4 dc in same sp, 5 dc in next V-space around; join.
Round S5: Sc in center dc of shell, ch 4, sc in next shell center around; join.
Round S6: In each ch-4 loop work (sc, hdc, 3 dc, hdc, sc). Join and fasten off.
Lightly block the sleeve scallops outward so they fan beautifully.
Three-Tier Lace Skirt
The skirt tiers are worked from top to bottom. Tier 1 begins at the waist. Tiers 2 and 3 begin from separate attachment rounds worked behind the previous tier so the layers overlap cleanly rather than being sewn edge to edge.
Tier 1 (Upper Flounce)
Round T1-1: Join white at waist seam. Sc evenly around the waist foundation, increasing to 224 sts by working 2 sc in every third stitch approximately. Count must be a multiple of 8.
Round T1-2: Ch 3, dc in next 3 sts, ch 2, sk 2, dc in next 3 sts around; join.
Round T1-3: Ch 3, dc in next 2 dc, large fan in ch-2 sp, dc in next 3 dc around; join.
Round T1-4: Sl st to ch-2 fan center, (3 dc, ch 2, 3 dc) in ch-2 sp, ch 1, skip to next fan center around; join.
Rounds T1-5 to T1-12: Continue working large fans into each ch-2 center, placing ch 1 between fans. On Rounds 7 and 10, increase fullness by working two fans in every 7th fan center. Keep increases evenly spaced.
Edging: In each fan center work (sc, hdc, 5 dc, hdc, sc), then picot at the center dc of each scallop. Fasten off.
Tier 1 should measure about 8 inches (20 cm) from waist and overlap Tier 2 by 2 to 3 inches.
Tier 2 (Middle Flounce)
From the WS at the waist, identify the original waist sc round directly behind Tier 1. Join yarn and work 224 sc around, catching the back loop or a lower bar so the new round sits behind Tier 1.
Next round: Increase evenly to 256 sts, keeping a multiple of 8.
Work the same lace sequence as Tier 1 for 14 rounds, adding an increase round after Rounds 5 and 9 by working two fans into every 8th fan center.
Finish with the same scallop-and-picot edging. Tier 2 should measure about 10 inches (25.5 cm) from its attachment line.
Tier 3 (Lower Flounce)
Create an attachment line about 4.5 to 5 inches (11.5 to 12.5 cm) below the waist on the underside of Tier 2. With the dress turned WS out, join yarn into the vertical posts or underside bars of the Tier 2 fabric and work 256 sc around. Keep the line level.
Next round: Increase evenly to 304 sts, a multiple of 8.
Work the same fan lace for 16 rounds. Increase after Rounds 5, 9, and 12 by working two fans into every 9th fan center, distributing any remainder evenly.
Finish with the same broad scallop edging and picots. Block the lower tier to a soft bell shape, not a stiff circle.
Length adjustment tip: Add or remove complete fan rounds before the final scallop row. Each fan round adds approximately 0.45 to 0.55 inches (1.1 to 1.4 cm) depending on gauge.
Daisy, Leaf, and Rosette Motifs
These dimensional embellishments bring the dress to life. Take your time with them because they’re the details everyone will notice.
Raised Daisy (Make 10 to 14)
Use golden yellow for the center and white for petals. Make 7 to 9 daisies for the diagonal bodice garland and 4 to 5 for the middle skirt tier.
Center: With yellow, make a magic ring. Ch 1, work 10 sc into ring, join, tighten ring. Fasten off.
Petal round: Join white to any sc. Ch 7, in 2nd ch from hook work sc, hdc, dc in next 2 ch, hdc, sc; sl st in next center sc; repeat around for 10 petals.
For extra relief: Work a second petal layer behind the first. Join white around the back loop or post of a center sc, ch 8, work sc, hdc, dc in next 3, hdc, sc, sl st around next post around. Fasten off.
Steam or wet-block lightly so petals remain raised rather than flattened.
Olive Leaf (Make 14 to 20)
With olive green, ch 8. Starting in 2nd ch from hook: sc, hdc, dc, tr, dc, hdc, sc.
Rotate to work along the opposite side of the foundation chain: sc, hdc, dc, tr, dc, hdc, sc. Sl st to first st and fasten off, leaving a sewing tail.
For smaller leaves, begin with ch 6 and use sc, hdc, dc, hdc, sc on each side.
White Waist Rosette (Make 1)
Ch 51. Row 1: Dc in 4th ch from hook and in each ch across. Turn.
Row 2: Ch 3, 4 dc in same st, 5 dc in next st across. The strip will curl strongly.
Fasten off with a long tail. Roll the strip into a rose from one end, keeping the base flat. Stitch through all layers at the back until secure. Finished diameter should be about 3 to 3.5 inches (7.5 to 9 cm).
Floral Placement and Bow
Diagonal Daisy Garland
Put the dress on a dress form or the wearer over the lining. Starting near the wearer’s left shoulder, pin the largest daisies diagonally across the front toward the right waist.
Space 7 to 9 daisies approximately 1.5 to 2 inches (4 to 5 cm) apart. Rotate petal angles so the garland looks organic rather than perfectly uniform.
Tuck olive leaves between and slightly beneath the flowers. Use 1 to 2 leaves per gap. Keep the upper section narrower and let the arrangement become slightly fuller near the waist.
Sew each center firmly to the crochet fabric with matching thread or yarn, catching only the center and inner petal bases so the outer petals remain dimensional.
Middle-Tier Daisies
Place 4 to 5 daisies around the middle tier, mostly on the front half of the skirt. Stagger them rather than creating a straight horizontal row.
Add one or two leaves beside selected flowers. Sew through the denser fan sections rather than large open chain spaces.
Satin Bow and Rosette
Cut two ribbon tails 25 to 30 inches (63 to 76 cm) long plus one center wrap 4 to 5 inches (10 to 13 cm). Seal cut ends by your preferred method.
Form a wide bow approximately 6 to 7 inches (15 to 18 cm) across. Hand tack the center securely.
Position the bow at the right side waist so its long tails fall toward the lowest flounce. Stitch the bow to the lining and to a few sturdy crochet waist stitches, avoiding distortion.
Center the crochet rosette over the bow knot and sew firmly through the rosette base, ribbon, lining, and selected crochet stitches.
Opaque Lining
The lining is essential because the crochet is intentionally open. A simple sleeveless dress lining works best and lets the crochet flutter sleeves remain airy.
Trace a well-fitting sleeveless sheath or tank dress to create front and back lining pieces. Add 3/8 inch (1 cm) seam allowance and enough skirt width for comfortable movement.
Cut front and back from white lining fabric. Sew shoulder and side seams. Finish the armholes with narrow bias binding or a clean turned edge.
Shape the lining neckline to sit about 1/4 inch (6 mm) below the crochet neckline so it stays hidden.
For the skirt, use an A-line or lightly gathered lining ending 1 to 2 inches (2.5 to 5 cm) above the crochet hem. Do not make the lining as full as the outer skirt because this keeps the crochet tiers light and floaty.
Finish the lining hem with a narrow double fold.
Insert the lining into the crochet shell, wrong sides together. Hand sew the lining to the crochet at the neckline, shoulder seams, side seams, and waist using small loose catch stitches. Leave enough ease that the crochet can stretch independently.
Final Assembly and Finishing
Weave in all ends on the WS. Split cotton yarn tails and weave in multiple directions for security.
Wet-block the dress on towels or a dress form. Pin the neckline round, keep the bodice straight, and shape each tier into smooth scallops. Avoid stretching the waist.
Allow to dry completely. Reshape raised flowers by hand once dry.
Attach daisies, leaves, bow, and rosette after major blocking. If needed, lightly steam only the skirt edges from a distance. Never press the raised flowers flat.
Try on the dress and confirm that the lining does not pull, the hem tiers hang evenly, and the armholes are comfortable.
Add a small clear snap at the back neckline only if needed for head clearance. Sew it to the lining and edge, not to open lace alone.
Grading for Sizes XS to 2XL
The easiest way to grade this dress is to adjust the waist foundation by complete 4-stitch bodice pattern units, then preserve the proportions of the armholes, neckline, sleeves, and skirt.
| Size | Waist Foundation | Bodice Panel Before Armhole | Tier 1 Start | Tier 2 Start | Tier 3 Start |
|---|---|---|---|---|---|
| XS | 144 sts | 72 / 72 | 192 | 224 | 272 |
| S | 156 sts | 78 / 78 | 208 | 240 | 288 |
| M | 168 sts | 84 / 84 | 224 | 256 | 304 |
| L | 184 sts | 92 / 92 | 240 | 272 | 320 |
| XL | 200 sts | 100 / 100 | 264 | 296 | 344 |
| 2XL | 216 sts | 108 / 108 | 288 | 320 | 368 |
For armhole shaping, scale the initial underarm bind-off to approximately 0.75 to 1.25 inches (2 to 3 cm) per side, then decrease gradually until the armhole curve lies flat. For larger sizes, add 0.5 inch (1.25 cm) of armhole depth per size above M. For smaller sizes, subtract about 0.25 inch (0.6 cm) per size below M. Keep shoulder width around 2 to 2.75 inches (5 to 7 cm) per side.
Sleeve stitch count should be a multiple of 8 and approximately 1.2 to 1.3 times the measured armhole edge stitch count.
Troubleshooting Common Issues
Bodice too loose: Your gauge is too large or you have too many waist stitches. Drop 4 to 8 foundation stitches or use a smaller hook.
Bodice pulls at bust: Not enough bust ease. Increase 4 to 12 stitches over upper bodice rounds.
Armhole gaps: Too many sleeve pickup stitches. Remove 8 to 16 pickup stitches, keeping a multiple of 8.
Skirt looks flat: Too little tier increase. Add one extra fan in every 6th to 8th repeat.
Skirt ruffles excessively: Too much increase. Skip an increase round or reduce repeat frequency.
Tier edges curl: Tension too tight. Use a 0.25 mm larger hook for the final 2 rounds.
Lining shows at hem: Lining too long. Shorten lining 1 to 2 inches above crochet hem.
Flowers flop: Centers not anchored. Sew through center and inner petals while leaving outer petals free.
Care Instructions
Hand wash in cool water with mild detergent, or use a gentle machine cycle in a garment bag only if your yarn label permits.
Do not wring. Roll in towels to remove excess water, then reshape and dry flat.
Store folded rather than hanging for long periods because the tiered cotton skirt has weight and can stretch the bodice over time.
Press the lining separately if needed. Do not press raised crochet flowers directly.
Construction Checklist
Use this to track your progress:
Final Thoughts on This White Daisy Tiered Dress Crochet Pattern
Thank you so much for choosing this pattern for your next project. I truly hope you love making this dress as much as I loved designing it. The combination of fitted bodice, dreamy lace tiers, and those sweet dimensional daisies creates something genuinely special that you’ll treasure for years.
Remember that crochet fabric varies significantly with yarn, hook, stitch height, and individual tension. Measure the garment repeatedly while working. For a truly made-to-measure result, prioritize the finished measurements and fit checks over exact round counts.
I would absolutely love to see your finished White Daisy Tiered Dress! Save this pattern to your Pinterest boards so you can find it easily when you’re ready to start, and please leave a comment below if you make it. Seeing your beautiful creations is the best part of sharing patterns.
Want a Quick & Easy Printable Version?
Get a clean, beautifully formatted PDF of this pattern — easy to follow step by step, ready to print or save on any device. No scrolling, no distractions, just the pattern.
Get the Printable PDF →