
I’ve been looking for the perfect way to add a little handmade charm to my living room, and this snowy owl curtain tieback is absolutely it. After searching through dozens of amigurumi patterns and home decor projects, this one stood out as something truly special.
Get the Ad-Free PDF Pattern
You can find the free pattern below, or you can purchase the ad-free printable PDF from my shop.
Get the Printable PDF →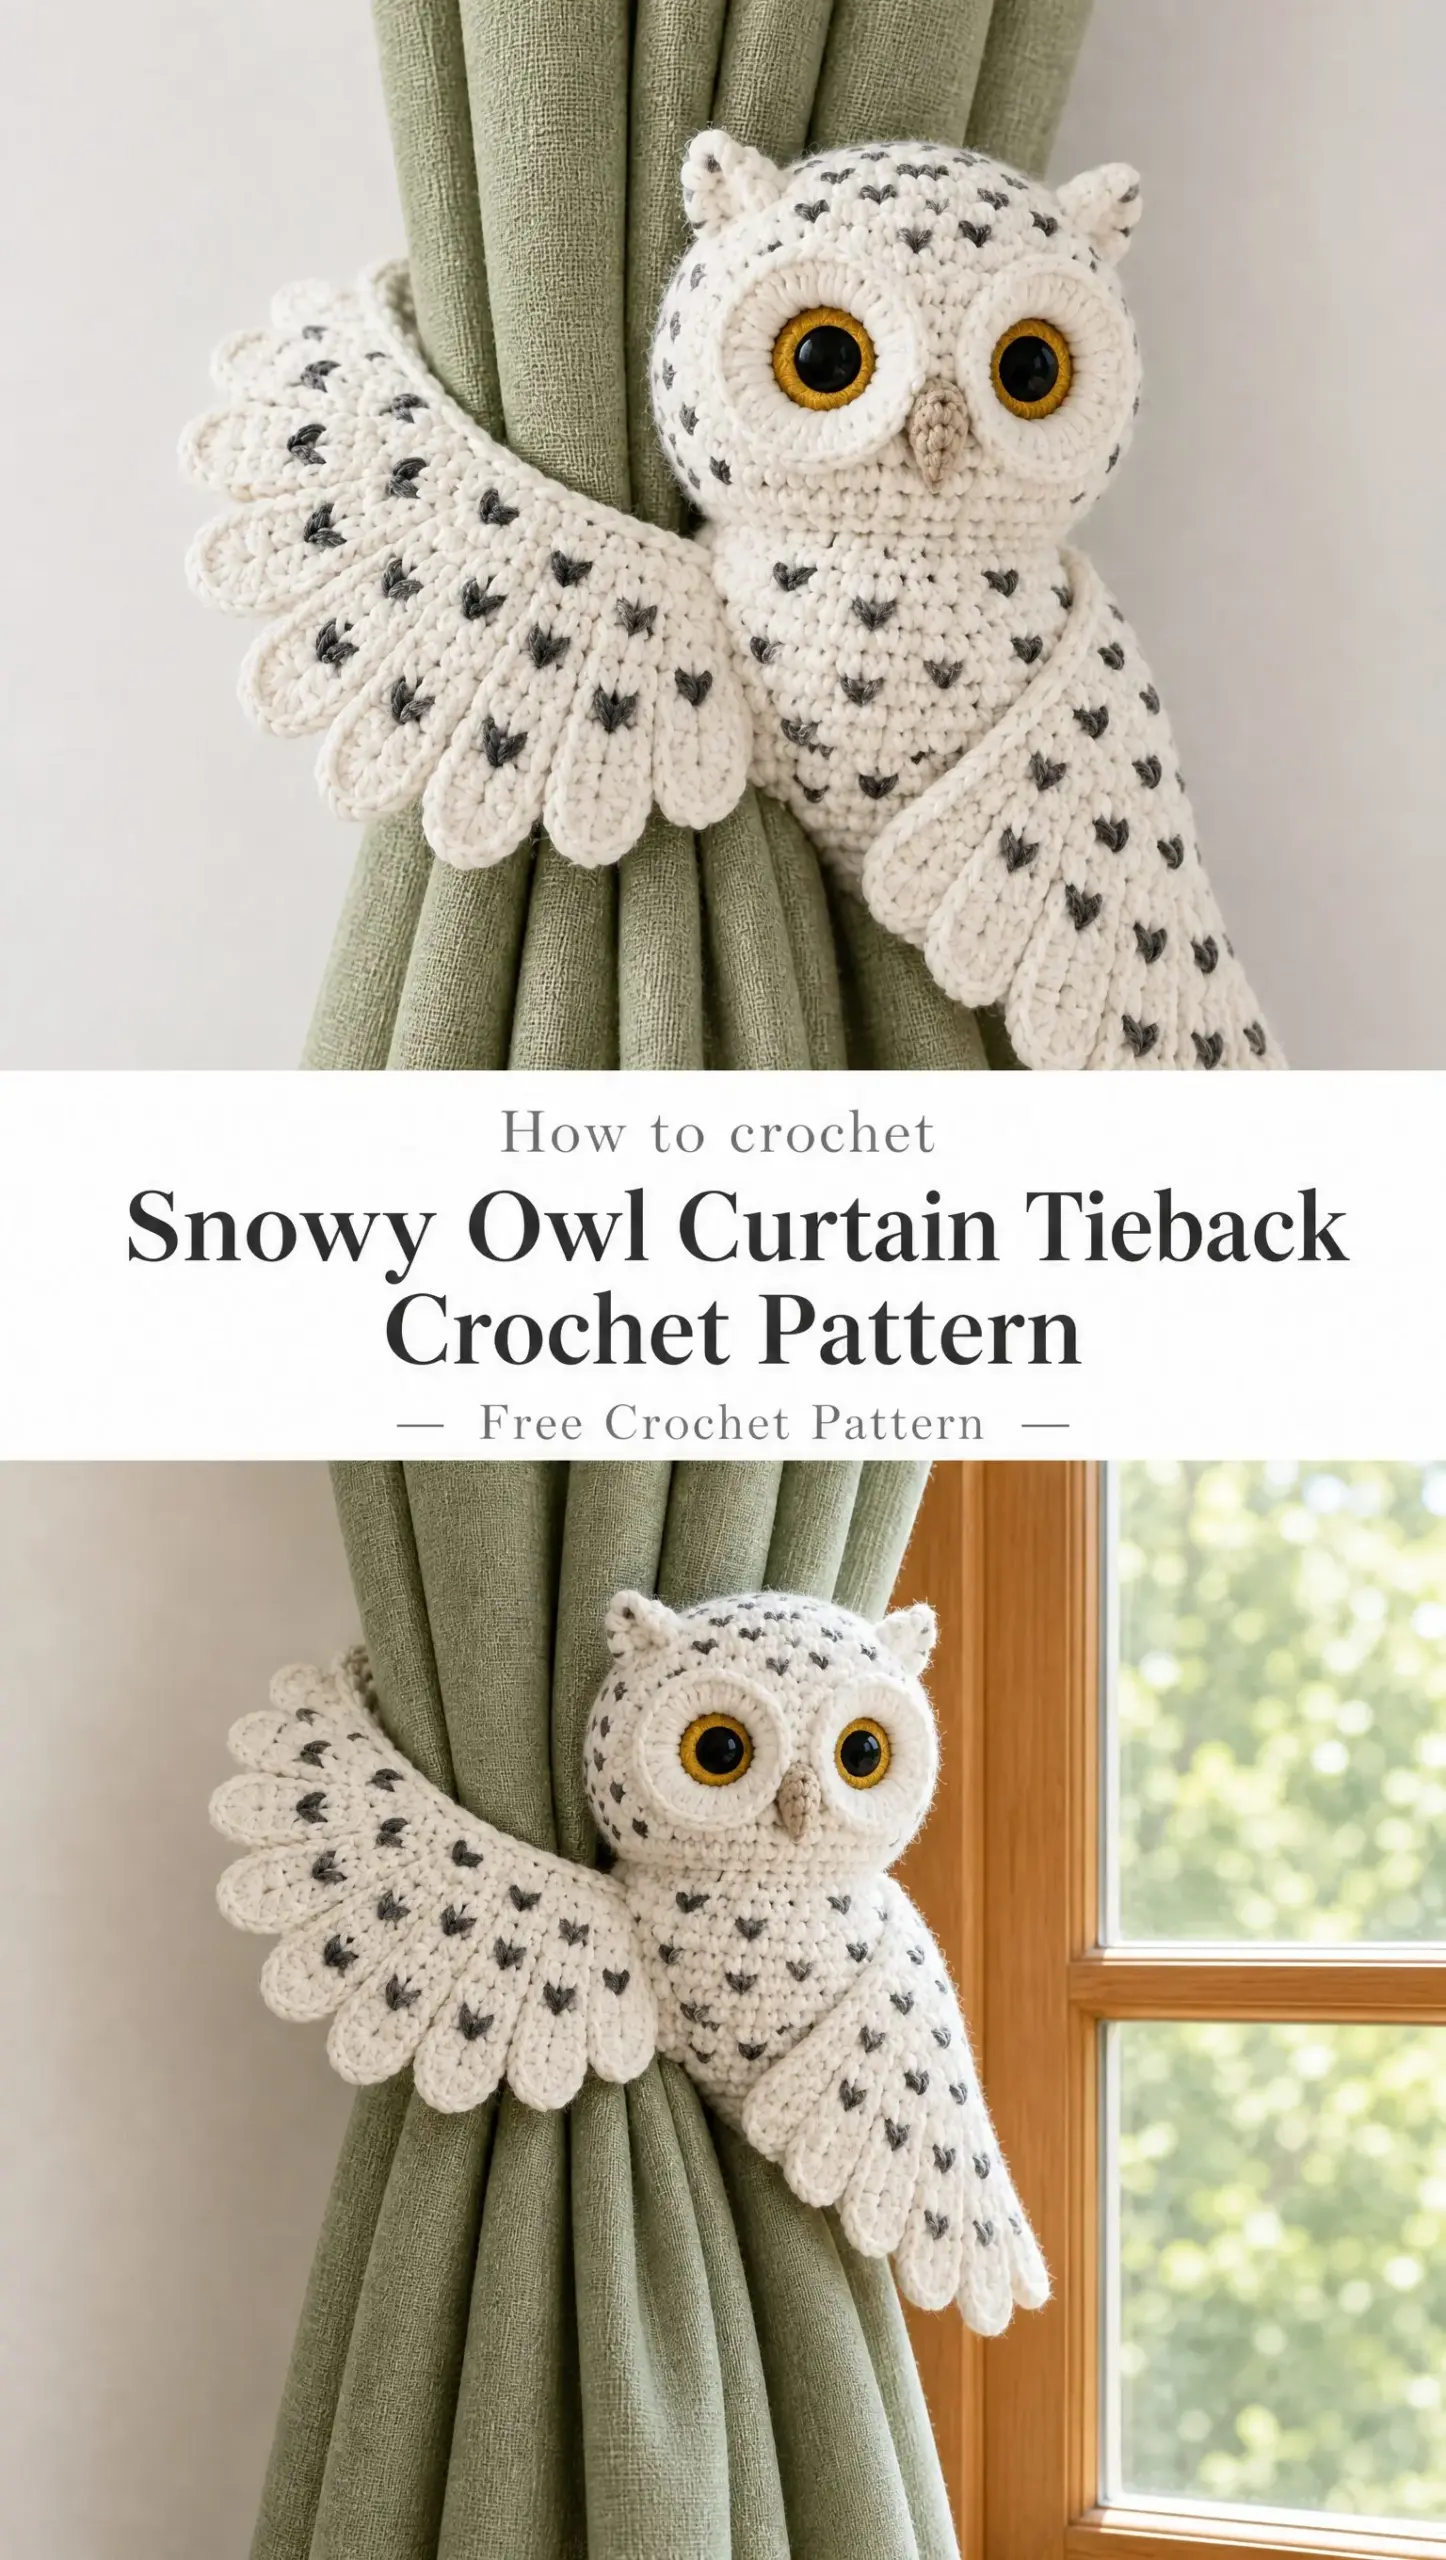
This crochet pattern combines everything I love: a plush stuffed animal, practical home decor, and those gorgeous scalloped wings that make everyone stop and stare. The owl wraps around your curtains with a concealed band, so it looks like this sweet little bird is actually hugging the fabric. If you’ve been wanting to add a whimsical touch to your windows, this is the project for you.
The finished owl stands about 19 to 21 centimeters tall with a wingspan of 25 to 30 centimeters when posed. It’s intermediate level, but don’t let that scare you off. If you can work single crochet in continuous rounds and follow a basic increase and decrease pattern, you’ve got this.
Materials You’ll Need for This Owl Crochet Pattern
Before you start crocheting, gather everything so you can work without interruptions. The pattern uses aran or worsted weight yarn (that’s #4 weight) in several colors.
Yarn requirements:
Look for a smooth, soft yarn that’s preferably plied. Acrylic or cotton and acrylic blends work beautifully because the stitches stay visible and defined. This matters for those adorable embroidered feather markings.
Tools and notions:
One thing I love about this pattern: no plastic safety eyes required. You’ll crochet the eyes entirely from yarn, which makes this piece safer for homes with curious little ones and gives it that soft, handmade look.
Understanding the Gauge
Your target gauge is 18 single crochet stitches and 22 rows equals 10 centimeters in firm single crochet. Make a swatch of 20 stitches by 24 rows, then measure the central 10 centimeters without stretching.
Here’s the thing about gauge for amigurumi style projects: you want a dense fabric. If your stuffing shows through the stitches, go down a hook size. Don’t try to force gauge with loose fabric because it changes the owl’s size and the band won’t fit your curtain properly.
Measuring for your curtain: Gather your curtain to the fullness you want and measure its circumference at tieback height without squeezing tightly. Call this measurement C. Your finished band will be about C plus 5 centimeters, including the closure overlap.
Stitch Abbreviations and Definitions
Let me walk you through every stitch you’ll use in this snowy owl crochet pattern.
ch = chain. Wrap yarn over hook and pull through the loop on your hook.
sl st = slip stitch. Insert hook, yarn over, pull through both the stitch and loop on hook in one motion.
sc = single crochet. Insert hook into stitch, yarn over and draw up a loop (two loops on hook), yarn over and draw through both loops.
hdc = half double crochet. Yarn over first, then insert hook and draw up a loop (three loops on hook), yarn over and draw through all three loops at once.
dc = double crochet. Yarn over, insert hook and draw up a loop, yarn over and draw through two loops, yarn over and draw through the remaining two loops.
inc = increase. Work 2 single crochet stitches into the same stitch. This adds one stitch to your count.
dec = invisible decrease. Insert your hook under the front loop only of the next stitch, then under the front loop only of the following stitch. Yarn over and draw through both front loops, then yarn over and draw through both loops on your hook. This creates a nearly invisible decrease.
sc2tog = single crochet two together (for flat rows). Insert hook in next stitch, yarn over and draw up a loop. Repeat in the following stitch. Yarn over and draw through all three loops.
MR = magic ring. This creates an adjustable starting ring. Tighten and secure the tail after your first few rounds.
BLO = back loop only. Work into just the back loop of the stitch.
FLO = front loop only. Work into just the front loop of the stitch.
Working Rules to Keep in Mind
The body, head, and ear tufts all use continuous rounds. This means you don’t join or turn at the end of each round. Place a stitch marker in your first stitch and move it up each round to keep track.
Work through both loops unless the pattern specifically says BLO or FLO. Every increase adds one stitch, and every decrease removes one. Count your stitches before moving on to the next round. Trust me, this saves so much frustration.
The wings and beak use turned rows. When you see "ch 1, turn" at the start of a row, that chain does not count as a stitch. Work your first stitch into the first stitch of the previous row.
The eye disks use joined rounds. The joining slip stitch and beginning chain 1 do not count in your stitch totals.
How to Crochet the One-Piece Body and Head
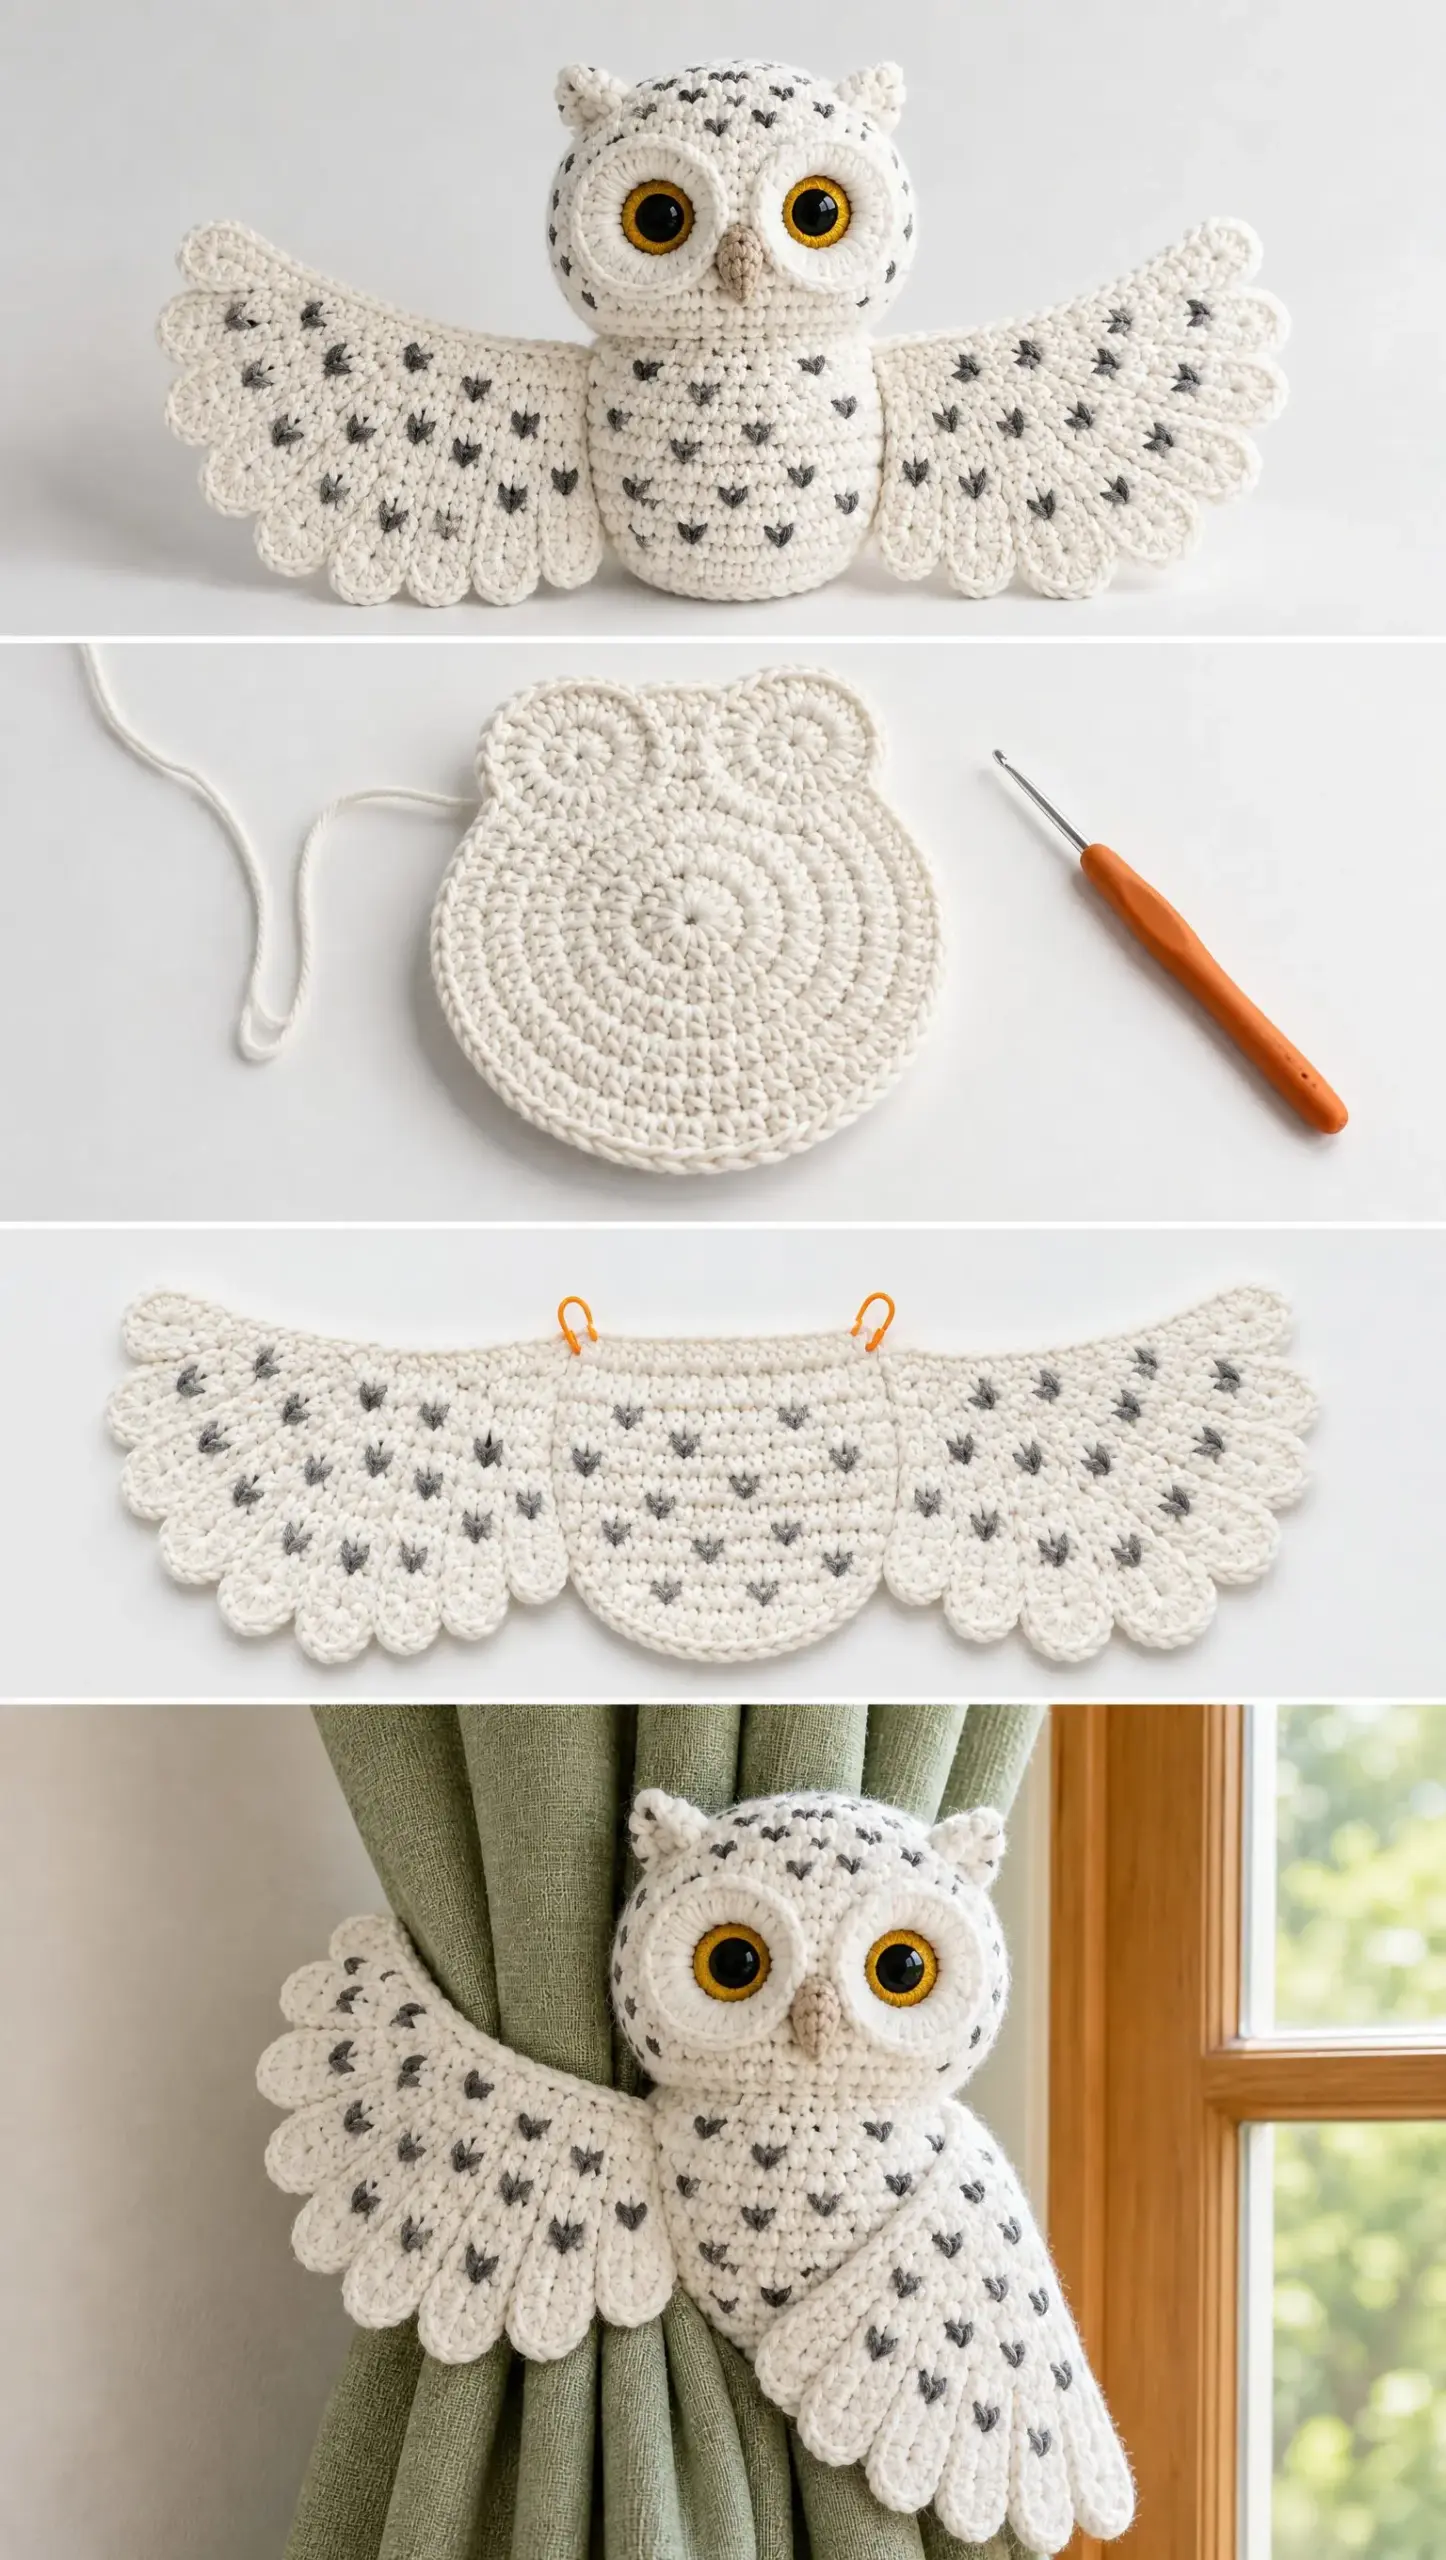
Use white yarn. You’ll start at the lower body and work upward in one continuous piece. Leave your round marker at the back of the work. The narrow middle section forms the neck, and the wider upper section becomes the head.
Round 1: 6 sc in MR. [6 stitches]
Round 2: Inc in each stitch. [12 stitches]
Round 3: (Sc 1, inc) repeat 6 times. [18 stitches]
Round 4: (Sc 2, inc) repeat 6 times. [24 stitches]
Round 5: (Sc 3, inc) repeat 6 times. [30 stitches]
Round 6: (Sc 4, inc) repeat 6 times. [36 stitches]
Round 7: (Sc 5, inc) repeat 6 times. [42 stitches]
Round 8: (Sc 6, inc) repeat 6 times. [48 stitches]
Rounds 9 through 16: Sc in each stitch for 8 rounds. [48 stitches]
Round 17: (Sc 6, dec) repeat 6 times. [42 stitches]
Round 18: (Sc 5, dec) repeat 6 times. [36 stitches]
Round 19: Sc in each stitch. [36 stitches]
Stuff the lower body lightly after this round.
Round 20: (Sc 5, inc) repeat 6 times. [42 stitches]
Round 21: (Sc 6, inc) repeat 6 times. [48 stitches]
Round 22: (Sc 7, inc) repeat 6 times. [54 stitches]
Round 23: (Sc 8, inc) repeat 6 times. [60 stitches]
Rounds 24 through 30: Sc in each stitch for 7 rounds. [60 stitches]
Round 31: (Sc 8, dec) repeat 6 times. [54 stitches]
Round 32: (Sc 7, dec) repeat 6 times. [48 stitches]
Round 33: (Sc 6, dec) repeat 6 times. [42 stitches]
After this round, fill the head firmly but don’t overstuff. Support the neck area.
Round 34: (Sc 5, dec) repeat 6 times. [36 stitches]
Round 35: (Sc 4, dec) repeat 6 times. [30 stitches]
Round 36: (Sc 3, dec) repeat 6 times. [24 stitches]
Round 37: (Sc 2, dec) repeat 6 times. [18 stitches]
Round 38: (Sc 1, dec) repeat 6 times. [12 stitches]
Top up the stuffing before continuing.
Round 39: Dec repeat 6 times. [6 stitches]
Cut your yarn, draw it through the front loop only of all 6 remaining stitches, pull closed, and bury the tail inside. Shape the head into a compact round with a flatter back for mounting.
Creating the Raised Eyes
The eyes are my favorite part of this snowy owl crochet pattern. They’re layered circles that create that distinctive owl expression.
White Eye Disks (Make 2)
Use white yarn and joined rounds.
Round 1: 6 sc in MR, join. [6 stitches]
Round 2: Ch 1, inc in each stitch, join. [12 stitches]
Round 3: Ch 1, (sc 1, inc) repeat 6 times, join. [18 stitches]
Round 4: Ch 1, (sc 2, inc) repeat 6 times, join. [24 stitches]
Round 5: Ch 1, (sc 3, inc) repeat 6 times, join. [30 stitches]
Round 6: Ch 1, sc in BLO of each stitch, join. [30 stitches]
Fasten off with a long sewing tail. That last round in back loop only creates a shallow raised rim. Each disk measures about 5 to 5.5 centimeters wide.
Black Centers and Golden Iris Rings (Make 2)
With black yarn:
Round 1: 6 sc in MR, join. [6 stitches]
Round 2: Ch 1, inc in each stitch, join. [12 stitches]
Fasten off black. Join golden yellow to any stitch.
Round 3: Ch 1, (sc 1, inc) repeat 6 times, join. [18 stitches]
Round 4: Ch 1, (sc 2, inc) repeat 6 times, join. [24 stitches]
Fasten off with a long yellow tail. This creates a black center surrounded by two yellow rounds. Sew each layered circle centrally onto a white disk using small stitches around the outer edge.
Optional detail: Embroider one tiny white highlight in each black center at the same upper right position for that classic amigurumi sparkle.
Making the Beak and Ear Tufts
Beak (Make 1)
Use beige yarn. Work from the broad top toward the point.
Ch 5.
Row 1: Sc in second ch from hook and in each remaining ch. [4 stitches]
Row 2: Ch 1, turn, sc in each stitch. [4 stitches]
Row 3: Ch 1, turn, sc2tog twice. [2 stitches]
Row 4: Ch 1, turn, sc2tog. [1 stitch]
Fasten off with a long tail. Gently curve the sides underneath to form a small dimensional triangle. No stuffing needed.
Tiny Pointed Ear Tufts (Make 2)
Use white yarn and continuous rounds.
Round 1: 4 sc in MR. [4 stitches]
Round 2: (Sc 1, inc) repeat 2 times. [6 stitches]
Round 3: (Sc 2, inc) repeat 2 times. [8 stitches]
Round 4: Sc in each stitch. [8 stitches]
Fasten off. Do not stuff. Flatten the opening to make 4 pairs of stitches.
Placing the Face
Find the front of your owl (opposite where your round marker was). Pin the eye centers level at approximately rounds 26 to 27, with the white disks just touching at the center. Pin both before sewing and adjust within the head area to fit your gauge.
Sew the disk rims to the head. Tuck a small pinch of stuffing behind each eye before closing to give them dimension. Keep the eye centers aligned.
Sew the beak between and just below the eyes. The broad end sits near round 25 with the point facing toward the neck.
Sew each tuft across its flattened opening near the upper side of the head at approximately rounds 32 to 34, one on each side. Secure both corners of each tuft.
Crocheting the Broad Scalloped Wings
Make 2 identical pieces using white yarn. These are worked as flat semicircles in turned rows. The straight diameter becomes the shoulder edge, and the curved outside becomes the gorgeous feathered edge.
Row 1: Work 3 sc in MR. Tighten into a half circle but do not join. [3 stitches]
Row 2: Ch 1, turn, inc in each stitch. [6 stitches]
Row 3: Ch 1, turn, (sc 1, inc) repeat 3 times. [9 stitches]
Row 4: Ch 1, turn, (sc 2, inc) repeat 3 times. [12 stitches]
Row 5: Ch 1, turn, (sc 3, inc) repeat 3 times. [15 stitches]
Row 6: Ch 1, turn, (sc 4, inc) repeat 3 times. [18 stitches]
Row 7: Ch 1, turn, (sc 5, inc) repeat 3 times. [21 stitches]
Row 8: Ch 1, turn, (sc 6, inc) repeat 3 times. [24 stitches]
Row 9: Ch 1, turn, (sc 7, inc) repeat 3 times. [27 stitches]
Row 10: Ch 1, turn, (sc 8, inc) repeat 3 times. [30 stitches]
Row 11: Ch 1, turn, (sc 9, inc) repeat 3 times. [33 stitches]
Row 12: Ch 1, turn, (sc 10, inc) repeat 3 times. [36 stitches]
Row 13: Ch 1, turn, (sc 11, inc) repeat 3 times. [39 stitches]
Row 14: Ch 1, turn, (sc 12, inc) repeat 3 times. [42 stitches]
Row 15: Ch 1, turn, (sc 13, inc) repeat 3 times. [45 stitches]
Row 16: Ch 1, turn, (sc 14, inc) repeat 3 times. [48 stitches]
Row 17: Creating the Eight Feather Scallops
Ch 1, turn. Repeat this sequence 8 times across the 48 stitches: sl st in next stitch, sc in next, hdc in next, 3 dc in next, hdc in next, sc in next.
Each repeat uses 6 base stitches and produces 8 stitches including the slip stitch. You’ll finish with 8 rounded feather tips. [64 stitches total]
Do not work a further row across the scallops.
Shoulder edge: Turn the piece to work along its straight shoulder edge. Ch 1, work 1 sc into each row end of rows 1 through 16 down to the center (16 sc), then 1 sc into each row end of rows 1 through 16 up the other side (16 sc). Do not include the scallop row ends.
Fasten off with a 40 centimeter sewing tail. Ease the edging evenly so it doesn’t pull the fan into a cup shape. Block both wings flat to matching dimensions without stretching the scallops.
Adding the Charcoal Feather Marks
This embroidery step brings the whole owl to life. Use charcoal yarn to make scattered small V shapes across the wings and body.
Bring your needle up at an upper left point, down one stitch to the lower center, up at the upper right point, and down at the same lower center. Each V spans about 1 to 2 stitches and 1 row. Keep your yarn relaxed so the fabric doesn’t pucker.
Recommended placement:
Stagger them with 2 to 4 stitches of white between marks. Leave the eye disks and beak clear. On the stuffed owl, run your yarn beneath the surface between nearby marks and bury all ends. On wings, weave ends through back loops on the reverse.
Important tip: Rotate the second wing into its final diagonal position before choosing the direction of its marks.
Creating the Fitted Band
Use white yarn. This concealed band does all the work of holding your curtain.
Ch 9.
Row 1: Sc in second ch from hook and across. [8 stitches]
Row 2: Ch 1, turn, sc 8. [8 stitches]
Repeat row 2 until the rested band measures your C measurement plus 5 centimeters. At the stated row gauge, a 30 centimeter curtain circumference needs about 35 centimeters of band, or approximately 77 rows total.
Always measure rather than relying on the row estimate. Fasten off and weave in ends. Band width is about 4.5 centimeters.
Adding the Closure
Overlap the ends by 5 centimeters and fit the band around your curtain. It should support the folds without crushing them.
Sew the soft loop half of the hook and loop tape to the outward face of the inner end. Sew the hook half to the inward face of the outer end. Secure all four edges and sew a cross through each tape piece.
Orient the overlap behind the curtain so the closure stays concealed and the hooks can’t touch your fabric.
Assembling and Mounting Your Snowy Owl
Step 1: Close the band on your curtain and mark its front center. Remove the band. Pin the owl’s back to that center with the band running behind the upper torso just below the neck. Sew a rectangle about 4 centimeters wide and 3 centimeters high through the band and the owl’s back stitches. Make a second pass around this rectangle for security. Do not sew through to the front of the owl.
Step 2: Looking from the front, pin one wing at the owl’s left shoulder. Gather only the inner 3 to 4 centimeters of the straight wing edge into a small fold at the shoulder and sew it firmly to the side of the upper torso. Fan the scalloped edge outward to the left. Curve the upper part of the wing around the curtain and tack its underside to the band at two points several centimeters apart. Leave the outer feather tips free.
Step 3: Attach the second wing at the right shoulder in the same way. Rotate it so its fan falls diagonally down and right across the lower torso. Sew the inner edge to the body over about 4 centimeters and add one hidden tack where the wing crosses the torso. Keep the right eye and beak fully visible.
Step 4: Refit on your gathered curtain. Check that the eyes sit level and the owl doesn’t tip forward. If it tilts, move the band attachment slightly higher on the back or widen the sewn attachment rectangle. If it slips, shorten the band or increase the overlap. Don’t try to tighten by pulling on the wings.
Care Instructions and Final Notes
Spot clean or gently hand wash according to your yarn label. Close the hook and loop tape before washing. Press out water in a towel, reshape, and dry flat completely. Avoid hanging the wet owl by its wings.
Safety note: This is a decorative furnishing, not a toy. Keep the tieback and any curtain cords beyond children’s reach. Do not use it on a cot or crib.
Completion checklist:
This snowy owl curtain tieback crochet pattern creates such a charming piece for your home. I hope you love making it as much as I enjoyed putting together these instructions. Thank you so much for choosing this pattern, and I’d absolutely love to see your finished owl. Tag me on Instagram or share a photo on Facebook so I can admire your work!
If you’re planning to make this adorable snowy owl tieback, save this pattern to your Pinterest boards so you can find it easily when you’re ready to start. And please leave a comment below once you’ve finished yours. I’d love to hear how it turned out and see it gracing your windows!
Want a Quick & Easy Printable Version?
Get a clean, beautifully formatted PDF of this pattern — easy to follow step by step, ready to print or save on any device. No scrolling, no distractions, just the pattern.
Get the Printable PDF →