
When I set out to design this dress, I had a clear vision in my head. I wanted something that felt elegant but not fussy. Something that showed off interesting construction techniques without being impossible to actually finish. I wanted a piece that would make people say "wait, you made that?"
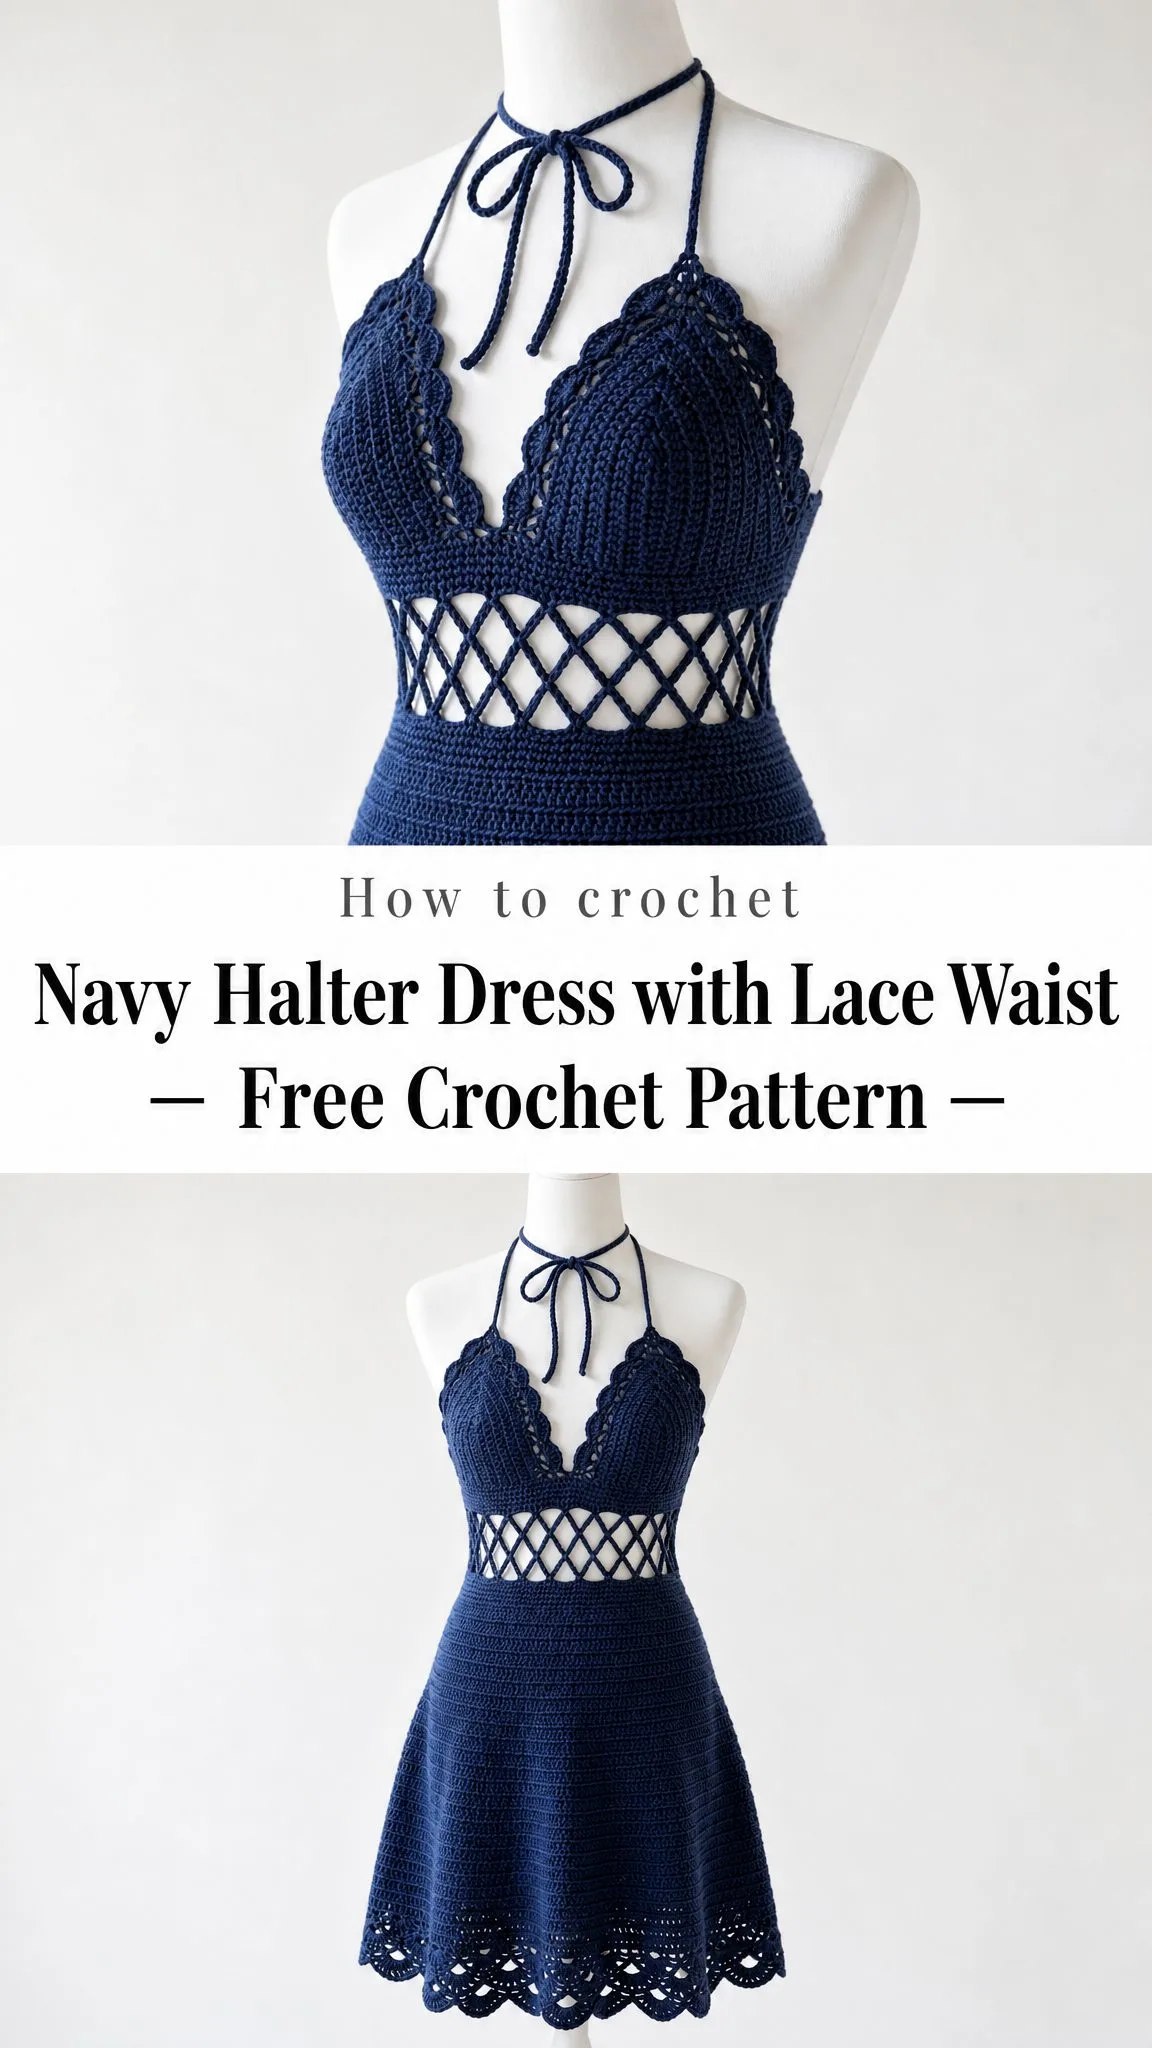
The diamond lattice waist detail was the first thing I sketched. From there, I built everything around it. The deep V neckline with those pretty scalloped edges. The fitted bodice that actually provides support. The A-line skirt that swings when you walk. Every single element had to earn its place.
I am SO pleased with how this turned out. The navy yarn photographs beautifully, the lattice panel creates that peek-a-boo detail that’s flirty without being over the top, and the lace hem border adds drama without extra bulk. If you’ve been wanting to try a garment project that pushes your skills just a bit, this is your sign.
About This Crochet Dress Pattern
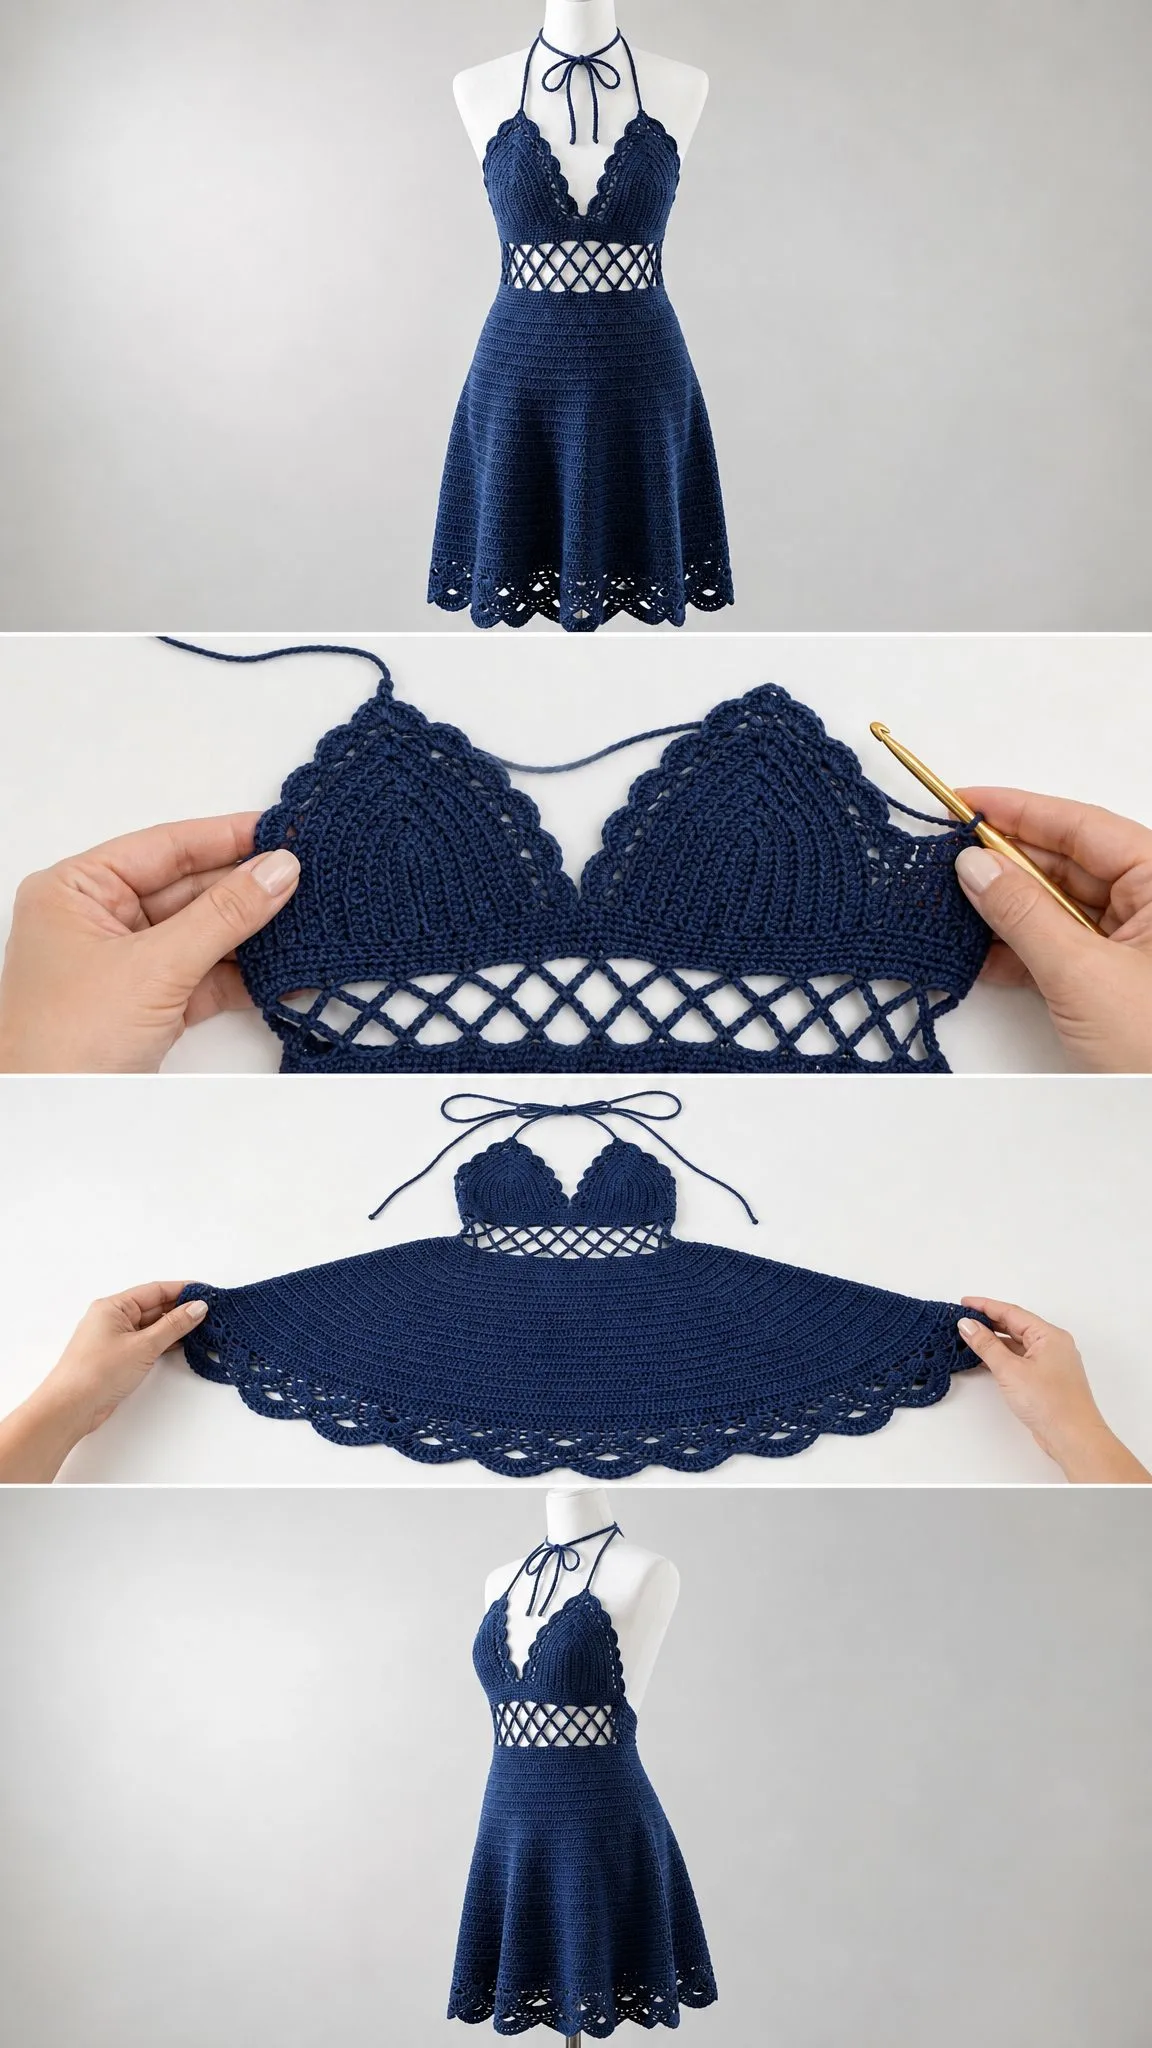
This halter dress combines several construction techniques into one stunning finished piece. You’ll work the bodice cups separately, join them to create that flattering V-neckline, add a decorative lattice waist panel, then work the skirt in the round with gradual increases for that perfect A-line shape.
The skill level sits at advanced beginner to intermediate. If you’re comfortable with basic shaping, can work in both rows and rounds, and don’t mind following stitch counts carefully, you can absolutely make this dress. The construction happens in phases, so you’re never juggling too many techniques at once.
Finished measurements fit a size Small/Medium with a 34 to 36 inch bust, 26 to 28 inch waist, and 36 to 38 inch hip. Total length from shoulder to hem is approximately 32 inches. I’ve included size customization tips at the end if you need to go larger or smaller.
Time estimate: Plan for 30 to 45 hours depending on your experience level and how fast you crochet. This is a project to enjoy over several weeks, not rush through in a weekend.
Materials You’ll Need
Yarn: Approximately 1,000 to 1,200 yards of DK weight (light weight 3) smooth cotton or cotton-blend yarn in navy blue. A smooth yarn without texture will best show the lattice and lace details.
Here are three yarn options that work beautifully:
Lion Brand 24/7 Cotton in Navy is my top pick. It’s a mercerized cotton with excellent stitch definition and a smooth finish that’s perfect for fine lattice work. You’ll need 6 skeins at 186 yards per skein.
Paintbox Yarns Simply DK in Sailor Blue is pure cotton with a polished sheen and firm structure ideal for fitted garments. Grab 8 skeins at 137 yards per skein.
Drops Safran in Navy Blue is a fine combed cotton with slight sheen and excellent drape. You’ll need 7 skeins at 175 yards per skein.
Whatever you choose, avoid fuzzy, bouclé, or heavily textured yarns. They’ll completely obscure the lattice and lace patterns, and that would be such a waste.
Hook: US size E-4 / 3.5 mm crochet hook, or whatever size you need to achieve gauge.
Notions: Yarn needle for weaving ends, at least 6 stitch markers, rust-proof pins for blocking. Optional: 1/4 inch elastic (approximately 30 inches) for added waistband structure.
Gauge (Please Don’t Skip This)
22 single crochet stitches and 24 rows = 4 inches, worked in single crochet (sc) and blocked.
I know gauge swatches feel tedious. But this is a fitted garment. A difference of even one stitch per inch will significantly alter how the bodice cups fit, how the waist panel sits, and whether the whole thing looks right on your body. Make a 5-inch swatch, block it, and measure. Your future self will thank you.
Abbreviations and Stitch Definitions
Let me walk you through every stitch you’ll use in this pattern. Even if you know these already, take a quick look to make sure we’re speaking the same language.
ch (chain): Yarn over, pull through the loop on your hook. This creates the foundation for most crochet work.
sl st (slip stitch): Insert hook into stitch, yarn over, pull through both the stitch and the loop on your hook in one motion. Used for joining and for nearly invisible stitches.
sc (single crochet): Insert hook into stitch, yarn over and pull up a loop (2 loops on hook), yarn over and pull through both loops. This is your bread and butter stitch for this entire dress.
hdc (half double crochet): Yarn over, insert hook into stitch, yarn over and pull up a loop (3 loops on hook), yarn over and pull through all 3 loops.
dc (double crochet): Yarn over, insert hook into stitch, yarn over and pull up a loop (3 loops on hook), yarn over and pull through 2 loops (2 loops remain), yarn over and pull through remaining 2 loops.
tr (treble crochet): Yarn over twice, insert hook into stitch, yarn over and pull up a loop (4 loops on hook), [yarn over and pull through 2 loops] 3 times.
sk (skip): Pass over the indicated number of stitches without working into them.
st(s) (stitch/stitches): The individual loops you work into.
sp(s) (space/spaces): The gaps created by chain stitches, which you work into.
RS/WS (right side/wrong side): The front and back of your work.
pm (place marker): Put a stitch marker in the indicated location.
sc2tog (single crochet 2 together): This is a decrease. Insert hook in next stitch and pull up a loop, insert hook in following stitch and pull up a loop (3 loops on hook), yarn over and draw through all 3 loops. You’ve turned 2 stitches into 1.
inc (increase): Work 2 sc in the same stitch. You’ve turned 1 stitch into 2.
ch-sp (chain space): The gap created by chain stitches in a previous row.
Special Stitches
Scallop Stitch
This creates the pretty wavy edge on the bodice neckline and hem border. Here’s how one scallop works:
1. Skip 2 stitches
2. Work 5 double crochet into the next stitch (this creates the "shell" or bump)
3. Skip 2 stitches
4. Slip stitch into the next stitch
One complete scallop uses 6 stitches total. You’ll repeat this pattern across edges that are multiples of 6.
Diamond Lattice Stitch
This is the showstopper that creates those open diamonds at your waist. It looks complex but follows a logical pattern once you get going.
Foundation: Start with a chain that’s a multiple of 4 plus 2.
Row 1 (RS): Ch 3 (counts as dc), dc in 4th ch from hook and in each ch across. Turn.
Row 2: Ch 5 (counts as dc plus ch 2), skip 2 sts, dc in next st, ch 2, skip 2 sts, dc in next st across. Turn.
Row 3: Ch 3, 2 dc in first ch-2 sp, ch 1, 2 dc in next ch-2 sp across, dc in top of turning ch. Turn.
Row 4: Ch 5, skip first dc and ch-1 sp, dc in next dc, ch 2, skip 2 dc, dc in ch-1 sp, ch 2, skip 2 dc, dc in next dc across. Turn.
For this dress, you’ll work 4 rows of lattice to create that visible band at the waist.
Lace Hem Border
This 3-round border creates the deep scalloped lace visible at the dress bottom.
Round 1: Sc in each st around. Join with sl st.
Round 2: Ch 1, sc in next st, ch 3, skip 2 sts, sc in next st around, join.
Round 3: Sl st into first ch-3 sp, ch 3, (4 dc, ch 2, 5 dc) in same sp, sl st in next sc, (5 dc, ch 2, 5 dc) in next ch-3 sp, sl st in next sc around, join. Fasten off.
Important Pattern Notes
Before you start stitching, read through these notes. They’ll save you confusion later.
1. The bodice is constructed as two separate triangular cups, then joined at center front.
2. The halter neck cord is a crocheted chain that threads through the top edge and ties behind your neck.
3. Chain 1 at the beginning of single crochet rows does NOT count as a stitch.
4. Chain 3 at the beginning of double crochet rows DOES count as the first double crochet.
5. Numbers in parentheses at the end of each instruction line show your total stitch count after completing that row or round.
6. Block your finished dress before wearing to open up the lattice and lace sections fully.
Pattern Instructions
Bodice: Right Cup
The right cup is worked in rows, building a triangular shape with decreases at the outer armhole edge.
Foundation chain: Ch 35. (35 ch)
Row 1 (RS): Sc in 2nd ch from hook and in each ch across. Turn. (34 sc)
Row 2: Ch 1, sc in each st across. Turn. (34 sc)
Row 3: Ch 1, sc in each st to last 2 sts, sc2tog. Turn. (33 sc)
Row 4: Ch 1, sc in each st across. Turn. (33 sc)
Row 5: Ch 1, sc in each st to last 2 sts, sc2tog. Turn. (32 sc)
Row 6: Ch 1, sc in each st across. Turn. (32 sc)
Row 7: Ch 1, sc in each st to last 2 sts, sc2tog. Turn. (31 sc)
Row 8: Ch 1, sc in each st across. Turn. (31 sc)
Row 9: Ch 1, sc in each st to last 2 sts, sc2tog. Turn. (30 sc)
Row 10: Ch 1, sc in each st across. Turn. (30 sc)
Row 11: Ch 1, sc in each st to last 2 sts, sc2tog. Turn. (29 sc)
Row 12: Ch 1, sc in each st across. Turn. (29 sc)
Row 13: Ch 1, sc in each st to last 2 sts, sc2tog. Turn. (28 sc)
Row 14: Ch 1, sc in each st across. Turn. (28 sc)
Row 15: Ch 1, sc in each st to last 2 sts, sc2tog. Turn. (27 sc)
Row 16: Ch 1, sc in each st across. Turn. (27 sc)
Row 17: Ch 1, sc in each st to last 2 sts, sc2tog. Turn. (26 sc)
Row 18: Ch 1, sc in each st across. Turn. (26 sc)
Row 19: Ch 1, sc in each st to last 2 sts, sc2tog. Turn. (25 sc)
Row 20: Ch 1, sc in each st across. Turn. (25 sc)
Do not fasten off. Set aside with a stitch marker holding the loop.
Bodice: Left Cup
Work exactly as Right Cup, Rows 1 through 20. (25 sc at end of Row 20)
Do not fasten off.
Joining the Cups
With wrong sides facing each other (or right sides facing up if you want a visible join), place the two cups side by side. The narrower decreased edges form the center front V.
Joining Row: Ch 1, sc across the 25 sts of the Left Cup, then sc across the 25 sts of the Right Cup. Turn. (50 sc)
The V neckline is created by the diagonal decrease edges of both cups meeting at center. You’ll add the scalloped trim to this edge after the bodice is complete.
Bodice Band Rows
These rows create the solid section just above the lattice waist.
Rows 21 through 26: Ch 1, sc in each st across. Turn. (50 sc each row)
Checkpoint: After completing through Row 26, the joined piece should measure approximately 6 inches tall from the top of the cups to the base. Width should be approximately 9 inches. If your measurements differ by more than 1/2 inch, check your gauge.
Scallop Trim: Bodice Neckline
Before working the waist lattice, add scallop trim to the V-neckline.
With RS facing, join yarn at top right shoulder edge. Work 1 sc evenly around the entire top edge and down both sides of the V, placing approximately 1 sc per row end and 1 sc per stitch along the top. Adjust your count to a multiple of 6.
Scallop Round: Skip 2 sc, 5 dc in next sc, skip 2 sc, sl st in next sc across the entire neckline edge. Fasten off.
If your sc count isn’t a multiple of 6, add or remove 1 to 2 sc evenly during the edging row to make it work.
Lattice Waist Panel
Working on the 50 sts from Row 26 of the bodice:
Lattice Row 1: Ch 3 (counts as dc), dc in each st across. Turn. (50 dc)
Lattice Row 2: Ch 5 (counts as dc plus ch 2), skip 2 sts, dc in next st, ch 2, skip 2 sts, dc in next st across to end. Turn. (17 dc and 16 ch-2 sps)
Lattice Row 3: Ch 3, 2 dc in first ch-2 sp, ch 1, 2 dc in next ch-2 sp 15 times, ch 1, 2 dc in last ch-2 sp, dc in top of ch-3. Turn.
Lattice Row 4: Ch 5, skip first dc and first ch-1 sp, dc in next dc, ch 2, skip 2 dc, dc in ch-1 sp, ch 2, skip 2 dc, dc in next dc across to end. Turn.
Back Lattice Extension: Ch 54 to create the back waist section. Join with sl st to the beginning of Lattice Row 1 to form a ring.
Note: The back of the dress above the lattice waist is open (backless halter), so this back lattice panel is the first structural element connecting front and back.
Lattice Round 5: Sl st across the back chain section following the same lattice pattern: ch 2, skip 2, dc in next ch across the 54 ch back section. Join to top of ch-3 at beginning of round.
Lattice Rounds 6 and 7: Continue the lattice diamond pattern in the round for 2 more rounds to complete 4 total lattice rows.
Transition Row to Skirt
Ch 1, sc in each dc and 2 sc in each ch-sp around the lattice to establish a solid stitch base for the skirt. The goal is 104 sc evenly distributed around the full waist. (104 sc)
Join with sl st to first sc. Do not turn; continue working in rounds.
Skirt
The skirt is worked in joined rounds from waist down, with increases every 4th round for the A-line flare.
Rounds 1 through 3: Ch 1, sc in each st around, join with sl st. (104 sc)
Round 4 (increase round): Ch 1, sc in next 12 sts, inc in next st 8 times, join with sl st. (112 sc)
Rounds 5 through 7: Ch 1, sc in each st around, join with sl st. (112 sc)
Round 8 (increase round): Ch 1, sc in next 13 sts, inc in next st 8 times, join with sl st. (120 sc)
Rounds 9 through 11: Ch 1, sc in each st around, join with sl st. (120 sc)
Round 12 (increase round): Ch 1, sc in next 14 sts, inc in next st 8 times, join with sl st. (128 sc)
Rounds 13 through 15: Ch 1, sc in each st around, join with sl st. (128 sc)
Round 16 (increase round): Ch 1, sc in next 15 sts, inc in next st 8 times, join with sl st. (136 sc)
Rounds 17 through 19: Ch 1, sc in each st around, join with sl st. (136 sc)
Round 20 (increase round): Ch 1, sc in next 16 sts, inc in next st 8 times, join with sl st. (144 sc)
Rounds 21 through 23: Ch 1, sc in each st around, join with sl st. (144 sc)
Round 24 (increase round): Ch 1, sc in next 17 sts, inc in next st 8 times, join with sl st. (152 sc)
Rounds 25 through 27: Ch 1, sc in each st around, join with sl st. (152 sc)
Round 28 (increase round): Ch 1, sc in next 18 sts, inc in next st 8 times, join with sl st. (160 sc)
Rounds 29 through 31: Ch 1, sc in each st around, join with sl st. (160 sc)
Round 32 (increase round): Ch 1, sc in next 19 sts, inc in next st 8 times, join with sl st. (168 sc)
Rounds 33 through 35: Ch 1, sc in each st around, join with sl st. (168 sc)
Round 36 (increase round): Ch 1, sc in next 20 sts, inc in next st 8 times, join with sl st. (176 sc)
Rounds 37 through 39: Ch 1, sc in each st around, join with sl st. (176 sc)
Round 40 (increase round): Ch 1, sc in next 21 sts, inc in next st 8 times, join with sl st. (184 sc)
Rounds 41 through 43: Ch 1, sc in each st around, join with sl st. (184 sc)
Round 44 (increase round): Ch 1, sc in next 22 sts, inc in next st 8 times, join with sl st. (192 sc)
Rounds 45 through 47: Ch 1, sc in each st around, join with sl st. (192 sc)
Round 48 (increase round): Ch 1, sc in next 23 sts, inc in next st 8 times, join with sl st. (200 sc)
Rounds 49 through 51: Ch 1, sc in each st around, join with sl st. (200 sc)
Round 52 (increase round): Ch 1, sc in next 24 sts, inc in next st 8 times, join with sl st. (208 sc)
Rounds 53 through 55: Ch 1, sc in each st around, join with sl st. (208 sc)
Round 56 (increase round): Ch 1, sc in next 25 sts, inc in next st 8 times, join with sl st. (216 sc)
Rounds 57 through 60: Ch 1, sc in each st around, join with sl st. (216 sc each round)
Checkpoint: At Round 60, the skirt alone should measure approximately 22 inches in length. Hem circumference should be approximately 39 to 40 inches.
Lace Hem Border
216 is already divisible by 6, so no adjustment needed.
Border Round 1: Ch 1, sc in each st around, join with sl st. (216 sc)
Border Round 2: Ch 1, sc in next st, ch 3, skip 2 sts, sc in next st 54 times around, join with sl st. (54 ch-3 sps)
Border Round 3 (scallop shells): Sl st into first ch-3 sp, ch 3 (counts as dc), (4 dc, ch 2, 5 dc) in same ch-3 sp, sl st in next sc, skip next sc, (5 dc, ch 2, 5 dc) in next ch-3 sp, sl st in next sc, skip next sc 27 times around, join with sl st to top of beginning ch-3. Fasten off.
Halter Neck Cord
Ch 120 (approximately 21 inches). Sl st in 2nd ch from hook and in each ch across. Fasten off.
Thread the cord through the top edge of the bodice cups, starting at the top right corner and weaving across both cups so equal lengths hang free on both sides. Tie behind the neck.
Alternative: Work two separate cords of 100 chains each and attach one to each top corner of each bodice cup. Tie together behind the neck.
Finishing Your Crochet Halter Dress
Weave in all ends securely with your yarn needle.
If the bodice cups have a visible gap at center front, use a whipstitch or mattress stitch seam along the inner edges of the V to close any gap, leaving the V opening to your desired depth.
Blocking is essential for this project. Soak the finished dress in cool water for 20 minutes. Gently press out excess water in a towel without wringing. Lay flat and pin to finished measurements. Pay special attention to pinning open the lattice waist diamonds and lace hem scallops, stretching them gently to their full shape. Let dry completely before unpinning.
Size Customization Tips
For a larger size: Increase the starting chain for each bodice cup by 4 stitches per size. Use 39 ch for Medium/Large or 43 ch for Large/XL. Adjust the joining row count accordingly.
For a longer skirt: Add more plain sc rounds between increase rounds, or continue the increase pattern until you reach your desired length before the lace hem.
For a shorter or mini length: Stop the skirt increases at Round 32 or 36 and proceed directly to the lace hem border.
For waist adjustment: Modify the back chain extension. Add or remove 4 stitches for each inch of adjustment.
For cup size: Add or remove 2 rows of plain sc between decrease rows on each cup. More rows per decrease creates a taller, fuller cup. Fewer rows creates a shallower cup.
Care Instructions
Machine wash cold on a gentle cycle inside a mesh laundry bag. Lay flat to dry. Do not tumble dry. If ironing is needed, place a damp pressing cloth over the garment and use a low steam setting. Store folded rather than hung to prevent stretching.
Thank you so much for choosing this pattern for your next crochet project. I genuinely hope you love making it as much as I loved designing it. If you have questions along the way, don’t hesitate to reach out.
If you make this navy halter dress, I would absolutely love to see it! Tag me on Instagram or share a photo in my Facebook group. Seeing your finished pieces is truly the best part of sharing patterns.
Save this crochet dress pattern to your Pinterest boards so you can find it when you’re ready to start. And if you do make it, please drop a comment below. I read every single one and love hearing how your projects turn out!
