
I call this one the Sunset Swirl, and she has been living in my design notebook for almost three years now. I originally sketched her out during a late summer evening when the sky turned those exact shades of caramel, amber, and deep rust right before dark. I wanted to capture that gradient in yarn, that feeling of warmth fading into something richer and deeper.
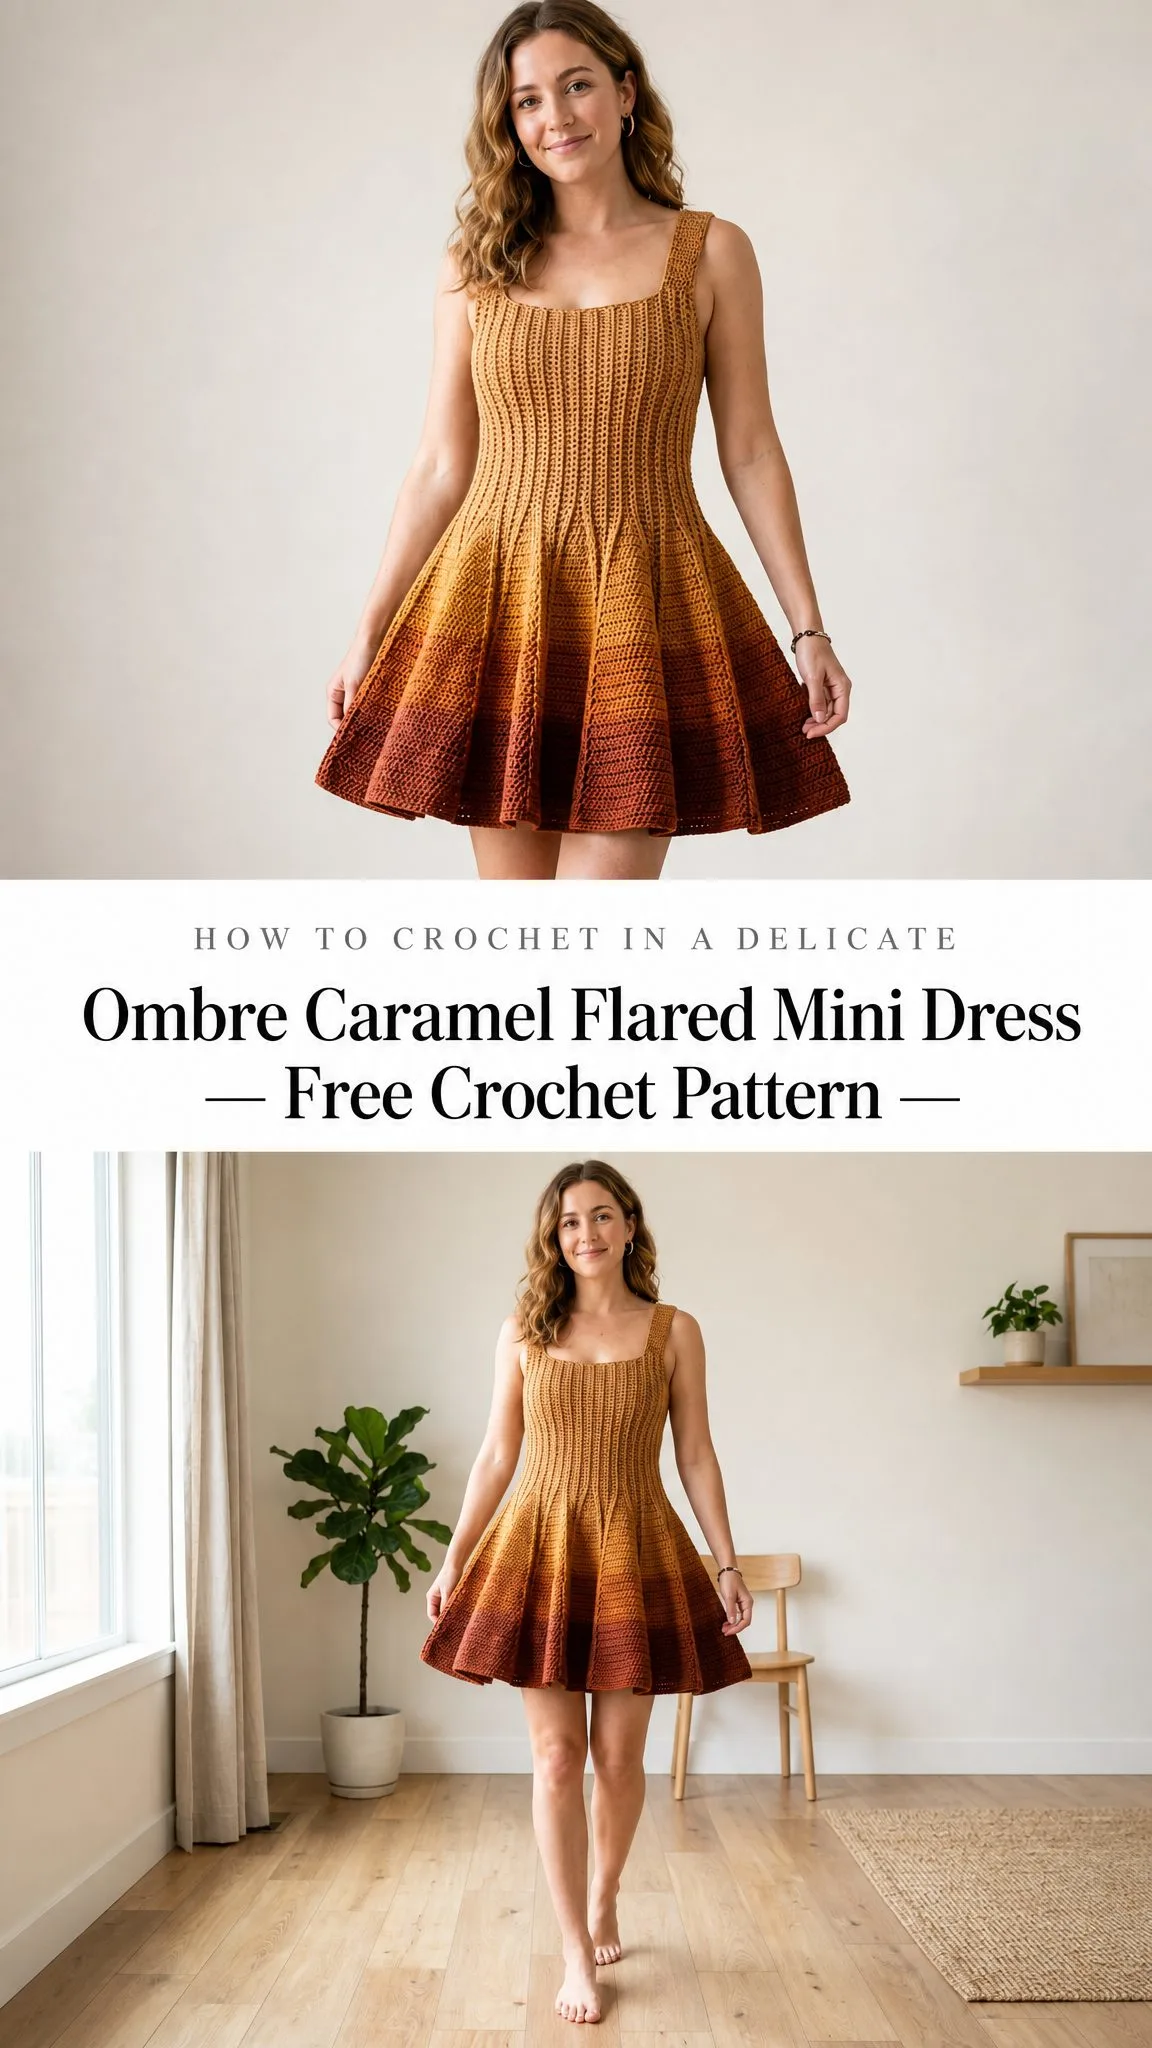
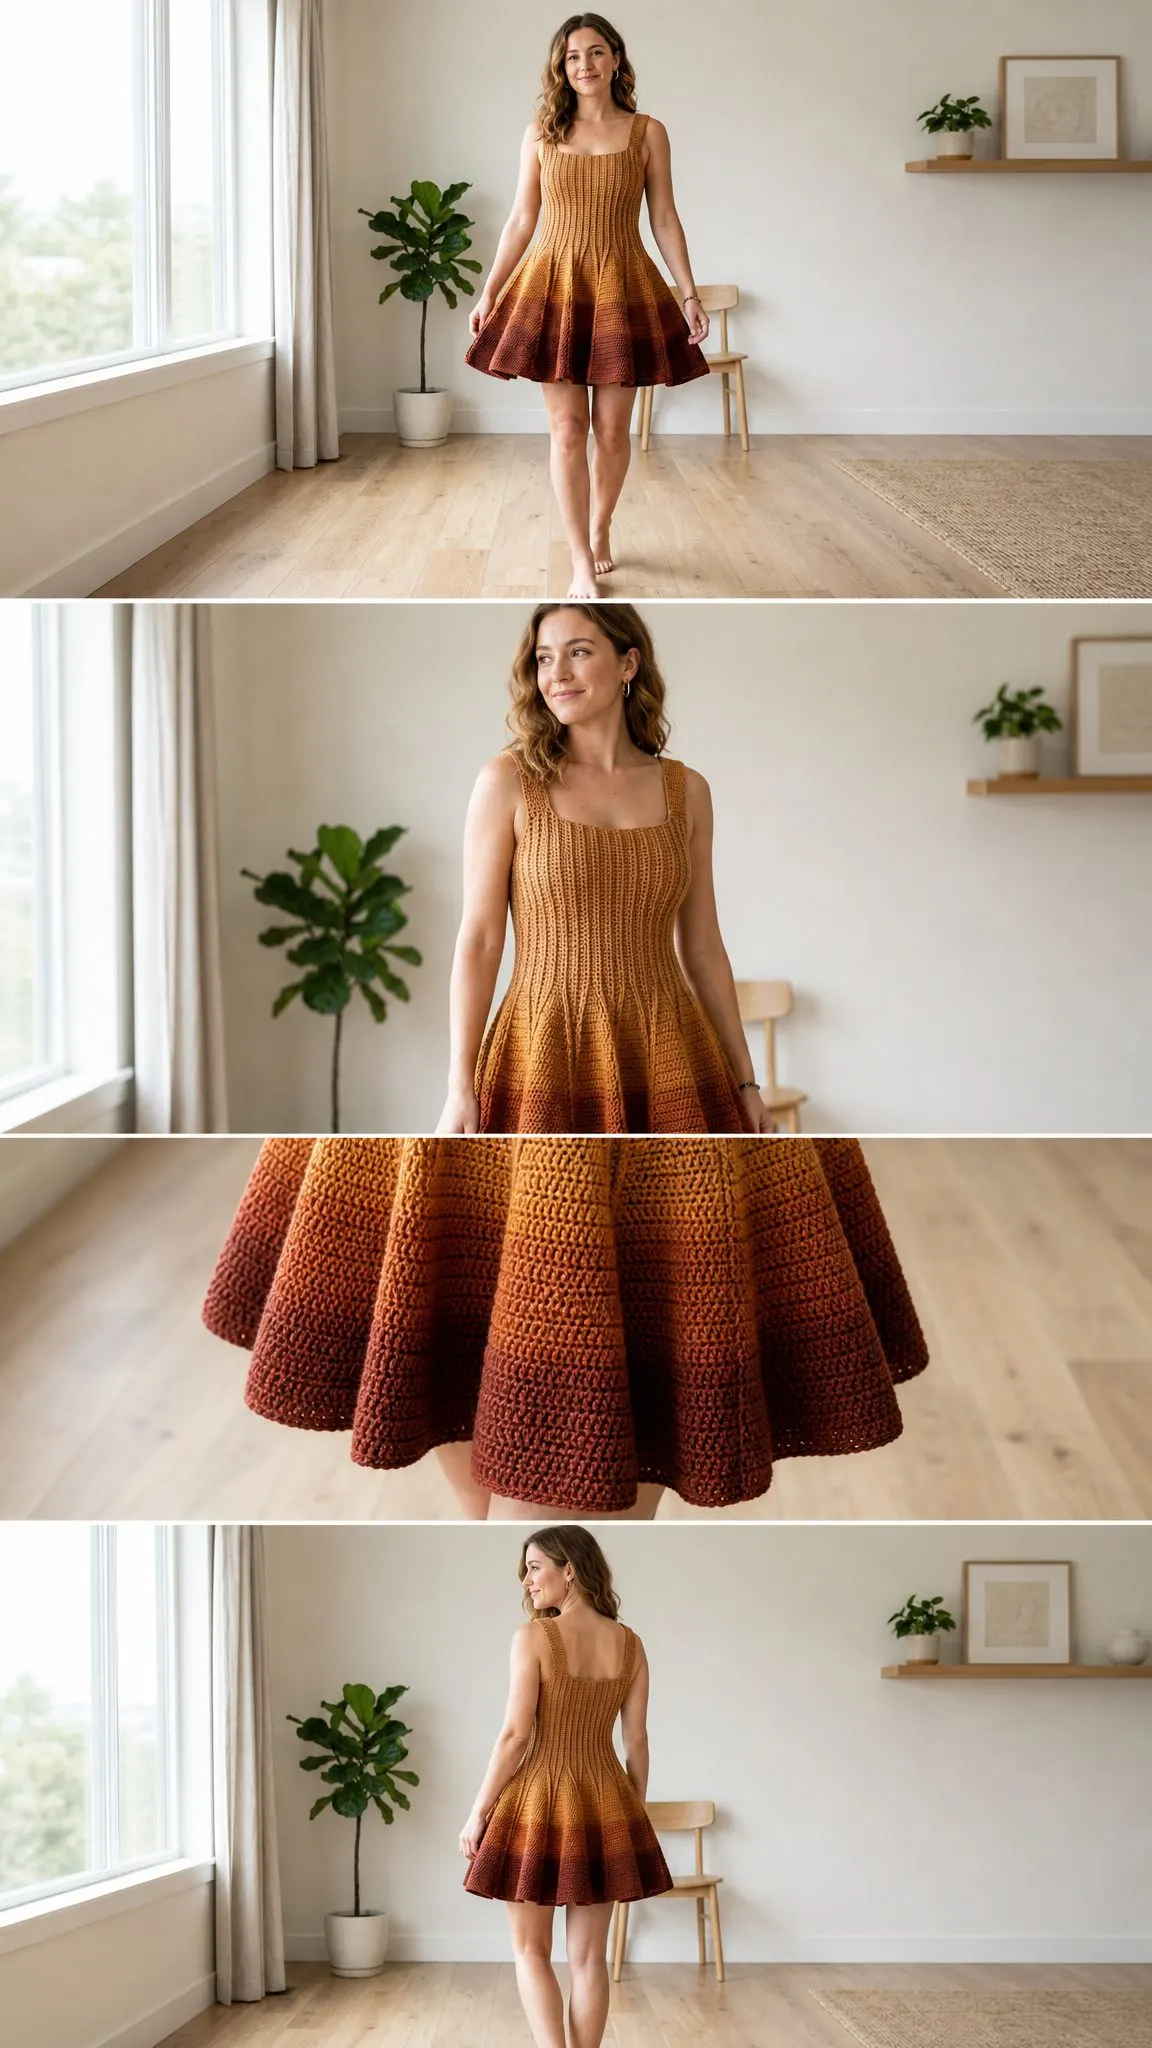
This dress finally made it off the page and onto my hook last fall, and I cannot tell you how satisfying it was to watch those colors blend together round by round. The fitted ribbed bodice hugs in all the right places while that dramatically flared skirt moves like it has a personality of its own.
If you have been looking for a wearable crochet project that feels like a true statement piece, this ombre caramel flared mini dress crochet pattern is absolutely the one. The construction is clever but not complicated, and the finished result looks far more advanced than the techniques actually are.
Why This Dress Works So Well
The magic of this design comes from combining two very different textures in one garment. The bodice uses front post double crochet (FPdc) and back post double crochet (BPdc) ribbing, which creates vertical ridges that stretch and hug your body like a knit fabric would. This means no zipper needed. You simply pull the dress on over your head or step into it from the bottom.
The skirt switches to half double crochet (hdc), a basic stitch that creates smooth, drapey fabric perfect for that full flared silhouette. Strategic increase rounds gradually expand the circumference from 72 stitches at the waist all the way to 192 stitches at the hem. That is a lot of movement and swish when you walk.
The ombre color transition happens gradually through the skirt section. Rather than hard color blocks, you will blend each color by alternating rounds during the transition, creating that smooth sunset gradient effect.
Skill Level and Time Investment
I would classify this as an advanced beginner to intermediate project. If you are comfortable working in the round and willing to learn post stitches, you can absolutely tackle this dress. The ribbing technique requires familiarity with inserting your hook around the post (the vertical bar) of stitches rather than into the top loops, but I will walk you through it completely.
Plan for approximately 25 to 35 hours of working time depending on your speed. This is not a weekend project, but it is absolutely worth the investment for a custom fitted dress you will wear again and again.
Materials You Will Need
Yarn: Approximately 1,400 yards (1,280 meters) of DK weight yarn (CYCA 3 Light), divided across four colors:
Hook: US size G-6 / 4.0 mm (or size needed to achieve gauge)
Additional supplies:
Yarn Suggestions
Lion Brand Vanna’s Choice Baby works beautifully for this project with excellent stitch definition in the ribbing. For colors, try Lamb (Color A), Goldfish (Color B), Terracotta (Color C), and Brick (Color D).
Paintbox Yarns Simply DK is another affordable option with consistent tension and a wide color range that makes matching the ombre palette straightforward.
WeCrochet Dishie in cotton gives a crisper texture and more structured drape if you prefer a stiffer skirt. Just note that cotton has less stretch than acrylic, so measure your gauge carefully and consider sizing up one hook size.
Any DK weight yarn achieving the stated gauge works as a substitute. Avoid fuzzy or textured yarns because they will obscure the beautiful ribbing detail.
Gauge (Do Not Skip This)
For half double crochet: 18 stitches and 12 rows = 4 inches / 10 cm worked in the round, after wet blocking.
For FPdc/BPdc ribbing: 20 stitches and 14 rows = 4 inches / 10 cm worked in the round, after wet blocking.
Gauge is mandatory for a fitted garment like this dress. The ribbing compresses width significantly, so I strongly recommend swatching larger than 4 inches square, especially for the ribbing section. Adjust your hook size up or down as needed until you match these numbers.
Finished Measurements
This pattern is written for a size Medium with these measurements:
Size customization notes are included at the end of the pattern.
Abbreviations and Stitch Definitions
Before we dive in, let me define every stitch and abbreviation you will encounter:
Special Techniques Explained
Front Post Double Crochet (FPdc)
This stitch creates the raised vertical ridges in your ribbing. Here is how to work it:
1. Yarn over.
2. Insert hook from front to back to front again, going around the post (vertical bar) of the indicated stitch from the previous round. Do not insert into the top loops.
3. Yarn over and pull up a loop. You now have 3 loops on hook.
4. Yarn over and pull through 2 loops. You now have 2 loops on hook.
5. Yarn over and pull through remaining 2 loops. FPdc complete.
Back Post Double Crochet (BPdc)
This stitch creates the recessed vertical channels between your ridges:
1. Yarn over.
2. Insert hook from back to front to back again, going around the post of the indicated stitch from the previous round.
3. Yarn over and pull up a loop. You now have 3 loops on hook.
4. Yarn over and pull through 2 loops. You now have 2 loops on hook.
5. Yarn over and pull through remaining 2 loops. BPdc complete.
Jogless Color Change
When changing colors at the end of a round, complete the final stitch of the old color until the last yarn over, then draw the new color through to complete that stitch. Do not cut old color unless specified. Carry unused colors loosely up the inside of the work for up to 4 rounds, then cut if no longer needed.
Pattern Notes Before You Begin
This dress is worked entirely in the round from the top down. The straps are worked first as flat strips, then joined to form the neckline foundation ring.
The bodice is worked in FPdc/BPdc ribbing for stretch and fit. The skirt begins at the waist with increase rounds that dramatically expand the stitch count, then transitions to hdc for drape and flow.
Color changes are gradual. Each color is introduced for 2 rounds, then blended by alternating 1 round of the old color with 1 round of the new color before committing fully to the new color. This creates a smooth ombre gradation rather than hard color blocks.
The dress has no seams other than the strap join and uses no zipper. Fit is achieved entirely through ribbing tension.
Right side is always facing you throughout.
At the end of each round, join with a slip stitch to the first stitch of the round, then chain 1 (for hdc rounds) or chain 2 (for FPdc/BPdc rounds). The chain 1 or chain 2 does NOT count as a stitch in this pattern.
Section 1: Straps
The dress has two identical wide straps. Each strap is approximately 1.75 inches / 4.5 cm wide and 6 inches / 15 cm long.
Strap 1
Using Color A and a G-6 / 4.0 mm hook, chain 9.
Row 1: Sc in 2nd ch from hook and in each ch across. Turn. (8 sc)
Row 2: Ch 1, sc in each st across. Turn. (8 sc)
Repeat Row 2 until strap measures 6 inches / 15 cm from foundation chain, approximately 18 rows total. Do not fasten off after the last row. Set aside with a locking marker to hold the live stitches.
Strap 2
Make identically to Strap 1. Fasten off after the last row, leaving an 8 inch tail for seaming. (8 sc per strap)
Section 2: Joining Straps and Forming the Neckline Ring
The two straps are placed parallel to form the front and back of the neckline. The space between the straps on each side becomes the armhole opening.
Step 1: Lay Strap 1 and Strap 2 parallel, side by side, with both short ends facing you. These short ends will become the top of the shoulders.
Step 2: Using a tapestry needle and Color A, whip stitch or mattress stitch the last row of Strap 2 to a point 8 stitches along the long edge of Strap 1, creating a rectangular neckline frame. Repeat on the opposite side, joining the other ends similarly so the two straps form a loop.
Step 3: With Color A and the hook, join yarn to any corner of the neckline rectangle at the inner edge (the edge facing the body, not the outer shoulder edge).
Step 4: Work 1 sc into each row end around the full inner perimeter of the joined strap rectangle. The inner perimeter consists of: 18 sc along the front long edge (the length of Strap 1 inner), 8 sc across the short connector edge, 18 sc along the back long edge (the length of Strap 2 inner), 8 sc across the other short connector edge. Join with sl st to first sc. (52 sc)
Step 5: Ch 2 (does not count as stitch). Work 1 FPdc and 1 BPdc alternately into each stitch around. Join. (52 sts)
This forms the neckline foundation ring from which the bodice grows downward.
Checkpoint: The joined strap frame should resemble a wide rectangular neckline opening. The inner ring should measure approximately 5.75 inches / 14.5 cm front to back and 3.5 inches / 9 cm side to side at the armhole openings.
Section 3: Bodice
The bodice is worked in FPdc/BPdc ribbing in the round, working downward from the neckline ring. All rounds begin with ch 2 (does not count as stitch).
The bodice also includes gentle increases along the sides to shape from the bust through to the waist.
Round 1: Ch 2. Work FPdc, BPdc alternately around all 52 sts. Join. (52 sts)
Round 2: Ch 2. FPdc in each FPdc, BPdc in each BPdc around. Join. (52 sts)
Round 3: Ch 2. FPdc in each FPdc, BPdc in each BPdc around. Join. (52 sts)
Round 4: Ch 2. FPdc in each FPdc, BPdc in each BPdc around. Join. (52 sts)
At this point the piece should measure approximately 1.25 inches / 3 cm below the neckline ring.
Bust Expansion
Now begin shaping. The increases are worked at 4 evenly spaced points (each side front and side back, 2 per side = 4 total per increase round). Work increases by placing 2 dc into the stitch at the increase point, staying consistent with the ribbing pattern.
Round 5 (increase round): Ch 2. Work in ribbing pattern to 1 st before the first side marker, work 2 FPdc in next st, continue in ribbing to 1 st before second side marker, work 2 FPdc in next st, continue in ribbing to 1 st before third side marker, work 2 FPdc in next st, continue to 1 st before fourth side marker, work 2 FPdc in next st, finish round in ribbing. Join. (56 sts)
Round 6: Ch 2. Work FPdc/BPdc ribbing around, treating each new stitch as an FPdc (or adjust to maintain rib alignment). Join. (56 sts)
Round 7: Ch 2. Ribbing around. Join. (56 sts)
Round 8: Ch 2. Ribbing around. Join. (56 sts)
Round 9 (increase round): Increase 4 evenly at side points. Join. (60 sts)
Round 10: Ch 2. Ribbing around. Join. (60 sts)
Round 11: Ch 2. Ribbing around. Join. (60 sts)
Round 12: Ch 2. Ribbing around. Join. (60 sts)
Round 13 (increase round): Increase 4 evenly at side points. Join. (64 sts)
Round 14: Ch 2. Ribbing around. Join. (64 sts)
Round 15: Ch 2. Ribbing around. Join. (64 sts)
Round 16: Ch 2. Ribbing around. Join. (64 sts)
Round 17 (increase round): Increase 4 evenly at side points. Join. (68 sts)
Round 18: Ch 2. Ribbing around. Join. (68 sts)
Round 19: Ch 2. Ribbing around. Join. (68 sts)
Round 20: Ch 2. Ribbing around. Join. (68 sts)
Round 21 (increase round): Increase 4 evenly at side points. Join. (72 sts)
Round 22: Ch 2. Ribbing around. Join. (72 sts)
Round 23: Ch 2. Ribbing around. Join. (72 sts)
Round 24: Ch 2. Ribbing around. Join. (72 sts)
At this point, the bodice should measure approximately 7 inches / 18 cm from the neckline ring.
Waist Shaping
Round 25 (waist decrease round): Ch 2. Work FPdc2tog (work 2 FPdc together, inserting hook around 2 consecutive front posts) and BPdc2tog alternately at 4 evenly spaced points to reduce 4 stitches total. Join. (68 sts)
Round 26: Ch 2. Ribbing around. Join. (68 sts)
Round 27: Ch 2. Ribbing around. Join. (68 sts)
Round 28 (waist decrease round): Decrease 4 evenly. Join. (64 sts)
Round 29: Ch 2. Ribbing around. Join. (64 sts)
Round 30: Ch 2. Ribbing around. Join. (64 sts)
Round 31 (waist decrease round): Decrease 4 evenly. Join. (60 sts)
Round 32: Ch 2. Ribbing around. Join. (60 sts)
Round 33: Ch 2. Ribbing around. Join. (60 sts)
Checkpoint: After the bodice section is complete, the piece should measure approximately 9 inches / 23 cm from the neckline ring to the bottom of Round 33. The circumference should be approximately 30 inches / 76 cm at the waist line when ribbing is slightly relaxed.
Section 4: Waist Transition
This single round bridges the ribbing bodice to the hdc skirt. It slightly increases the stitch count to begin the skirt foundation and distributes the stitches evenly.
Round 34 (transition, begin Color A to B blend): Ch 1. Work hdc in each st around, placing 1 hdc-inc at every 5th st. Join. (72 hdc)
Color note: Begin the ombre transition at Round 34. Work Round 34 entirely in Color A.
Section 5: Skirt
The skirt is worked in half double crochet in the round with strategic increase rounds to create the full flared silhouette. The increases are distributed evenly and gradually accelerate as the skirt grows to maintain a smooth cone shape.
All rounds: Ch 1 (does not count as stitch), hdc in each st around unless otherwise noted. Join.
Color Sequence for the Skirt
Rounds 34 through 43 transition from Color A to Color B. Rounds 44 through 55 transition from Color B to Color C. Rounds 56 through 66 transition from Color C to Color D.
Round 34: Color A. (72 hdc) (completed above)
Round 35: Color A. Hdc around. Join. (72 hdc)
Round 36: Color A. Hdc around. Join. (72 hdc)
Round 37 (increase): Color A. Hdc in each of first 8 sts, hdc-inc in next st. Rep (hdc 8, hdc-inc) around. Join. (80 hdc)
Round 38: Color A. Hdc around. Join. (80 hdc)
Round 39: Color B. Hdc around. Join. (80 hdc)
Round 40 (increase): Color B. Hdc in each of first 9 sts, hdc-inc in next st. Rep (hdc 9, hdc-inc) around. Join. (88 hdc)
Round 41: Color B. Hdc around. Join. (88 hdc)
Round 42: Color B. Hdc around. Join. (88 hdc)
Round 43 (increase): Color B. Hdc in each of first 10 sts, hdc-inc in next st. Rep (hdc 10, hdc-inc) around. Join. (96 hdc)
Round 44: Color B. Hdc around. Join. (96 hdc)
Round 45: Color B. Hdc around. Join. (96 hdc)
Round 46: Color C. Hdc around. Join. (96 hdc)
Round 47 (increase): Color C. Hdc in each of first 11 sts, hdc-inc in next st. Rep (hdc 11, hdc-inc) around. Join. (104 hdc)
Round 48: Color C. Hdc around. Join. (104 hdc)
Round 49: Color C. Hdc around. Join. (104 hdc)
Round 50 (increase): Color C. Hdc in each of first 12 sts, hdc-inc in next st. Rep (hdc 12, hdc-inc) around. Join. (112 hdc)
Round 51: Color C. Hdc around. Join. (112 hdc)
Round 52: Color C. Hdc around. Join. (112 hdc)
Round 53 (increase): Color C. Hdc in each of first 13 sts, hdc-inc in next st. Rep (hdc 13, hdc-inc) around. Join. (120 hdc)
Round 54: Color C. Hdc around. Join. (120 hdc)
Round 55: Color C. Hdc around. Join. (120 hdc)
Round 56: Color D. Hdc around. Join. (120 hdc)
Round 57 (increase): Color D. Hdc in each of first 14 sts, hdc-inc in next st. Rep (hdc 14, hdc-inc) around. Join. (128 hdc)
Round 58: Color D. Hdc around. Join. (128 hdc)
Round 59: Color D. Hdc around. Join. (128 hdc)
Round 60 (increase): Color D. Hdc in each of first 15 sts, hdc-inc in next st. Rep (hdc 15, hdc-inc) around. Join. (136 hdc)
Round 61: Color D. Hdc around. Join. (136 hdc)
Round 62: Color D. Hdc around. Join. (136 hdc)
Round 63 (increase): Color D. Hdc in each of first 16 sts, hdc-inc in next st. Rep (hdc 16, hdc-inc) around. Join. (144 hdc)
Round 64: Color D. Hdc around. Join. (144 hdc)
Round 65: Color D. Hdc around. Join. (144 hdc)
Round 66 (increase): Color D. Hdc in each of first 17 sts, hdc-inc in next st. Rep (hdc 17, hdc-inc) around. Join. (152 hdc)
Round 67: Color D. Hdc around. Join. (152 hdc)
Round 68: Color D. Hdc around. Join. (152 hdc)
Round 69 (increase): Color D. Hdc in each of first 18 sts, hdc-inc in next st. Rep (hdc 18, hdc-inc) around. Join. (160 hdc)
Round 70: Color D. Hdc around. Join. (160 hdc)
Round 71: Color D. Hdc around. Join. (160 hdc)
Round 72 (increase): Color D. Hdc in each of first 19 sts, hdc-inc in next st. Rep (hdc 19, hdc-inc) around. Join. (168 hdc)
Round 73: Color D. Hdc around. Join. (168 hdc)
Round 74: Color D. Hdc around. Join. (168 hdc)
Round 75 (increase): Color D. Hdc in each of first 20 sts, hdc-inc in next st. Rep (hdc 20, hdc-inc) around. Join. (176 hdc)
Round 76: Color D. Hdc around. Join. (176 hdc)
Round 77: Color D. Hdc around. Join. (176 hdc)
Round 78 (increase): Color D. Hdc in each of first 21 sts, hdc-inc in next st. Rep (hdc 21, hdc-inc) around. Join. (184 hdc)
Round 79: Color D. Hdc around. Join. (184 hdc)
Round 80: Color D. Hdc around. Join. (184 hdc)
Round 81 (increase, final): Color D. Hdc in each of first 22 sts, hdc-inc in next st. Rep (hdc 22, hdc-inc) around. Join. (192 hdc)
Round 82: Color D. Hdc around. Join. (192 hdc)
Round 83: Color D. Hdc around. Join. (192 hdc)
Checkpoint: After Round 83, the skirt should measure approximately 14 inches / 35.5 cm from the transition round. The circumference at the hem should be approximately 42.5 inches / 108 cm when measured unstretched. When worn, the fabric relaxes and the flared drape creates a hem circumference of approximately 68 to 72 inches / 173 to 183 cm.
Section 6: Hem Finishing
Round 84: Color D. Ch 1. Sc in each st around. Join. (192 sc)
Round 85: Color D. Ch 1. Working in blo, sc in each st around. Join. (192 sc)
Round 86 (final hem round): Color D. Ch 1. Sc in each st around. Join with sl st. Fasten off. (192 sc)
The blo round at Round 85 creates a subtle folded ridge that gives the hem a clean, finished edge without curling.
Section 7: Armhole Edging
The open areas on each side of the joined straps form the armhole openings.
Step 1: With Color A, join yarn to any point along one armhole opening.
Step 2: Ch 1. Work sc evenly around the armhole opening, working approximately 1 sc per row end along strap edges and 1 sc per stitch along any chain or stitch edges. Total stitches around each armhole should be approximately 40 to 44 sc. Adjust to make an even number.
Step 3: Join with sl st. Fasten off.
Repeat for the second armhole opening.
The armhole edging keeps the opening tidy and prevents stretching.
Size Customization Tips
To size down (size XS or Small): Begin with a foundation ring of 44 stitches instead of 52. Reduce increase rounds in the bodice by one round (4 fewer increase events) so the bust circumference peaks at 64 stitches instead of 72. Work the skirt with the same increase pattern but begin from the smaller stitch count.
To size up (size Large or XL): Begin with a foundation ring of 60 stitches instead of 52. Add one additional increase round in the bodice section (4 stitches per round) between Rounds 9 and 13. Increase the waist peak stitch count to 80 and adjust the waist decrease rounds accordingly.
To lengthen the bodice: Add additional plain ribbing rounds (without shaping) between any two existing rounds. Each additional round adds approximately 0.33 inches / 0.85 cm.
To lengthen the skirt: After Round 83, continue working plain hdc rounds in Color D, adding an additional increase round every 4 rounds.
To lengthen the straps: Add additional sc rows before joining. Each 2 rows of sc adds approximately 0.33 inches / 0.85 cm.
Finishing and Blocking
Step 1: Weave in all ends securely using a tapestry needle, working ends back and forth through several stitches in alternating directions. Color change ends are especially important to secure.
Step 2: Wet block the finished dress. Submerge in lukewarm water with a small amount of wool wash or gentle soap. Gently press out excess water without wringing. Lay flat or hang over a dress form or padded hanger.
Step 3: Shape the bodice by smoothing the ribbing flat and pinning the straps to the correct width if needed.
Step 4: Allow to dry completely before wearing, approximately 24 hours flat or 12 hours on a form.
Note for acrylic yarn: Acrylic can be gently steam blocked using a steam iron held 1 to 2 inches above the fabric. Do not press the iron directly onto acrylic.
Care Instructions
Machine wash on gentle cycle in cold water inside a mesh laundry bag. Lay flat to dry or hang carefully on a dress form to maintain shape. Do not tumble dry at high heat for acrylic blends. Steam or press lightly with a pressing cloth if needed to restore shape after washing.
You Did It!
Thank you so much for choosing this ombre caramel flared mini dress crochet pattern for your next project. I hope you love watching those colors blend together as much as I did. This dress really does feel special to wear, and I know yours is going to turn out beautifully.
If you make your own Sunset Swirl, I would absolutely love to see it! Tag me on Instagram or share a photo in our Facebook group. Your makes genuinely brighten my day.
Do not forget to save this crochet tutorial to your Pinterest boards so you can find it easily when you are ready to start. And if you have any questions or just want to share your progress, drop a comment below. I love hearing from you!
