Let me guess. You took one look at this dress covered in hundreds of crocheted roses and thought, "There is absolutely no way I could make that." I get it. I really do. This dress looks like something out of a couture fashion show, the kind of piece that seems reserved for professional designers with decades of experience. But here is the truth: if you can single crochet and double crochet, you already have the skills to make this stunning Pink Rose Garden Dress. The construction is simpler than it appears. The bodice is just rows of single crochet worked flat. The skirt is basic chain mesh. And those gorgeous spiral roses? They are made from a simple strip of double crochets that you roll up like a cinnamon bun. No advanced shaping. No complicated colorwork. Just patience, repetition, and a whole lot of love for beautiful things.
Get the Ad-Free PDF Pattern
You can find the free pattern below, or you can purchase the ad-free printable PDF from my shop.
Get the Printable PDF →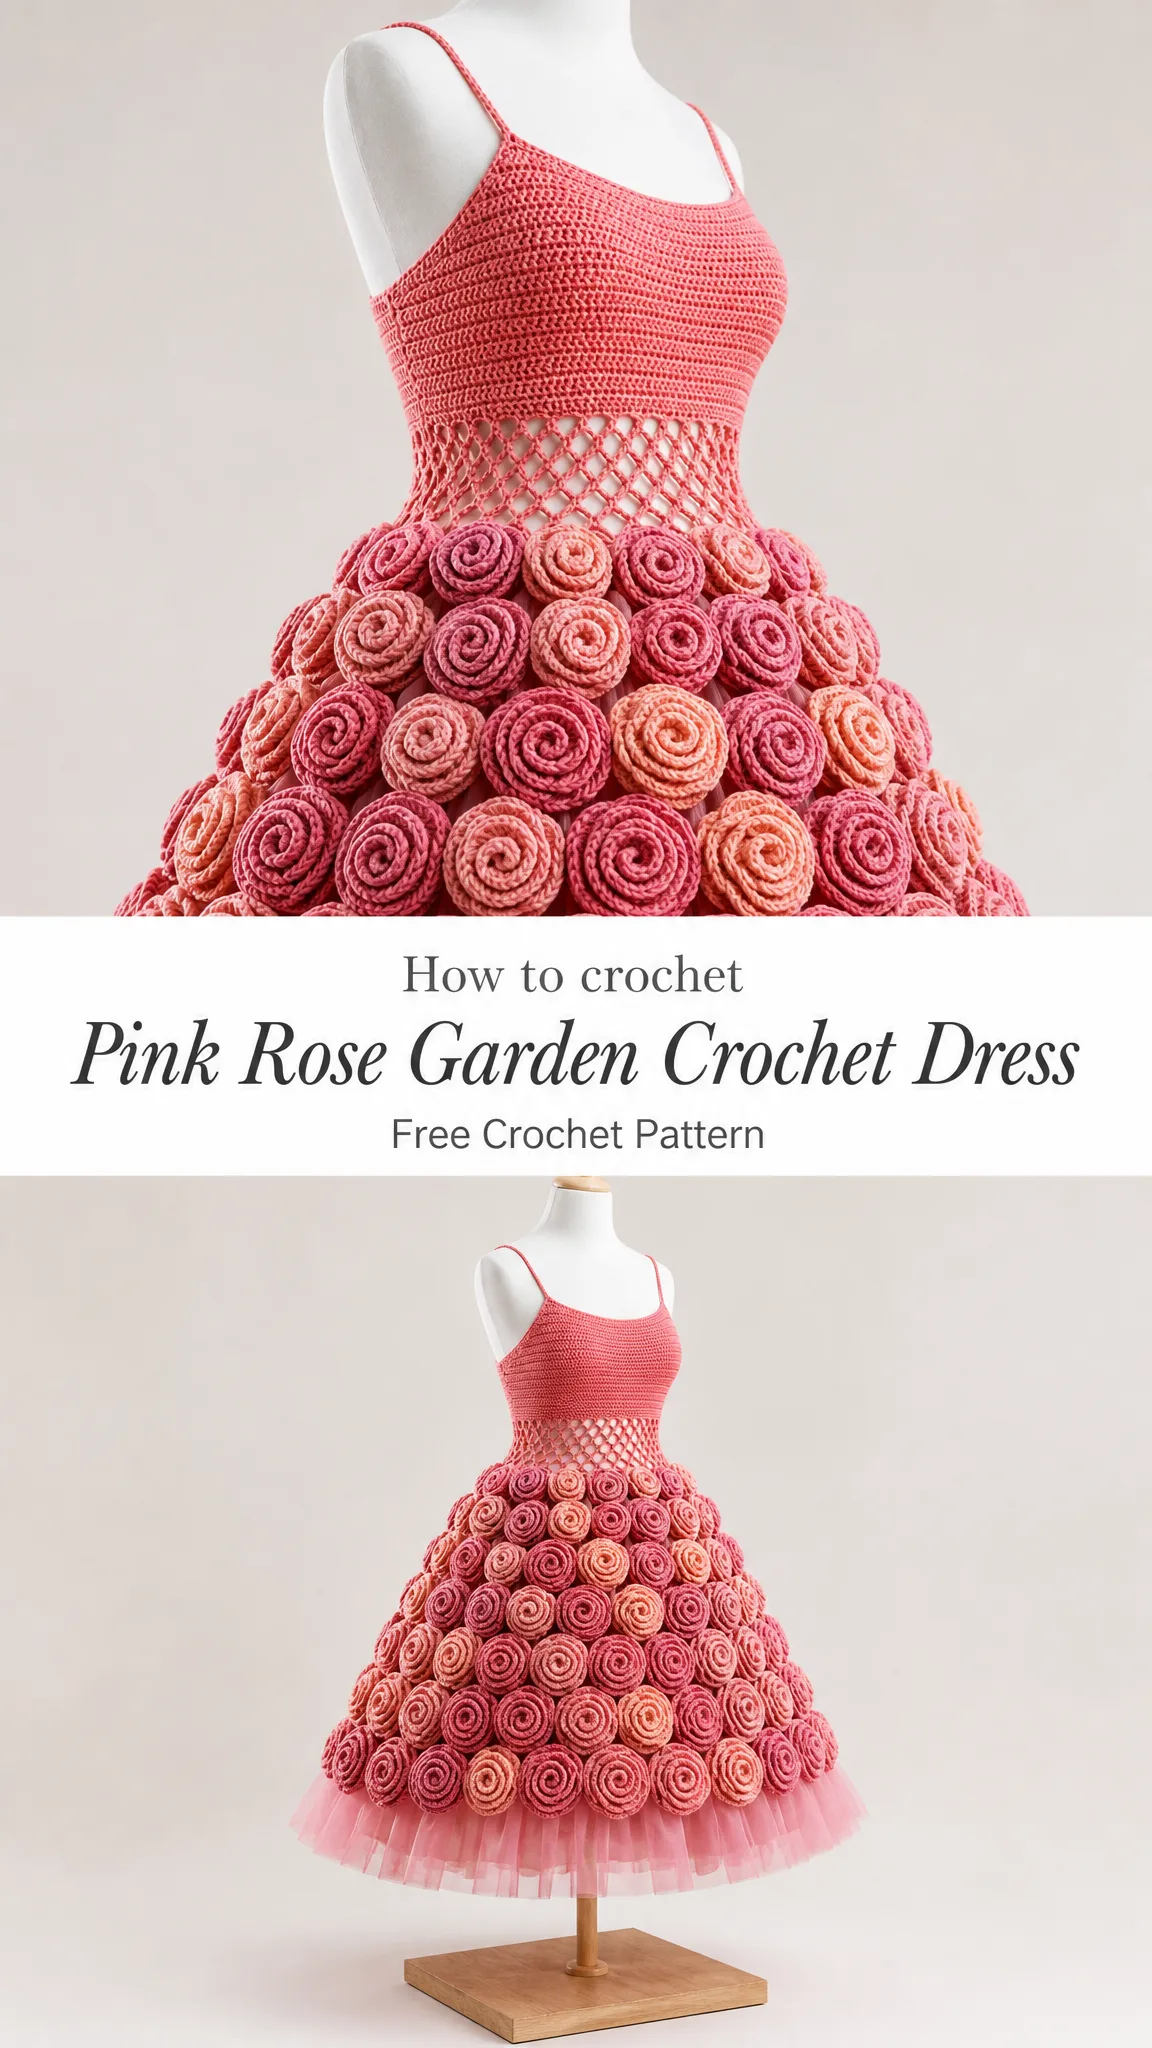
This pattern is perfect for intermediate crocheters ready to take on a showstopper project. If you have never worked a garment before, this could absolutely be your first. The techniques are straightforward, and the real magic comes from layering simple elements together.
About This Romantic Showpiece
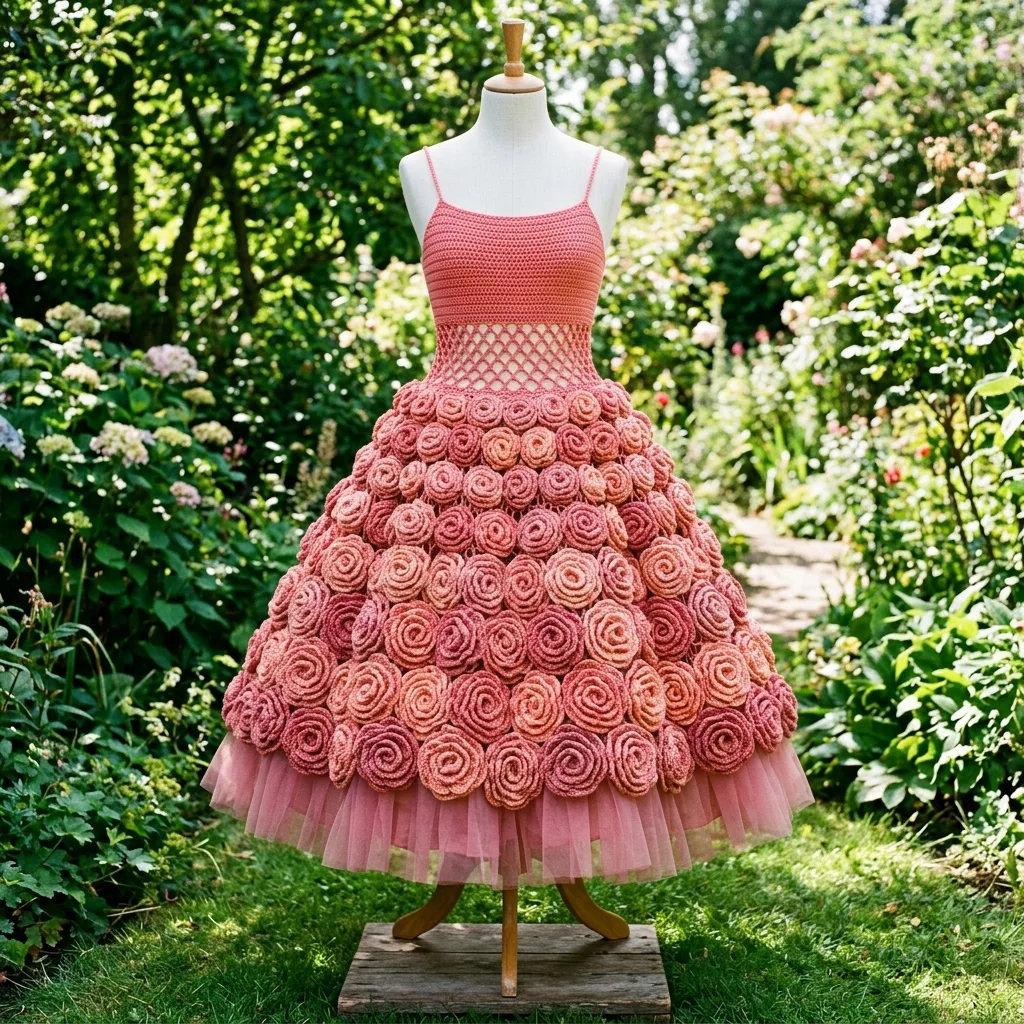
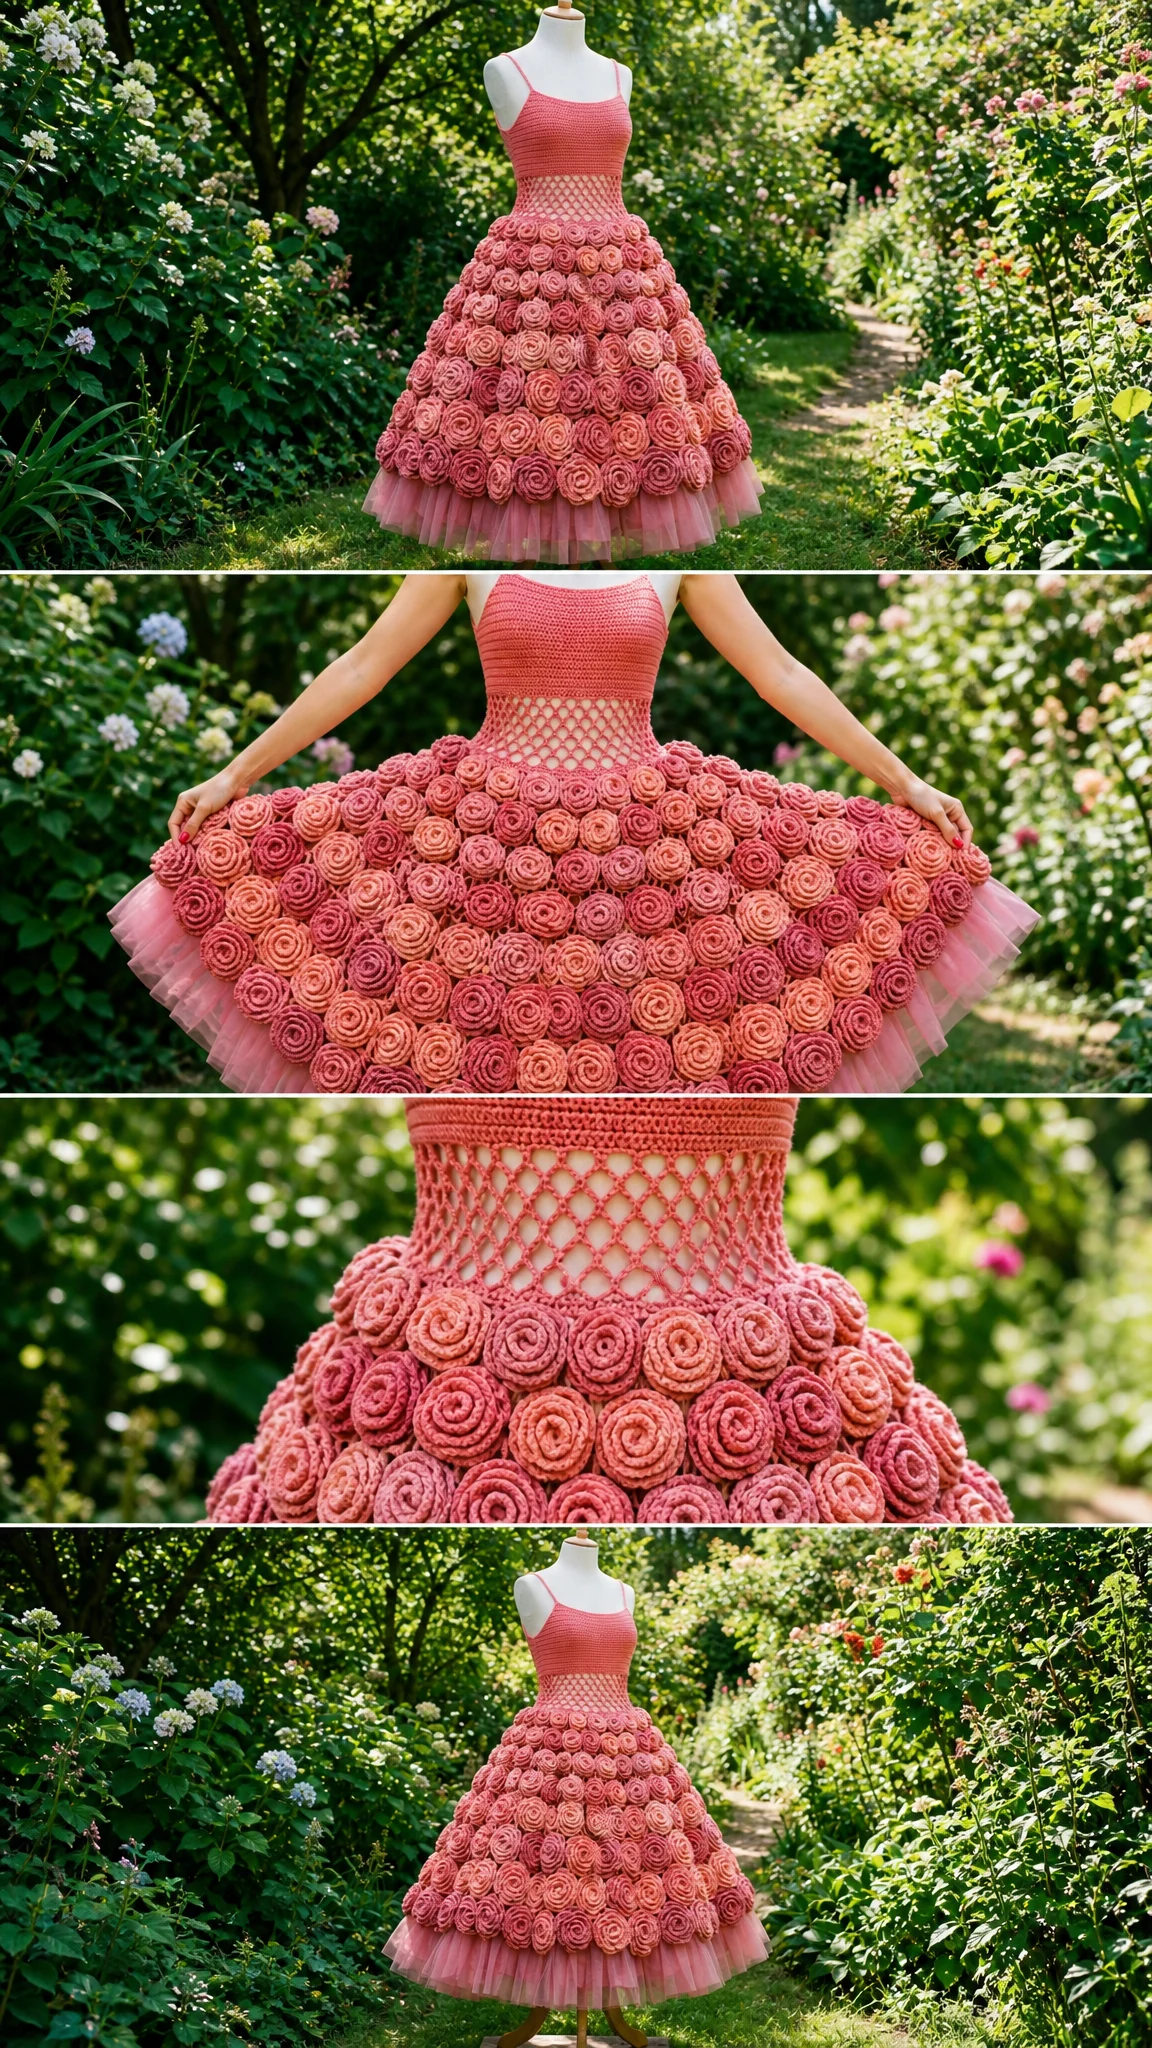
The Pink Rose Garden Dress is a romantic, full-skirted masterpiece featuring a softly fitted single crochet bodice, an airy open mesh waist, and a sweeping A-line skirt completely blanketed in hand-rolled spiral roses. The roses create a beautiful blush-to-coral ombré effect, and the whole piece is finished with a whisper of pink tulle peeking out at the hem.
This is not a quick weekend project. The pattern estimates 35 to 45 hours of work, with most of that time going into making and attaching the 238 individual roses. But the result is an heirloom piece, something truly extraordinary that could be worn for a special occasion, displayed as art, or passed down through generations.
Finished measurements:
Materials You Will Need
Gathering your materials before you begin makes the whole process smoother. Here is everything you need for this crochet dress pattern.
Yarn:
Color plan for ombré roses:
The bodice and mesh base are worked in Shade B (Blush Pink), using about 600 yards of that total.
Suggested yarns:
Any smooth #4 weight yarn will work beautifully. For the plush, velvety roses shown in the photos, a chenille or velvet worsted yarn creates the softest petals. Just go up to a 5.5 mm hook and recheck your gauge, since velvet yarn tends to run slick.
Hook:
Additional supplies:
Gauge
Getting gauge right is essential for proper fit. Take the time to swatch before diving in.
16 single crochet stitches and 18 rows = 4 inches (10 cm) in single crochet with an H/5.0 mm hook, after light blocking.
One finished spiral rose measures approximately 2.5 inches (6.5 cm) across.
Make a 5 inch square in single crochet and block it lightly. If you have too many stitches per inch, size up your hook. If you have too few stitches, size down. Every measurement in this pattern flows from this gauge, so matching it keeps the fit true.
Abbreviations and Stitch Guide
Before starting, familiarize yourself with these abbreviations. This pattern uses US crochet terms throughout.
| Abbreviation | Meaning |
|---|---|
| ch | chain |
| sc | single crochet (insert hook, yarn over, pull through, yarn over, pull through both loops) |
| dc | double crochet (yarn over, insert hook, yarn over, pull through, yarn over, pull through two loops, yarn over, pull through remaining two loops) |
| sl st | slip stitch |
| st(s) | stitch(es) |
| sk | skip |
| sp | space |
| rep | repeat |
| rnd | round |
| beg | beginning |
| FLO | front loop only |
| * * | repeat instructions between asterisks |
UK crocheters note: US sc equals UK dc. US dc equals UK tr.
Special Stitch: Ch-3 Mesh
This creates the airy net at the waist and serves as the skirt base.
Set-up: *1 dc in next st, ch 3, skip 3 sts*; repeat around.
Following rounds: *1 dc in the dc, ch 3, 1 dc in next dc*, working ch-3 over each previous ch-3 space.
Special Stitch: Spiral Rose
This is the technique that creates each beautiful rose motif.
1. Chain 40. Double crochet in the 4th chain from hook, then work 2 dc in each remaining chain. This creates approximately 74 dc, forming a long ruffled strip.
2. Fasten off, leaving a 14 inch tail.
3. Roll the strip from one end into a spiral. The natural ruffle forms petals as you roll. Stitch through all layers at the base with the tail to hold the rose together securely.
Pattern Notes
A few important things to keep in mind as you work:
For left-handed makers: Work every row and round in mirror image. Read right-to-left instructions as left-to-right. All stitch counts and shaping remain identical. Only the direction flips.
Part One: The Bodice and Mesh Waist
The bodice creates a fitted tube that hugs above the bust with slight negative ease.
Bodice (worked flat in Blush)
Row 1: Ch 121. Sc in 2nd ch from hook and in each ch across. (120 sc)
Row 2: Ch 1, turn. Sc in each st across. (120 sc)
Rows 3-32: Repeat Row 2 until the piece measures 7 inches (18 cm). This takes approximately 31 more rows for a total of 32 rows. (120 sc)
Seaming: Fold the bodice with right sides together and whip stitch the center back seam with a flat seam to form a tube.
Checkpoint: Your bodice tube should measure approximately 30 inches (76 cm) around the top edge and 7 inches (18 cm) tall.
Mesh Waist (worked in the round)
Round 1: Join Blush yarn at the seam. *Dc in next st, ch 3, sk 3 sts*; rep around. (30 mesh spaces)
Rounds 2-5: Work mesh in each mesh around. (30 mesh spaces)
Part Two: The A-Line Skirt
Continue working in the round directly from the waist mesh, using Blush yarn. The skirt uses the same airy mesh pattern, gently flared by adding evenly spaced mesh increases. Do not worry about perfection here. The roses will cover this base entirely. Just keep your increases even.
How to Add a Mesh Increase
To increase, work two dc + ch-3 groups sharing one base mesh. This creates an extra mesh that "fans" out. Space the increases evenly around each round according to this table:
| Round | Increase | Total Count |
|---|---|---|
| Rnd 1 | +0 mesh (start) | 30 mesh |
| Rnd 2 | +6 meshes | 36 mesh |
| Rnd 3 | +6 meshes | 42 mesh |
| Rnd 4 | +6 meshes | 48 mesh |
| Rnd 5 | +5 meshes | 53 mesh |
| Rnd 6 | +6 meshes | 59 mesh |
| Rnd 7 | +6 meshes | 65 mesh |
| Rnd 8 | +6 meshes | 71 mesh |
| Rnd 9 | +6 meshes | 77 mesh |
| Rnd 10 | +5 meshes | 82 mesh |
| Rnd 11 | +6 meshes | 88 mesh |
| Rnd 12 | +6 meshes | 94 mesh |
| Rnd 13 | +6 meshes | 100 mesh |
Checkpoint: After Round 13, the hem measures approximately 118 inches (300 cm) around and the skirt is approximately 17 inches (43 cm) long. Fasten off and weave in ends.
Part Three: Making the Spiral Roses
Now comes the most time-intensive but deeply satisfying part of this crochet dress pattern. You will make 238 spiral roses using the spiral rose method described in the stitch guide.
Mix the three shades freely as you work so the color drifts naturally from deeper rose near the waist to warm coral toward the hem.
Rose Placement Guide
| Tier | Number of Roses |
|---|---|
| Tier 1 (top) | 17 roses |
| Tier 2 | 22 roses |
| Tier 3 | 28 roses |
| Tier 4 | 34 roses |
| Tier 5 | 40 roses |
| Tier 6 | 46 roses |
| Tier 7 (hem) | 51 roses |
| Total | 238 roses |
Attaching the Roses
Pin the roses in horizontal tiers around the skirt, spacing them approximately 2.3 inches (6 cm) apart. Each tier should nestle slightly to overlap the one above so no mesh shows through.
Sew each rose down firmly through the base using its long tail. Adjust the counts to fit your skirt’s exact size. Full coverage is the goal, so make a few extra roses if needed to fill any thin spots.
Finishing Touches
Straps
For each strap, ch 6. Sc in 2nd ch from hook and across. (5 sc)
Continue working rows until the strap measures 14 inches (36 cm) long.
Sew the fronts and backs symmetrically to the top edge of the bodice. Try on the dress first to adjust the length. The straps are fully adjustable to your preference.
Tulle Underskirt
Cut two strips of tulle, each 54 inches by 20 inches.
Gather along one long edge with a running stitch, then pull to approximately 40 inches.
Hand-sew inside the skirt at the top of the final rose tier so 2 to 3 inches of tulle peeks below the hem. This creates that beautiful, romantic peek of softness at the bottom.
Blocking
Gently steam-block the bodice and mesh sections flat. Do not crush the roses. Let them keep their beautiful three-dimensional shape.
Care Instructions
This dress is delicate and should be treated with care.
Troubleshooting Tips
Skirt too flat? Add an extra mesh increase round to create more fullness.
Mesh gapes at the waist? Drop down a hook size for the bodice section only.
Roses look sparse? Make a few additional roses and tuck them into any thin spots.
Tips for Success
Take your time with this project. The individual components are not difficult, but the cumulative effect requires patience and attention.
Consider making roses while watching television or listening to audiobooks. The repetitive motion becomes meditative, and before you know it, you will have a basket full of beautiful blooms ready to attach.
Store finished roses in a large bag or basket to keep them safe until attachment time. Sorting them by color as you go makes the ombré placement easier.
When attaching roses, work from the top tier down. This helps you see how the colors are blending and make adjustments as needed.
This dress makes an incredible statement piece for weddings, photoshoots, proms, or any occasion that calls for something truly extraordinary. The construction is completely customizable. You can adjust the bodice length, strap placement, and skirt fullness to suit your vision.
I hope this Pink Rose Garden Dress crochet pattern inspires you to create something absolutely breathtaking. Remember, the techniques are simpler than they look. You absolutely can do this.
If you make this dress, I would absolutely love to see it. Save this pattern to your Pinterest boards so you can find it when you are ready to start, and please leave a comment below to share your progress or finished piece. Seeing your creations brings me so much joy, and it helps other makers feel confident to try ambitious projects like this one too.
Want a Quick & Easy Printable Version?
Get a clean, beautifully formatted PDF of this pattern — easy to follow step by step, ready to print or save on any device. No scrolling, no distractions, just the pattern.
Get the Printable PDF →