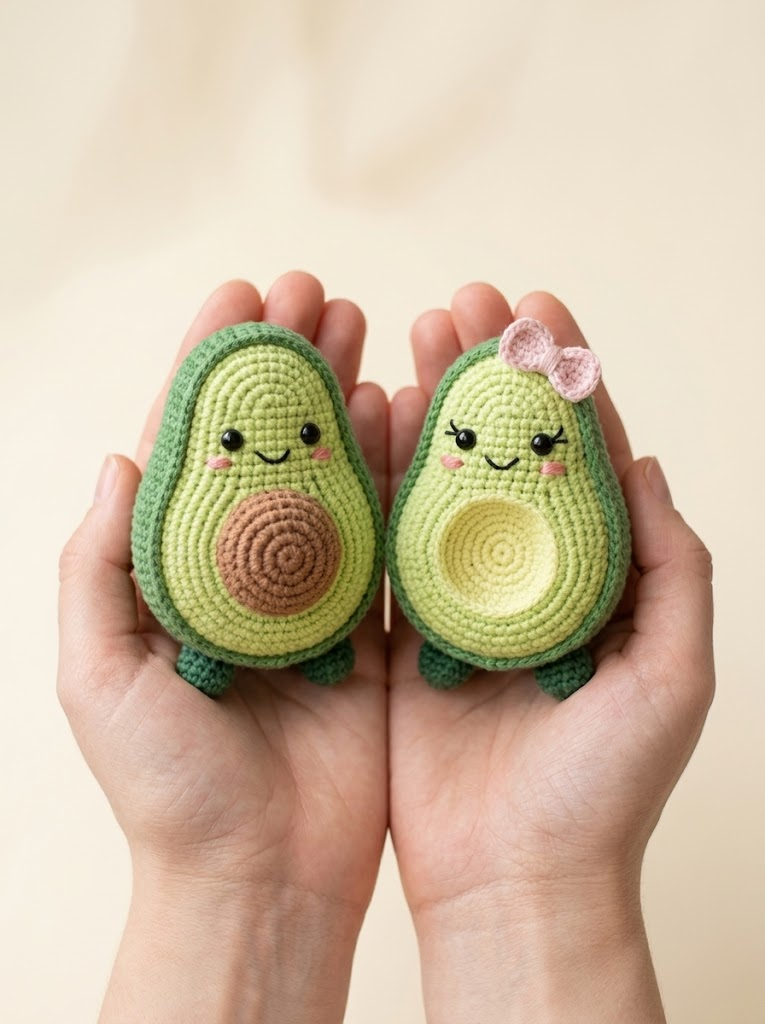
These little cuties are about to become your new favorite project. This avocado couple amigurumi crochet pattern creates two plump, perfectly ripe avocados complete with kawaii faces, rosy cheeks, and the sweetest little details. One has a brown pit. The other has a creamy yellow center and a darling pink bow. They stand on tiny feet and look absolutely huggable.

If you can single crochet in the round, you can make these. I promise.
This step by step crochet tutorial walks you through every detail. You will learn how to construct the body, attach the pit or center circle, add the facial features, and create those adorable finishing touches. Whether you want a gift for your best friend, a nursery decoration, or just something fun to brighten your desk, this beginner friendly crochet pattern delivers.
Let me show you exactly how to crochet this precious pair.
Why You Will Love This Avocado Amigurumi Crochet Pattern
These avocados hit all the right notes. They are small enough to finish in a weekend but substantial enough to feel like a real accomplishment. The finished size is approximately 4 to 5 inches tall, making them perfect for display, gifting, or even gentle play.
The construction uses basic amigurumi techniques. You work in continuous rounds with single crochet stitches. The shaping comes from simple increases and decreases. Color changes create the realistic avocado look with dark green skin, bright lime flesh, and contrasting center details.
What makes this pattern special is the couple concept. You get two variations. One avocado features a raised brown pit that adds dimension and texture. The other has a flat yellow center circle and wears a sweet crocheted bow. Together they make an irresistible pair.
The kawaii faces bring these little ones to life. Safety eyes, embroidered smiles, and pink cheek accents give them so much personality. You can customize expressions to match your style.
Materials You Will Need
Gather these supplies before you begin. Having everything ready makes the process smooth and enjoyable.
Yarn:
I recommend worsted weight yarn (also called medium weight or number 4) in acrylic or cotton. Cotton gives crisper stitch definition. Acrylic offers softness and affordability. Either works beautifully.
Hook:
Using a smaller hook than typically recommended for worsted weight creates tight stitches. This prevents stuffing from showing through. This is essential for amigurumi.
Notions:
Stitches and Abbreviations
Let me define every stitch you will encounter. Read through this section before starting so nothing catches you off guard.
Magic Ring (MR): An adjustable starting loop that pulls closed completely. You work your first round of stitches into this ring, then pull the tail to close the center hole. This creates a seamless start with no gap. If magic rings frustrate you, chain 2 and work your stitches into the first chain instead.
Chain (ch): The foundation stitch. Yarn over, pull through the loop on your hook. One chain made.
Single Crochet (sc): Insert hook into stitch, yarn over, pull up a loop (2 loops on hook), yarn over, pull through both loops. One single crochet completed.
Increase (inc): Work 2 single crochet stitches into the same stitch. This adds one stitch to your count.
Invisible Decrease (invdec): Insert hook through the front loops only of the next 2 stitches, yarn over, pull through both front loops, yarn over, pull through both loops on hook. This creates a neater decrease than the standard method. Less visible holes.
Slip Stitch (sl st): Insert hook, yarn over, pull through both the stitch and the loop on hook in one motion. Used for joining and finishing.
Front Loop Only (FLO): Work into only the front loop of the stitch, leaving the back loop unworked.
Back Loop Only (BLO): Work into only the back loop of the stitch.
Gauge and Sizing Notes
Exact gauge is not critical for amigurumi. What matters is fabric density. Your stitches should be tight enough that stuffing does not show through. If you see white peeking between stitches, try a smaller hook.
The finished avocados measure approximately 4.5 inches tall and 3 inches wide. Yours may vary slightly based on your tension and yarn choice. This is perfectly fine.
The Pattern Instructions
Work in continuous rounds unless otherwise noted. Do not join rounds. Do not turn. Use a stitch marker to track the beginning of each round. Move it up as you go.

Avocado Body (Make 2)
The body is worked from bottom to top. You will change colors partway through to create the skin and flesh sections.
Starting with Dark Green (Outer Skin):
Round 1: MR, 6 sc into ring. Pull closed. (6 sts)
Round 2: Inc in each st around. (12 sts)
Round 3: *Sc 1, inc* repeat around. (18 sts)
Round 4: *Sc 2, inc* repeat around. (24 sts)
Round 5: *Sc 3, inc* repeat around. (30 sts)
Round 6: *Sc 4, inc* repeat around. (36 sts)
Round 7: *Sc 5, inc* repeat around. (42 sts)
Rounds 8 through 10: Sc in each st around. (42 sts)
Change to Bright Lime Green:
When switching colors, complete the last yarn over of your final dark green stitch with lime green yarn. This creates a clean transition.
Rounds 11 through 22: Sc in each st around. (42 sts)
You are now shaping the top of the avocado.
Round 23: *Sc 5, invdec* repeat around. (36 sts)
Round 24: Sc in each st around. (36 sts)
Round 25: *Sc 4, invdec* repeat around. (30 sts)
Round 26: Sc in each st around. (30 sts)
Change to Dark Green:
Round 27: Working in BLO, sc in each st around. (30 sts)
This creates a ridge that mimics the edge of avocado skin.
Round 28: *Sc 3, invdec* repeat around. (24 sts)
Round 29: *Sc 2, invdec* repeat around. (18 sts)
Begin stuffing firmly now. Add more as you close.
Round 30: *Sc 1, invdec* repeat around. (12 sts)
Round 31: Invdec around. (6 sts)
Fasten off, leaving a long tail. Thread through remaining stitches, pull tight, and weave in.
Brown Pit (Make 1)
This dimensional pit attaches to one avocado.
Using Medium Brown:
Round 1: MR, 6 sc into ring. (6 sts)
Round 2: Inc in each st around. (12 sts)
Round 3: *Sc 1, inc* repeat around. (18 sts)
Round 4: *Sc 2, inc* repeat around. (24 sts)
Rounds 5 through 8: Sc in each st around. (24 sts)
Round 9: *Sc 2, invdec* repeat around. (18 sts)
Stuff lightly.
Round 10: *Sc 1, invdec* repeat around. (12 sts)
Sl st to next st. Fasten off, leaving a long tail for sewing.
Yellow Center Circle (Make 1)
This flat circle attaches to the second avocado.
Using Pale Yellow:
Round 1: MR, 6 sc into ring. (6 sts)
Round 2: Inc in each st around. (12 sts)
Round 3: *Sc 1, inc* repeat around. (18 sts)
Round 4: *Sc 2, inc* repeat around. (24 sts)
Sl st to next st. Fasten off, leaving a long tail for sewing.
Feet (Make 4)
Each avocado needs two feet.
Using Dark Green:
Round 1: MR, 6 sc into ring. (6 sts)
Round 2: Inc in each st around. (12 sts)
Rounds 3 through 5: Sc in each st around. (12 sts)
Sl st to next st. Fasten off, leaving a tail. Stuff lightly.
Pink Bow (Make 1)
This adorable accessory tops one avocado.
Using Light Pink:
Ch 8.
Row 1: Sc in 2nd ch from hook, sc across. (7 sts)
Rows 2 through 5: Ch 1, turn, sc across. (7 sts)
Fasten off, leaving a long tail.
Fold the rectangle accordion style into thirds. Wrap the tail tightly around the center several times. Secure with a knot. This creates the bow shape.
Assembly Instructions
Now comes the fun part. You will bring your avocados to life.
Attaching the Pit and Center Circle
For the pit: Position the brown pit in the center of the lime green section on one avocado body. Pin in place. Using the long tail and yarn needle, whipstitch around the opening edge, sewing through both the pit and the body. The pit should sit slightly raised, creating dimension.
For the yellow circle: Position the flat yellow circle on the second avocado body. Pin in place. Whipstitch around the entire edge, keeping stitches small and even. This circle lies flat against the body.
Adding Facial Features
Safety eyes: Position eyes between rounds 16 and 17 of the body, approximately 6 to 8 stitches apart. The exact placement affects expression. Closer together looks more innocent. Farther apart looks more surprised. Pin first, check from multiple angles, then secure the backs inside.
Important: Attach safety eyes before final stuffing if you have not already. The backs need to be inside the body.
Mouth: Using black yarn and yarn needle, embroider a small curved smile between and below the eyes. Three or four small straight stitches in an arc work perfectly.
Cheeks: Using light pink yarn, embroider two small diagonal lines or circles below and to the outside of each eye. These rosy cheeks add so much charm.
Eyelashes (optional for bow avocado): Using black yarn, embroider 2 or 3 small straight stitches extending from the outer corner of each eye.
Attaching Feet
Position two feet at the bottom of each avocado. They should sit at the front, allowing the avocado to stand. Pin in place. Whipstitch around the opening of each foot, securing to the body.
Attaching the Bow
Position the pink bow at the top right side of one avocado, slightly angled. Sew in place using matching pink yarn and small stitches through the center wrap.
Helpful Tips for Success
Tension matters. Keep your stitches consistent throughout. Tight amigurumi fabric is your goal.
Count every round. Place a stitch marker and count as you go. Losing track leads to wonky shapes.
Stuff as you decrease. Once the opening gets small, you cannot add more. Better to slightly overstuff than understuff. Firm avocados hold their shape beautifully.
Take breaks. If color changes or assembly frustrate you, step away. Fresh eyes solve problems faster than frustrated ones.
Customize freely. Want both avocados with pits? Go for it. Prefer no bow? Skip it. Different colored cheeks? Absolutely. Make these yours.
Ideas for Your Finished Avocado Couple
These versatile little ones work for so many purposes.
Gift them to newlyweds, best friends, or anyone who loves avocados. The couple concept makes them meaningful for relationships.
Display them in a nursery or kitchen. Their cheerful faces brighten any space.
Attach a keychain ring to create bag charms. Make them smaller using lighter weight yarn and a smaller hook for miniature versions.
Sell them at craft fairs. Food amigurumi is incredibly popular right now.
You Did It
Congratulations on completing your avocado couple amigurumi. These charming little ones showcase your skill beautifully. Every stitch, every color change, every tiny detail came together because of your effort.
I genuinely hope this crochet pattern brought you joy to make. There is something deeply satisfying about creating cute things from yarn and a hook. These avocados represent hours of your creativity and patience.
Thank you so much for choosing this pattern. It means the world to me that you trusted my instructions to guide your project.
I would absolutely love to see your finished avocados. Please share photos on Instagram or Facebook and tag me. Seeing your creations inspires me to keep designing, and your versions always bring such happiness to my day.
Now go display those cuties proudly. You earned it.
Happy crocheting, friend.
