
Pineapple lace looks intimidating. I hear it all the time. Those intricate fans, the delicate openwork, the way each motif narrows to a perfect point. It seems like something only expert crocheters should attempt.
Here is the truth. If you can double crochet and chain, you already have the skills you need. Pineapple lace is really just a series of simple stitches worked in a predictable sequence. Each row follows a logical pattern, and once you understand the rhythm, it practically works itself. This dress breaks down every single step so clearly that even confident beginners can tackle it successfully.
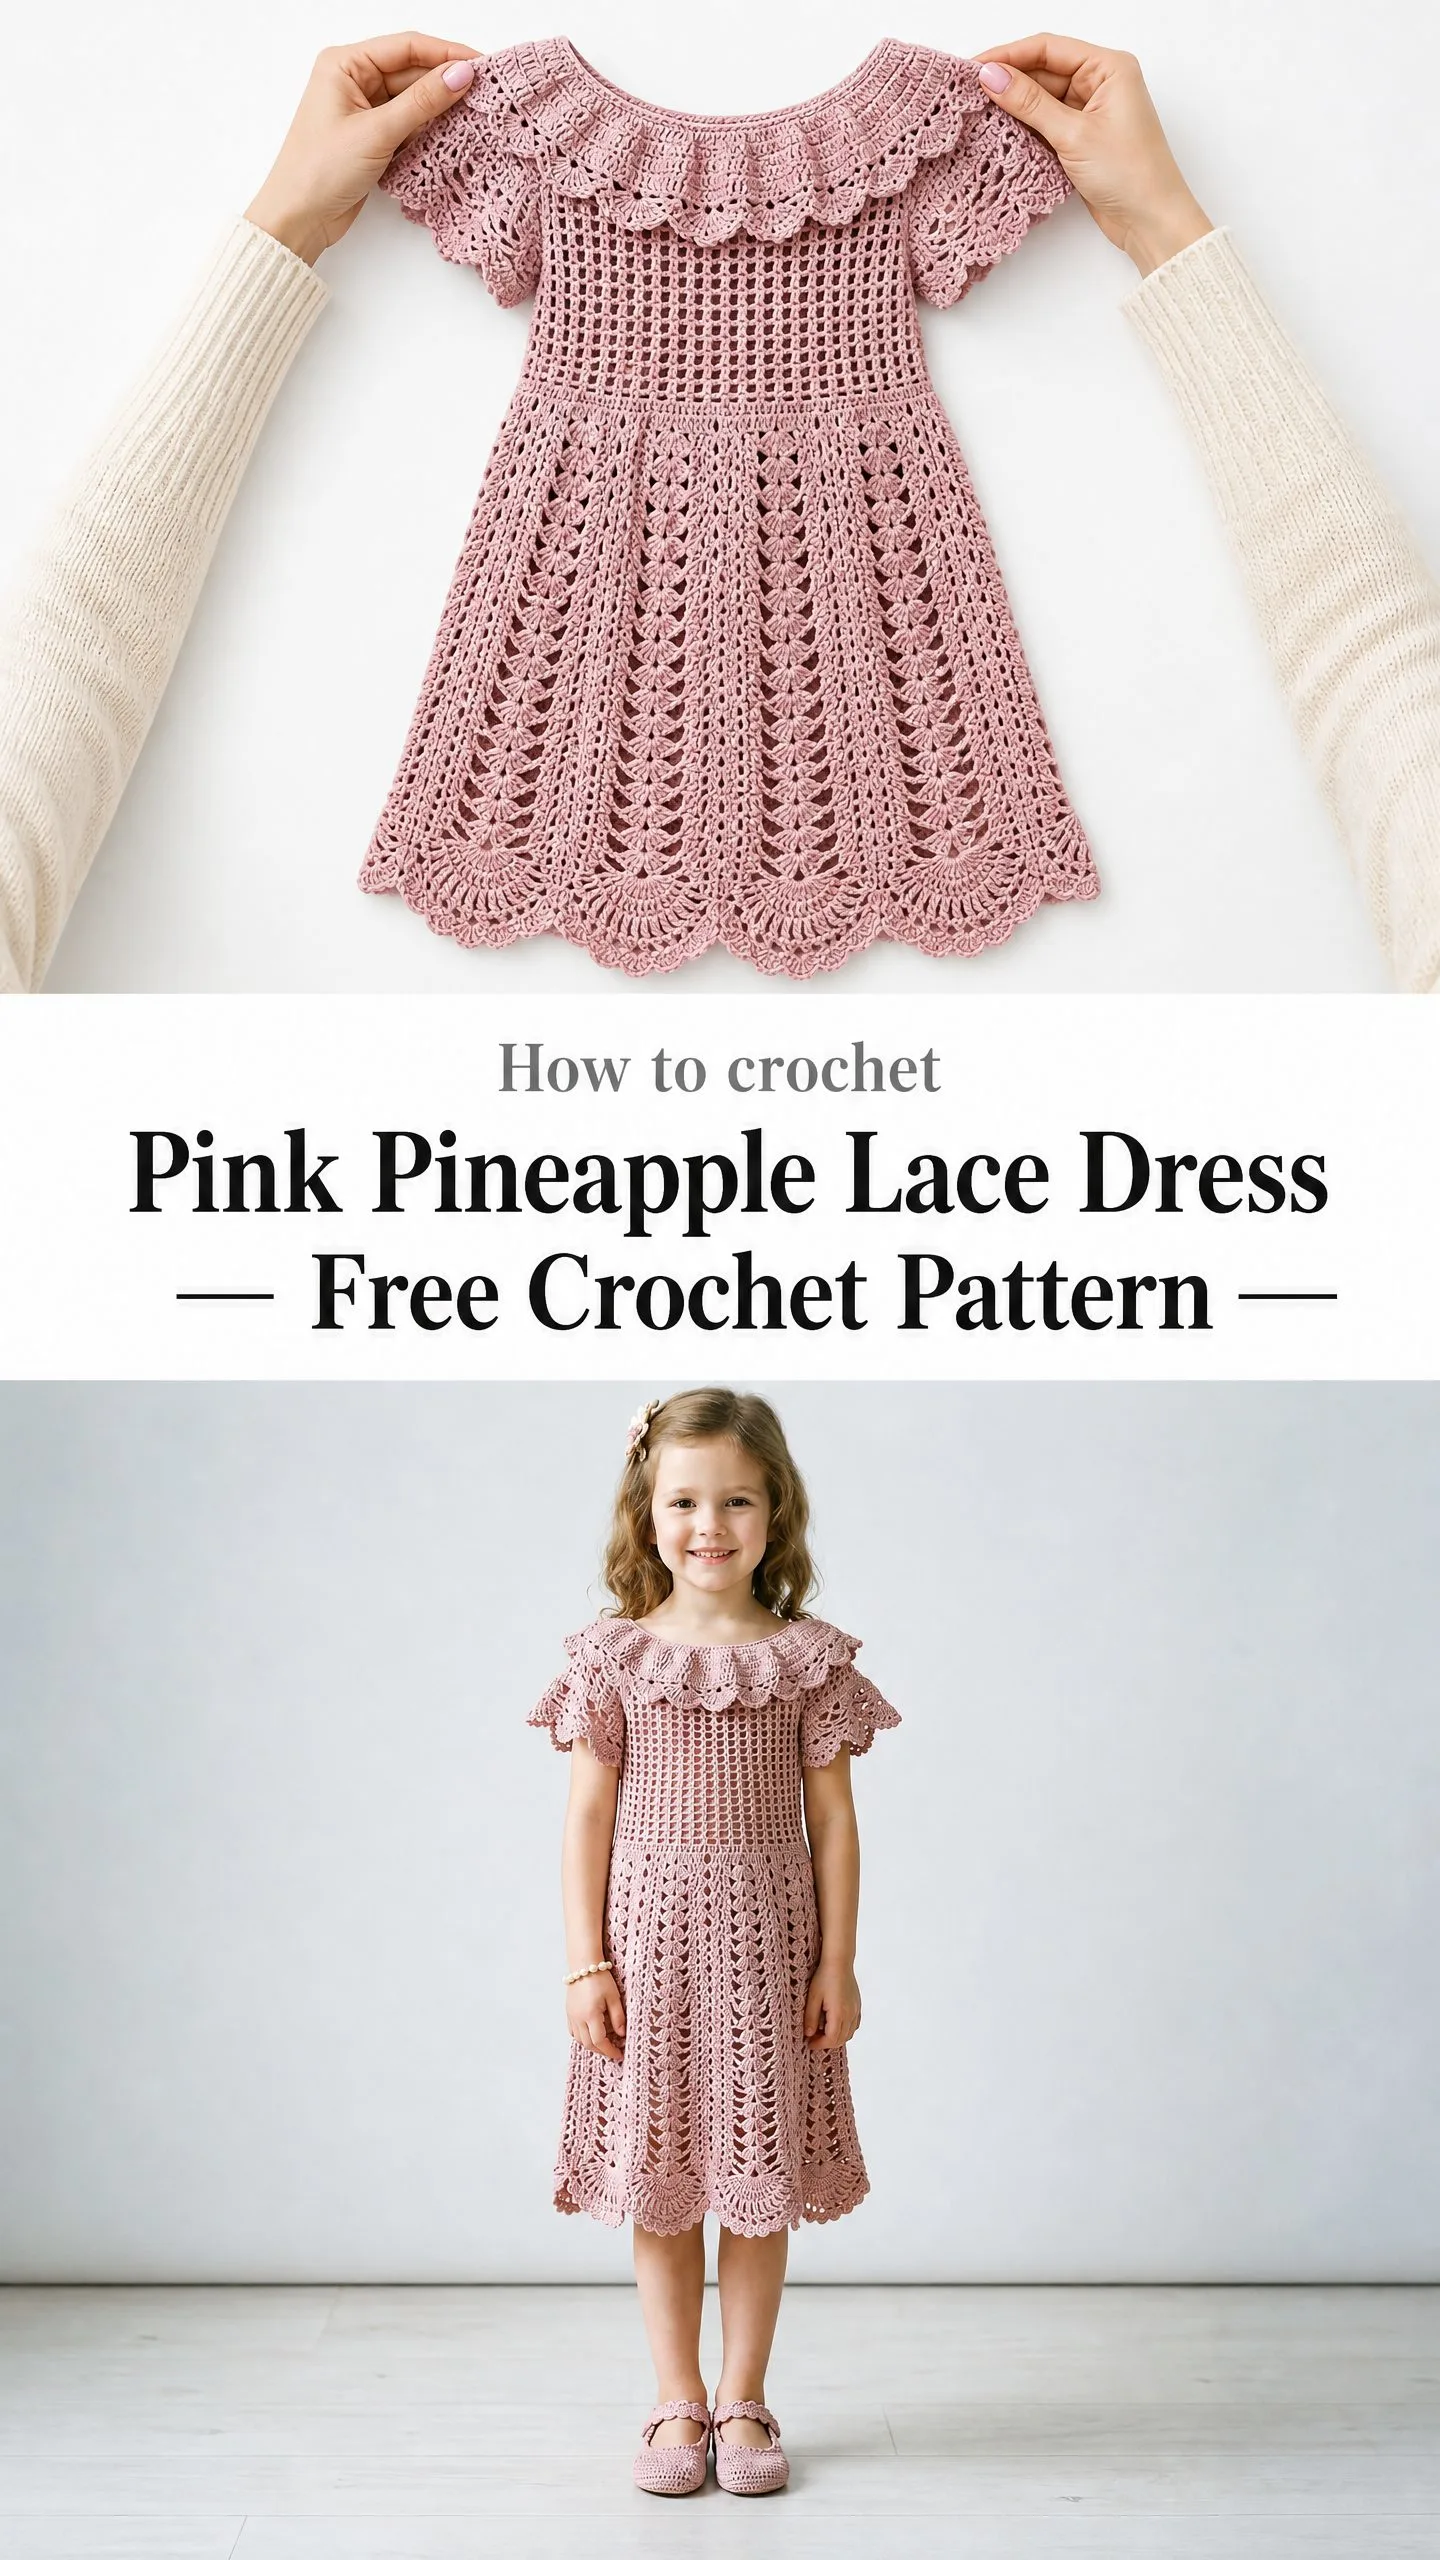
This Pink Pineapple Lace Dress is an heirloom piece in the making. The dusty rose color, the dramatic ruffle collar, the flowing A-line skirt with those gorgeous vertical pineapple panels. It looks like something from a vintage portrait, but the construction is straightforward once you understand the building blocks. Let me walk you through exactly how to create this stunning piece for the little one in your life.
About This Crochet Pattern
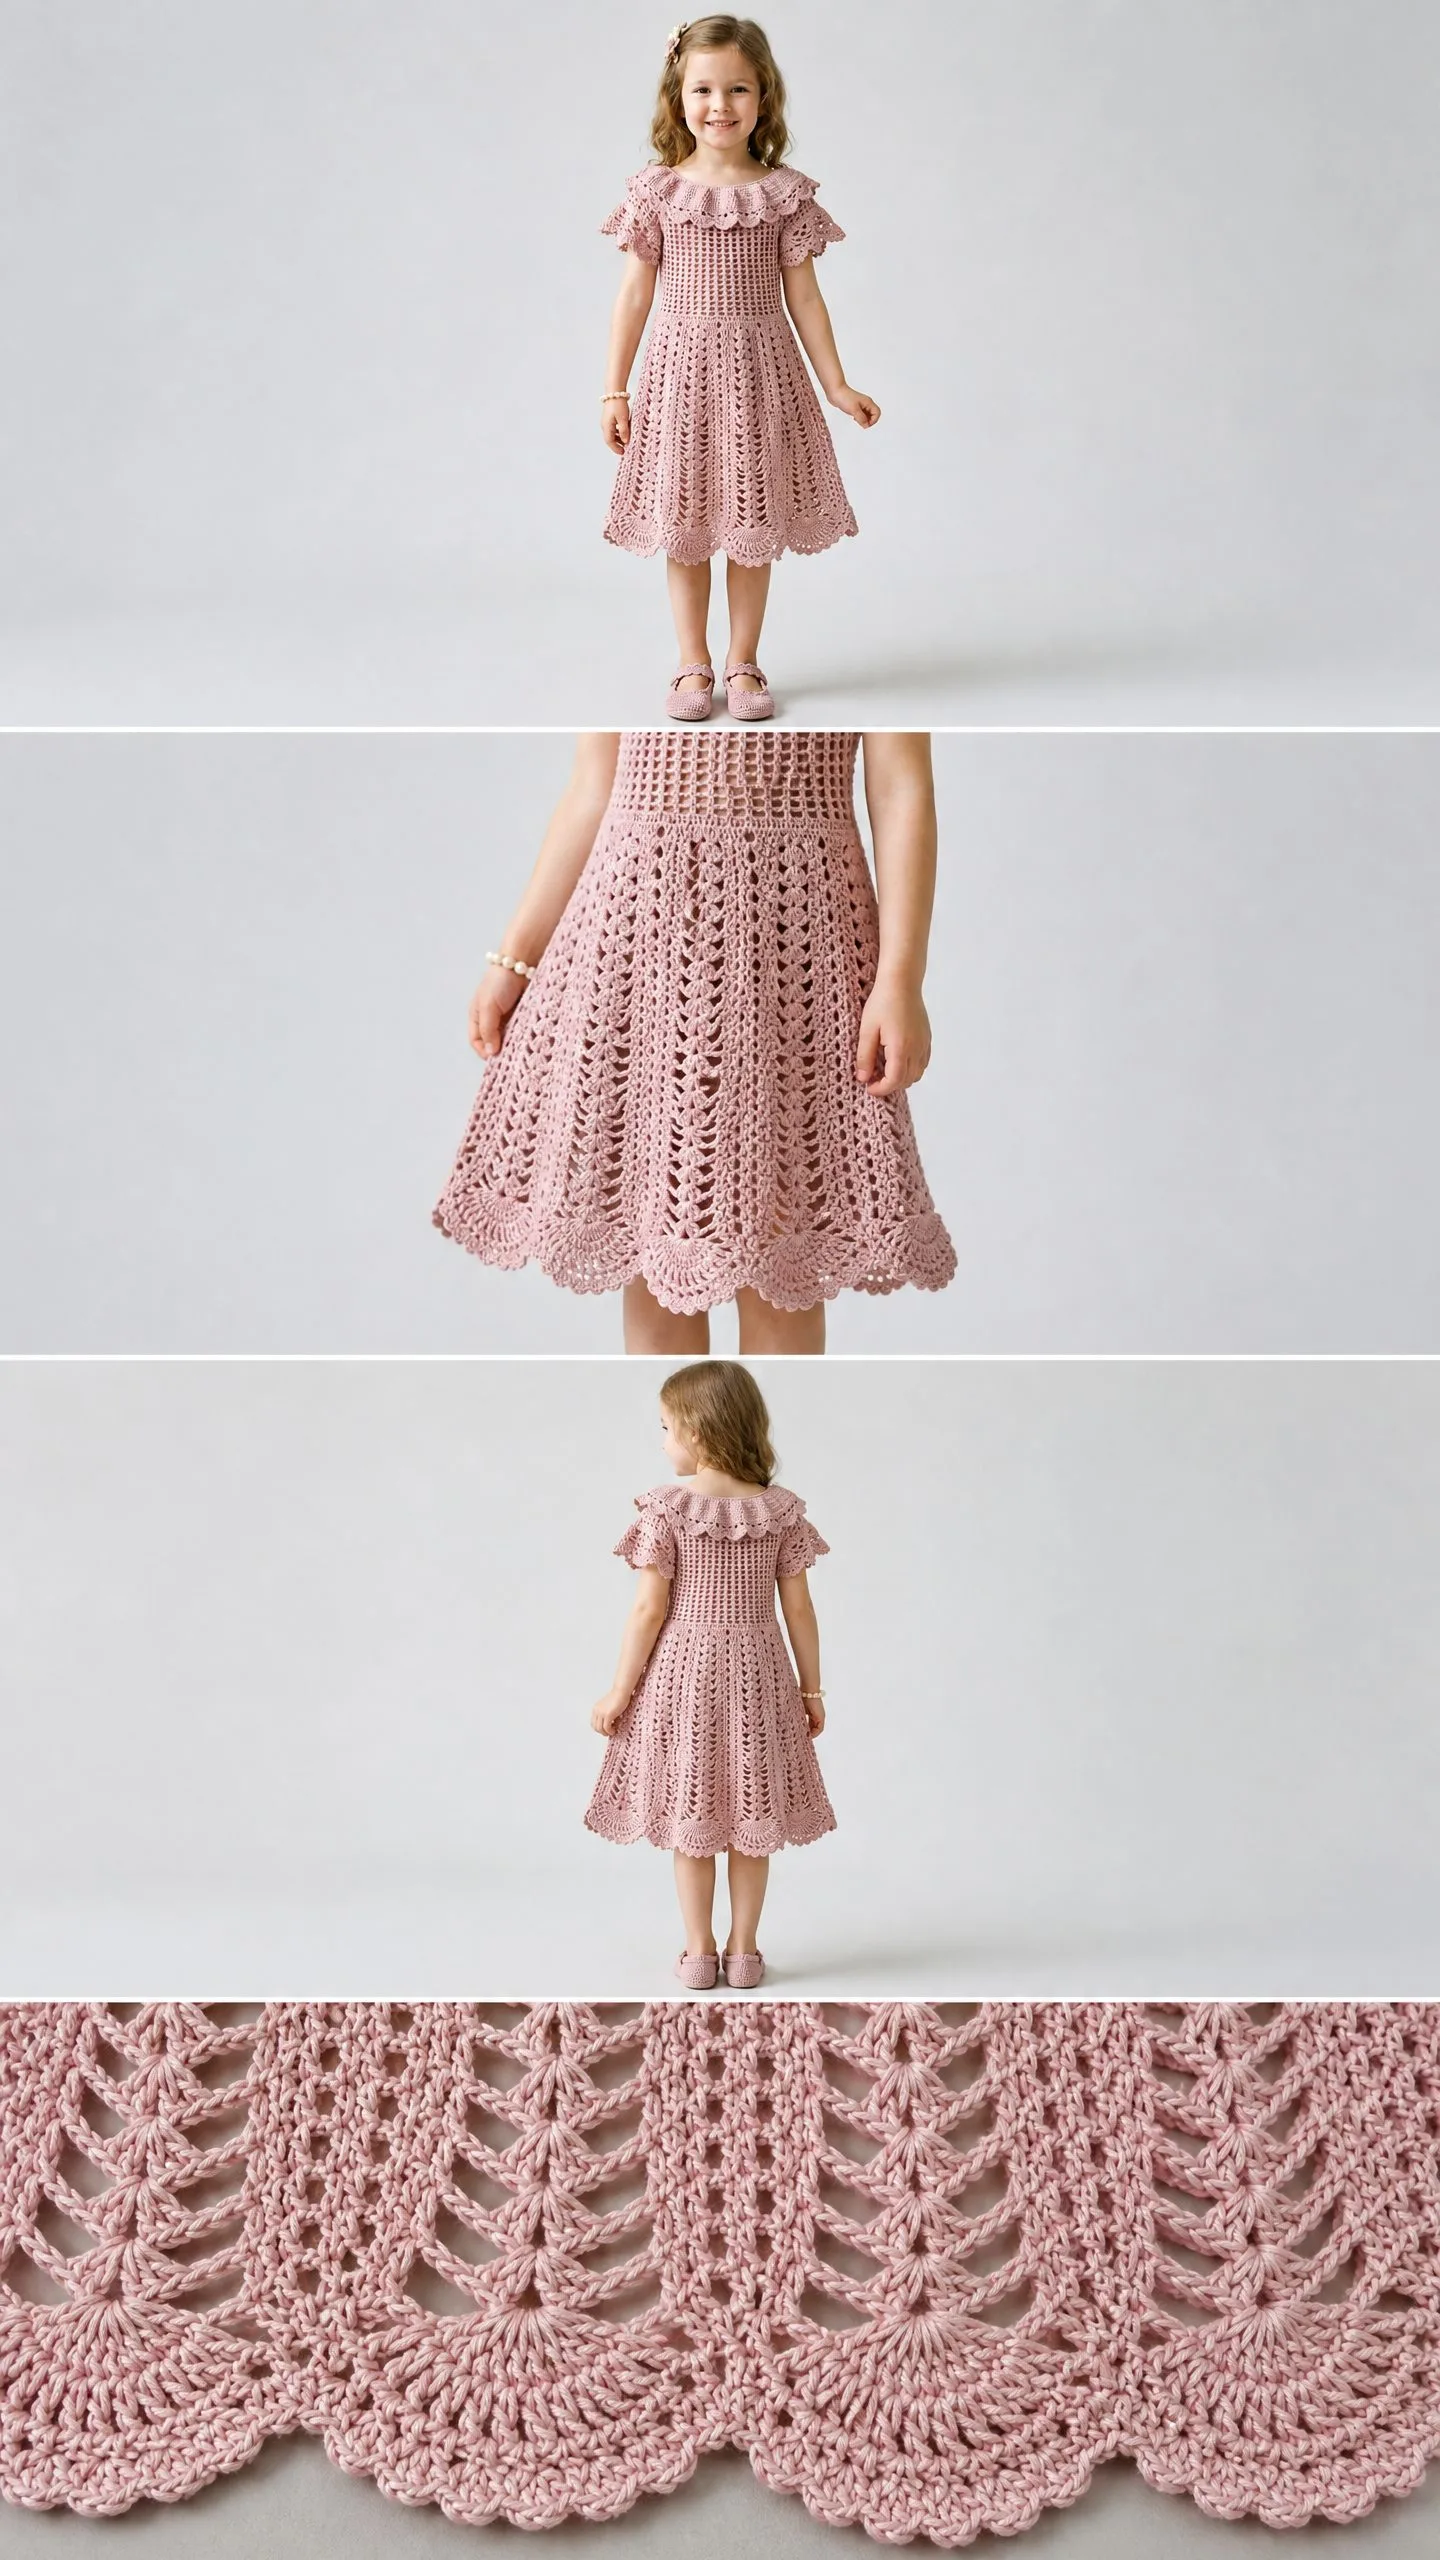
This dress features a square-mesh bodice worked in the round from the top down. A beautiful ruffle collar with scalloped edging drapes around the neckline and extends over short cap sleeves. The drop-waist design transitions into a flowing A-line skirt composed of eight vertical pineapple lace panels separated by chain-space columns. The hem finishes with a wide fan-and-shell border and delicate scalloped edge.
The entire dress pulls on over the head with no zipper or buttons needed. The neckline is wide enough for easy dressing, which any parent will appreciate.
Skill Level: Advanced. This pattern requires confident command of pineapple lace construction, working in the round on a large circumference, managing multiple stitch patterns within one garment, and assembling a sewn-on ruffle.
Time Estimate: 20 to 30 hours for an experienced crocheter. Allow extra time for blocking, which is essential for the lace skirt to truly shine.
Finished Measurements for the Pink Pineapple Lace Dress
This pattern is written for size 4T, which fits approximately US girls size 4, age 3 to 4 years.
Materials Needed
Yarn: Fingering weight to sport weight 100 percent mercerized cotton, approximately 800 to 950 yards / 730 to 870 meters total, in dusty rose or antique pink
Recommended Yarn Options:
1. Paintbox Yarns Simply DK (100% cotton, 137 yards per 50g skein) in Blush Pink. Use 6 to 7 skeins. Note: This is DK weight, so crochet slightly looser or go up half a hook size to match gauge.
2. Drops Safran (100% cotton, 175 yards per 50g skein) in color 18 Old Rose. Use 5 to 6 skeins. This is the closest match to the original.
3. Lion Brand 24/7 Cotton (100% mercerized cotton, 186 yards per 3.5oz skein) in Dusty Pink. Use 5 skeins.
Substitution note: Choose a smooth, tightly plied mercerized cotton. Avoid fuzzy or hairy fibers because they will obscure the pineapple lace openwork. Mercerized cotton gives the stitch definition and slight sheen visible in the finished dress.
Hook: US size E-4 (3.5 mm) crochet hook for bodice and skirt. US size D-3 (3.25 mm) for ruffle collar edging.
Notions:
Gauge
Bodice mesh gauge: 20 dc (double crochet) and 10 rows = 4 inches / 10 cm in the mesh stitch pattern (ch-1, dc grid), blocked.
Skirt pineapple gauge: One full pineapple repeat (14 stitches wide) = 2.25 inches / 5.7 cm wide, blocked. 10 rows of pineapple pattern = 4 inches / 10 cm, blocked.
Gauge swatch instructions: Chain 32. Work in mesh pattern (dc in 3rd ch from hook, ch 1, skip 1, dc in next ch, repeat across) for 15 rows, turning with ch 2 (does not count as dc). Wash and block the swatch before measuring. Adjust hook size as needed. Gauge is critical for fit in this garment.
Abbreviations
Special Stitches for This Crochet Tutorial
Mesh Stitch (Bodice)
Ch 2 at beginning of row (does not count as a stitch throughout bodice), dc in first stitch, ch 1, skip next st or ch-sp, dc in next st. Repeat ch 1, skip, dc across. At end of round, sl st to top of first dc to join. This creates an open grid of double crochets separated by single chain spaces.
Shell Stitch (Hem Border)
Work (2 dc, ch 2, 2 dc) all into the same stitch or space. This forms a small shell with a center picot space.
Fan Stitch (Hem Border)
Work (3 dc, ch 2, 3 dc, ch 2, 3 dc) all into the same stitch or space. This creates the wide fan at the bottom hem.
Pineapple Cluster
Yo, insert hook in designated sp, yo, pull up lp, yo, draw through 2 lps. Repeat 4 more times in same sp (5 partial dc in sp). Yo, draw through all 6 lps on hook. One pineapple cluster complete.
Scallop Edging
Sl st to corner or designated st, ch 1, (sc, hdc, 3 dc, hdc, sc) in same sp, skip 2 sts, sl st in next st. Repeat to end. This forms the rounded scallop points on collar and hem.
Step by Step Instructions
Bodice
Foundation: With US E-4 hook and MC, chain 90. Without twisting chain, sl st to first ch to form ring. (90 ch)
Neckline check: Your foundation ring should measure approximately 18 inches / 45.5 cm in circumference (unstretched). If it measures significantly more or less, adjust your foundation chain count in multiples of 2.
Round 1 (mesh round): Ch 2 (does not count as st), dc in same ch as joining sl st, ch 1, skip 1 ch, (dc in next ch, ch 1, skip 1 ch) around, sl st to first dc to join. (45 dc, 45 ch-1 sp)
Round 2: Ch 2, dc in same st, ch 1, (dc in next dc, ch 1) around, sl st to first dc. (45 dc, 45 ch-1 sp)
Rounds 3 through 5: Rep Round 2. (45 dc, 45 ch-1 sp each round)
These 5 rounds form the upper bodice and yoke. The neckline should sit wide and off-shoulder or at shoulder edge as shown.
Armhole placement round (Round 6): You will now divide the round into front, armhole gaps, and back sections.
The bodice circumference of 45 dc is divided as:
Round 6 instruction: Ch 2, dc in same st (position 1), ch 1, (dc, ch 1) in each of next 19 dc (positions 2 through 20). For right armhole: ch 4, skip next 2 dc. (dc, ch 1) in each of next 20 dc (positions 23 through 42). For left armhole: ch 4, skip next 2 dc. Dc in last dc, ch 1, sl st to first dc. (41 dc around body + 2 ch-4 armhole bridges)
Round 7: Ch 2, (dc in next dc, ch 1) across front 20 dc, then (dc in 2nd ch of ch-4 bridge, ch 1, dc in 4th ch of ch-4 bridge, ch 1) for each armhole, then (dc, ch 1) across back 20 dc, sl st to join. (45 dc, 45 ch-1 sp)
Rounds 8 through 14: Rep Round 2. (45 dc, 45 ch-1 sp each round)
Checkpoint: After Round 14 the bodice should measure approximately 8 inches / 20 cm from the top of the neckline foundation to the bottom of Round 14. The circumference at the bottom of the bodice should be approximately 20 inches / 51 cm.
Sleeve Caps (Make 2)
The sleeve cap is a small ruffle that covers the armhole gap and matches the collar ruffle treatment.
With US E-4 hook, attach yarn to any dc at the right side of the right armhole opening.
Round 1: Ch 1, sc evenly around the armhole opening, working approximately 10 sc total. Sl st to first sc to join. (10 sc)
Round 2 (increase for ruffle base): Ch 1, 2 sc in every sc around, sl st to join. (20 sc)
Round 3 (ruffle row): Ch 3 (counts as dc here), (2 dc, ch 1, 2 dc) in same st as joining (shell made), skip 2 sc, sl st in next sc, skip 2 sc, (3 dc, ch 1, 3 dc) in next sc. Rep from (3 dc, ch 1, 3 dc) pattern, working one shell every 4 sts around armhole. Adjust as needed for even spacing. Join with sl st. Finish off.
Scallop edging on sleeve cap: Attach yarn to first ch-1 sp of any shell, ch 1. Work (sc, hdc, 3 dc, hdc, sc) into same ch-1 sp. Sl st in sl st between shells. Rep around all shells. Sl st to first sc. Finish off.
Rep for second armhole.
Ruffle Collar
The ruffle collar is a long rectangle worked flat, then seamed and attached. It sits around the wide neckline and drapes over the upper bodice and sleeve caps.
Outer Ruffle Layer:
With US E-4 hook, chain 181.
Foundation row: Dc in 4th ch from hook, dc in each ch across. (179 dc)
Row 1 (WS): Ch 3 (counts as dc), turn. 2 dc in first dc, dc in each dc to last dc, 3 dc in last dc. (183 dc)
Row 2: Ch 3, turn. 2 dc in first dc, (ch 1, skip 1, dc in next dc) across to last dc, 3 dc in last dc. (185 dc + ch-1 sp)
Row 3: Ch 3, turn. Dc in each dc and ch-sp across. (185 dc)
Row 4 (scallop edge row): Do not turn. Work scallop edging along bottom long edge of outer ruffle: Ch 1, sc in first dc, (skip 2 dc, shell of 5 dc in next dc, skip 2 dc, sc in next dc) across. Finish off. Adjust skips as needed so last repeat ends with sc. (Approximately 30 to 31 shells along ruffle bottom edge)
Inner Ruffle Layer (shorter, sits underneath):
With US E-4 hook, chain 181.
Foundation row: Dc in 4th ch from hook, dc in each ch across. (179 dc)
Row 1: Ch 3, turn. Dc in each dc across. (179 dc)
Row 2 (scallop edge): Ch 1, sc in first dc, (skip 2 dc, 5 dc in next dc, skip 2 dc, sc in next dc) across. Finish off.
Assembling Collar:
Fold outer ruffle in half along its length (chain edge meets chain edge). The two short ends form the center back opening. With yarn needle, sew the two short ends together at center back, leaving enough open at top for neckline to fit through.
Align the top raw chain edge of the outer ruffle and inner ruffle together. With US D-3 hook and RS facing, sl st both layers together along top edge to join them into a double-layer collar band.
Attaching Collar to Dress:
Hold collar RS up against RS of bodice neckline (Round 1 of bodice). The joined top edge of the collar should align with the neckline foundation chain. With yarn needle, whip stitch or sl st collar to bodice at every other dc post around neckline Round 1. Center back seam of collar should sit at center back of neckline. The ruffle drapes outward and downward over the bodice front and over the sleeve caps.
Waistband Transition
After completing Round 14 of the bodice, work the following transition round to establish the skirt base.
Transition Round (increase round): Ch 2, do not count as st. Working into the mesh of Round 14, dc in first dc, ch 1, (dc, ch 1) in each dc around. At 4 evenly spaced points (every approximately 11th to 12th dc), work 2 dc into one dc to increase. Total increases: 4. (49 dc, 49 ch-1 sp)
Increase Round 2: Ch 2, (dc in next dc, ch 1) 5 times, 2 dc in next dc sp, ch 1, (dc, ch 1) 5 times, 2 dc in next dc, ch 1. Continue in this manner, spacing increases so 4 additional dc are added total. (53 dc)
Additional spacing round (Round 16 total): Ch 2, (dc, ch 1) in each dc around, adding 3 more increases evenly spaced. (56 dc, 56 ch-1 sp)
Note: 56 dc gives 8 pineapple repeats of 7 dc columns each at the top of the skirt.
Skirt
The skirt is worked in the round with RS always facing. It consists of 8 pineapple lace panels separated by vertical (dc, ch 1, dc) columns.
Skirt increase bridge round: Work increases to reach 112 dc evenly spaced with ch-1 sp between each, giving 112 mesh units.
Skirt Round 1 (Pineapple base setup):
Sl st to first dc. Ch 4 (counts as dc + ch 1 here only for this round).
*[Separator column: dc in next dc, ch 1, dc in next dc, ch 1]
[Pineapple base: into the next ch-sp, work (dc, ch 1) 6 times = 6 dc and 5 ch-sp between them, then dc in next dc = 7 dc across pineapple base]
[Separator column: ch 1, dc in next dc, ch 1, dc in next dc, ch 1]*
Rep to 7 more times. Sl st to 3rd ch of beginning ch-4. (8 pineapple bases established, 8 separator column pairs, 112 dc total)
Skirt Round 2 (Pineapple row 1 of body, begin narrowing):
Sl st across to first ch-1 sp of first pineapple base.
*[Separator: dc in separator dc, ch 1, dc in next separator dc, ch 1]
[Pineapple: sk first dc of base, sc in first ch-1 sp, (ch 3, sc in next ch-1 sp) 5 times, ch 3]
[Separator: ch 1, dc in next separator dc, ch 1, dc in next separator dc, ch 1]*
Rep to around. Sl st to join. (8 pineapples each with 6 ch-3 arches, 8 separator pairs)
Skirt Round 3 (Pineapple row 2):
Sl st to center of first ch-3 arch.
*[Separator: dc in separator dc, ch 1, dc in next separator dc, ch 1]
[Pineapple: sc in first ch-3 arch, (ch 3, sc in next ch-3 arch) 4 times, ch 3]
[Separator: ch 1, dc, ch 1, dc, ch 1]*
Rep around. Sl st to join. (8 pineapples each with 5 ch-3 arches)
Skirt Round 4: Same as Round 3 but 4 ch-3 arches per pineapple.
Skirt Round 5: Same, 3 ch-3 arches per pineapple.
Skirt Round 6: Same, 2 ch-3 arches per pineapple.
Skirt Round 7: Same, 1 ch-3 arch per pineapple (pineapple tip).
Skirt Round 8 (pineapple tip closure and fan base setup):
Sl st to first ch-3 arch tip.
*[Separator: dc in separator dc, ch 1, dc in next separator dc, ch 1]
[Pineapple tip: into the single remaining ch-3 sp, work (dc, ch 1) 6 times, dc = 7 dc, 6 ch-1 sp]
[Separator: ch 1, dc in next separator dc, ch 1, dc in next separator dc, ch 1]*
Rep around. Sl st to join. (8 new pineapple bases established)
Repeat Skirt Rounds 2 through 8 to work a second full pineapple tier below the first.
Checkpoint: After completing 2 full pineapple tiers, the skirt should measure approximately 11 inches / 28 cm from waistband.
Hem Border
Hem Round A: Into each remaining single ch-3 arch at each pineapple tip, work the following:
Sc in separator column position. Into single ch-3 arch of pineapple tip: (dc, ch 1) 4 times, dc (5 dc, 4 ch-1 sp). Sc in separator column position, ch 2.
Rep around. Sl st to join.
Hem Round B:
Sl st to first ch-1 sp inside fan.
Sc in first ch-1 sp, (ch 3, sc in next ch-1 sp) 3 times. Ch 3, sc in 2nd ch of ch-2 between fans.
Rep around. Sl st to join.
Hem Round C (large fan row):
Sl st to center of first ch-3 arch.
Into center ch-3 arch (second arch of 4): work (3 dc, ch 2, 3 dc, ch 2, 3 dc) = large fan. Sc in next ch-3 arch on each side. Sc in ch-3 arch between fans.
Rep around. Sl st to join.
Hem Round D (scallop bind-off):
Sl st to first ch-2 sp of large fan.
Into ch-2 sp: (sc, hdc, 3 dc, hdc, sc) = scallop point. Ch 1, into next ch-2 sp of same fan: (sc, hdc, 3 dc, hdc, sc) = second scallop point. Sl st between fans.
Rep around. Sl st to join. Finish off. Weave in end.
This creates 2 scallop points per pineapple = 16 scallop points total around hem.
Size Customization Tips
For a larger size (size 6, age 5 to 6):
For a smaller size (size 2T, age 18 months to 2 years):
Finishing and Blocking Your Lace Dress
Weave in all yarn ends securely, particularly at collar attachment and hem.
Wet blocking (strongly recommended):
Submerge finished dress in cool water with a small amount of wool wash or gentle soap. Gently press out air. Do not wring or twist. Roll in a clean towel to remove excess water.
Lay flat on blocking mats. Stretch bodice to chest measurement (22 inches / 56 cm circumference). Pin hem scallop points individually, pulling each point outward firmly to open the fans. Lace fans should open dramatically. Pin pineapple tips along skirt to encourage vertical alignment.
Allow to dry completely before unpinning, approximately 24 hours in a warm room.
Care Instructions
Final Thoughts on This Heirloom Crochet Piece
This Pink Pineapple Lace Dress is truly a labor of love. The combination of the delicate mesh bodice, the flowing pineapple lace skirt, and that gorgeous ruffle collar creates something that will be treasured for generations. Yes, it takes time. Yes, it requires patience. But when you see a little one twirling in something you made with your own hands, every single stitch becomes worth it.
I hope this tutorial has given you the confidence to tackle pineapple lace. Remember, each row builds on the last in a predictable way. Once you complete your first pineapple panel, the rest will feel almost automatic.
If you loved this pattern, go ahead and save it to your Pinterest boards so you can find it easily when you are ready to start. And please, if you make this dress, I would absolutely love to see it! Drop a comment below or tag me on Instagram. Seeing your finished projects is honestly the best part of sharing patterns.
