This crochet crop top uses basic stitches with one decorative section to create a fitted summer garment. You will need to know single crochet, double crochet, and chain stitches. The lacy bust panel adds visual interest without complicated techniques. Start to finish, this project takes about 8 to 12 hours depending on your speed.
About This Lavender Crochet Crop Top Pattern
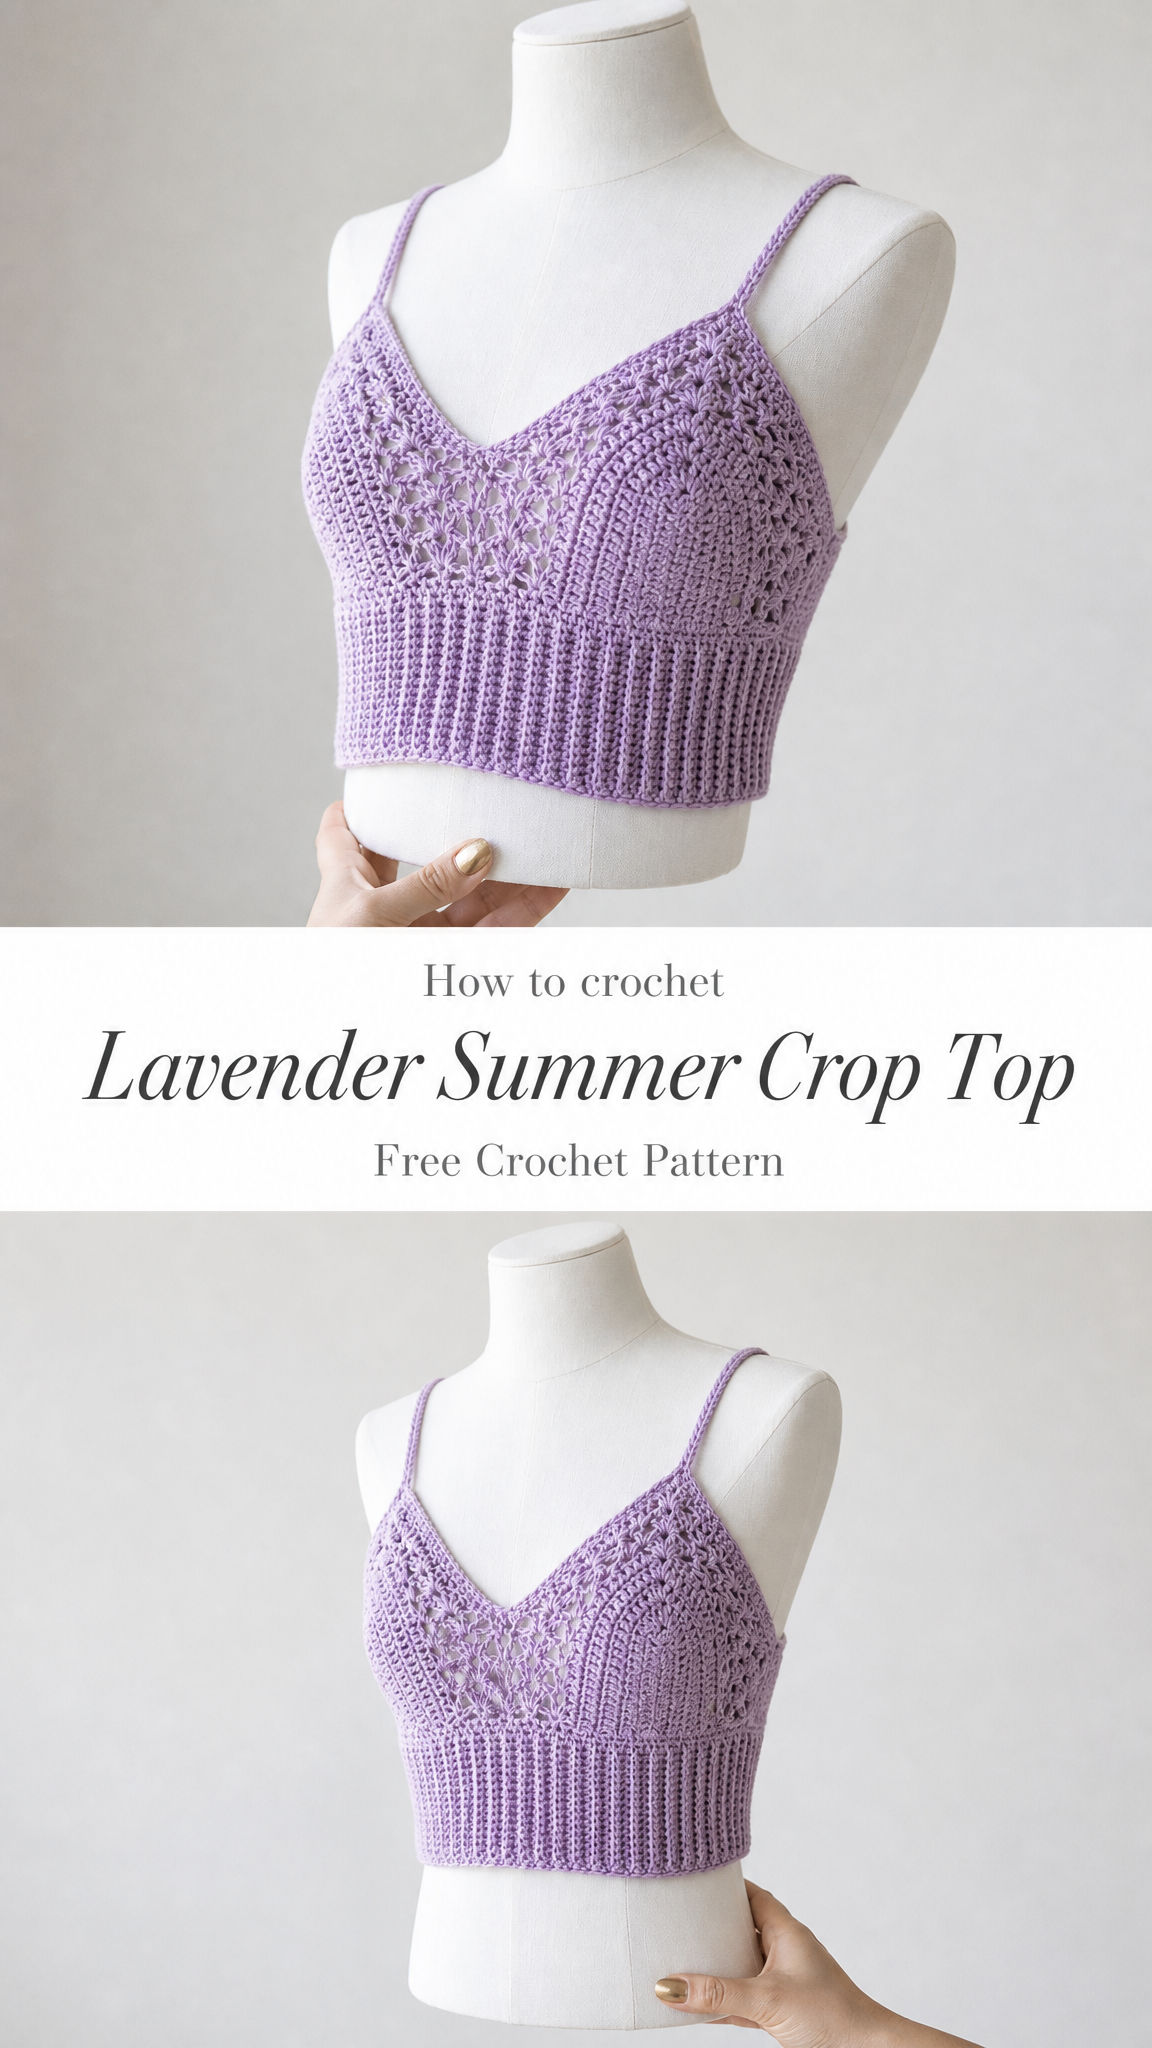
I designed this crochet crop top pattern with warm weather in mind. The combination of a solid ribbed band, openwork lace panel, and simple cup construction creates a flattering silhouette that works for beach days, festivals, or layering under cardigans.
The lavender color shown here is perfect for spring and summer, but you can absolutely make this in any shade that suits your wardrobe. Neutrals like cream, black, or tan work beautifully. Bold colors like coral or teal make a statement.
What I love most about this design is how the different textures work together. The ribbed band at the bottom provides structure and a snug fit around your torso. The lacy middle section adds breathability and a touch of romance. The solid cups give you the coverage you need without feeling heavy.
Skill Level
This crochet tutorial is suited for confident beginners and intermediate crocheters. If you have made a few scarves or simple accessories and feel ready to try a wearable garment, this is a great stepping stone.
You should be comfortable with:
If any of those feel unfamiliar, I recommend practicing on a small swatch first. There is no rush. Take your time and enjoy the process.
Materials Needed
Yarn:
Hook:
Notions:
Gauge
Gauge matters for garments, so please take a moment to check yours before starting.
In single crochet:
18 stitches and 20 rows = 4 inches (10cm)
In the lace pattern:
One pattern repeat (approximately 8 stitches) = about 1.75 inches wide
If your gauge is too loose, go down a hook size. If your gauge is too tight, go up a hook size. A small difference in gauge can change the final fit significantly.
Finished Measurements
This pattern is written for a Small/Medium size with a finished bust measurement of approximately 30 to 34 inches. The ribbed band stretches to accommodate different body shapes.
Dimensions as shown:
Abbreviations and Stitch Definitions
Let me walk you through every abbreviation before we begin. If you are new to reading crochet patterns, bookmark this section to reference as you work.
Ch = Chain. Wrap yarn over hook, pull through loop on hook. This creates the foundation for most crochet projects.
Sl st = Slip stitch. Insert hook, yarn over, pull through both loops on hook at once. Used for joining rounds and creating a nearly invisible stitch.
Sc = Single crochet. Insert hook into stitch, yarn over, pull up a loop (2 loops on hook), yarn over, pull through both loops. This is a short, dense stitch.
Dc = Double crochet. Yarn over, insert hook into stitch, yarn over, pull up a loop (3 loops on hook), yarn over, pull through 2 loops, yarn over, pull through remaining 2 loops. This is a taller stitch with more drape.
Hdc = Half double crochet. Yarn over, insert hook into stitch, yarn over, pull up a loop (3 loops on hook), yarn over, pull through all 3 loops at once. Height falls between sc and dc.
Sc2tog = Single crochet two together (decrease). Insert hook into first stitch, yarn over, pull up a loop, insert hook into next stitch, yarn over, pull up a loop (3 loops on hook), yarn over, pull through all 3 loops. This turns 2 stitches into 1.
BLO = Back loop only. Instead of inserting your hook under both loops of the stitch, insert it under only the back loop. This creates a ribbed texture.
Sk = Skip. Pass over the indicated stitch without working into it.
St(s) = Stitch(es)
Rep = Repeat
Step by Step Crochet Pattern Instructions
Part 1: Ribbed Band
The band is worked sideways in rows using back loop only single crochet. This creates vertical ribs that stretch horizontally, giving the band its elastic quality.
Foundation:
Ch 17.
Row 1: Sc in 2nd ch from hook and in each ch across. Turn. (16 sts)
Row 2: Ch 1, sc in BLO of each st across. Turn. (16 sts)
Rows 3 through 116: Repeat Row 2.
You should now have a long ribbed rectangle. The exact number of rows depends on your desired band circumference. For a 30 to 34 inch finished measurement, 116 rows works well. Measure as you go and adjust if needed. The band should measure approximately 26 inches long unstretched.
Joining the Band:
Fold the band so the short ends meet. Sl st or whip stitch the ends together to form a tube. This seam will sit at the center back of the top.
Part 2: Lace Panel Body
Now you will pick up stitches along the top edge of the ribbed band and work the lace section upward.
Setup Round:
With the band seam at center back, join yarn to the top edge of the band. Ch 1, work approximately 116 sc evenly around the top edge of the band, placing one sc in the end of each row. Sl st to first sc to join. (116 sts)
*Note: Your stitch count may vary slightly depending on your row count. Aim for a multiple of 8 for the lace pattern to work out evenly. Adjust by skipping a stitch or adding one as needed.*
Round 1 (Lace Setup):
Ch 3 (counts as first dc), dc in each st around. Sl st to top of ch 3 to join. (116 dc)
Round 2 (Lace Pattern):
Ch 1, sc in first st, *ch 3, sk 3 sts, sc in next st*, rep from * around, ending with ch 3, sl st to first sc to join.
Round 3:
Ch 1, sc in first sc, *5 dc in ch 3 space (shell made), sc in next sc*, rep from * around. Sl st to first sc to join.
Round 4:
Ch 4 (counts as dc plus ch 1), *sc in center dc of shell, ch 3*, rep from * around, ending with sc in center dc, ch 1, sl st to 3rd ch of beginning ch 4.
Round 5:
Ch 3, 2 dc in ch 1 space, *sc in sc, 5 dc in ch 3 space*, rep from * around, ending with sc in last sc, 2 dc in last space. Sl st to top of ch 3 to join.
Repeat Rounds 2 through 5 once more for additional height, or continue until the lace section measures approximately 3 to 4 inches tall.
Final Round:
Work one round of sc evenly around, decreasing as needed to bring the stitch count down to approximately 100 sts. This creates a smoother transition to the cups.
Part 3: Cup Construction
The cups are worked separately in rows, then attached to the lace body. You will make two identical triangular pieces.
Cup (Make 2):
Row 1: Ch 2, 3 sc in 2nd ch from hook. Turn. (3 sts)
Row 2: Ch 1, 2 sc in first st, sc to last st, 2 sc in last st. Turn. (5 sts)
Row 3: Ch 1, sc in each st across. Turn. (5 sts)
Row 4: Ch 1, 2 sc in first st, sc to last st, 2 sc in last st. Turn. (7 sts)
Row 5: Ch 1, sc in each st across. Turn. (7 sts)
Continue alternating increase rows and plain rows until each cup measures approximately 6 inches wide at the base and 5 inches tall. You should have approximately 25 to 30 sts at the widest point.
Top Edging:
Work 1 row of sc across the top edge, then 1 row of sl st for a clean finish.
Part 4: Attaching the Cups
Position the cups on the front of the top, centering them with the points meeting at center front. The wide bases should sit just above the lace panel.
Pin in place first, try on if possible to check placement, then whip stitch or slip stitch the bottom and side edges to the lace body. Leave the top edges open for the straps.
Part 5: Straps
The straps are simple chains with a row of slip stitches for stability.
For each strap:
Ch 80 (or desired length, approximately 14 to 16 inches). Sl st in 2nd ch from hook and each ch across. Fasten off.
Attach one end of each strap to the top point of each cup. Attach the other ends to the back of the band, spaced approximately 4 to 5 inches apart. Try on as you attach to find your ideal strap length and placement.
Part 6: Finishing Touches
Weave in all ends using your yarn needle. For cotton yarn, I recommend weaving through at least 2 inches of stitches and doubling back for security.
Optional V-Neckline Detail:
Work a round of sc along the inner edges of both cups where they meet at the center, creating a clean V-neckline border.
Blocking:
Wet block your finished top by soaking in cool water, gently pressing out excess moisture, and laying flat to dry. This evens out your stitches and helps the garment hold its shape.
Tips for Customizing This Crochet Crop Top
To adjust the size: Add or remove rows from the ribbed band for a larger or smaller band circumference. Add or remove increase rows from the cups for larger or smaller cup coverage.
To add length: Work additional rounds of the lace pattern before starting the cups, or add rows to the ribbed band.
To make it more modest: Line the cups with fabric or add a second layer of solid crochet behind the lace panel.
For different yarn weights: Going up to worsted weight will make a larger, sturdier top. Going down to sport or fingering weight creates a more delicate garment. Adjust hook size accordingly.
Care Instructions
Cotton garments should be washed in cold water on a gentle cycle or by hand. Lay flat to dry to prevent stretching. Avoid hanging wet, as the weight of water can distort the shape. If needed, reshape while damp and allow to air dry completely.
I hope this lavender summer crop top crochet pattern brings you joy to make and wear. There is something deeply satisfying about creating your own summer wardrobe piece by piece, stitch by stitch.
If you make this top, I would absolutely love to see your finished project. Tag me on Instagram or share a photo in our Facebook group. Seeing your creations honestly makes my whole day brighter.
Save this pattern to your Pinterest boards so you can find it when you are ready to start, and drop a comment below if you give it a try. I read every single one and love hearing which colors you choose. Happy crocheting, friend!
