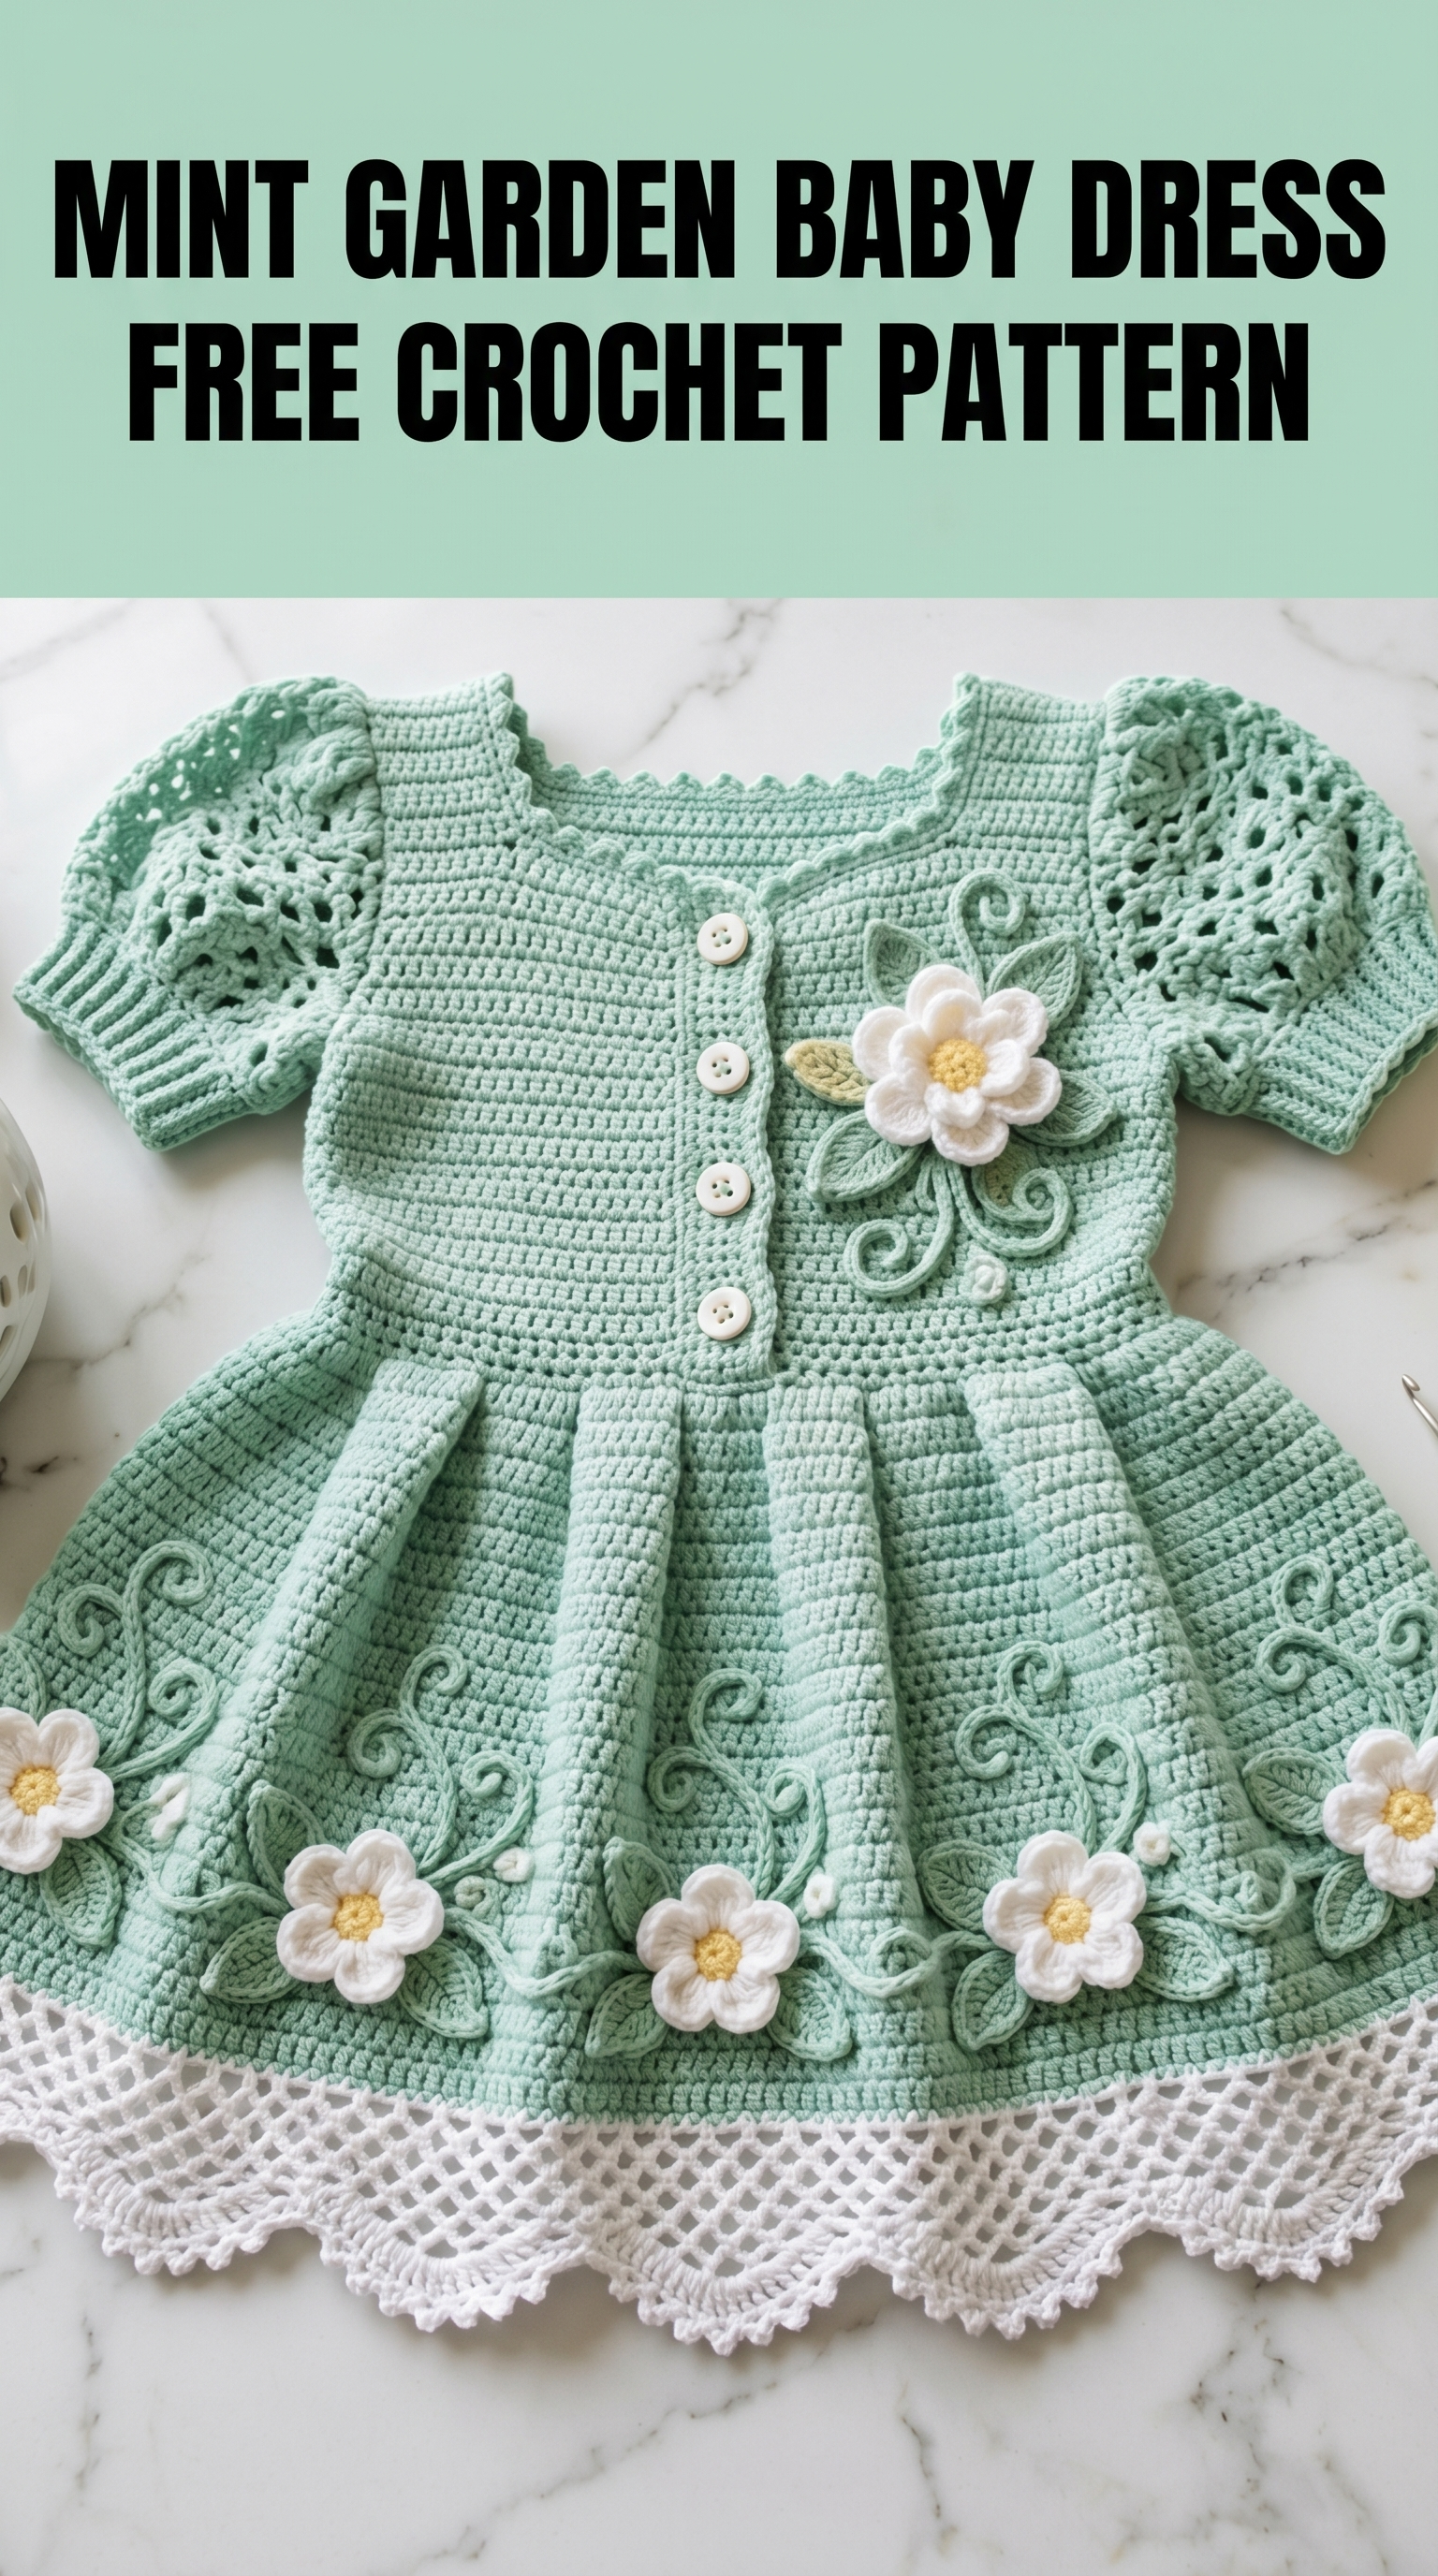
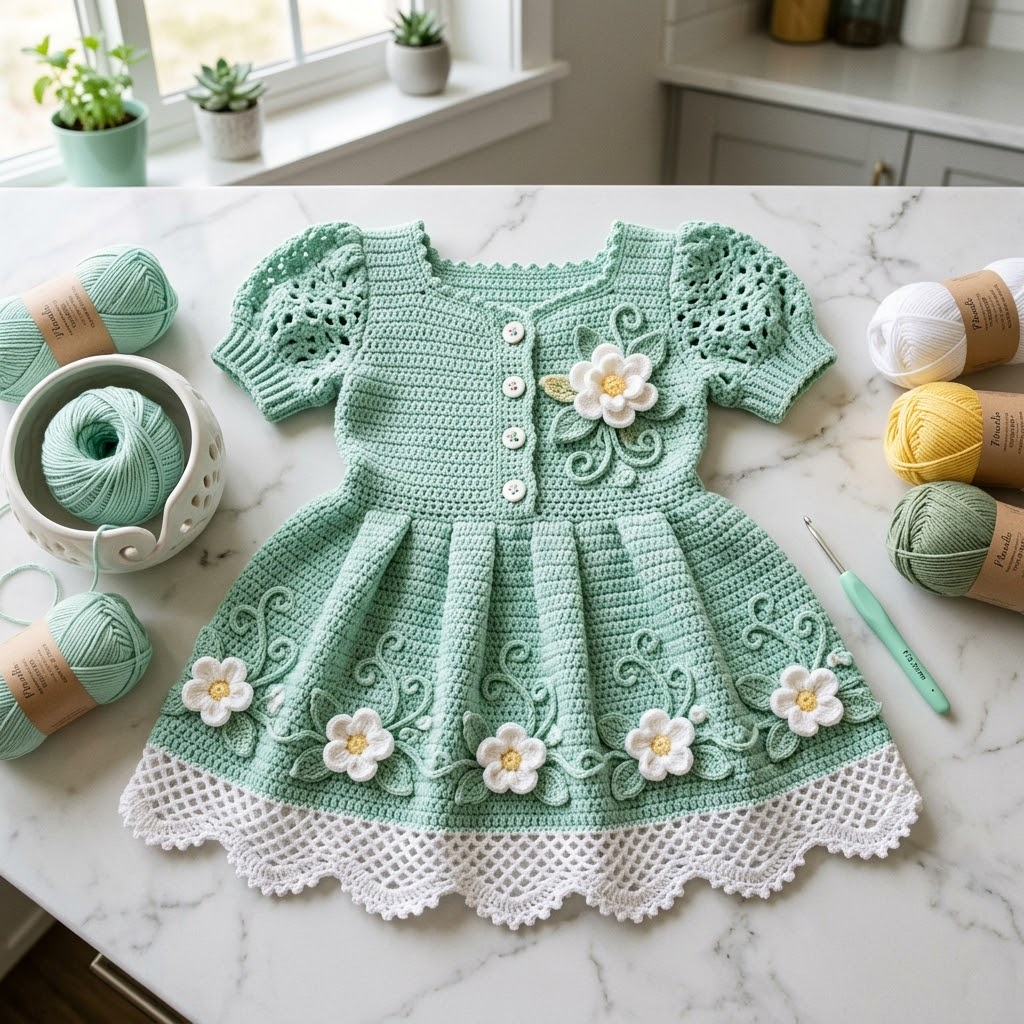
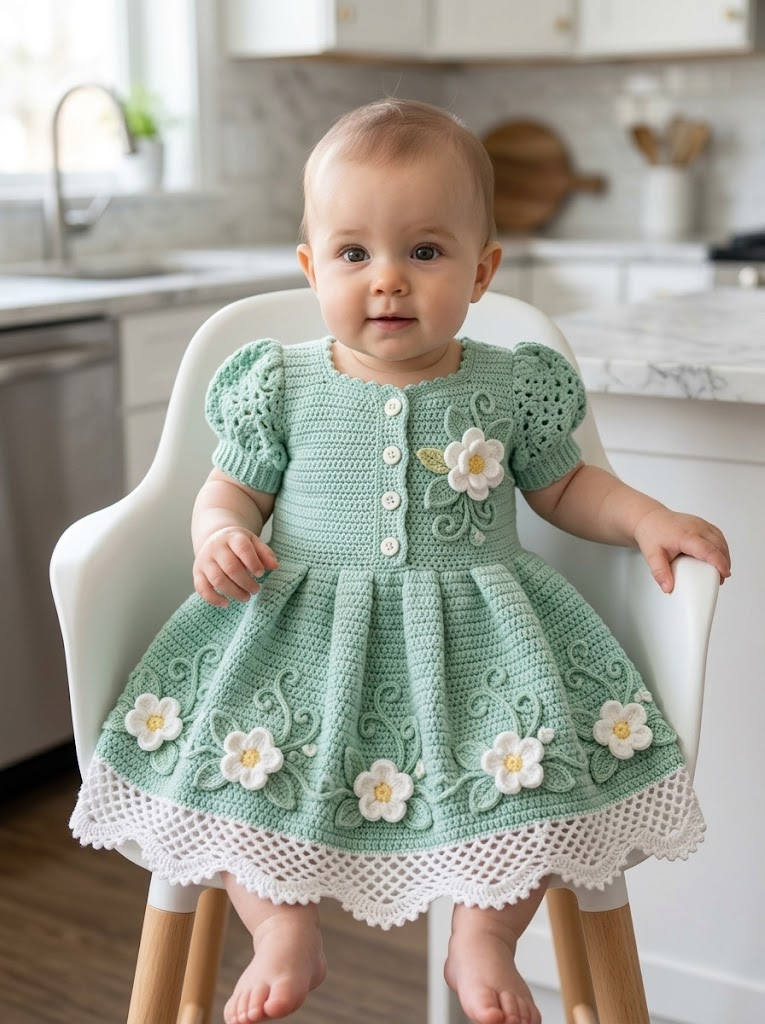
There is something magical about crocheting a tiny dress covered in sweet little flowers. This Mint Garden Baby Dress is exactly the kind of project that makes my heart happy. The soft sage green paired with crisp white lace and cheerful daisies creates a look that is both vintage and fresh at the same time.
I designed this baby dress crochet pattern for intermediate crocheters who want to try something a little more detailed without feeling overwhelmed. If you have made a few garments before and feel comfortable with basic stitches, you can absolutely make this. The construction is straightforward even though the finished piece looks fancy.
Let me walk you through every single step. By the end, you will have a gorgeous heirloom quality baby dress perfect for photos, special occasions, or gifting to a lucky little one.
What Makes This Baby Dress Pattern Special
This crochet baby dress combines several techniques that work together beautifully. The bodice features a fitted design with button front closure. The sleeves have an open lace panel that adds breathability and visual interest. The skirt uses gentle increases to create that classic gathered look without bulk.
The real showstoppers are the 3D crocheted daisy appliqués scattered across the skirt and bodice. These are made separately and sewn on at the end. You also get those lovely swirling vine embellishments that add movement and whimsy.
That white lace border at the hem ties everything together with a delicate scalloped edge.
Finished Measurements
This pattern is written for size 6 to 12 months.
Gauge: 16 stitches and 18 rows equals 4 inches in single crochet using worsted weight yarn and a 4.0mm hook. Please check your gauge before starting.
Materials Needed for This Crochet Baby Dress
Yarn:
I recommend 100% cotton yarn for baby garments. It is soft, breathable, machine washable, and holds stitch definition well for the lace portions.
Tools:
Abbreviations and Stitch Definitions
Let me explain every stitch before we begin. Even if you know these already, a quick refresher never hurts.
ch — Chain: Wrap yarn over hook, pull through loop on hook. This creates the foundation for most crochet work.
sl st — Slip Stitch: Insert hook into stitch, yarn over, pull through both the stitch and loop on hook in one motion. Used for joining and moving across stitches.
sc — Single Crochet: Insert hook into stitch, yarn over and pull up a loop (2 loops on hook), yarn over and pull through both loops. The shortest basic stitch.
hdc — Half Double Crochet: Yarn over, insert hook into stitch, yarn over and pull up a loop (3 loops on hook), yarn over and pull through all 3 loops. Slightly taller than single crochet.
dc — Double Crochet: Yarn over, insert hook into stitch, yarn over and pull up a loop (3 loops on hook), yarn over and pull through 2 loops, yarn over and pull through remaining 2 loops. A tall stitch that works up quickly.
tr — Treble Crochet: Yarn over twice, insert hook into stitch, yarn over and pull up a loop (4 loops on hook), yarn over and pull through 2 loops three times. Creates an even taller stitch.
inc — Increase: Work 2 stitches into the same stitch to add width.
dec — Decrease: Work 2 stitches together as one to reduce width. For sc2tog, insert hook in first stitch and pull up loop, insert hook in next stitch and pull up loop (3 loops on hook), yarn over and pull through all 3.
sk — Skip: Pass over the indicated stitch without working into it.
sp — Space: The gap created by chain stitches.
BLO — Back Loop Only: Work into only the back loop of the stitch instead of both loops.
Pattern Instructions
Bodice Back Panel
With MC and 4.0mm hook, ch 37.
Row 1: Sc in 2nd ch from hook and in each ch across. Turn. (36 sts)
Row 2: Ch 1, sc in each st across. Turn. (36 sts)
Rows 3 through 24: Repeat Row 2. (36 sts)
You should have a rectangle measuring approximately 9 inches wide and 5.5 inches tall.
Shape Armholes:
Row 25: Ch 1, sk first 3 sts, sc in next 30 sts, leave remaining 3 sts unworked. Turn. (30 sts)
Row 26: Ch 1, sc2tog over first 2 sts, sc across to last 2 sts, sc2tog. Turn. (28 sts)
Rows 27 through 30: Repeat Row 26. (20 sts after Row 30)
Rows 31 through 36: Ch 1, sc in each st across. Turn. (20 sts)
Fasten off and weave in ends.
Bodice Left Front Panel
With MC and 4.0mm hook, ch 20.
Row 1: Sc in 2nd ch from hook and in each ch across. Turn. (19 sts)
Rows 2 through 24: Ch 1, sc in each st across. Turn. (19 sts)
Shape Armhole:
Row 25: Ch 1, sk first 3 sts, sc in remaining 16 sts. Turn. (16 sts)
Row 26: Ch 1, sc across to last 2 sts, sc2tog. Turn. (15 sts)
Rows 27 through 30: Repeat Row 26, decreasing at armhole edge only. (11 sts after Row 30)
Rows 31 through 36: Ch 1, sc in each st across. Turn. (11 sts)
Fasten off.
Bodice Right Front Panel
Work same as Left Front Panel through Row 24.
Shape Armhole:
Row 25: Ch 1, sc in first 16 sts, leave remaining 3 sts unworked. Turn. (16 sts)
Row 26: Ch 1, sc2tog, sc across remaining sts. Turn. (15 sts)
Rows 27 through 30: Continue decreasing at armhole edge. (11 sts after Row 30)
Rows 31 through 36: Ch 1, sc in each st across. Turn. (11 sts)
Fasten off.
Button Band (Right Front)
With MC, join yarn at bottom edge of right front panel.
Row 1: Work 36 sc evenly along front edge. Turn.
Row 2: Ch 1, sc in each st. Turn.
Row 3 (Buttonhole Row): Ch 1, sc in first 3 sts, *ch 2, sk 2 sts, sc in next 5 sts* repeat 4 more times, sc in remaining sts. Turn.
Row 4: Ch 1, sc in each st and 2 sc in each ch-2 sp. Turn.
Row 5: Ch 1, sc in each st. Fasten off.
Work matching band on left front without buttonholes.
Sleeves (Make 2)
With MC and 4.0mm hook, ch 32.
Row 1: Sc in 2nd ch from hook and each ch across. Turn. (31 sts)
Rows 2 through 4: Ch 1, sc in each st. Turn.
Lace Panel Section:
Row 5: Ch 3 (counts as dc), sk 1 st, *dc in next st, ch 1, sk 1 st* repeat across, dc in last st. Turn.
Row 6: Ch 3, dc in each dc and each ch-1 sp across. Turn. (31 sts)
Rows 7 through 10: Repeat Rows 5 and 6.
Cuff:
Rows 11 through 14: Ch 1, sc in each st. Turn. (31 sts)
Work ribbing by working sc in BLO for Rows 12 through 14.
Fasten off leaving a long tail for seaming.
Skirt
Join all three bodice pieces at shoulders using sl st or whipstitch.
With MC, join yarn at bottom edge of assembled bodice.
Round 1: Ch 1, work 72 sc evenly across bottom edge of bodice, join with sl st to first sc. (72 sts)
Round 2: Ch 1, *sc in next st, 2 sc in next st* repeat around, join. (108 sts)
Rounds 3 through 8: Ch 1, sc in each st around, join.
Round 9: Ch 1, *sc in next 2 sts, 2 sc in next st* repeat around, join. (144 sts)
Rounds 10 through 20: Ch 1, sc in each st around, join.
Round 21: Ch 1, *sc in next 3 sts, 2 sc in next st* repeat around, join. (180 sts)
Rounds 22 through 32: Ch 1, sc in each st around, join.
Do not fasten off. Continue to lace border.
White Lace Border
Change to Color A (white).
Round 1: Ch 1, sc in each st around, join. (180 sts)
Round 2: Ch 4 (counts as dc plus ch 1), sk 1 st, *dc in next st, ch 1, sk 1 st* repeat around, join to 3rd ch of beginning ch-4.
Rounds 3 through 5: Ch 4, *dc in next dc, ch 1* repeat around, join.
Scallop Edging Round: *Sk 1 st, 5 dc in next st, sk 1 st, sl st in next st* repeat around. Fasten off.
Daisy Appliqué (Make 5)
With Color B (yellow) and 3.5mm hook, make a magic ring.
Round 1: Ch 1, 6 sc into ring, join, pull ring tight. (6 sts)
Change to Color A (white).
Round 2 (Petals): *Ch 3, 2 dc in same st, ch 3, sl st in same st, sl st in next st* repeat 6 times. (6 petals)
Fasten off leaving tail for sewing.
Leaf Appliqué (Make 8 to 10)
With Color C (leaf green) and 3.5mm hook, ch 8.
Sl st in 2nd ch from hook, sc in next ch, hdc in next ch, dc in next 2 ch, hdc in next ch, 3 sc in last ch. Working along opposite side of chain: hdc in next ch, dc in next 2 ch, hdc in next ch, sc in next ch, sl st in last ch.
Fasten off leaving tail.
Vine Embellishments
With Color C, ch a length of approximately 30 to 40 chains. Fasten off. Make several in varying lengths for the swirling vine design on the skirt and bodice.
Assembly and Finishing
Step 1: Sew shoulder seams if not already joined.
Step 2: Fold each sleeve in half and sew the short edges together to form a tube.
Step 3: Pin sleeves into armhole openings, easing to fit. Whipstitch in place.
Step 4: Sew side seams from underarm to bottom of bodice on each side.
Step 5: Arrange vine chains in swirling patterns on skirt front as shown. Pin and then whipstitch or backstitch in place.
Step 6: Position daisy appliqués along hem and one on bodice. Sew securely.
Step 7: Attach leaves near flowers and along vines.
Step 8: Sew buttons onto left front band opposite buttonholes.
Step 9: Weave in all remaining ends. Block gently if desired.
Tips for Success with This Baby Dress Crochet Pattern
Gauge matters here. Because this is a fitted garment, being off by even half a stitch per inch can affect the final size significantly. Take five minutes to make a swatch. You will thank yourself later.
Cotton yarn behaves differently than acrylic. It has less stretch and more drape. This is perfect for the skirt portion but means the bodice needs to fit correctly from the start.
The lace sleeve section looks harder than it is. If you can chain and double crochet, you can do it. Just count your stitches at the end of each row to make sure you stayed on track.
For the appliqués, take your time. These small pieces work up fast but can be fiddly. Use stitch markers to keep your place if needed.
Caring for the Finished Dress
Machine wash on gentle cycle in cold water or hand wash. Lay flat to dry to maintain shape. Steam block lightly if wrinkled. Avoid high heat which can damage cotton fibers over time.
You Did It
Making a complete baby dress with appliqué details and lace borders is no small accomplishment. If you made it this far, you should feel genuinely proud. This Mint Garden Baby Dress crochet pattern combines multiple techniques into one beautiful finished piece that any baby would be lucky to wear.
Thank you so much for trusting me with your crafting time. I know how precious those hours are and it means the world that you chose to spend them here with this tutorial.
I would absolutely love to see your finished dress. Seriously, nothing makes my day like seeing your creations come to life. Tag me on Instagram or share in our Facebook group so I can cheer you on.
Happy crocheting, friend. You have got this.
