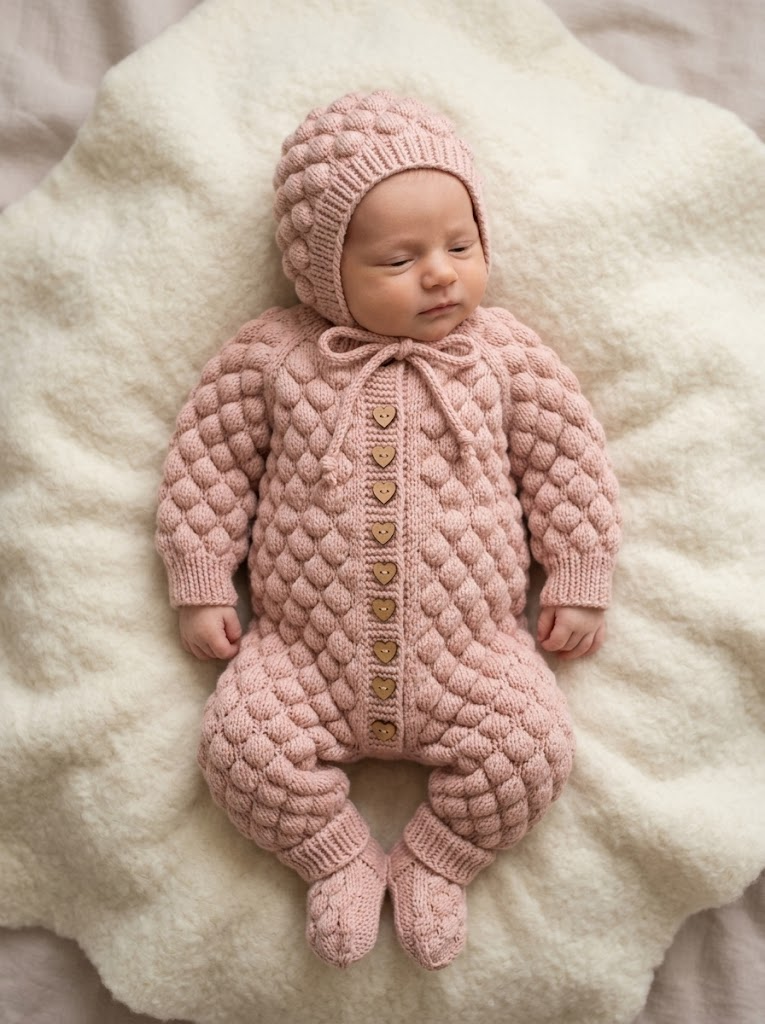
This adorable pink bubble stitch baby romper set is everything you want in a handmade baby gift. The matching bonnet and booties make it a complete layette that looks like it came from a boutique. And that gorgeous textured bubble stitch? It creates the coziest, squishiest fabric perfect for snuggling a newborn.

I know what you are thinking. A whole baby romper sounds intimidating. But here is the truth. If you can work basic stitches and follow a simple repeat, you can absolutely make this set. The bubble stitch pattern is rhythmic once you get going. Promise.
Let me walk you through everything you need to recreate this crochet baby romper pattern from scratch.
What You Are Making
This set includes three pieces:
1. Button-front baby romper with long sleeves and ribbed cuffs
2. Matching bonnet with tie closures
3. Coordinating booties with folded cuffs
The entire set uses the same bubble stitch texture throughout, giving it that cohesive, heirloom quality. Those sweet wooden heart buttons down the front add the perfect finishing touch.
Finished Sizes (0-6 months):
Skill Level
Intermediate. You should be comfortable with basic crochet stitches and working in the round. The bubble stitch requires a specific technique, but I will walk you through it step by step. If you have made a baby blanket or simple garment before, you are ready for this.
Materials Needed
Yarn:
Hooks:
Notions:
Gauge
Gauge matters for garments. Please take time to check yours.
Using 5.0mm hook in bubble stitch pattern:
If your gauge is off, adjust your hook size. Too many stitches per inch? Go up a hook size. Too few? Go down.
Abbreviations and Stitch Definitions
Let me define every stitch before we begin. Read through these so nothing surprises you mid-pattern.
ch = chain: Yarn over, pull through loop on hook. This creates your foundation.
sl st = slip stitch: Insert hook, yarn over, pull through stitch AND loop on hook in one motion. Used for joining and moving across stitches.
sc = single crochet: Insert hook, yarn over, pull up loop (2 loops on hook), yarn over, pull through both loops. Your basic short stitch.
hdc = half double crochet: Yarn over, insert hook, yarn over, pull up loop (3 loops on hook), yarn over, pull through all 3 loops. Slightly taller than sc.
dc = double crochet: Yarn over, insert hook, yarn over, pull up loop (3 loops on hook), yarn over, pull through 2 loops, yarn over, pull through remaining 2 loops. A tall, open stitch.
BLO = back loop only: Work into just the back loop of the stitch below, leaving the front loop unworked. Creates ribbed texture.
BS = bubble stitch: This is our star texture stitch. I will explain it fully below.
inc = increase: Work 2 stitches into the same stitch.
dec = decrease: Work 2 stitches together as one.
The Bubble Stitch Tutorial
This is the signature stitch that creates that beautiful puffy texture. Take your time learning it before starting the romper.
How to work the Bubble Stitch (BS):
1. Yarn over, insert hook into stitch
2. Yarn over, pull up a loop (3 loops on hook)
3. Yarn over, pull through 2 loops (2 loops remain)
4. Repeat steps 1-3 four more times, all in the SAME stitch (6 loops on hook)
5. Yarn over, pull through all 6 loops
6. Chain 1 to secure the bubble
The bubble pops forward toward you. On wrong side rows, the bubbles will naturally face the right side of your work.
Practice tip: Make a small swatch of 15 chains. Work a few rows alternating sc rows with bubble stitch rows until you feel confident.
Pink Bubble Stitch Baby Romper Pattern
Now let us make this beautiful romper. We will work the body first, then add sleeves, and finish with ribbing.

Back Panel
Foundation: With 5.0mm hook, ch 33.
Row 1 (RS): Sc in 2nd ch from hook and in each ch across. Turn. (32 sts)
Row 2 (WS): Ch 1, sc in first st, *BS in next st, sc in next st* repeat across. Turn. (32 sts, 16 bubbles)
Row 3: Ch 1, sc in each st across. Turn. (32 sts)
Row 4: Ch 1, sc in first 2 sts, *BS in next st, sc in next st* repeat to last 2 sts, sc in last 2 sts. Turn. (32 sts, 15 bubbles)
Row 5: Ch 1, sc in each st across. Turn. (32 sts)
Rows 6-45: Repeat Rows 2-5 for bubble stitch pattern. (32 sts)
You should have a rectangle approximately 9 inches wide and 12 inches tall.
Leg Shaping
Row 46: Ch 1, sc in first 14 sts. Turn, leaving remaining sts unworked. (14 sts)
Rows 47-60: Continue in bubble stitch pattern on these 14 sts for first leg. (14 sts)
Fasten off.
Second Leg:
Skip center 4 sts on Row 46. Join yarn in next st.
Row 46b: Ch 1, sc in same st and next 13 sts. Turn. (14 sts)
Rows 47-60: Continue in bubble stitch pattern. (14 sts)
Fasten off.
Front Panels (Make 2)
Foundation: Ch 17.
Row 1 (RS): Sc in 2nd ch from hook and across. Turn. (16 sts)
Rows 2-45: Work in bubble stitch pattern as established for back. (16 sts)
Leg Shaping:
Row 46: Ch 1, sc in first 14 sts. Turn. (14 sts)
Rows 47-60: Continue in bubble stitch pattern. (14 sts)
Fasten off.
Make second front panel as a mirror image.
Button Band
On right front panel:
Row 1: With RS facing, join yarn at bottom edge. Ch 1, work 60 sc evenly along front opening edge. Turn. (60 sts)
Rows 2-4: Ch 1, sc in each st across. Turn. (60 sts)
Fasten off.
On left front panel:
Row 1: Work same as right side. Turn. (60 sts)
Row 2: Ch 1, sc in first 3 sts, *ch 2, skip 2 sts, sc in next 5 sts* repeat 7 more times, sc to end. Turn. (60 sts with 8 buttonholes)
Rows 3-4: Ch 1, sc in each st and ch-2 space across. Turn. (60 sts)
Fasten off.
Sleeves (Make 2)
Foundation: Ch 24. Join with sl st to form ring, being careful not to twist.
Round 1: Ch 1, sc in each ch around. Join. (24 sts)
Rounds 2-20: Continue in bubble stitch pattern, working in the round. Place marker at beginning of round. (24 sts)
Rounds 21-24: With 4.5mm hook, ch 1, sc in BLO of each st around for ribbed cuff. Join. (24 sts)
Fasten off, leaving long tail for seaming.
Neckline Ribbing
After assembling body pieces:
Round 1: Join yarn at back neck edge. Ch 1, work approximately 50 sc evenly around neckline. Join. (50 sts)
Rounds 2-4: Ch 1, sc in BLO of each st around. Join. (50 sts)
Fasten off.
Ankle Ribbing
Rounds 1-4: With 4.5mm hook, join yarn at leg opening. Work sc in BLO around for 4 rounds. (28 sts approximately)
Fasten off.
Assembly Instructions
1. Seam shoulders: Align front and back panels. Whip stitch or mattress stitch shoulder seams, leaving center open for neckline.
2. Attach sleeves: Pin sleeve openings to armhole edges. Seam using mattress stitch for invisible join.
3. Side seams: Starting at underarm, seam down sides to leg openings.
4. Inner leg seams: Seam each leg from ankle to crotch.
5. Attach buttons: Sew 8 heart buttons along right front band, aligned with buttonholes.
6. Weave in all ends. Take your time here. Baby items get washed frequently.
Matching Bonnet Pattern
Foundation: Ch 4. Join with sl st to form ring.
Round 1: Ch 1, 8 sc in ring. Join. (8 sts)
Round 2: Ch 1, 2 sc in each st around. Join. (16 sts)
Round 3: Ch 1, *sc in next st, 2 sc in next st* repeat around. Join. (24 sts)
Rounds 4-6: Continue increasing 8 sts evenly each round. (48 sts after Round 6)
Rounds 7-16: Work in bubble stitch pattern without increasing. (48 sts)
Rounds 17-18: Sc in each st around for border. (48 sts)
Ties: Ch 50 at each corner of bonnet opening. Sl st back along chain. Fasten off.
Coordinating Booties Pattern (Make 2)
Sole:
Foundation: Ch 8.
Round 1: Sc in 2nd ch from hook, sc in next 5 ch, 3 sc in last ch. Working on opposite side of foundation, sc in next 5 ch, 2 sc in last ch. Join. (16 sts)
Round 2: 2 sc in first st, sc in next 5 sts, 2 sc in each of next 3 sts, sc in next 5 sts, 2 sc in last 2 sts. Join. (22 sts)
Round 3: Inc, sc in 6 sts, inc in next 4 sts, sc in 6 sts, inc in last 4 sts. Join. (30 sts)
Sides:
Rounds 4-8: Work in bubble stitch pattern. (30 sts)
Toe Shaping:
Round 9: Sc in 10 sts, dec 5 times across toe, sc in remaining 10 sts. Join. (25 sts)
Cuff:
Rounds 10-14: With 4.5mm hook, sc in BLO around. (25 sts)
Fold cuff down. Fasten off.
Care Instructions
Troubleshooting Tips
Bubbles look flat? You may not be working enough loops into each bubble. Make sure you have 6 loops on your hook before the final pull-through.
Edges curling? Block your finished pieces by wetting and pinning flat to dry.
Gauge off? Remember that bubble stitches pull in the fabric width-wise. Your foundation chain should be slightly wider than your finished measurement.
Buttonholes too tight? Try ch 3 instead of ch 2 for the buttonhole openings.
Final Thoughts
There is something incredibly special about making a baby romper crochet pattern by hand. Every bubble stitch holds a little bit of love. This set makes an unforgettable baby shower gift or a treasured keepsake for your own little one.
Thank you so much for choosing this pattern. I genuinely hope you enjoy making it as much as I did designing it. The bubble stitch is one of my favorite textures, and seeing it come together in a complete baby set is just magical.
If you make this pink bubble stitch baby romper set, I would absolutely love to see it. Tag me on Instagram or share your finished project on Facebook. Seeing your creations truly makes my day.
Happy crocheting, friend. You have got this.
