
Last summer, I found myself standing in front of my closet, completely frustrated. I had a stack of gorgeous handmade blankets, countless scarves, and more hats than any one person could ever need. But when it came to wearable pieces that actually made me feel good? My crochet collection was seriously lacking.
Get the Ad-Free PDF Pattern
You can find the free pattern below, or you can purchase the ad-free printable PDF from my shop.
Get the Printable PDF →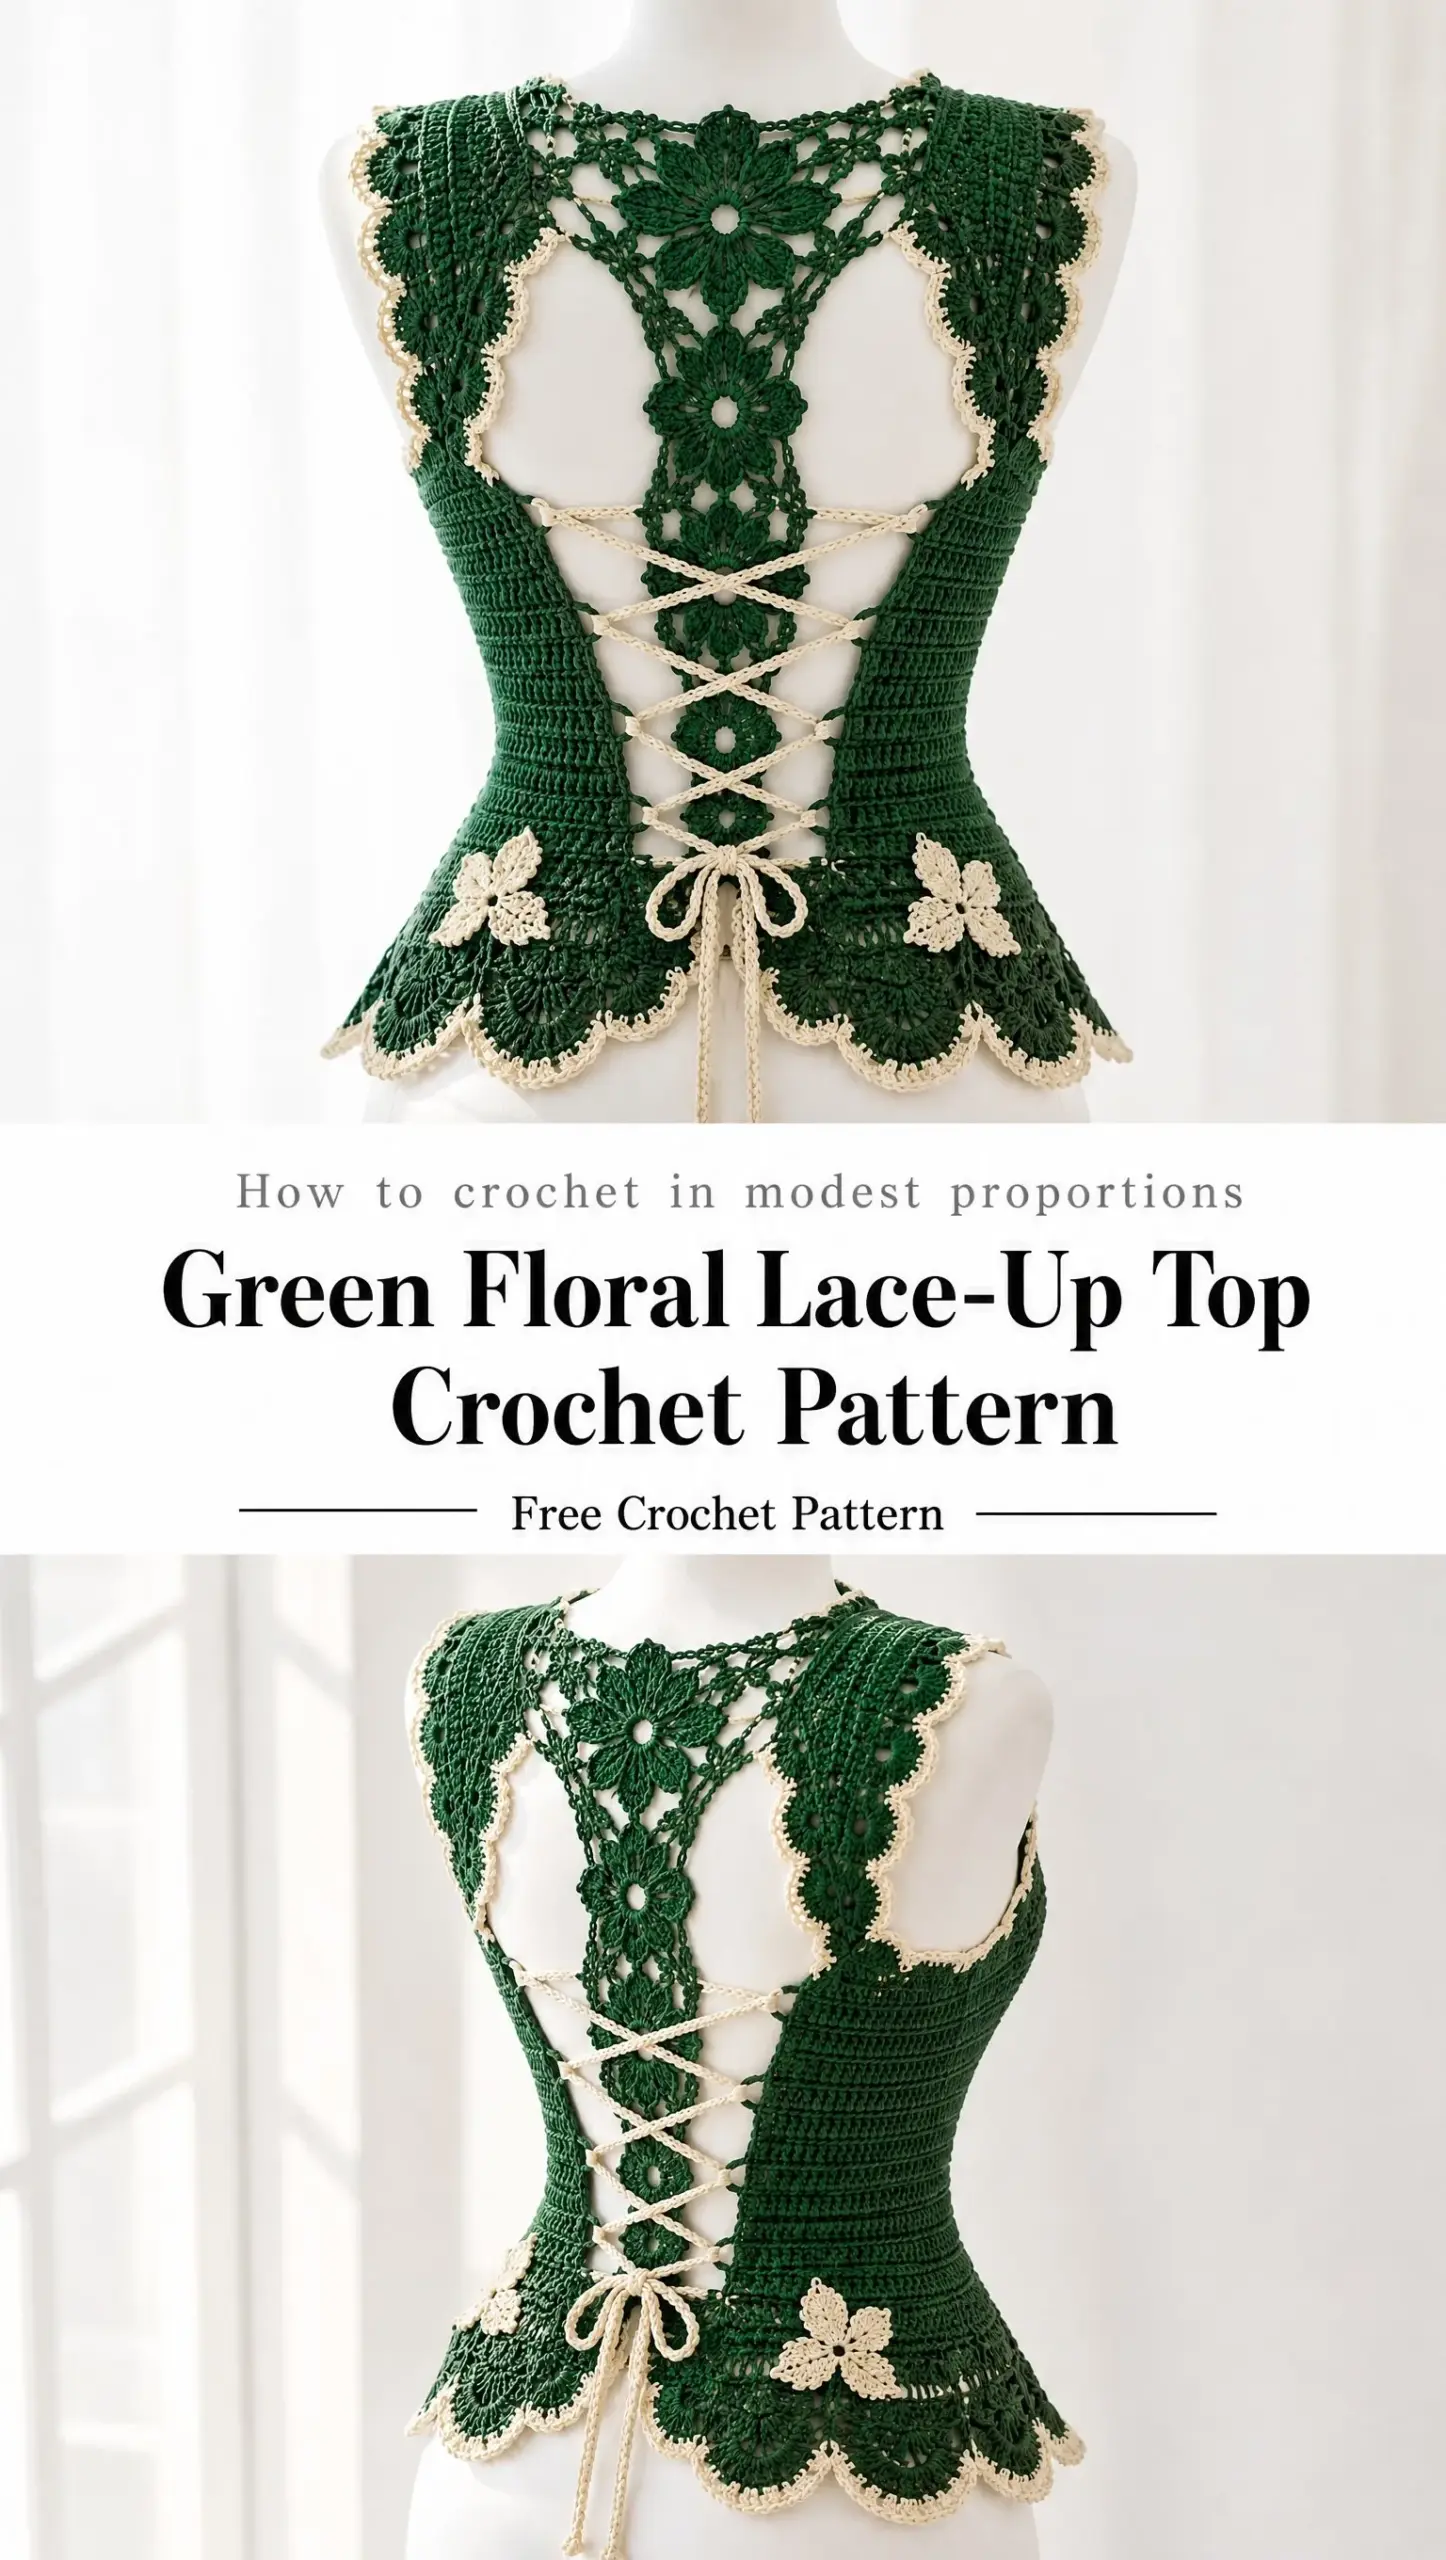
That frustration led me down a rabbit hole of garment design, and this green floral lace-up top is what came out the other side. I wanted something that looked intricate and impressive but was actually achievable for someone willing to take their time. Something with drama, with structure, and with that corset-inspired silhouette that makes you stand a little taller.
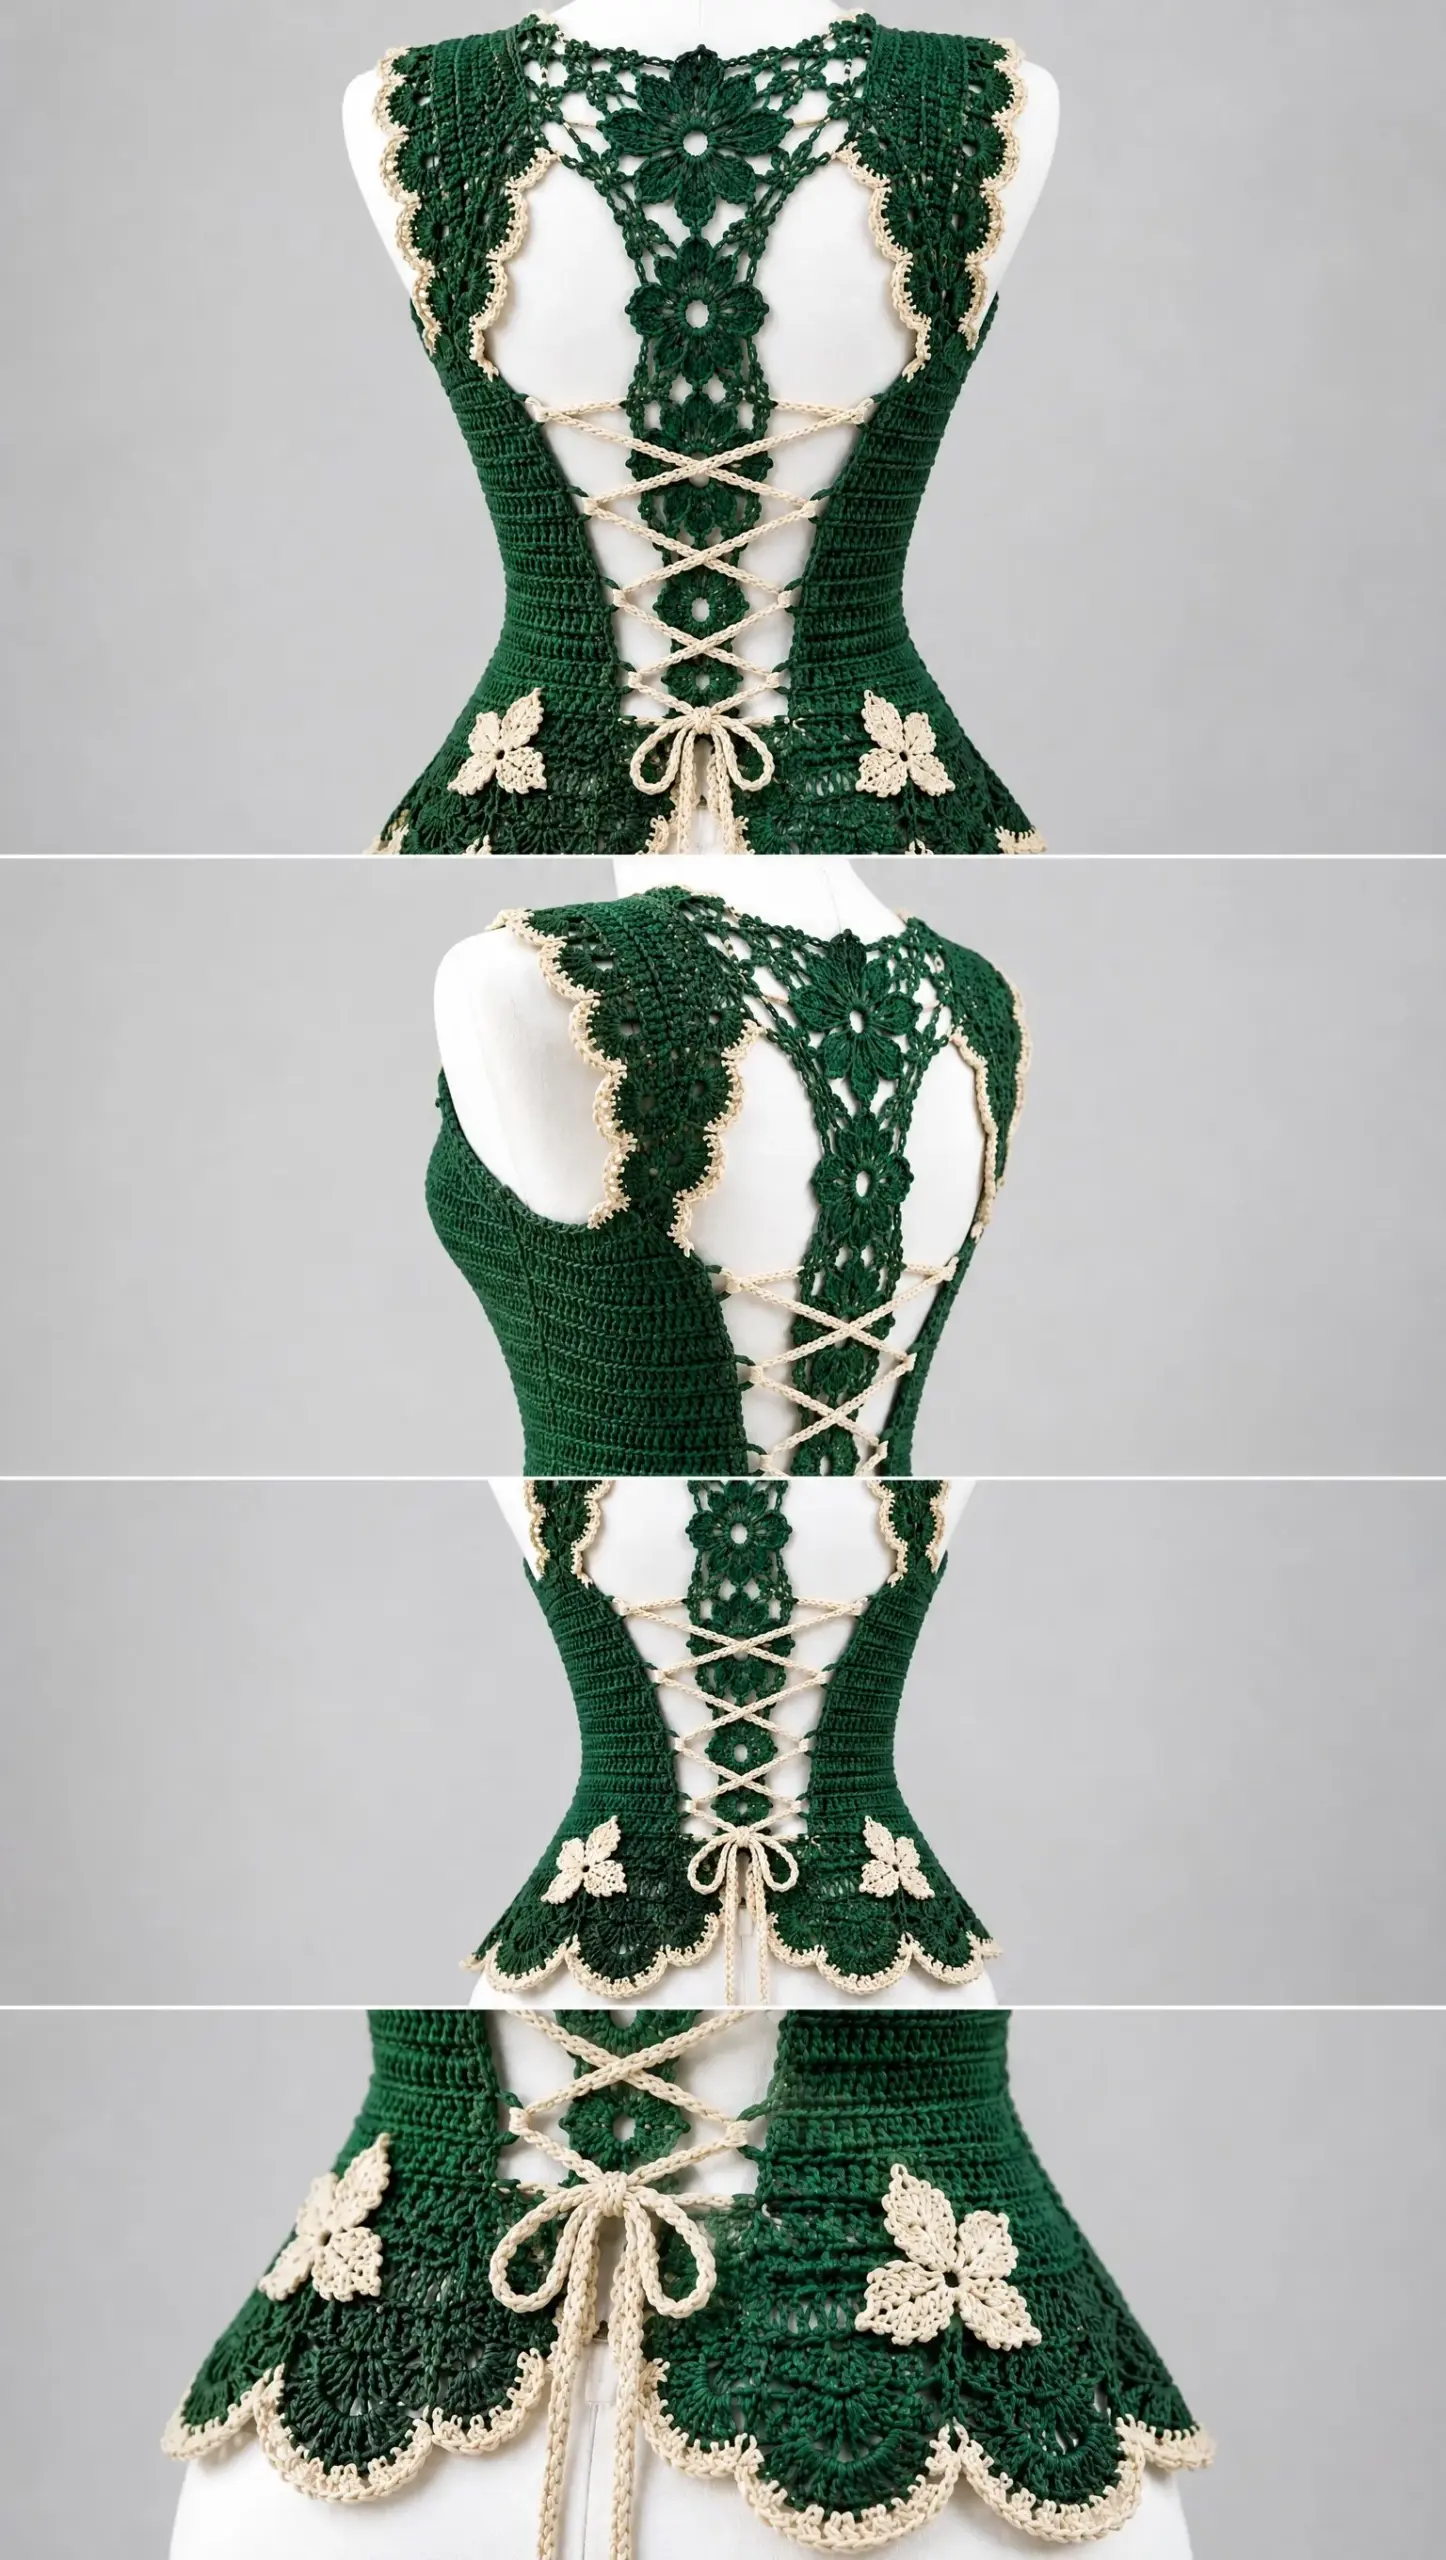
The open back with its delicate floral lace column, the adjustable corset lacing, the scalloped peplum hem with beige trim. This top has it all. And honestly? I am so pleased with how it turned out. If you have been itching to create a statement garment that showcases your skills, this is the one.
About This Pattern
This fitted, waist-length crochet top features a broad open back that becomes the visual centerpiece of the entire garment. The focal point is a vertical column of joined floral lace motifs that sits right between the shoulder blades. Dense double crochet (dc) side panels shape the waist and create structure, while a pale beige cord crosses the open back in wide X-shaped lacing.
The short shell peplum finishes the lower edge beautifully, and three-leaf appliqués in beige decorate the back hips for an extra touch of elegance. This is an intermediate to advanced level project, but I will walk you through every component so it feels manageable.
Construction method: The top is worked in separate pieces. You will crochet the front panel, two back side panels, two shoulder sections, and four floral motifs. These are then assembled and edged, with the adjustable back lacing added last.
Materials You Will Need
Before diving in, gather everything so you can work without interruption:
Yarn:
Hooks:
Notions:
Finished Sizes
This pattern includes five sizes. The finished measurements assume the lacing edges are approximately 18 cm apart. Because the back is adjustable, the garment can accommodate several centimeters more or less.
| Size | To Fit Bust (cm) | Finished Bust (cm) | Finished Waist (cm) | Body Length (cm) |
|---|---|---|---|---|
| XS | 76-81 | 74 | 66 | 43 |
| S | 86-91 | 84 | 76 | 44 |
| M | 96-101 | 94 | 86 | 45 |
| L | 106-111 | 104 | 96 | 46 |
| XL | 116-122 | 114 | 106 | 47 |
Gauge
Getting your gauge right is essential for a fitted garment like this. Work a swatch at least 15 x 15 cm in dc. Wash or steam it exactly as you intend to finish the top, let it dry, then measure the center 10 cm.
Target gauge: 18 dc x 9 rows = 10 x 10 cm after light blocking
Stitch gauge controls circumference. Row gauge controls length.
Adjustment rule: At this gauge, 1 dc is about 0.56 cm wide and 1 row is about 1.11 cm tall. Add or subtract stitches in pairs on the front and side panels to change circumference. Add or subtract full rows below the armhole for torso length.
Abbreviations (US Terms)
Let me break down every stitch abbreviation you will encounter:
Construction Overview
Here is the order you will work through this project:
1. Crochet the solid front panel from hem upward
2. Crochet two back side panels with waist shaping and back-lacing eyelets
3. Join front to back side panels at side seams, leaving armholes
4. Crochet two shoulder sections from the upper front toward the back
5. Crochet 4 floral motifs and join them vertically to make the center back lace column
6. Connect shoulder sections to the floral column with chain arches and tall stitches
7. Work the green shell peplum around the lower edge, then add beige outlining
8. Add beige edging around armholes, shoulder scallops, and back opening
9. Crochet two three-leaf appliqués and sew them at the back hips
10. Make the beige lacing cord, thread in wide Xs, and finish with a bow
Front Panel Instructions
The front is intentionally simple and fitted so the back lace remains the feature. Work from the lower edge upward in rows.
Foundation: Ch 71 (79, 87, 97, 105). Dc in 4th ch from hook and across: 68 (76, 84, 94, 102) dc. Ch 3, turn. The ch-3 counts as dc throughout.
Rows 2-27 (28, 29, 30, 31): Dc in each st across. For a more sculpted waist, decrease 1 st at each edge on rows 8 and 14, then increase 1 st at each edge on rows 20 and 24. Keep the final stitch count equal to the starting count.
Shape armholes: At the beginning of the next 2 rows, sl st across 5 (6, 7, 8, 9) sts, then work dc to end. On each of the next 3 rows, dc2tog at both ends. Continue even until armhole depth measures 17 (18, 19, 20, 21) cm.
Shape front neck: Mark the center 24 (26, 28, 30, 32) sts. Work each shoulder separately. At the neck edge, decrease 2 sts once, then 1 st on the next 2 rows. Continue until shoulder width is about 8 (9, 10, 11, 12) cm. Fasten off. Repeat for the second shoulder.
Back Side Panels (Make 2)
These dense panels form the side and back waist while creating the vertical edges used for corset lacing.
Foundation: Ch 24 (27, 30, 33, 36). Dc in 4th ch from hook and across: 21 (24, 27, 30, 33) dc.
Rows 2-27 (28, 29, 30, 31): Dc across. To shape the waist, decrease 1 st at the side-seam edge on rows 8 and 14, then increase 1 st at the same edge on rows 20 and 24. Keep the back-opening edge straight.
Create lacing eyelets: Beginning about 8 cm below the armhole, replace the second stitch from the back-opening edge with ch 1, sk 1 every 3rd row. Make 5 (5, 6, 6, 7) eyelets up the back edge. On following rows work 1 dc into each ch-1 sp.
Upper back shaping: At the side-seam edge, shape the armhole exactly as for the front. At the back-opening edge, decrease 1 st every 3rd row three times to angle the panel gently toward the shoulder. Continue until the upper edge reaches the same height as the front shoulder.
Joining Side Seams
With RS together, align each back side panel with the corresponding edge of the front. Join from hem to underarm using mattress stitch or sl st through both loops.
Important: Try on before weaving in ends. The two back-opening edges should sit roughly 17 (18, 19, 21, 23) cm apart at waist level before lacing.
Shoulder Sections (Make 2)
Join yarn at the front shoulder edge and work toward the back. Each shoulder is a broad green strip with a decorative outer scallop and an inner lace edge that connects to the floral center panel.
Row 1: Work 14 (16, 18, 20, 22) dc evenly across the front shoulder edge. Ch 3, turn.
Rows 2-5: Dc across. On Row 5, at the inner back edge, finish with ch 5 instead of the final turning chain to begin an airy connector.
Decorative outer edge: Along the armhole-facing edge work sc in edge, sk about 1 cm, 5 dc in next edge space, sk about 1 cm; repeat. Fasten off. Beige trim is added later.
Large Floral Motif (Make 1)
This is the upper focal flower that sits between the shoulder blades. Take your time with this one because it sets the tone for the whole back.
Rnd 1: With green, ch 6, join with sl st to form ring. Ch 1, 12 sc into ring; join.
Rnd 2: Ch 7, sc in next sc around: 12 loops.
Rnd 3: Into each ch-7 loop work (sc, hdc, 3 dc, 2 tr, 3 dc, hdc, sc). This forms 12 tall petals. Join and fasten off.
Rnd 4 (connector layer): Rejoin behind petals. Ch 5, sc around the base between next 2 petals around. Join. These rear loops are used to connect the motif to the shoulder web.
Medium Floral Motif (Make 2)
Rnd 1: Ch 5, join; 10 sc in ring.
Rnd 2: Ch 6, sc in next sc around: 10 loops.
Rnd 3: Into each loop work (sc, hdc, 2 dc, tr, 2 dc, hdc, sc). Join and fasten off.
Rear connectors: Add 4 evenly spaced ch-5 loops on the back for joining.
Small Lower Motif (Make 1)
Ch 5, join. Work 8 sc in ring. Ch 5, sc in next sc around. Into each loop work (sc, hdc, 2 dc, hdc, sc). Add 4 small rear ch-4 connector loops and fasten off.
Assembling the Vertical Floral Column
Block the motifs lightly first. This makes a huge difference in how they lay.
Arrange from top to bottom: large flower, medium flower, medium flower, small flower. Leave about 1 to 1.5 cm between motifs.
With green yarn, join adjacent motifs at two points using ch-3 bridges or invisible sewing through corresponding rear connector loops. The finished column should measure approximately 27 to 31 cm long.
Center the floral column over the open back. The top large flower should sit just below the neckline. The small lower motif should finish a few centimeters above the lacing bow.
Creating the Lace Web
Working with green, connect the inner edge of each shoulder section to the upper floral motif using alternating chain arches.
A practical repeat is: sl st to shoulder edge, ch 6, sc into a rear connector loop on the flower, ch 6, sl st to shoulder edge 2-3 cm lower. Repeat down each side of the large motif.
Add 1-2 diagonal ch-7 arches from the large flower to the first medium flower so the panel hangs flat and symmetrical.
For more structure: Replace a ch-6 arch with (ch 3, tr into connector point, ch 3). This creates the radiating tall-stitch look visible in the design while keeping the back light and open.
Peplum Hem
Join green yarn at one side seam along the lower edge. Work evenly around the front and both back side panels, but do not bridge the central back opening.
Setup row: Sc evenly around lower edge, adjusting to a multiple of 8 sts plus 1 along each continuous section.
Row 1: Ch 3, dc in next st, ch 2, sk 2, dc in next 2 sts; repeat.
Row 2: Ch 1, sc in first dc, 7 dc in next ch-2 sp, sc between next pair of dc; repeat to form broad shells.
Row 3: Sl st to center of first shell, ch 5, sc in center of next shell; repeat. Fasten off green.
Beige outline: Join beige at one back corner. Work sc around the entire scalloped edge, placing 2 sc at each shell peak and 1 sc in each valley. Keep the trim narrow and neat.
Beige Edging Details
Armholes: Work 1 round beige sc evenly around each armhole. For a softer scallop, add a second round of sl st, ch 3, sl st in same st, sk 1 around the shoulder portion only.
Back opening: Work 1 row beige sc down each vertical lacing edge. At each eyelet, work 2 sc around the ch-1 space without closing it. Continue around the neckline if desired for a continuous finish.
Three-Leaf Appliqué (Make 2)
With beige, ch 7. In 2nd ch from hook work sl st, then sc, hdc, dc, tr, 5 tr in final ch. Working down opposite side of the foundation chain: tr, dc, hdc, sc, sl st. This forms one pointed leaf.
Without fastening off, ch 8 and repeat for the second leaf. Ch 7 and repeat for the third leaf.
Gather the three bases together with 2-3 tight sc. Fasten off leaving a sewing tail. Sew one appliqué at each back hip just above the peplum.
Beige Corset Cord
Make a firm cord approximately 220 (230, 240, 255, 270) cm long. The easiest method is a crochet chain worked with two strands held together, then slip stitch back along the entire chain. Alternatively use an i-cord or Romanian cord if you prefer a rounder finish.
Lacing: Start at the top pair of eyelets with the cord centered. Cross the ends to the opposite eyelets, continue downward in broad X shapes, and keep the tension even. The Xs should sit clearly over the green floral lace without crushing it.
Finish at the lower back with a small bow and two hanging ends approximately 18 to 25 cm long.
Final Assembly and Finishing
Fit Corrections Guide
Here are solutions for common fitting issues:
Back gap too wide: Add 1-2 dc to each back side panel or use tighter lacing.
Back gap too narrow: Remove 1-2 dc from each back side panel or lengthen the lace web.
Front rides up: Add 1-3 rows to front below armholes. Keep back length unchanged.
Armholes too tight: Work fewer armhole decreases or add a final edging round with a larger hook.
Waist too loose: Add one extra decrease at side seams around the natural waist, then restore stitches before hip.
Floral panel buckles: Use longer chain arches or re-block motifs with more spacing.
Floral panel sags: Shorten chain arches, add one hidden ch-3 bridge between motifs, or use a smaller hook for the web.
Peplum flares too much: Use 5 dc instead of 7 dc in each shell.
Peplum too straight: Use 9 dc per shell or insert an extra shell repeat at each side.
Try-On Checkpoints
I recommend trying on at these stages:
Care Instructions
Hand wash or use a gentle machine cycle in cool water according to the yarn label. Reshape while damp and dry flat. Avoid hanging the top while wet because the floral back panel can stretch. Store folded with the lacing loosened.
Pattern Checklist
Use this to track your progress:
Final Thoughts on This Green Floral Lace-Up Top Crochet Pattern
Creating a garment with this level of detail takes patience, but the result is absolutely worth it. The combination of structured side panels, delicate floral lace, and that gorgeous corset lacing creates something truly special. This is the kind of piece that makes people stop and ask, "Did you really make that?"
Yes. Yes, you did.
I hope you love making this green floral lace-up top as much as I loved designing it. If you found this pattern helpful, please save it to your Pinterest boards so you can find it whenever you are ready to start. And if you make one, I would absolutely love to see it! Drop a comment below or tag me on Instagram with your finished top.
Want a Quick & Easy Printable Version?
Get a clean, beautifully formatted PDF of this pattern — easy to follow step by step, ready to print or save on any device. No scrolling, no distractions, just the pattern.
Get the Printable PDF →