Last summer, I was packing for a beach trip and realized I had absolutely nothing cute to wear under my flowy cover-ups. Everything in the stores looked the same, and honestly, the prices made me cringe. So I grabbed my hook, some cotton yarn, and decided to make exactly what I wanted. Three prototypes later, this bralette was born. It has become my go-to summer project, and I think you are going to love it just as much as I do.
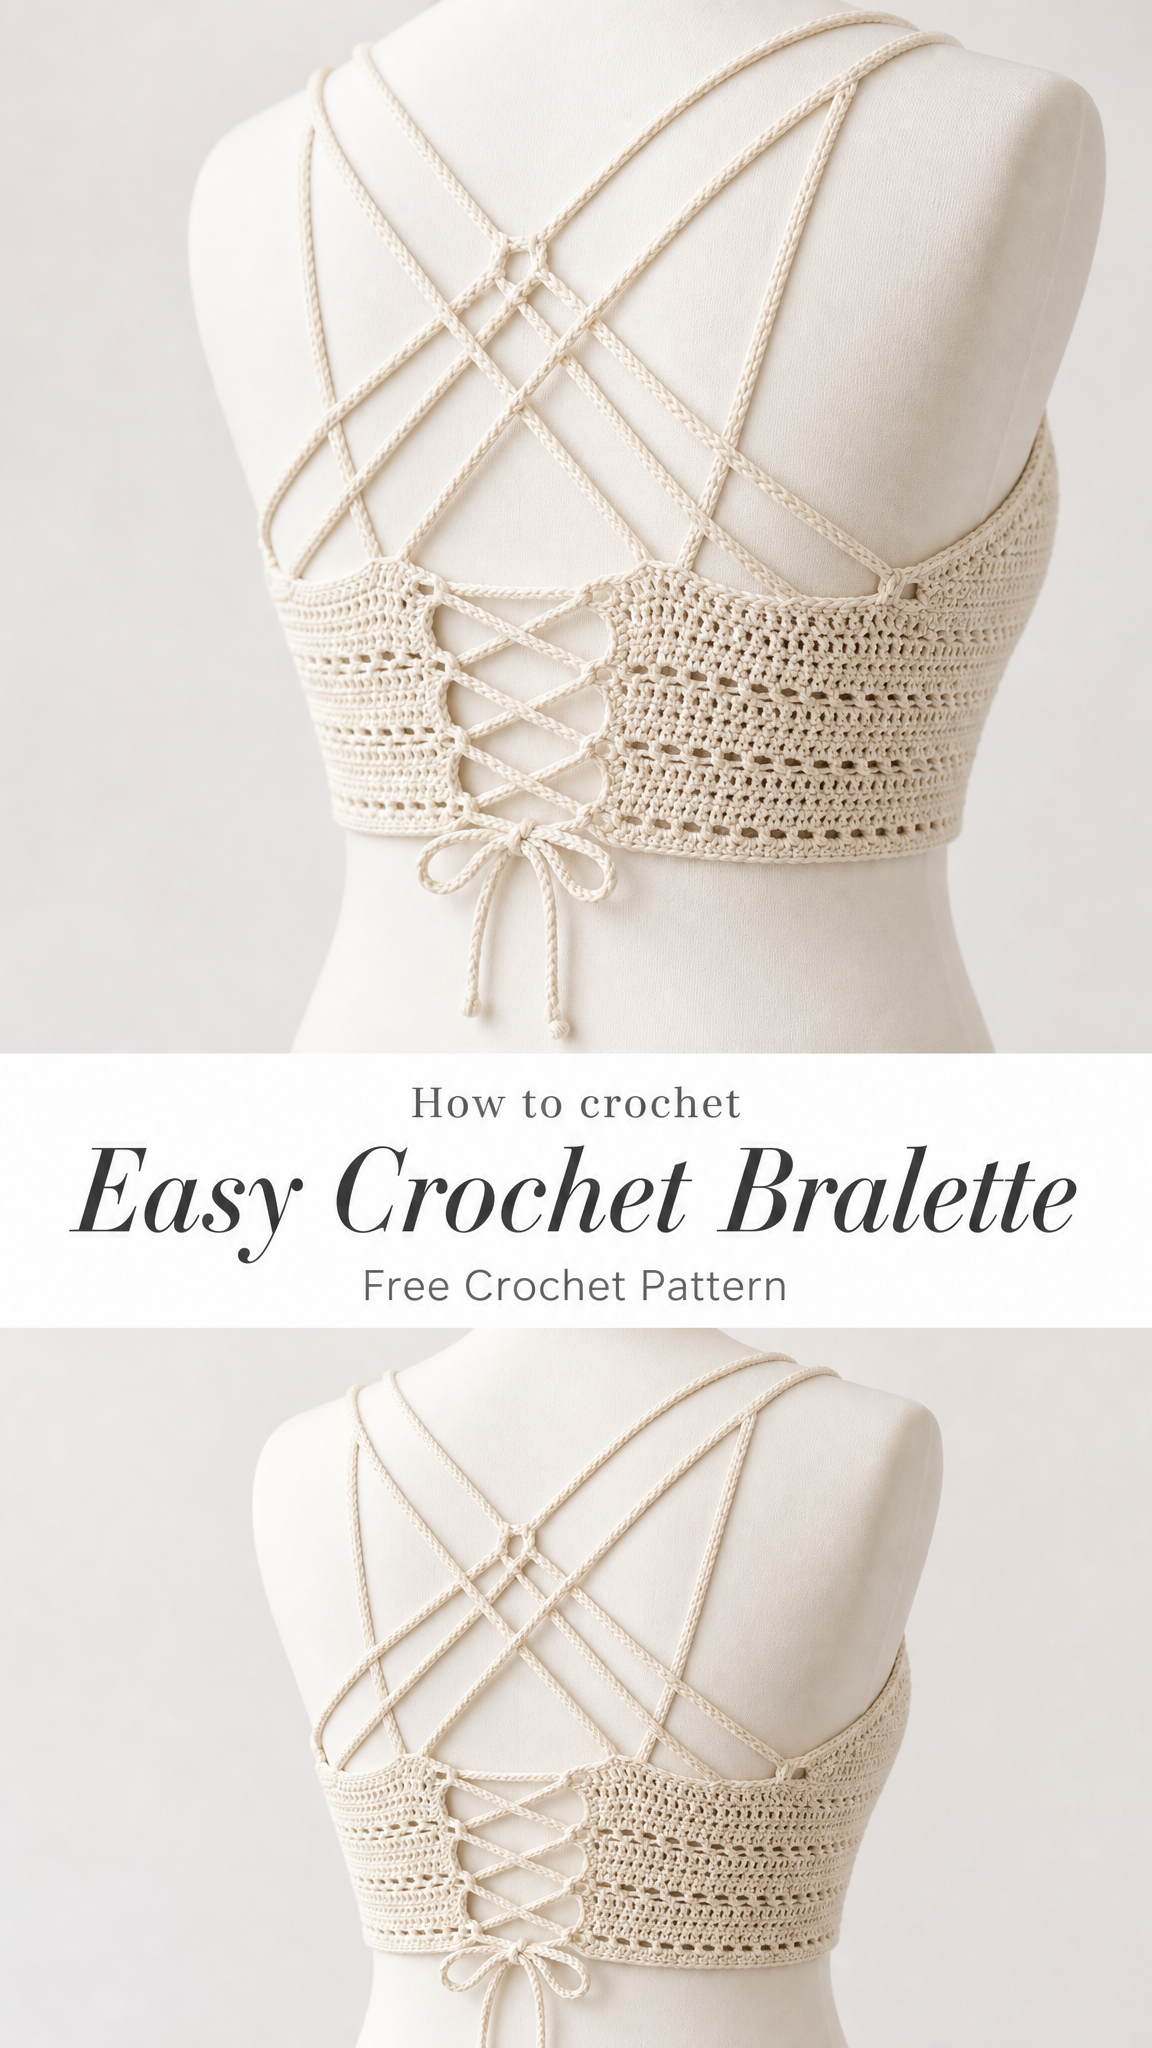
This crochet bralette pattern features a stunning strappy back detail that looks complicated but is actually surprisingly straightforward. The lace-up back panel gives you an adjustable fit, while those beautiful crisscross straps add serious visual interest. Whether you are headed to a festival, lounging at the beach, or just want a pretty layering piece, this bralette checks all the boxes.
Why You Will Love This Crochet Bralette Pattern
This design combines simple stitches with thoughtful construction to create something that looks like you spent weeks on it. The truth? You can finish this in a weekend. The body uses basic stitches in an alternating pattern that creates lovely texture without any complicated stitch work.
The strappy back is the real showstopper. Those crisscross straps are just chains attached at strategic points. No fancy techniques, no confusing assembly. If you can chain and single crochet, you can absolutely make this happen.
The lace-up closure on the back panel is both functional and fashionable. It allows you to adjust the fit to your body, which means this pattern works for a range of sizes without needing extensive modifications.
Materials Needed for Your Crochet Bralette
Yarn: Approximately 200 to 250 yards of DK weight cotton yarn in your preferred color. The sample uses a natural cream shade. Cotton is essential here because it provides structure, breathability, and minimal stretch. Avoid acrylic for this project as it tends to stretch out and does not hold its shape well against the body.
Recommended yarns:
Hook: 4.0mm (G/6) crochet hook. Adjust if needed to match gauge.
Notions:
Gauge: 18 stitches and 10 rows = 4 inches in double crochet. Always check your gauge before starting.
Skill Level
Intermediate beginner. If you are comfortable with basic stitches and have made at least one or two projects, you can handle this. The construction involves working flat panels and creating chain straps, which requires some assembly but nothing intimidating.
Stitch Abbreviations and Definitions
Ch = Chain. Wrap yarn over hook and pull through the loop on your hook. This creates the foundation for most crochet projects.
Sl st = Slip stitch. Insert hook, yarn over, pull through both the stitch and the loop on your hook in one motion. Used for joining and moving across stitches without adding height.
Sc = Single crochet. Insert hook into stitch, yarn over and pull up a loop (2 loops on hook), yarn over and pull through both loops.
Dc = Double crochet. Yarn over, insert hook into stitch, yarn over and pull up a loop (3 loops on hook), yarn over and pull through 2 loops, yarn over and pull through remaining 2 loops. This is taller than single crochet and works up faster.
Ch-sp = Chain space. The gap created when you chain over stitches in the previous row. You will work into these spaces, not into specific stitches.
Sk = Skip. Pass over the indicated number of stitches without working into them.
Size Information
This pattern is written for size Small with a finished bust measurement of approximately 30 to 32 inches. The lace-up back provides 2 to 4 inches of adjustability.
To size up: Add stitches to your foundation chain in multiples of 2 for the body panels. Add 1 to 2 inches of length to straps.
To size down: Reduce foundation chain by multiples of 2. Shorten straps as needed.
Crochet Bralette Pattern Instructions
Front Panel
Row 1: Ch 61. Dc in 4th ch from hook and in each ch across. Turn. (58 dc, counting turning ch as first dc)
Row 2: Ch 1, sc in first st, *ch 1, sk 1, sc in next st* repeat across. Turn. (29 sc, 28 ch-1 spaces)
Row 3: Ch 3 (counts as dc), dc in each st and ch-sp across. Turn. (58 dc)
Row 4: Ch 3, dc in each st across. Turn. (58 dc)
Row 5: Repeat Row 2.
Row 6: Repeat Row 3.
Row 7: Repeat Row 4.
Row 8: Repeat Row 2.
Row 9: Repeat Row 3.
Rows 10 to 12: Ch 3, dc in each st across. Turn. (58 dc)
This creates the main body section with alternating texture rows.
Shaping the Front Cups
You will now divide for the two cup sections.
Right Cup:
Row 13: Ch 3, dc in next 24 sts. Turn, leaving remaining stitches unworked. (25 dc)
Row 14: Ch 3, dc2tog over next 2 sts, dc across to last 3 sts, dc2tog, dc in last st. Turn. (23 dc)
Dc2tog = Double crochet 2 together (decrease). Yarn over, insert hook in next st, yarn over and pull up loop, yarn over and pull through 2 loops. Without completing the stitch, yarn over, insert hook in next st, yarn over and pull up loop, yarn over and pull through 2 loops, yarn over and pull through all 3 loops on hook.
Row 15: Repeat Row 14. (21 dc)
Row 16: Repeat Row 14. (19 dc)
Row 17: Repeat Row 14. (17 dc)
Row 18: Repeat Row 14. (15 dc)
Row 19: Ch 3, dc in each st across. Turn. (15 dc)
Row 20: Repeat Row 14. (13 dc)
Fasten off and weave in ends.
Left Cup:
Skip 8 center stitches from Row 12. Join yarn in next stitch.
Row 13: Ch 3, dc in each remaining st across. Turn. (25 dc)
Rows 14 to 20: Work same as Right Cup shaping.
Fasten off and weave in ends.
Back Panel
The back panel is narrower and features the lace-up detail.
Row 1: Ch 45. Dc in 4th ch from hook and in each ch across. Turn. (42 dc)
Row 2: Ch 1, sc in first st, *ch 1, sk 1, sc in next st* repeat across. Turn. (21 sc, 20 ch-1 spaces)
Row 3: Ch 3, dc in each st and ch-sp across. Turn. (42 dc)
Rows 4 to 12: Repeat Rows 2 and 3 alternately, ending with Row 3.
Creating Lace-Up Eyelets:
Row 13: Ch 3, dc in next 5 sts, ch 2, sk 2, dc in next 26 sts, ch 2, sk 2, dc in last 6 sts. Turn. (38 dc, 2 ch-2 spaces)
Row 14: Ch 3, dc in each st and ch-sp across. Turn. (42 dc)
Rows 15 to 18: Repeat Rows 13 and 14 twice more, creating 3 sets of eyelets on each side.
Fasten off and weave in ends.
Shoulder Straps (Make 4)
These straps create the beautiful crisscross effect on the back.
For each strap:
Ch 80. Sl st in 2nd ch from hook and in each ch across. Fasten off. (79 sl sts)
This creates a sturdy, cord-like strap that holds its shape beautifully.
Lace-Up Tie
Ch 150. Sl st in 2nd ch from hook and in each ch across. Fasten off. (149 sl sts)
Connecting Ring
This small ring is where your straps meet in the center back.
Ch 6. Join with sl st to form a ring. Sc 12 times into the ring. Join with sl st to first sc. Fasten off.
Assembly Instructions
Take your time with assembly. This is where the magic happens.
Step 1: Join Front and Back Panels
Lay the front panel right side up. Place the back panel behind it, aligning the bottom edges and side edges. The back panel is narrower, so center it along the back.
Using a yarn needle and matching yarn, whip stitch the side seams together from the bottom edge up approximately 3 to 4 inches on each side. Leave the rest open for the lace-up closure.
Step 2: Attach Shoulder Straps to Front
Position the front panel with cups facing you. Attach two straps to the top corners of the right cup, spacing them about 1 inch apart. Attach two straps to the left cup in the same manner.
Sew straps securely by threading through the top edge several times and knotting firmly on the wrong side.
Step 3: Thread Straps Through Connecting Ring
Take the free ends of all four straps. Thread them through the small connecting ring you made earlier.
Cross the straps: the two from the right cup go toward the left side of the back panel, and the two from the left cup go toward the right side. This creates the X pattern visible in the photos.
Step 4: Attach Straps to Back Panel
Sew the strap ends to the top corners of the back panel, maintaining the crisscross pattern. Make sure straps lie flat and are not twisted.
Step 5: Thread Lace-Up Tie
Starting at the bottom eyelet, thread your long tie through the eyelets in a crisscross pattern, moving upward. When you reach the top, you should have equal lengths on each side for tying.
Bottom Edging (Optional)
For a finished look, join yarn at any point along the bottom edge.
Round 1: Sc evenly around the entire bottom edge, working approximately 3 sc for every 2 rows along the sides. Join with sl st. Fasten off.
Tips for Success with This Crochet Bralette
Blocking matters. Wet block your finished panels before assembly. Cotton relaxes with water and your stitches will even out beautifully. Pin to measurements and let dry completely.
Check your tension. If your work is too loose, the bralette will stretch out of shape. Go down a hook size if needed. Cotton should feel firm but not stiff.
Try it on as you go. Hold the front panel up to yourself after completing the body section. This helps you decide if you need more or fewer rows before shaping the cups.
Adjust strap length. The chain count for straps is a starting point. Try on the assembled bralette and adjust strap length for your torso.
Styling Your Finished Bralette
This crochet bralette pairs beautifully with high-waisted shorts, flowy skirts, or under an oversized button-down worn open. The neutral cream color goes with everything, but imagine this in terracotta, sage green, or classic black.
For beach days, throw it over a bikini bottom or under a sheer cover-up. For festivals, layer it over a fitted tank for coverage while still showing off those gorgeous straps.
Caring for Your Crochet Bralette
Hand wash in cool water with mild detergent. Gently squeeze out excess water without wringing. Reshape and lay flat to dry. Cotton holds up well to regular wear but avoid the dryer, which can cause shrinkage and distortion.
I hope you have so much fun making this bralette. It really is one of those projects where the finished piece looks far more complicated than it actually is, which is my favorite kind of crochet.
If you make one, I would absolutely love to see it. Tag me on Instagram or share in our Facebook group. Your creations always make my day brighter.
Save this pattern to your Pinterest boards so you can find it when you are ready to start, and please drop a comment below if you give it a try. I love hearing which colors you choose and how the fit works for you. Happy crocheting, friend!
