A practical crossbody bag that keeps your hands free while looking absolutely adorable? Yes please. This Daisy Granny Square Crossbody Bag works up using basic single crochet panels dressed with dimensional flowers, puff stitch medallions, and a raised diamond texture that gives it that classic granny square look without all the joining fuss. It makes an excellent gift for friends who love boho style, and the sturdy cotton construction means it will hold up to daily use.
Get the Ad-Free PDF Pattern
You can find the free pattern below, or you can purchase the ad-free printable PDF from my shop.
Get the Printable PDF →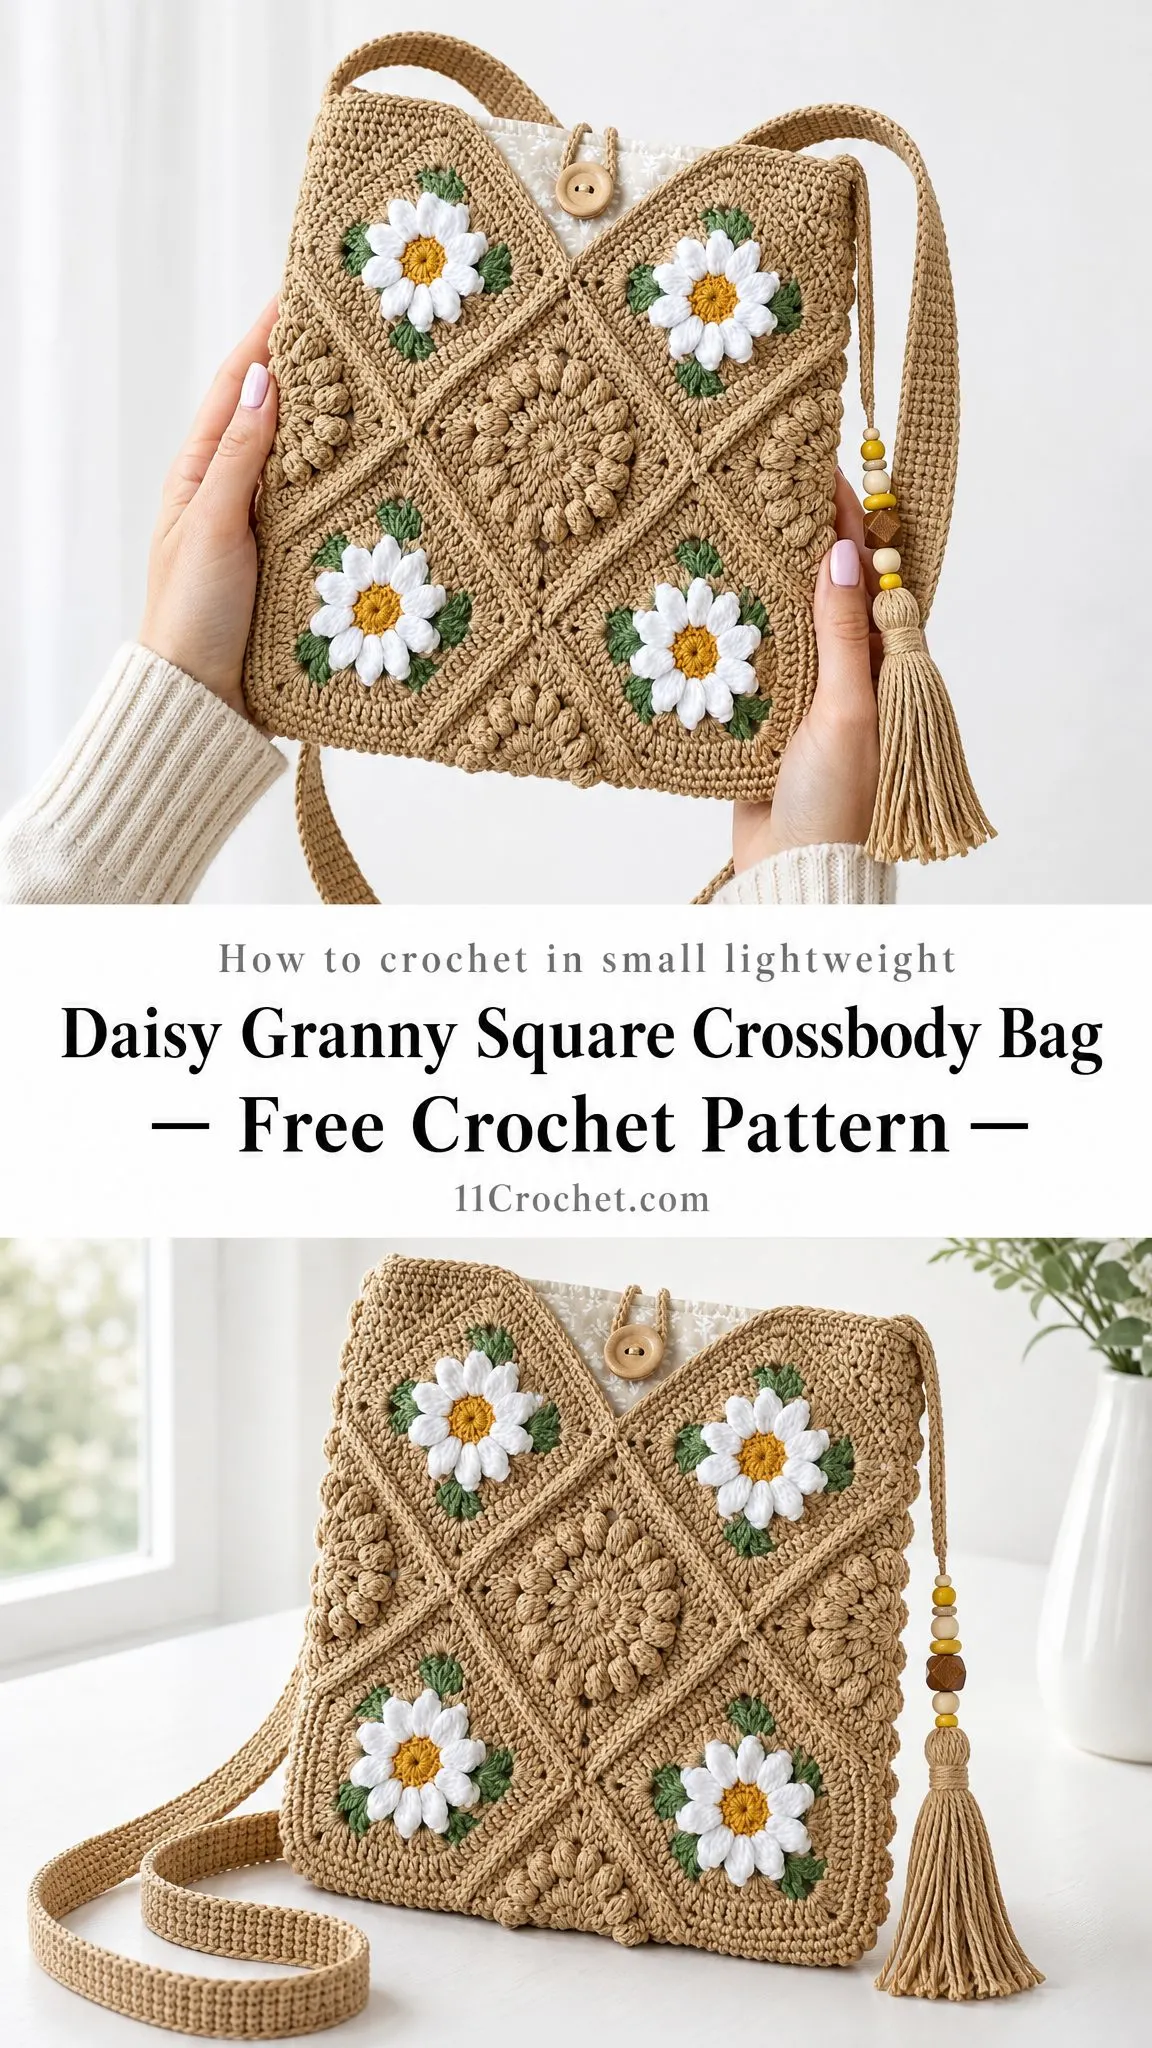
The stitches here are simpler than they appear. You will be working mainly in single crochet, with some surface slip stitches for the lattice effect and a few special techniques for the flowers. If you can make a magic ring and follow stitch counts, you can absolutely make this bag.
I designed this project to give you that charming joined granny square aesthetic while actually being more durable and easier to construct. The secret is building solid panels first, then adding the decorative elements on top. Let me walk you through everything you need to know.
About This Crossbody Bag Pattern
This pattern is rated adventurous intermediate. The bag body uses simple single crochet panels, but the dimensional flowers, surface crochet lattice, clean seaming, optional lining, and finishing details require confident stitch control.
Finished Size: Approximately 10 inches wide x 9.75 inches tall x 2 inches deep (25.5 x 25 x 5 cm), excluding the strap and tassel.
Time Estimate: 9 to 12 hours from start to finish.
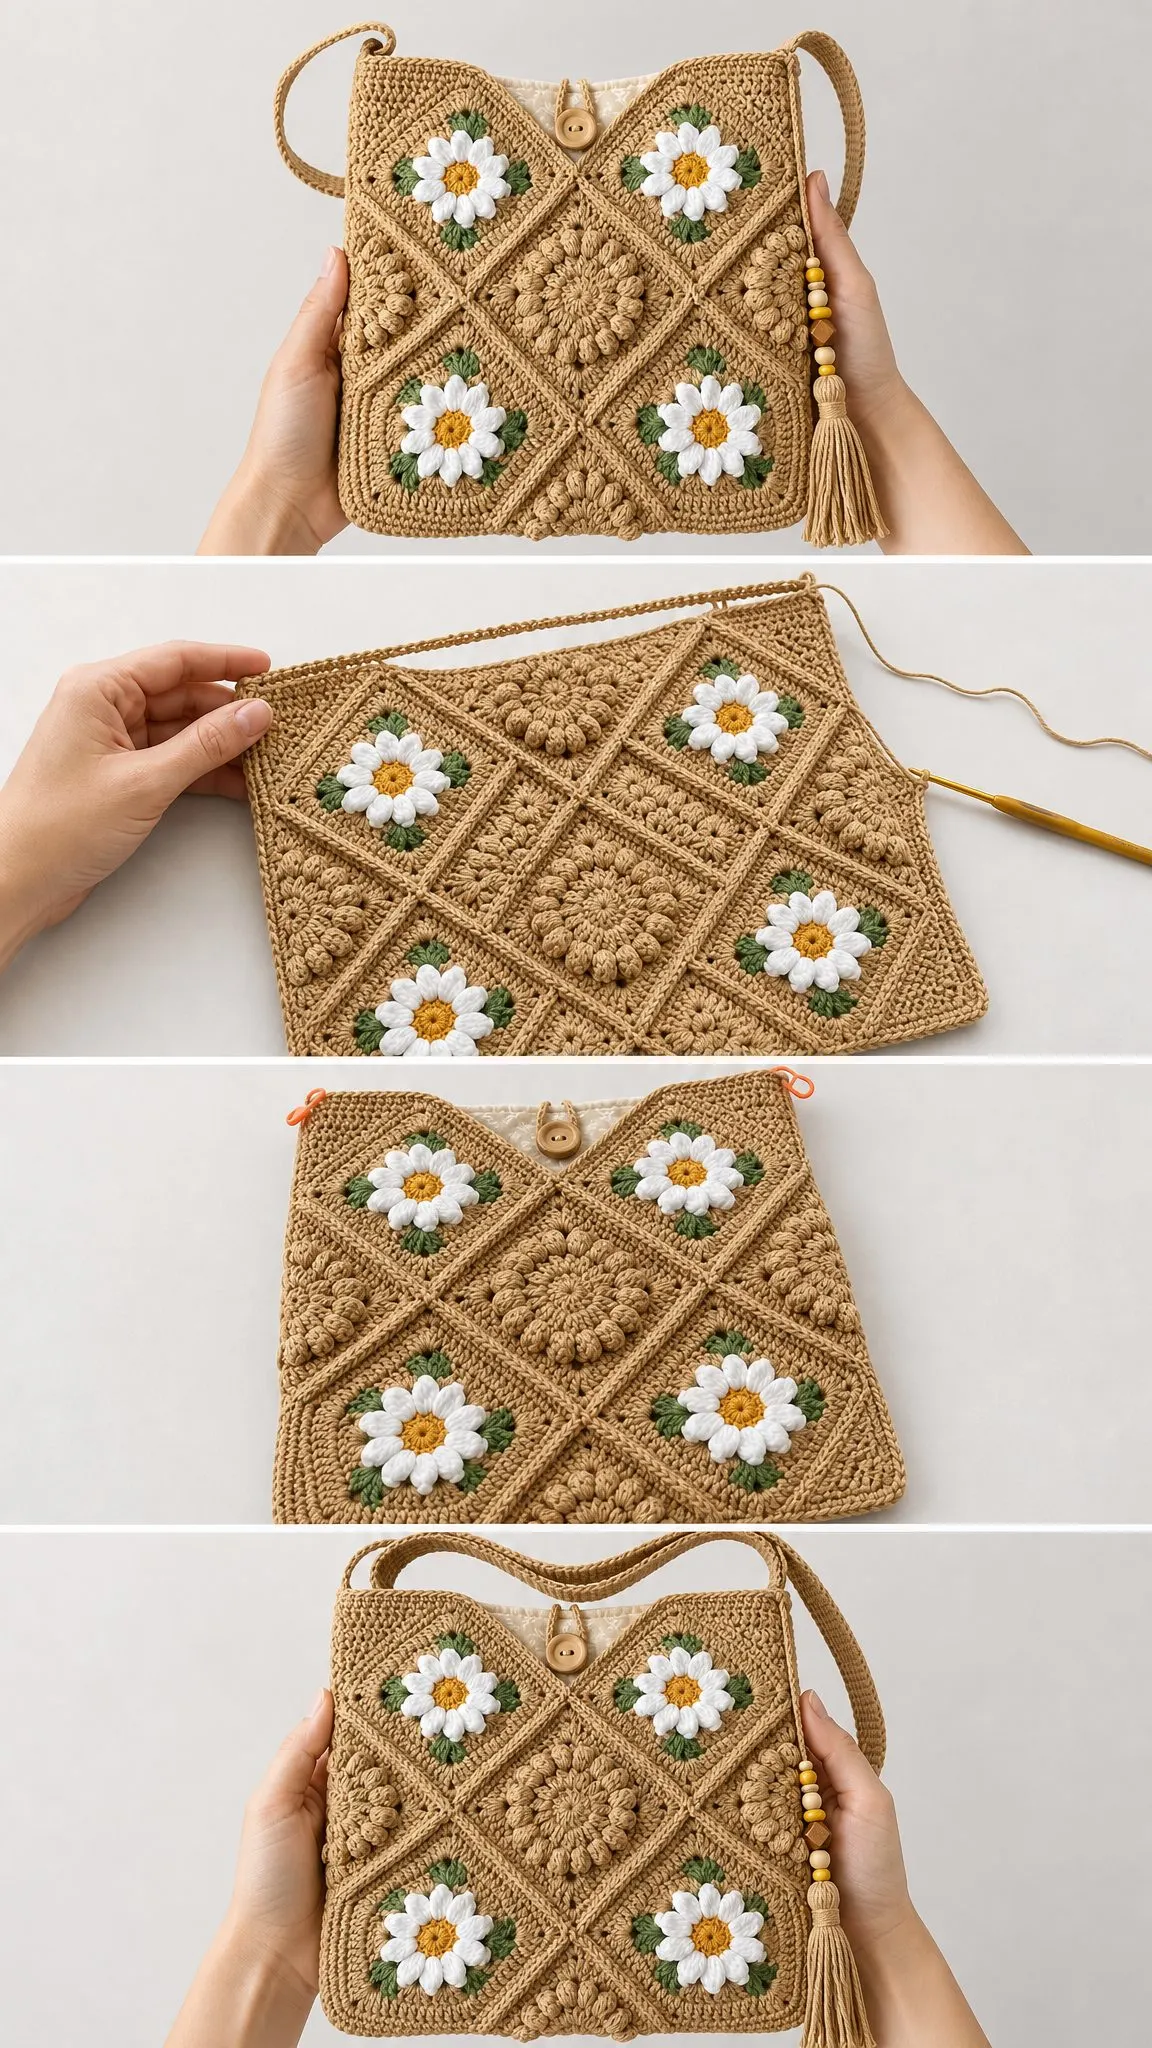
The construction method is clever. You work sturdy single crochet (sc) panels first, then dress them with raised diamond lines, daisies, puff medallions, a narrow gusset, shoulder strap, top band, button loop, and tassel. The result has the look of joined floral granny squares with a smoother, more durable bag structure.
Materials You Will Need
Gather these supplies before you start:
Yarn (Worsted Weight Cotton or Cotton Blend):
Yarn Suggestions: Lion Brand 24/7 Cotton, Paintbox Yarns Cotton Aran, or WeCrochet Dishie. You want a firm worsted cotton that holds surface texture and does not stretch heavily.
Hooks:
Notions:
Gauge
16 sc x 18 rows = 4 inches / 10 cm after blocking with the 4.0 mm hook.
One daisy measures about 2.35 inches / 6 cm across. One puff rosette measures about 2.1 inches / 5.5 cm across.
Please swatch and match gauge before starting. This is especially important for a bag because you want it to hold its shape and fit together properly.
Gauge Checkpoint: After Row 44, each body panel should measure about 10 inches wide x 9.75 inches tall (25.5 x 25 cm) before edging.
Abbreviations and Stitch Guide
Before we dive in, let me explain all the abbreviations and special stitches you will encounter.
Standard Abbreviations:
Note for UK Crocheters: US sc = UK dc; US hdc = UK htr; US dc = UK tr.
Special Stitches
Puff Stitch: Yarn over, insert hook in the indicated stitch, pull up a loop. Repeat this 4 times in the same stitch (you will have 9 loops on your hook). Yarn over and pull through all loops on hook, then chain 1 to close. This creates a puffy, textured bump.
Petal: Chain 5. Working back down the chain: single crochet in the 2nd chain from hook, half double crochet in the next chain, double crochet in the next chain, half double crochet in the next chain, then slip stitch into the next center stitch. This creates one shaped petal.
Surface Slip Stitch: Hold working yarn behind the panel. Insert hook from front to back at the marked point and pull up a loop. Then insert at the next marked point and pull through the panel loop and hook loop. Keep the loops loose enough that the fabric lies flat. This creates a raised line on the surface.
Crab Stitch (Reverse Single Crochet): Work single crochet from left to right around the edge instead of right to left. This creates a firm, corded finish. Left handed makers work in the opposite direction.
Left Handed Note: Mirror the direction of surface crochet diagonals and edge rounds. Stitch counts and measurements stay the same.
Body Panels (Make 2)
These panels form the front and back of your bag. Work both in camel yarn.
Chain 41.
Row 1: Single crochet in the 2nd chain from hook and in each chain across. (40 sc)
Rows 2 through 44: Chain 1, turn, single crochet in each stitch across. (40 sc each row)
You now have a solid rectangle of single crochet fabric.
Edging Round 1
With the right side facing, chain 1. Work 40 sc across the top edge, chain 1 for the corner, work 44 sc down the side, chain 1, work 40 sc across the bottom, chain 1, work 44 sc up the remaining side, chain 1, join. (168 sc plus four chain 1 corners)
Edging Round 2
Chain 1, single crochet in each sc around, working 3 sc in each chain 1 corner space, join. (180 sc)
Panel Checkpoint: Your finished edged panel should be close to 10.25 x 10 inches (26 x 25.5 cm) and lie flat. If it cups inward, loosen your edging tension. If it waves or ripples, remove extra side stitches evenly.
Gusset Strip
The gusset creates the depth of the bag and connects your two panels.
Chain 9.
Row 1: Single crochet in the 2nd chain from hook and across. (8 sc)
Rows 2 through 136: Chain 1, turn, single crochet across. (8 sc each row)
Your strip should measure about 2 inches wide x 30.25 inches long (5 x 77 cm).
Fit Tip: Add or remove rows in pairs so the gusset fits the two sides and bottom of your panels without stretching. Pin it in place before joining to check the fit.
Top Band
After the gusset is joined to the panels (see Assembly section), you will work the top band.
Attach camel yarn at one side seam.
Round 1: Single crochet around the top opening: 40 sc across front, 8 sc across side gusset, 40 sc across back, 8 sc across other side gusset, join. (96 sc)
Rounds 2 through 4: Chain 1, single crochet in each stitch around, join. (96 sc each round)
Daisies (Make 8)
These cheerful dimensional flowers are the stars of the show.
Center (Gold): Make a magic ring, chain 1, work 12 sc in the ring, join. (12 sc)
Petals (White): Change to white yarn. Work the petal round: Work 1 Petal (as described in the stitch guide), slip stitch in the next center stitch; repeat from around. (12 petals)
Fasten off and weave in your ends.
Leaves (Make 32)
Each daisy gets 2 leaves tucked behind it.
With green yarn, chain 7. Slip stitch in the 2nd chain from hook, single crochet in the next chain, half double crochet in the next chain, double crochet in the next chain, half double crochet in the next chain, single crochet in the last chain. Fasten off.
Puff Rosettes (Make 6)
These textured medallions fill the diamonds that do not have daisies.
Round 1 (Camel): Make a magic ring, chain 1, work 12 sc in the ring, join. (12 sc)
Round 2: Chain 2, puff stitch in the same stitch, chain 1. Puff stitch in the next stitch, chain 1; repeat from around, join. (12 puff stitches)
Round 3: Single crochet in the next chain 1 space, chain 3; repeat from around, join. (12 chain 3 loops)
Fasten off and weave in ends.
Diamond Lattice
This is where the magic happens. The surface slip stitch creates raised lines that make your solid panels look like joined granny squares.
Marking Your Panels
On each panel, place stitch markers at these locations:
Working the Lattice
Using camel yarn and the surface slip stitch technique, work diagonal lines from the top marks to the side marks, and from the side marks to the bottom marks.
Then mirror the lines in the opposite direction to create the diamond grid pattern.
Important: Keep your lines relaxed and evenly raised. If they pucker the fabric, you are pulling too tightly. The loops should be loose enough that the fabric lies completely flat.
Placement and Assembly of Motifs
Daisies: Sew 4 daisies on the front panel and 4 on the back panel, placing them in alternating diamond sections.
Puff Rosettes: Sew 3 puff rosettes per face in the remaining center and lower diamond sections.
Leaves: Add 2 green leaves behind each daisy, positioning them to peek out attractively.
Steam the flowers lightly from the back without flattening the petals.
Assembly, Strap, and Closure
Joining the Body
Hold the front panel, gusset strip, and back panel with wrong sides together.
Starting at the top left edge, whipstitch or slip stitch the gusset around one side, across the bottom, and up the second side of the front panel. Repeat with the back panel.
Leave the top open for the bag opening.
Check your fit: The gusset should not be stretched. If it is too short or too long, adjust the strip rows.
Shoulder Strap
Chain 161.
Row 1: Single crochet in the 2nd chain from hook and across. (160 sc)
Rows 2 through 5: Chain 1, turn, single crochet across. (160 sc each row)
Edge both long sides with slip stitch or crab stitch for a finished look.
Your strap measures about 40 inches / 102 cm before seaming. To make it longer or shorter, add or remove starting chains.
Sew the strap ends securely to the top of the gusset on each side.
Button Tab
With cream yarn, chain 15.
Row 1: Single crochet in the 2nd chain from hook and across. (14 sc)
Row 2: Chain 1, turn, sc2tog (single crochet 2 together), single crochet 10, sc2tog. (12 sc)
Row 3: Sc2tog, single crochet 8, sc2tog. (10 sc)
Continue decreasing 2 stitches every row until 2 sc remain. Fasten off.
Sew to the inside front top center, with the point facing down.
Button Loop
Chain 12, slip stitch to form a loop, single crochet 16 around the loop, fasten off.
Sew to the inside back top center.
Sew the wooden button to the front tab so the loop closes neatly over it.
Tassel
Cut 24 strands of camel yarn, each 12 inches / 30 cm long. Fold through a ring or cord, wrap the neck firmly with another piece of yarn, and trim the ends evenly.
Add your decorative beads above the tassel and attach to one side seam.
Finishing Touches
Weave in all remaining ends securely.
Block your panels flat before final assembly if you have not already. This helps everything line up properly.
Optional Lining: Add a fabric lining for extra structure and to protect the contents of your bag. Place the lining just below the top band so the cream button tab remains visible.
Customizing Your Bag
Size Adjustments
Width: Add or remove body panel chains in multiples of 2. Keep your flower placement and lattice marks centered.
Height: Add or remove rows before edging. Adjust your side lattice marks into thirds.
Depth: Change gusset width by changing the starting chain. An 8 sc gusset gives about 2 inches / 5 cm depth.
Strap Length: Add or remove starting chains for your desired crossbody length.
Motif Arrangement: Daisies and rosettes may be rearranged, but keep the visual balance mirrored across the front and back.
Care Instructions
Hand wash in cool water, reshape, and dry flat. Avoid heavy machine agitation because the dimensional petals, beads, tassel, and lining details can distort.
Troubleshooting Tips
Panel leans to one side: Block firmly and check that each row has exactly 40 sc. A missing or extra stitch can cause leaning.
Lattice puckers the fabric: Remove and rework the surface slip stitches more loosely.
Opening stretches out: Add one extra round of crab stitch for reinforcement.
Flowers curl up: Use the smaller hook (3.75 mm) for your appliques and steam gently from the back.
You Did It!
I hope you love making this Daisy Granny Square Crossbody Bag as much as I loved designing it. The combination of simple construction with those gorgeous dimensional details makes it such a satisfying project. It is the kind of bag that gets compliments everywhere you go.
Thank you so much for choosing this pattern. If you make one, I would absolutely love to see it! Share your photos on Instagram or in my Facebook group and tag me so I can celebrate your beautiful work.
If you found this pattern helpful, please save it to your Pinterest boards so you can find it again later. And drop a comment below if you have any questions or just want to share how your bag turned out. I always love hearing from you!
Want a Quick & Easy Printable Version?
Get a clean, beautifully formatted PDF of this pattern — easy to follow step by step, ready to print or save on any device. No scrolling, no distractions, just the pattern.
Get the Printable PDF →